How To Clean Kitchen Cabinet
A spotless kitchen cabinet not only elevates the room’s aesthetics but also ensures food safety and longevity for your storage spaces. Over time, cabinets accumulate grease, fingerprints, dust, and food residue, impacting both their appearance and hygiene. Whether you’re tackling a spring cleaning or prepping for a kitchen remodel, knowing exactly how to clean kitchen cabinet surfaces, inside and out, can make a dramatic difference.
In my experience, taking a systematic approach saves time and delivers lasting results. This guide covers everything from identifying cabinet material, choosing the right cleaning agents, to step-by-step methods, tackling stubborn stains, and ongoing maintenance. You’ll learn how to restore wood, laminate, and painted surfaces, and see real-world examples illustrating the difference a deep clean makes.
Plus, you’ll find actionable tips, comparison tables, and answers to frequently asked questions for a practical, data-driven resource that will help you keep your kitchen cabinets looking their best.
Key Takeaways
- Regular cabinet cleaning prevents buildup of grease, dust, and bacteria.
- Different cabinet materials, wood, laminate, and painted surfaces, require specific cleaning products and techniques.
- Deep cleaning at least twice a year extends cabinet lifespan and maintains hygiene.
- DIY solutions like vinegar and baking soda can effectively clean most stains.
- Proper drying and ongoing maintenance are essential to prevent warping and discoloration.
- Real-world examples and comparison tables offer guidance for selecting the best cleaning methods and products.

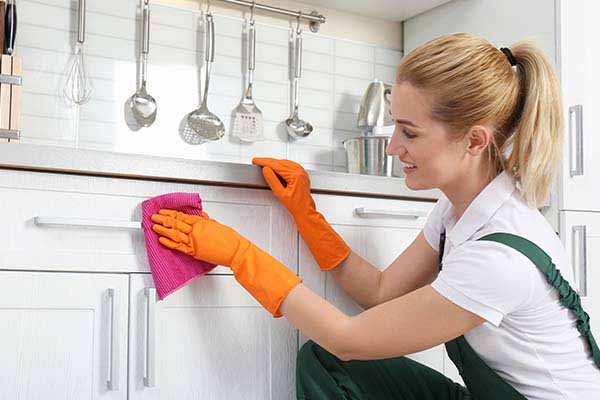
Credit: nancyshousekeepingservice.com
Understanding Kitchen Cabinet Materials
Cleaning methods vary depending on your cabinet’s material. Each type responds differently to cleaning agents, moisture, and abrasion. Before grabbing your supplies, it’s crucial to know what you’re working with.
Wood Cabinets
Wood cabinets, popular for their natural beauty and durability, can be sensitive to moisture and harsh chemicals. The grain and finish, whether lacquered, stained, or painted, will impact how you clean.
- Hardwood cabinets (oak, maple, cherry) are robust but may absorb water if not sealed properly.
- Softwood cabinets (pine, cedar) are more prone to dents and scratches.
- Finish type: A glossy polyurethane finish tolerates mild cleaners, while oil-based finishes require gentler, non-abrasive solutions.
Laminate Cabinets
Laminate cabinets are made from synthetic materials fused to particleboard, offering a smooth, non-porous surface. They are easy to clean but can be damaged by strong solvents or excessive moisture.
- Plastic laminate resists stains but scratches easily.
- Melamine is more water-resistant but can chip at the edges.
Painted Cabinets
Painted cabinets, whether wood or MDF, have a protective layer but can fade or chip over time. Cleaning must be gentle to preserve the paint.
- Glossy paint withstands cleaning better than matte.
- Light colors show stains and dirt more easily.
Comparison Table: Cleaning Suitability By Cabinet Material
| Cabinet Material | Suitable Cleaners | Sensitivity | Durability |
|---|---|---|---|
| Wood | Mild soap, diluted vinegar | Moisture, harsh chemicals | High (if sealed) |
| Laminate | All-purpose, non-abrasive | Abrasives, solvents | Moderate |
| Painted | Mild soap, water | Scrubbing, bleach | Varies (depends on paint quality) |
Credit: vontobels.com
Preparing For Kitchen Cabinet Cleaning
A thorough cleaning begins with proper preparation. Skipping this step can lead to incomplete results or even damage.
Clearing Out Cabinets
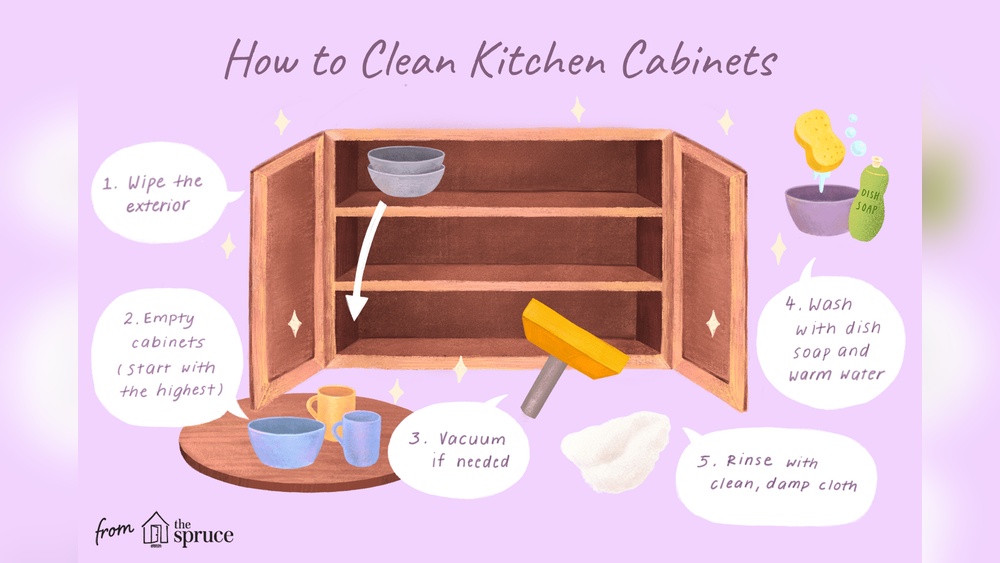
Remove all items from your cabinets, including dishes, food, and cookware. This prevents products from contaminating food and allows access to every surface.
- Use a checklist to ensure nothing is left behind.
- Set aside expired or unused items for disposal.
Gathering Supplies
Select cleaning products tailored to your cabinet material. Avoid abrasive sponges and harsh chemicals unless specifically recommended.
- Soft microfiber cloths
- Non-abrasive sponges
- Mild dish soap
- White vinegar
- Baking soda
- Bucket of warm water
- Rubber gloves
- Vacuum with brush attachment (for crumbs)
- Old toothbrush (for crevices)
Pro Tip: Prepare a dedicated workspace to sort cabinet contents and supplies, minimizing kitchen disruption.
Protecting Floors And Countertops
Lay towels or plastic sheets under cabinets to catch drips and debris. This shields flooring from water damage or chemical spills.
- Tape down edges to prevent slipping.
- Move fragile items away from splash zones.

Credit: quadcitykitchens.com
Step-by-step Cleaning Methods For Kitchen Cabinets
Each cabinet surface requires a unique approach. Below are detailed methods for tackling grease, dust, and stains.
Cleaning Cabinet Exteriors
Cabinet doors and handles are the most visible, and often the dirtiest, parts.
- Dust first: Wipe surfaces with a dry microfiber cloth.
- Prepare cleaning solution: Mix a few drops of mild dish soap in warm water.
- Wipe down: Use a damp cloth, wrung out well, to clean doors and handles.
- Rinse and dry: Wipe with clean water, then dry with a soft towel.
For greasy buildup, use a diluted vinegar solution (1:3 ratio of vinegar to water). Test on a hidden spot first.
Cleaning Cabinet Interiors
Inside surfaces harbor crumbs, spills, and hidden grime.
- Vacuum crumbs and dust using a brush attachment.
- Clean shelving with a damp cloth and mild soap.
- Dry thoroughly to prevent mold.
Cabinet corners and hardware often require extra attention. Use an old toothbrush for crevices and hinges.
Tackling Stubborn Stains
Some stains resist basic cleaning. Baking soda paste (mix 2 tablespoons baking soda with water) gently removes residue.
- Apply paste to the stain, let sit for 5 minutes.
- Scrub lightly with a soft brush.
- Rinse and dry.
Warning: Avoid abrasive pads or harsh chemicals, which can scratch finishes.
Real-world Example: Grease Removal
A family kitchen with wood cabinets developed a thick layer of grease above the stove. After removing items and prepping the area, a mixture of dish soap and vinegar dissolved the grease without damaging the finish. The cabinets were dried promptly, restoring their shine.
Cleaning Specific Cabinet Types: Wood, Laminate, And Painted
Different cabinet finishes require unique care strategies.
Wood Cabinets: Deep Cleaning And Restoration
Wood is sensitive to moisture and chemicals. For deep cleaning:
- Use a solution of mild soap and warm water.
- Wipe in the direction of the wood grain.
- Dry immediately with a soft towel.
To restore shine, apply a wood conditioner (follow manufacturer’s instructions). Avoid excess water, which can cause warping.
Example: After cleaning, one homeowner applied lemon oil to oak cabinets, reviving their natural luster.
Laminate Cabinets: Stain And Scratch Prevention
Laminate’s synthetic surface is easy to clean but prone to scratches.
- Clean with non-abrasive all-purpose cleaner.
- Avoid steel wool or rough pads.
- For tough stains, use diluted vinegar.
If scratches appear, repair with a laminate filler or touch-up pen.
Painted Cabinets: Protecting The Finish
Painted cabinets require gentle handling.
- Use a soft cloth with mild soap solution.
- Avoid bleach, ammonia, or abrasive cleaners.
- Address chips with matching paint.
Pro Tip: For touch-ups, keep leftover paint labeled for easy access.
Comparison Table: Cleaning Frequency By Cabinet Type
| Cabinet Type | Recommended Cleaning Frequency | Deep Clean Interval |
|---|---|---|
| Wood | Weekly wipe-down | Twice a year |
| Laminate | Biweekly wipe-down | Annually |
| Painted | Weekly wipe-down | Annually |
Using Diy And Commercial Cleaning Solutions
Choosing the right cleaning solution can impact both effectiveness and safety. Many homeowners opt for DIY mixtures to avoid harsh chemicals.
Diy Cleaning Solutions
- Vinegar and water: Removes grease and disinfects. Ideal for wood and laminate.
- Baking soda paste: Tackles stains and odors.
- Lemon oil: Conditions wood and adds shine.
Mix solutions in small batches and test on a hidden area before applying widely.
Commercial Cleaners
For stubborn stains or professional results, commercial products are available.
- Cabinet-specific cleaners: Formulated for wood or laminate.
- Degreasers: Remove tough buildup, especially in high-cooking areas.
- Disinfectants: Use sparingly to avoid residue.
Consult product labels to ensure compatibility with your cabinet material.
Comparison Table: Diy Vs Commercial Solutions
| Solution Type | Cost | Effectiveness | Safety |
|---|---|---|---|
| DIY (vinegar, baking soda) | Low | Moderate to High | Generally safe |
| Commercial (cabinet cleaner) | Moderate to High | High | Check for harsh chemicals |
Example: A homeowner used a store-bought degreaser for laminate cabinets after DIY attempts failed, achieving a streak-free finish.
Maintaining Clean Kitchen Cabinets: Preventive Strategies
Ongoing maintenance extends the life and appearance of your cabinets.
Routine Cleaning Habits
- Wipe spills immediately to prevent staining.
- Clean handles and knobs weekly, these are high-contact points.
- Dust exterior surfaces biweekly.
Preventing Grease And Stains
Install a range hood to reduce airborne grease. Line cabinet shelves with mats or paper for easy cleaning.
- Use shelf liners to absorb spills.
- Store oils and sauces in airtight containers.
Seasonal Deep Cleaning
Schedule deep cleaning at least twice a year. Remove all contents, clean every surface, and inspect for damage.
Pro Tip: Pair cabinet cleaning with other kitchen maintenance tasks (like appliance cleaning) for efficiency.
Real-world Example: Preventive Maintenance
After installing a shelf liner and wiping cabinet doors weekly, a homeowner noticed fewer stains and easier cleaning, reducing deep cleaning time by half.
Addressing Cabinet Hardware: Knobs, Handles, And Hinges
Cabinet hardware often harbors bacteria and grime. Cleaning these parts is essential for both hygiene and appearance.
Cleaning Knobs And Handles
- Remove hardware if possible for thorough cleaning.
- Soak in warm, soapy water for 10-15 minutes.
- Scrub with a soft brush, rinse, and dry.
If hardware is fixed, clean in place with a damp cloth and mild soap.
Cleaning Hinges And Tracks
- Use an old toothbrush to reach tight spaces.
- Lubricate hinges with a silicone-based spray after cleaning.
Warning: Avoid harsh chemicals on metal, which may cause corrosion.
Polishing And Protecting Hardware
Apply metal polish for a lasting shine, following product instructions. For brass or stainless steel, use dedicated cleaners.
Pro Tip: Regular hardware cleaning prevents rust and keeps cabinets functioning smoothly.
Troubleshooting Common Cabinet Cleaning Challenges
Sometimes, cleaning reveals underlying issues. Here’s how to handle them.
Water Damage And Warping
Cabinets exposed to excess moisture may swell or warp. Dry surfaces immediately, and use a dehumidifier in humid kitchens.
- Inspect for leaks under sinks.
- Repair or replace damaged panels promptly.
Persistent Odors
Odors can linger in cabinet interiors. Place an open box of baking soda inside to absorb smells. For severe cases, wipe surfaces with diluted vinegar.
Mold And Mildew
Mold often appears in damp, poorly ventilated cabinets.
- Clean affected areas with vinegar solution.
- Dry thoroughly, and improve ventilation.
Warning: If mold persists, consult a professional for remediation.
Scratches And Chips
For minor scratches, use a touch-up pen or filler. Deep chips may require professional repair.
- Avoid abrasive pads.
- Protect cabinet edges from impact.
Frequently Asked Questions
How Often Should I Deep Clean My Kitchen Cabinets?
Deep cleaning is recommended at least twice a year. However, high-traffic kitchens or those prone to spills may require quarterly deep cleaning. Regular wipe-downs should be done weekly to maintain hygiene and prevent buildup.
Can I Use Bleach To Clean Kitchen Cabinets?
Bleach is generally not recommended for kitchen cabinets, especially wood or painted surfaces. It can discolor, weaken finishes, and leave residues. For disinfecting, opt for diluted vinegar or a mild soap solution and always test on a small area first.
What Is The Best Way To Prevent Water Damage To Cabinets?
To prevent water damage:
- Wipe up spills immediately.
- Check for leaks under sinks regularly.
- Install shelf liners to absorb moisture.
- Maintain proper ventilation to reduce humidity.
Are Shelf Liners Necessary For Cabinet Maintenance?
Shelf liners are optional but beneficial. They protect cabinet surfaces from spills, stains, and scratches, making cleaning easier. Choose liners that are non-slip and moisture-resistant for best results.
How Can I Restore Dull Or Faded Cabinet Surfaces?
Restoring dull cabinets depends on the material:
- Wood: Apply a wood conditioner or lemon oil.
- Laminate: Clean with a non-abrasive cleaner; consider a laminate polish.
- Painted: Use matching paint for touch-ups. If the finish is heavily worn, repainting may be needed.
References
A clean kitchen cabinet is more than just a visual upgrade, it’s a foundation for food safety, durability, and a welcoming cooking environment. By understanding your cabinet materials, preparing thoughtfully, and using tailored cleaning methods, you’ll achieve lasting results. Remember to maintain a routine, address hardware, and troubleshoot challenges promptly. For related kitchen upkeep, explore guides such as choosing the right canning jar, freeze-drying vs canning, and vacuum sealing vs canning. With these expert strategies, your kitchen cabinets will stay spotless and functional year-round.
Products related to this article
Sponsored / affiliate links. As an Amazon Associate I earn from qualifying purchases. I may earn additional commission from eligible campaigns.