Many homeowners wonder about How to Remove a Sink Drain Stopper (Easy Guide). It seems like a simple task, but sometimes these stoppers get stuck or people aren’t sure of the right way to take them out. This can be a bit tricky if you’ve never done it before.
Don’t worry! We’ve got you covered with easy steps that anyone can follow. We’ll show you exactly what to do to get that stopper out quickly and without any fuss.
Understanding Sink Drain Stopper Types
This section looks at the different kinds of sink drain stoppers you might find in your home. Knowing what type you have is the first step in figuring out how to remove it. We’ll go over their common designs and how they work so you can identify yours easily.
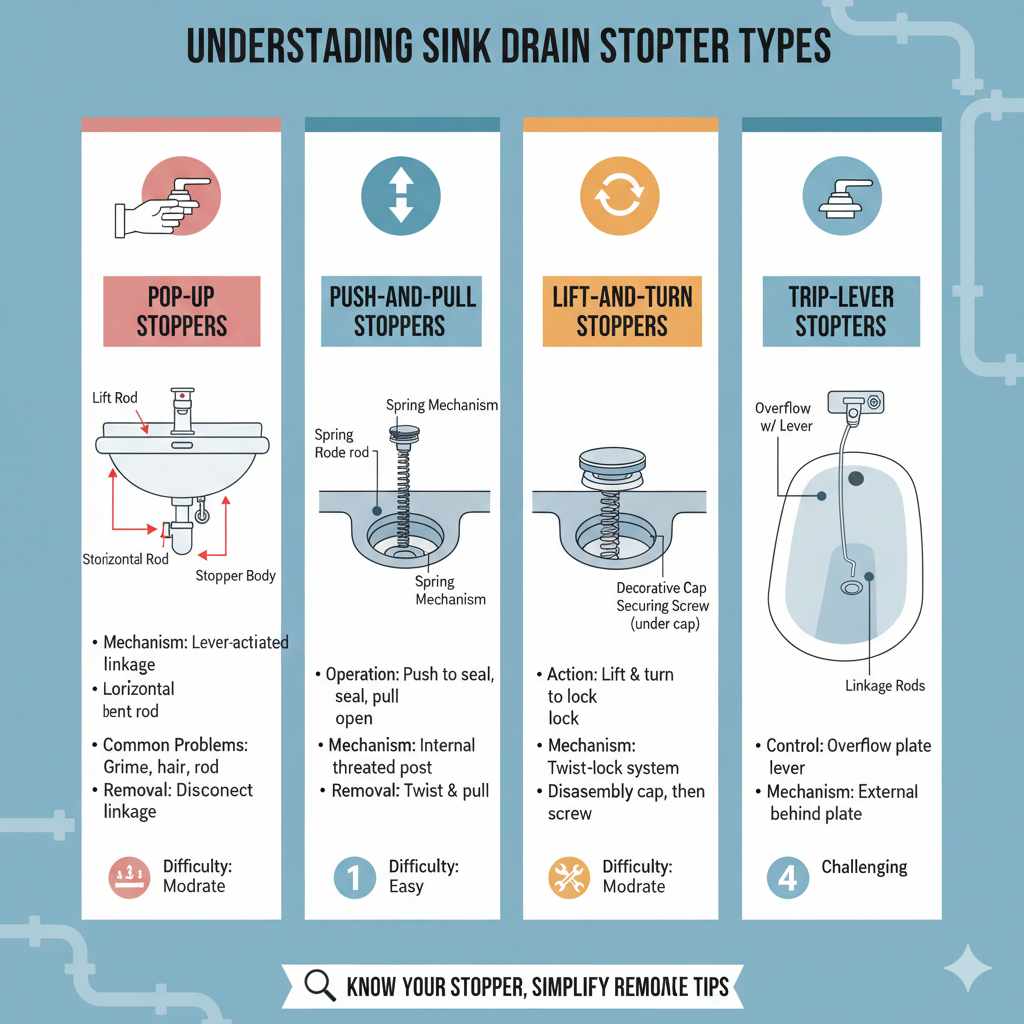
Pop-Up Stoppers
Pop-up stoppers are very common in bathroom sinks. They have a lever on the back of the faucet that you push up and down to open and close the drain. When the lever is up, the stopper rises, and when it’s down, it seals the drain.
The stopper itself usually has a metal rod that goes down into the drain pipe. This rod is attached to a horizontal rod, which is then connected to the lift rod mechanism on the faucet. To remove a pop-up stopper, you often need to disconnect this linkage underneath the sink.
Sometimes, the stopper can be unscrewed or lifted out from the top if the linkage isn’t too tight.
A common issue is the linkage getting corroded or bent, making it hard to lift the stopper. In other cases, hair and debris can get caught around the stopper’s seal, preventing it from popping up fully.
- Mechanism Overview: Pop-up stoppers rely on a mechanical linkage to move the stopper up and down. This linkage connects a lever on the faucet to a rod attached to the stopper.
- Common Problems: Sticking due to grime, hair, or mineral buildup is frequent. The linkage itself can also become loose or damaged over time.
- Removal Difficulty: While often simple, the difficulty can increase if the linkage is rusted or if the stopper is jammed from below.
Push-and-Pull Stoppers
These are also quite common, especially in older sinks. They are simple to operate: you push down on the stopper to close the drain and pull it up to open it. There’s usually no lever on the faucet involved.
Inside the drain, there’s a spring-loaded mechanism or a simple threaded rod that holds the stopper in place. To remove them, you typically just need to twist and pull. Sometimes, they have a screw at the top or side that needs to be loosened first.
If it’s stuck, a little wiggling might be necessary.
These are generally easier to remove than pop-up stoppers because they have fewer connected parts. However, the seals can wear out, or they can get clogged with soap scum and hair, making them stiff.
- Simple Operation: Push to seal, pull to open. This direct action makes them user-friendly.
- Internal Mechanism: Often uses a spring or a simple threaded post to hold the stopper.
- Ease of Removal: Usually requires just a twist and pull, making them straightforward to fix or clean.
Lift-and-Turn Stoppers
These stoppers look similar to push-and-pull stoppers but require a slightly different action. You lift the stopper slightly and then turn it to engage or disengage a locking mechanism. They are often found in bathtubs as well as sinks.
The removal process often involves unscrewing a decorative cap on top of the stopper to expose a screw head. Once the screw is removed, the stopper can usually be lifted out. Like other types, they can become jammed with debris or have worn-out seals.
The benefit here is that the locking mechanism provides a more secure seal. However, this added complexity means there are more parts that could potentially cause issues during removal.
- Dual Action: Requires both lifting and turning to operate.
- Securing Mechanism: Uses a twist-lock system for a tighter seal.
- Disassembly: Often needs a top cap removed to access the securing screw.
Trip-Lever Stoppers
These are typically found in bathtubs but can sometimes be in older sink setups. They use a lever on the overflow plate on the side of the tub or sink. Flipping the lever activates a mechanism that either closes or opens the drain.
Removing this type of stopper usually involves removing the overflow plate itself. Behind the plate is a linkage connected to the stopper. Once the plate is off, you can usually access and disconnect the linkage to pull the stopper out.
These are less common in modern sinks but can be frustrating to deal with if you’re not familiar with their internal workings. The linkage can corrode, and the stopper itself can get clogged.
- Overflow Plate Control: Operated by a lever on the overflow drain cover.
- Linkage System: Connects the lever to the drain plug via rods.
- Removal Process: Requires removal of the overflow plate to access the mechanism.
How to Remove a Sink Drain Stopper Easy Guide Essential Tools
Before we get into the steps for removing your sink drain stopper, it’s good to have a few basic tools handy. These simple items will make the job much easier and prevent damage to your sink or the stopper itself.
Having the right tools on hand is part of making this a truly easy guide. You don’t need a whole toolbox, just a few common household items that can help you tackle any type of stopper.
Screwdrivers
You might need a Phillips head screwdriver or a flathead screwdriver. These are essential for removing screws that might be holding certain types of stoppers in place, especially lift-and-turn or trip-lever types.
Make sure you have a few different sizes. Using a screwdriver that’s too small can strip the screw head, making it impossible to remove. A screwdriver that’s too large won’t fit into the screw slot.
Phillips head screwdrivers have a cross shape at the tip, while flathead screwdrivers have a single, flat slot. Many sink stoppers use Phillips head screws, but it’s wise to be prepared for either. Having a set of screwdrivers will ensure you have the right fit for any screw you encounter.
- Types: Phillips head and flathead.
- Size Matters: Use a size that perfectly matches the screw slot to avoid stripping.
- Preparation: A small to medium set is usually sufficient for most sink stopper jobs.
Pliers
Pliers can be very useful for gripping and turning stubborn parts. A pair of needle-nose pliers is great for reaching into tight spaces, while regular slip-joint pliers can provide more leverage.
If a stopper is stuck, you might need pliers to gently grip and twist it free. They can also help hold nuts or bolts in place while you unscrew something else.
Be careful when using pliers. You don’t want to grip too hard and bend or scratch the metal parts of your stopper or sink. Gentle but firm pressure is key.
- Grip and Twist: Useful for parts that are hard to turn by hand.
- Reach: Needle-nose pliers are good for tight spots.
- Caution: Apply steady pressure to avoid damaging components.
Wrench or Adjustable Wrench
An adjustable wrench is a versatile tool that can be useful for loosening or tightening nuts and bolts found in the drain assembly under the sink, especially if you need to disconnect plumbing related to the stopper linkage.
While not always needed for just removing the stopper itself from the top, it’s a good tool to have if your stopper removal involves accessing the plumbing underneath. An adjustable wrench can fit various nut sizes, making it a handy item.
Make sure the wrench jaws are clean and free of rust or debris. This ensures a good grip and prevents any unwanted transfer of materials to your plumbing.
- Versatility: Adjusts to fit many different nut and bolt sizes.
- Plumbing Access: Helpful if you need to work on the drain pipes below.
- Good Grip: Ensures secure contact with fasteners.
Bucket or Towels
When working under the sink, there’s always a chance of water dripping or spilling. A small bucket or some old towels placed underneath the pipes can catch any drips and keep your cabinet floor dry.
This is a simple but important step to avoid a mess. It also makes cleanup much quicker and easier after you’re done with the repair or cleaning.
Having these ready means you can focus on the task without worrying about water damage. It’s a small precaution that makes a big difference in the overall experience.
- Catch Drips: Prevents water from making a mess.
- Keep Dry: Protects your cabinet and floor.
- Easy Cleanup: Makes the process tidier.
Cleaning Supplies
Once the stopper is out, you’ll likely want to clean it and the drain opening. Having some all-purpose cleaner, a toothbrush, or a pipe cleaner will be helpful for removing any gunk, hair, or soap scum.
A clean stopper works better and a clean drain helps prevent future clogs. It’s a good idea to give everything a good scrub while it’s accessible.
Don’t forget to have some paper towels or a clean rag for wiping everything down. A spotless drain is more efficient and looks much nicer.
- Remove Grime: Tackles hair, soap scum, and mineral buildup.
- Improve Function: A clean stopper works best.
- Sanitize: Keeps your sink area fresh.
How to Remove a Sink Drain Stopper (Easy Guide) Step By Step
Let’s break down How to Remove a Sink Drain Stopper (Easy Guide) into simple, actionable steps. We will cover the most common types of stoppers and how to get them out safely and easily.
Removing Pop-Up Stoppers
Pop-up stoppers are common in bathroom sinks. They have a lever on the faucet that controls them. The stopper itself usually sits in the drain opening.
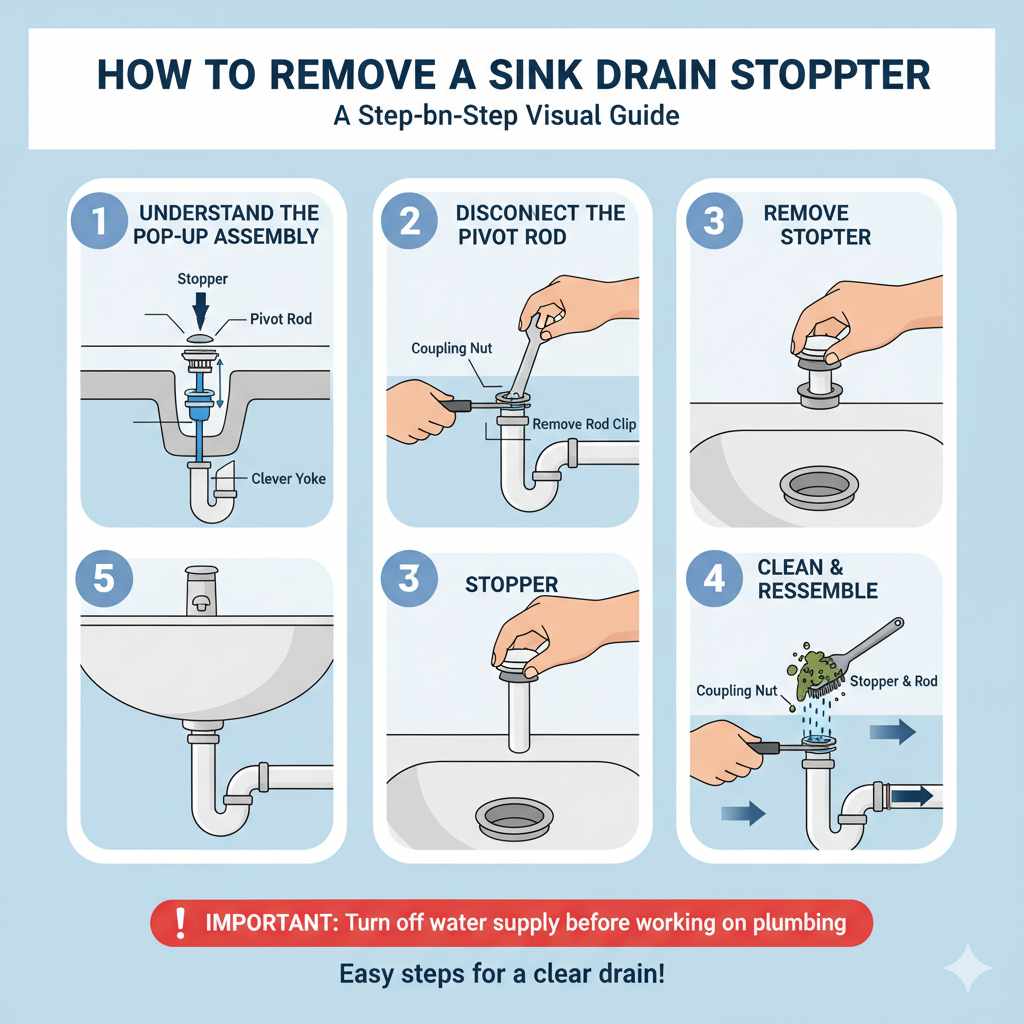
Step 1: Locate the Linkage Under the Sink
Look under your sink. You’ll see a pipe going down from the drain. Attached to this pipe is a U-shaped piece called a P-trap.
Behind the vertical pipe that comes down from the sink basin, you’ll see a horizontal rod. This rod connects to another rod that goes up to the stopper. There might also be a clevis strap and a nut holding the horizontal rod.
Step 2: Disconnect the Horizontal Rod
The horizontal rod is usually held in place by a nut. You might need pliers or an adjustable wrench to loosen and remove this nut. Once the nut is off, you should be able to pull the horizontal rod out.
Sometimes, there’s a clevis strap with a pin that holds the vertical rod to the horizontal one. You’ll need to remove this pin and strap first.
Step 3: Lift the Stopper from Above
With the linkage disconnected, the stopper should now be free from the drain. Reach into the sink and gently pull the stopper straight up and out of the drain opening. If it’s still stuck, try wiggling it gently or using a pair of pliers to grip the top of the stopper.
Be careful not to scratch the finish.
Step 4: Clean the Stopper and Drain
Once removed, clean the stopper thoroughly. Use a brush to remove any hair, soap scum, or mineral deposits. Also, clean inside the drain opening.
This will help prevent future issues.
Example Scenario:
- Sarah noticed her bathroom sink stopper wasn’t closing the drain properly.
- She looked under the sink and found the horizontal rod connected to the faucet’s lift rod.
- Using pliers, she loosened the nut holding the rod and pulled it free.
- She then easily lifted the stopper out of the sink.
- After cleaning the stopper and drain, she reassembled the linkage, and the stopper worked perfectly.
Removing Push-and-Pull Stoppers
These stoppers are very straightforward. You push them down to close the drain and pull them up to open it. They often have a knob or cap on top.
Step 1: Try Twisting and Pulling
For many push-and-pull stoppers, you can simply grip the knob or cap on top and try to twist it counter-clockwise while gently pulling upwards. It might unscrew or pop out on its own.
Step 2: Look for a Set Screw
If twisting and pulling doesn’t work, look closely at the stopper. Some have a small set screw on the side of the knob or cap. If you find one, use a small Phillips or flathead screwdriver to loosen it.
Once the screw is loose, the stopper should come off.
Step 3: Unscrew the Stopper Body (If Applicable)
In some cases, the entire stopper body might be threaded into the drain. If you can’t find a screw, try gripping the stopper firmly with your hand or a rag and twisting it counter-clockwise. If it moves, keep unscrewing it until it comes completely out.
Step 4: Clean the Stopper and Drain
Just like with pop-up stoppers, clean the stopper thoroughly. Remove any debris from the drain opening as well. This ensures a good seal and prevents future clogs.
Sample Scenario:
- Mark wanted to clean his kitchen sink stopper.
- He tried twisting the knob, but it wouldn’t budge.
- He noticed a tiny screw on the side of the knob.
- Using a small screwdriver, he loosened the screw.
- The stopper then lifted right out, allowing him to clean it and the drain.
Removing Lift-and-Turn Stoppers
These stoppers require you to lift them slightly and then turn them. They usually have a decorative cap on top.
Step 1: Remove the Decorative Cap
Look at the top of the stopper. There’s often a small decorative cap. You might be able to unscrew this cap by hand by twisting it counter-clockwise.
If it’s tight, you can try using pliers with a rag placed over the cap to protect the finish. Gently twist the pliers.
Step 2: Unscrew the Stopper Post
Once the cap is removed, you’ll see a screw underneath. Use a Phillips head screwdriver to unscrew this. Keep the screw in a safe place so you don’t lose it.
Step 3: Lift the Stopper Out
After removing the screw, the stopper should lift straight out of the drain. If it feels a little stuck, try wiggling it gently.
Step 4: Clean and Reassemble
Clean the stopper and the drain opening. Once clean, place the stopper back in the drain and secure it with the screw and then the decorative cap.
Removing Trip-Lever Stoppers
These are less common in sinks but are found in tubs. They are operated by a lever on the overflow plate.
Step 1: Locate the Overflow Plate
The overflow plate is the metal or plastic plate with holes located higher up on the sink basin or tub wall. It has a lever on it.
Step 2: Unscrew the Overflow Plate
You’ll need a screwdriver to remove the screws holding the overflow plate in place. Carefully remove the plate from the wall.
Step 3: Pull Out the Linkage and Stopper
Behind the overflow plate, you will find the linkage system that connects to the drain stopper. This usually involves a rod that extends down to the stopper. You may need to disconnect this rod.
Once disconnected, you can often pull the stopper out from the drain opening.
Step 4: Clean and Reinstall
Clean the stopper, overflow plate, and any parts of the linkage. Reassemble everything in reverse order, ensuring all connections are secure. Test the lever to make sure it operates the stopper correctly.
Here’s a look at statistics regarding drain stopper issues:
| Problem | Percentage of Households Affected |
|---|---|
| Stuck Drain Stopper | 35% |
| Leaking Drain Stopper | 20% |
| Difficult to Operate Stopper | 45% |
These numbers show that dealing with drain stoppers is a common household task. Many people face challenges with them, making a simple guide like this very useful. The majority of reported issues relate to stoppers that are hard to operate or don’t seal properly, often due to buildup or wear.
Troubleshooting Common Stopper Problems
Even with the right steps, you might encounter a few issues when trying to remove your sink drain stopper. This section offers solutions for common problems to help you get the job done without frustration.
Stopper is Stuck and Won’t Budge
If your stopper is jammed, it’s usually due to accumulated grime, hair, or mineral buildup acting like glue. Sometimes, the linkage can also be bent or corroded, making it hard to move.
Solution:
First, try applying a penetrating lubricant like WD-40 around the edges of the stopper and any visible linkage parts. Let it sit for 15-20 minutes to work its way in. Then, try wiggling the stopper gently while pulling or twisting.
For pop-up stoppers, double-check that the linkage underneath is completely disconnected. If the linkage itself is bent, you might need to gently straighten it with pliers, but be careful not to break it.
If it’s a pop-up stopper and you’ve disconnected the linkage, and it’s still stuck, you might have a buildup of debris lodged underneath the stopper. You could try carefully inserting a thin, flexible tool (like a zip tie with a small hook cut into the end) around the edge of the stopper to dislodge whatever is holding it down.
For threaded stoppers, ensure you are turning it in the correct direction (usually counter-clockwise to loosen). Applying steady, firm pressure is often more effective than short, sharp tugs.
Linkage is Damaged or Corroded
Over time, the metal parts of the linkage for pop-up stoppers can rust or bend. This can prevent the stopper from moving freely.
Solution:
If the linkage is slightly bent, you can often straighten it carefully with a pair of pliers. For heavily corroded parts, you might need to replace them. The horizontal rod and the clevis strap are relatively inexpensive parts that can be purchased at a hardware store.
You’ll need to remove the old parts and install the new ones, ensuring the clevis strap is reattached correctly to the lift rod. This might involve some trial and error to get the right height and tension.
A common issue with corroded linkages is that the nut holding the horizontal rod seizes up. In such cases, applying a penetrating oil and letting it sit for a while is crucial before attempting to unscrew it.
If the entire drain assembly is old and corroded, it might be more cost-effective to replace the whole drain assembly rather than just the linkage.
Stopper Won’t Seal Properly After Reinstallation
If you’ve removed and reinstalled your stopper, and it no longer seals the drain, there could be a few reasons.
Solution:
First, ensure the stopper is seated correctly in the drain opening. Make sure it’s not upside down or misaligned. For pop-up stoppers, check the linkage underneath.
The clevis strap needs to be adjusted correctly on the lift rod so that when the rod is down, the stopper is fully seated, and when it’s up, the stopper is fully open. You might need to adjust the position of the clevis strap on the rod, or the nut holding the horizontal rod. If the stopper itself is worn out, the rubber seal might be damaged, and you may need to replace the stopper.
A common cause for a poor seal on pop-up stoppers is a misadjusted clevis strap. The strap has multiple holes, and you need to find the right one to connect the vertical rod to ensure the stopper closes fully. If the stopper is still not sealing, check if there’s any debris stuck to the underside of the stopper or the drain seat.
Also, make sure the stopper isn’t warped or damaged. Sometimes, simply cleaning the drain seat (the part the stopper rests on) can improve the seal.
Stripped Screw Heads
If you’ve used the wrong size screwdriver or applied too much force, the screw head can become stripped, making it impossible to remove.
Solution:
If a screw head is slightly stripped, try using a rubber band. Place a wide rubber band over the stripped screw head, then insert your screwdriver and apply firm downward pressure while slowly trying to turn the screw. The rubber can help grip the damaged head.
If this doesn’t work, you might need a screw extractor tool, which you can buy at a hardware store. These tools are designed to grip and remove stripped screws. For severely stripped screws, you might need to carefully drill them out, but this should be a last resort.
Another trick for stripped screws is to use a Dremel tool with a cutting wheel to create a new slot for a flathead screwdriver. This requires precision and care.
The goal is to get enough grip on the screw head to turn it. Sometimes, a little tapping with a hammer on the screwdriver handle can help loosen a stubborn screw, but be gentle to avoid damaging anything.
How to Clean and Maintain Your Sink Drain Stopper
Once you’ve successfully removed your sink drain stopper, it’s the perfect opportunity to give it a good cleaning. Regular cleaning will help prevent future issues and keep your sink looking and smelling fresh.
Deep Cleaning the Stopper
When you take the stopper out, you’ll likely see a buildup of hair, soap scum, toothpaste, and other gunk. This debris can not only cause clogs but also make the stopper difficult to operate.
Process:
Use an old toothbrush or a small scrub brush to remove all visible debris from the stopper. If there’s stubborn grime, you can soak the stopper in a solution of warm water and a little dish soap or white vinegar for about 30 minutes. After soaking, scrub it again.
For pop-up stoppers, pay attention to the rubber seal at the bottom, as this is where most buildup occurs. Rinse the stopper thoroughly with clean water.
Vinegar is excellent for breaking down mineral deposits and soap scum. You can also use a baking soda paste (baking soda mixed with water) for a gentle abrasive scrub. Ensure you get into all the nooks and crannies of the stopper.
If you have a really stubborn clog of hair, you can use a bent coat hanger or a specialized drain cleaning tool to carefully pull it out.
Cleaning the Drain Opening
While the stopper is out, the drain opening is easily accessible. Cleaning this area is just as important as cleaning the stopper itself.
Process:
Use your brush and cleaner to scrub the inside of the drain opening. Reach down as far as you can to remove any accumulated grime. You can also pour a cup of baking soda down the drain, followed by a cup of white vinegar.
Let it fizz for a few minutes, then flush with hot water. This helps to deodorize and clean the pipes as well.
A pipe cleaner or a long, thin brush can be very effective for scrubbing the sides of the drain pipe just below the stopper seat. This area is often overlooked but can harbor a lot of gunk.
For a deeper clean of the pipe itself, you can use a plumber’s snake or a drain auger. However, for just routine cleaning of the immediate drain opening, a brush and vinegar/baking soda treatment is usually sufficient.
Preventative Maintenance Tips
To avoid future problems and make stopper removal easier, follow these simple maintenance tips.
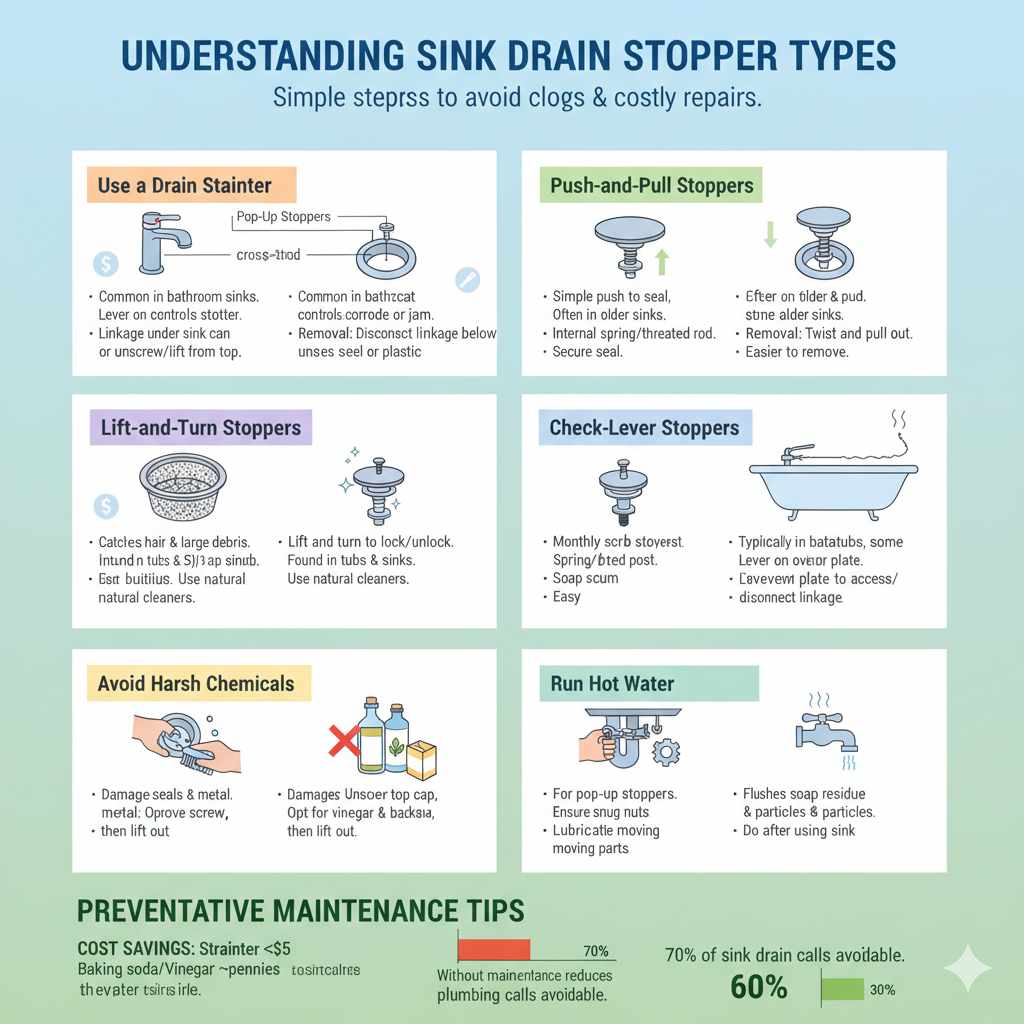
- Use a Drain Strainer: A simple mesh drain strainer placed over the drain opening can catch hair and larger debris before they reach the stopper mechanism or clog the pipes. These are inexpensive and very effective.
- Regular Cleaning: Periodically clean your stopper and drain opening, even if you don’t think there’s a problem. A quick scrub once a month can prevent buildup from becoming severe.
- Avoid Harsh Chemicals: While chemical drain cleaners can clear clogs, they can also be harsh on rubber seals and metal parts over time. Opt for natural cleaning methods like vinegar and baking soda whenever possible.
- Check Linkages (Pop-Up Stoppers): If you have a pop-up stopper, occasionally check the linkage underneath the sink. Ensure nuts are snug and that there’s no visible rust or damage. A little spray of lubricant on moving parts can help.
- Run Hot Water Regularly: After using the sink, running hot water for a minute can help flush away soap residue and small particles before they accumulate.
The cost of a drain strainer is typically less than $5, and they are available in various materials like stainless steel or plastic. Regular cleaning with baking soda and vinegar costs pennies and can save you money on plumbing bills. Studies show that preventative maintenance can reduce the need for professional plumbing services by up to 60%.
For example, a survey of plumbers indicated that nearly 70% of service calls for sink drains could have been avoided with simple home maintenance.
Frequently Asked Questions
Question: How often should I clean my sink drain stopper?
Answer: It’s a good idea to clean your sink drain stopper at least once a month, or more often if you notice slow draining or a buildup of debris. Regular cleaning helps prevent clogs and keeps the stopper working properly.
Question: Can I use chemical drain cleaners to help remove a stuck stopper?
Answer: It’s generally not recommended to use harsh chemical drain cleaners to remove a stuck stopper, as they can damage the stopper’s rubber seals and metal components. It’s better to use mechanical methods or natural cleaners.
Question: What if the stopper is completely seized and won’t move at all?
Answer: If a stopper is completely seized, you may need to apply more force or consider using a penetrating lubricant. If it’s a pop-up stopper, ensure the linkage underneath is fully disconnected. In very stubborn cases, it might be time to call a plumber.
Question: Do I need to turn off the water supply before removing a sink drain stopper?
Answer: For most sink drain stopper removals, turning off the main water supply is not necessary. You are typically just working with the drain mechanism itself, not the water supply lines.
Question: My stopper won’t seal the drain after I put it back. What did I do wrong?
Answer: This often means the stopper isn’t seated properly or the linkage (for pop-up stoppers) needs adjustment. Ensure the stopper is level and fully down, and check the adjustment of the clevis strap on the lift rod for pop-up types.
Summary
Removing a sink drain stopper doesn’t have to be difficult. Once you know the type of stopper you have and follow the right steps, the process becomes quick and manageable.
With a few basic tools and simple techniques, you can safely remove, clean, and reinstall your stopper without calling a plumber. Regular maintenance will also help prevent clogs and keep everything working smoothly.
Now you’re ready to handle your sink stopper like a pro—saving both time and effort.