
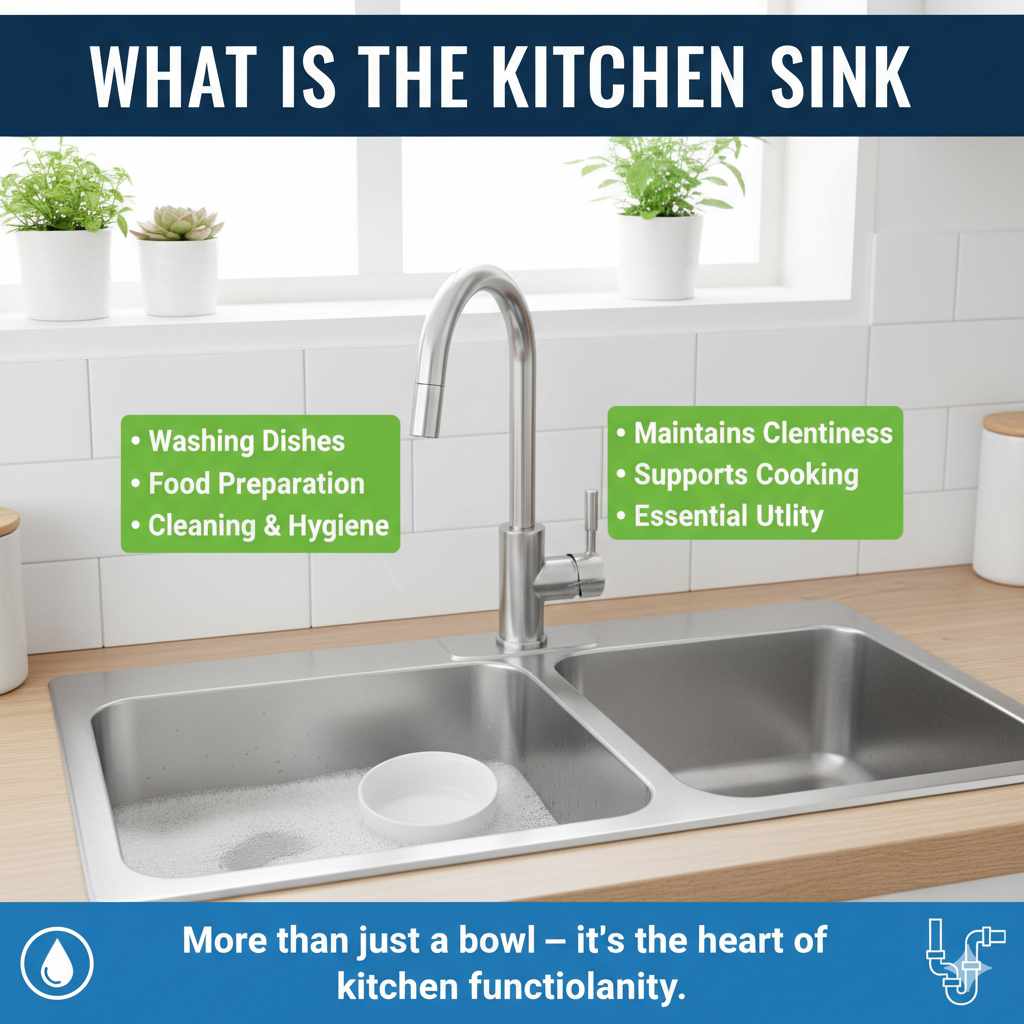
The kitchen sink is the hardworking, often overlooked heart of your kitchen. It’s not just a basin for washing dishes; it’s a multifunctional hub crucial for food prep, cleaning, and hygiene. Understanding its essential parts and styles ensures you choose or maintain the perfect, functional centerpiece for your home.
For a closely related home or decor topic, why put marbles in sink? 5 Interesting Reason gives readers a useful next step.
Do you ever look at your kitchen sink and feel… overwhelmed? It seems simple, but choosing the right one, or even just knowing what all the parts are called, can stop a simple refresh in its tracks. You deserve a kitchen that feels organized and beautiful, not frustrating!
Don’t worry, my friend. We are going to break down what is the kitchen sink completely. We’ll explore its anatomy, the different materials available, and how to choose a style that fits your life perfectly. Get ready to transform that functional spot into a genius feature of your kitchen layout. Let’s start making your kitchen work smarter for you!
The Kitchen Sink Depths: Understanding Its Essential Genius
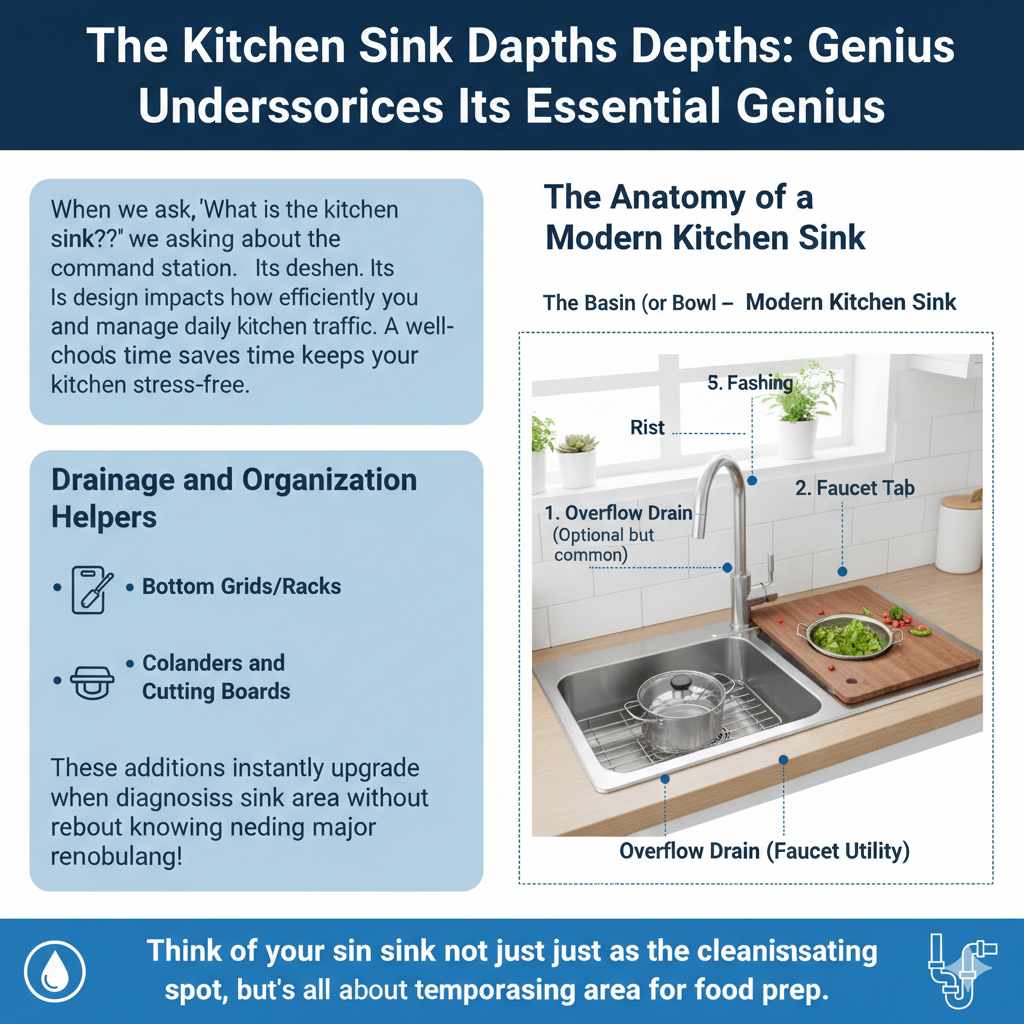
When we ask, “What is the kitchen sink?” we are asking about the central command station of the kitchen. It combines plumbing, a basin, and often acts as a workspace. Its design directly impacts how efficiently you cook, clean, and manage daily kitchen traffic.
For many of us, the sink is where most of the messy, essential work happens. From rinsing lettuce for tonight’s salad to tackling that mountain of dinner cleanup, its design needs to support your real-life cooking habits. A well-chosen sink saves time and keeps your kitchen stress-free.
The Anatomy of a Modern Kitchen Sink
To appreciate the genius of the kitchen sink, we must know its components. Think of these as the essential building blocks that make this fixture function seamlessly day after day.
- The Basin (or Bowl): This is the main container that holds water. Sinks can have one, two, or even three bowls. Bigger bowls are great for washing large pots and sheets!
- The Rim/Deck: This is the outer edge that sits above or on top of the countertop. It supports the sink structure.
- The Drain Opening: This is where the dirty water exits. It’s where your basket strainer or garbage disposal connects.
- The Faucet (Tap): While often separate, the faucet is intrinsically linked to the sink. It delivers hot and cold water directly into the basin.
- The Overflow Drain (Optional but common): A small opening usually located high on the basin wall. Its job is essential safety: it prevents major floods if you accidentally leave the water running!
Understanding these parts helps when you are shopping for a replacement or trying to diagnose a minor clog. It’s all about knowing the vocabulary!
Material Matters: Choosing the Right Foundation
The material of your sink doesn’t just affect how it looks—it changes its durability, how easy it is to clean, and even how much noise it makes when you drop a fork! As a home advisor, I always stress that the right material is about balancing budget, lifestyle, and preferred style.
Comparing the Top Sink Materials
Here is a simple breakdown of the most popular choices homeowners make today. Note the trade-offs—every material has its unique pros and cons.
| Material | Pros (Style & Practicality) | Cons (Maintenance) | Best For… |
|---|---|---|---|
| Stainless Steel | Affordable, durable, excellent heat resistance, thin profile. | Dents easily, prone to water spots, can be noisy. | Budget-conscious renovators who need resilience. |
| Cast Iron (Enameled) | Extremely durable finish, vibrant color options, timeless look. | Very heavy, chipping the enamel exposes the heavy iron underneath. | Traditional kitchens prioritizing a classic, solid feel. |
| Fireclay | Thick, chip-resistant glaze, handles heat well, very elegant farmhouse look. | Expensive, can crack under severe impact, heavy installation. | Farmhouse or classic kitchens seeking high-end durability. |
| Composite Granite/Quartz | Highly scratch-resistant, wide range of colors, excellent noise dampening. | Can sometimes stain if liquids sit too long, higher initial cost. | Modern kitchens valuing low noise and scratch resistance. |
For instance, if you’re a passionate baker tossing heavy mixing bowls around daily, you might lean toward the toughness of fireclay or composite granite. If you are renting or need a fast, budget-friendly swap, stainless steel is your dependable friend. Remember, choosing the right material boosts your kitchen’s everyday joy!
Style & Installation: How Your Sink Sits In Your Countertop
Beyond material, the way the sink physically connects to your countertop defines its style and determines how easy it is to wipe crumbs directly into the bowl. This choice is crucial for achieving that smooth, custom look we all crave.
The Three Main Installation Styles
Think about your current countertop material. If it’s solid stone (like granite or quartz), you have more options than if you have laminate. Always check manufacturer guidelines, especially when dealing with materials like laminate or wood, often found in older or rental homes. For deep dives into safe cutting practices for stone countertops, resources from organizations like the National Association of the Remodeling Industry (NARI) offer great background on structural integrity during cutout procedures.
- Drop-In (Top-Mount): This is the easiest and most forgiving style. The sink has a visible rim that rests right on top of the cut countertop.
- Beginner Tip: This is perfect for DIYers because if the hole you cut in the counter is slightly too big, the rim will hide the mistake!
- Undermount: The sink is mounted under the countertop. You don’t see any rim; the counter edge drops straight into the basin.
- The Genius Factor: This creates a seamless look that is incredibly easy to clean. You simply sweep water and debris directly from counter to sink.
- Note: This usually requires a solid, non-porous countertop material like stone or solid surface.
- Apron-Front (Farmhouse): This style features a large, exposed front wall that extends beyond the cabinetry.
- The Style Factor: It’s dramatic, historical, and very popular right now.
- Installation Note: These are often very heavy, especially fireclay or cast iron versions, and require specialized cabinet modifications.
Single Bowl vs Double Bowl: The Great Divide
This decision impacts your workflow more than almost any other choice. Are you washing giant cookie sheets, or are you mostly hand-washing delicate glassware?
| Feature | Single Bowl Sink | Double Bowl Sink |
|---|---|---|
| Washing Space | Maximum uninterrupted space for large items (stock pots, baking sheets). | Divided space; better for soaking dishes on one side while rinsing on the other. |
| Disposal Use | Ideal, as the disposal takes up the entire bottom surface. | Requires careful planning, usually only fits in one sink cavity. |
| Flexibility | Less flexible for multi-tasking cleanup at once. | High flexibility for concurrent tasks (e.g., wash/rinse or food/trash separation). |
If your goal is high-volume cleaning of oversized items, the single bowl truly shines. If balancing two tasks simultaneously is your daily reality, the double bowl setup offers unparalleled organizational genius.
The Plumbing Partners: Faucets and Disposals
A sink is just a hole in the counter without its essential companions: the faucet and the drain mechanism. Choosing these wisely enhances the functionality and beauty of your overall sink area.
Choosing Your Faucet Wisely (The True Workhorse)
The faucet should feel comfortable in your hand and match your style. Look beyond just the finish (chrome, brushed nickel, matte black) and think about the mechanism. Are you comfortable reaching around a handle while your hands are covered in raw chicken juice? Maybe a touchless faucet is better for you!
Key Faucet Styles to Consider:
- Pull-Down Sprayers: The hose pulls straight down into the sink. Great for deep cleaning corners.
- Pull-Out Sprayers: The head pulls out toward you. Ideal if your sink basin is wide, allowing you to spray down nearby counters easily.
- Hands-Free/Touchless: Activated by a simple tap or sensor motion. Excellent for hygiene, which is key in any busy kitchen environment!
When selecting a faucet, always note how many holes your sink deck has. A three-hole sink deck might need a base plate (escutcheon) to cover unused holes if you opt for a single-hole faucet style.
Making Garbage Disposal Decisions
A disposal (or “garbage eater”) grinds food scraps, preventing clogs in your actual plumbing system and making cleanup faster. While not mandatory, for homeowners who prep a lot of vegetables or bones, they feel like magic.
Before purchasing, ensure your home’s plumbing can safely handle the addition. Generally, local building codes govern whether you can install one, and you often need a dedicated electrical outlet under the sink for operation. Check with your local municipality or a licensed plumber regarding specific regulations in your area regarding food waste disposal systems.
Beginner Setup Guide: How to Install a Basic Drop-In Sink
While undermount sinks usually benefit from professional installation due to the structural weight and precise sealing required, a drop-in sink is often manageable for the confident beginner. This overview provides the confidence boost you need to tackle this project!
Tools You Will Likely Need
- Safety Glasses and Gloves
- Pencil or Marker
- Jigsaw (for cutting laminate or wood countertops) or Rotary Tool
- Adjustable Wrench or Basin Wrench (for tight spots under the sink)
- Plumber’s Putty or Silicone Caulk (essential for sealing!)
- Screwdriver
Step-by-Step Confidence Booster for Drop-In Installation
This assumes the old sink is already removed and the hole in the countertop is ready or needs minor enlarging.
- Prep the Sink: Before lowering the sink, install the faucet and the drain assembly (including the basket strainer) onto the sink bowl. It is far easier to do this on a workbench than blindly under the counter!
- Apply the Seal: Run a thick, even continuous bead of plumber’s putty or silicone caulk around the underside edge of the sink rim that will contact the countertop. This creates a waterproof barrier.
- Position and Drop: Slowly lower the sink into the countertop opening. Take your time to ensure it sits evenly.
- Secure from Below: Reach underneath the cabinet. Fasten the mounting clips provided with the sink around the underside rim. Tighten these clips evenly until the sink is snug against the counter. Do not overtighten, especially with cast iron, as this can damage the rim.
- Clean Up Excess Sealant: Once secure, wipe away any excess plumber’s putty or caulk that squeezed out around the top rim. This leaves a clean, professional line.
- Connect Plumbing: Reconnect the P-trap, garbage disposal (if applicable), and the faucet supply lines. Run a little water and check every connection underneath for drips. Patience here prevents future headaches!
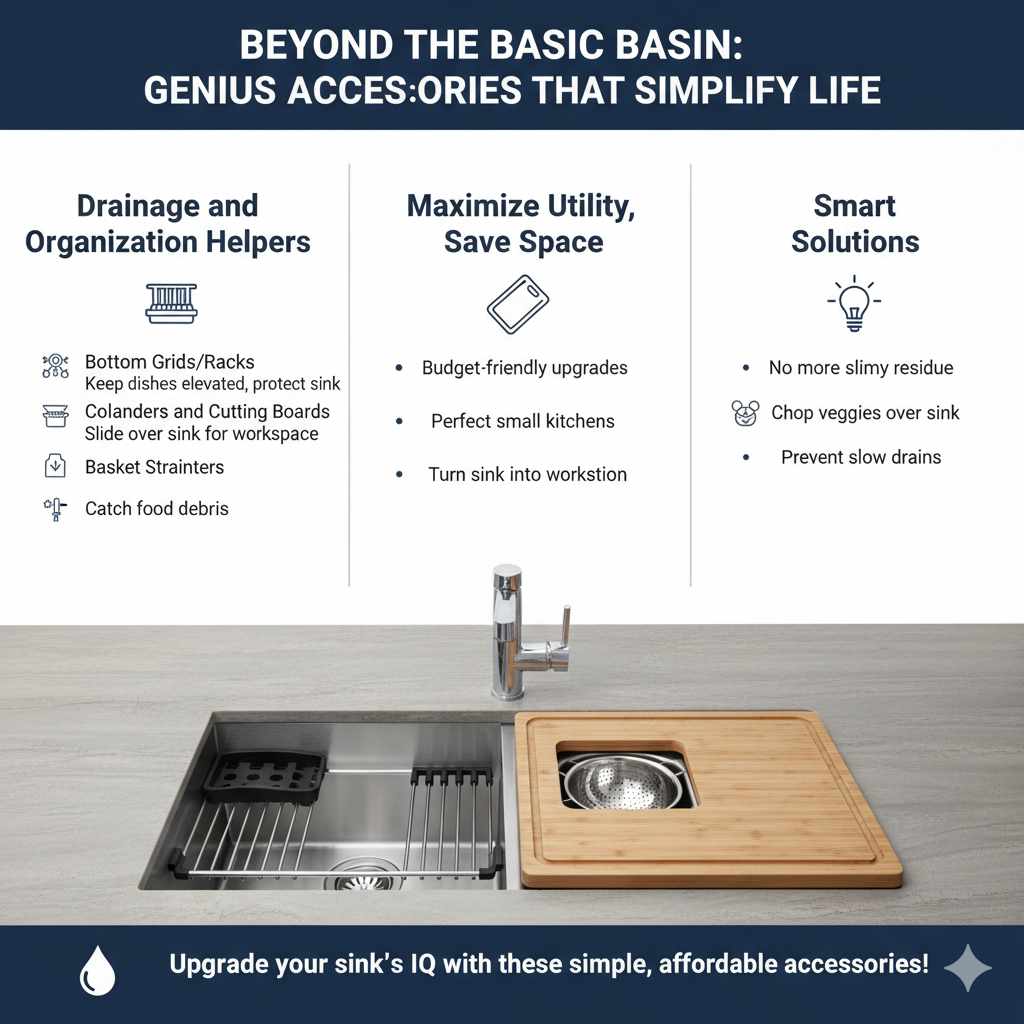
Beyond the Basic Basin: Genius Accessories That Simplify Life
The true genius of the modern kitchen sink isn’t just the bowl itself, but the accessories that turn it into a multi-functional workstation. These items are budget-friendly upgrades that maximize utility, perfect for renters or those seeking affordable style boosts.
Drainage and Organization Helpers
These additions instantly upgrade your sink area without needing major remodeling:
- Bottom Grids/Racks: These metal racks sit on the floor of the basin. They keep dishes slightly elevated, protecting the sink surface from scratches and allowing water to drain easily beneath pots, ensuring no slimy residue pools underneath. Essential for stainless steel and composite sinks!
- Colanders and Cutting Boards: Many companies now make custom-fit accessories that slide over the sink or nestle into the rim. A rolling drying rack or a custom cutting board turns the empty sink into temporary extra counter space—a lifesaver in small kitchens!
- Basket Strainers: These replace the standard stopper and are designed to catch food debris while allowing slow, gradual draining. Keeping a spare on hand is a smart preventative measure against slow drains.
Think of your sink not just as a cleaning spot, but as a temporary staging area for food prep. When you can chop vegetables over the sink and slide scraps directly into a colander or disposal, you save precious counter space.
Maintaining Your Investment: Longevity Tips
Even the most expensive, high-quality sink will look tired fast if not cared for properly. Maintenance is so simple when you know the routine. We want your sink to look beautiful for years!
Sink Care by Material Type
| Material | Daily Care Tip | What to NEVER Use |
|---|---|---|
| Stainless Steel | Rinse thoroughly after every use and wipe dry with a soft cloth to prevent water spots. | Steel wool pads or harsh abrasive cleaners that can scratch the finish. |
| Fireclay/Cast Iron | Wipe with mild soap and water. Dry if using dark soap/scrubbing powders to avoid residue build-up. | Strong acid-based cleaners or scouring pads; they dull the glaze. |
| Composite Granite | Wipe down daily. For mineral deposits, use vinegar/water mixture. | Oven cleaners or strong chemical solvents. |
A quick wipe-down at the end of the day takes less than 60 seconds but makes a huge visual impact. This small habit keeps your kitchen feeling clean and cared for.
Frequently Asked Questions (FAQ) for New Sink Owners
Q1: Can I put a garbage disposal on any sink?
A: Not exactly. While most sinks are designed to accommodate standard 3.5-inch disposal flanges, you must ensure the sink material and setup can handle the weight and vibration, especially with undermount installations. Always confirm compatibility before purchasing.
Q2: What is “blotting” my sink, and why should I do it?
A: Blotting means using a soft cloth or towel to dry the sink basin after use, especially for stainless steel. This prevents mineral deposits (water spots) from forming as the water evaporates, keeping the finish looking shiny and new.
Q3: Which sink type is considered the “easiest to clean”?
A: The undermount sink is generally the easiest to clean because there is no rim lip catching food debris between the counter and the sink edge. You can sweep everything directly in.
Q4: How deep should my kitchen sink bowls be?
A: Most experts recommend a basin depth between 9 and 10 inches. Deeper sinks (10+ inches) are great for hiding dirty dishes but can cause back strain if you are short. Shallow sinks make cleanup splashing messy.
Q5: What are “zero-radius” sinks? Are they hard to clean?
A: Zero-radius sinks have perfectly sharp, 90-degree corners, giving a very modern, industrial look. While beautiful, those sharp corners can sometimes trap food bits, requiring a little extra attention with a sponge or brush compared to sinks with slightly rounded corners.
Q6: My sink faucet leaks from the base. What part do I need to fix?
A: Leaks at the very base of the faucet body are usually caused by worn-out O-rings or loose mounting nuts underneath the sink. Tightening the nuts or replacing the O-rings (check your faucet manufacturer’s parts list) usually solves this common problem.
Conclusion: Embracing Your Kitchen’s Most Essential Tool
We’ve journeyed through the anatomy, materials, and installation genius that defines the modern kitchen sink. What is the kitchen sink really? It’s more than just a place to wash dishes—it’s the hardworking centerpiece that keeps your kitchen running smoothly every single day.
From choosing the right material to understanding installation styles and adding smart accessories, every decision you make shapes how efficiently and comfortably your kitchen functions. A well-chosen sink doesn’t just improve workflow—it enhances the overall look and feel of your space.
The best part? You don’t need a full renovation to make a big impact. Small upgrades, proper maintenance, and thoughtful choices can transform your sink area into a stylish, functional hub you actually enjoy using.
So the next time you stand at your kitchen sink, you’ll see it differently—not as a simple fixture, but as a powerful tool that supports your daily life. With the right setup, your kitchen becomes easier to manage, more beautiful to use, and truly designed around you.


