
Get your brushed nickel fixtures shining again easily! This guide shows you beginner-friendly, safe methods using pantry staples like vinegar or mild soap to gently remove water spots and grime without damaging the finish. Feel confident keeping your bathroom looking stylish and fresh!
For a related decorating choice, 70+ Mind Blowing Kids Bathroom Ideas can help readers compare style and placement.
For a related decorating choice, Transform Your Bathroom with a Luxurious Japanese Soaking Tub Shower Combo can help readers compare style and placement.
For a closely related home or decor topic, Why Do Poops Float or Sink: Essential gives readers a useful next step.
For a closely related home or decor topic, Where Are The Leg Warmers In Dress To Impress? Essential gives readers a useful next step.
For a closely related home or decor topic, Valentine’s Day Breakup Self-Care: Treat Yourself This Year gives readers a useful next step.
For a closely related home or decor topic, Shower Pouf vs Loofah: Key Differences gives readers a useful next step.
For a closely related home or decor topic, How To Disassemble A Futon Step By Step gives readers a useful next step.
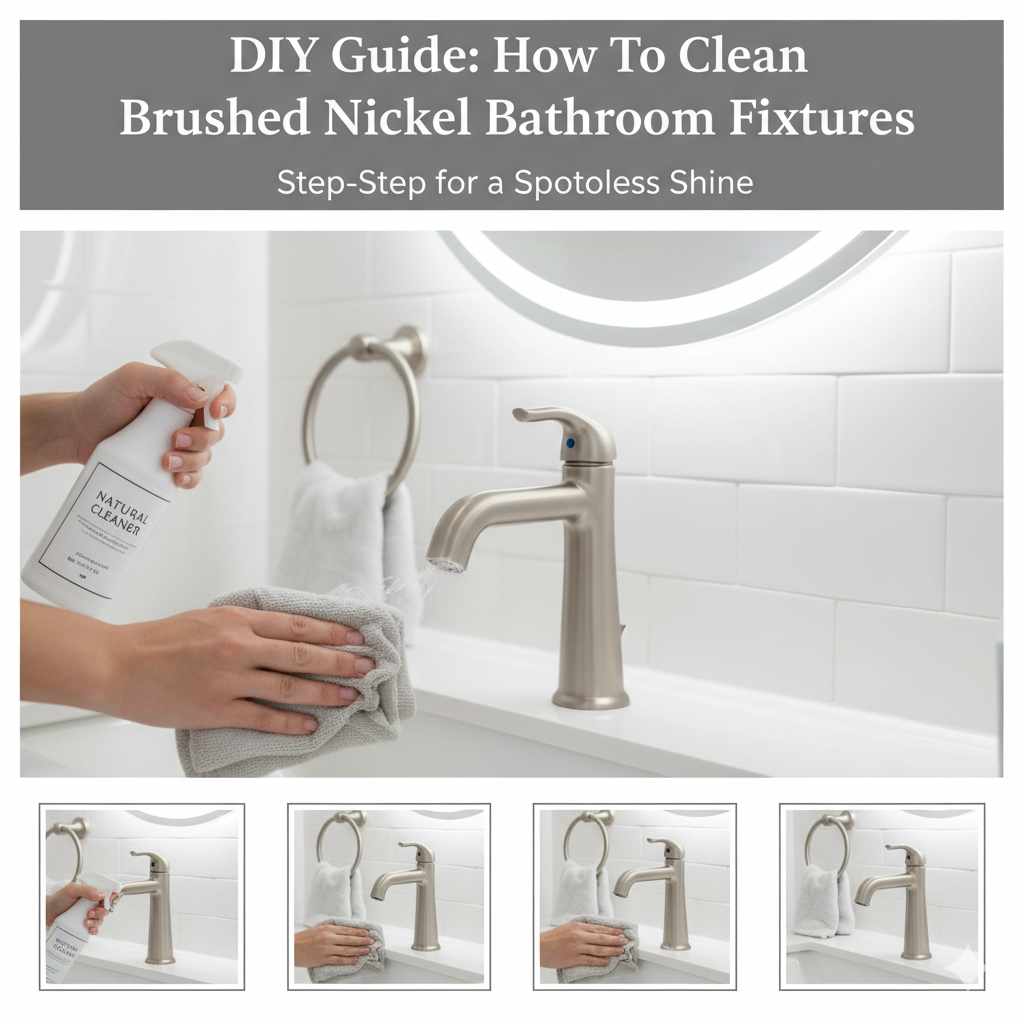
Your brushed nickel fixtures add such a lovely, modern touch to your bathroom. They look sophisticated and warm, right? But keeping that beautiful matte look streak-free can feel tricky. Those pesky water spots and fingerprints seem to show up instantly! Don’t worry; you don’t need harsh chemicals or professional help to maintain their charm. We’re going to walk through the simplest, safest ways to clean brushed nickel bathroom fixtures so they stay gorgeous year after year. Getting that clean, airy look is easier than you think!
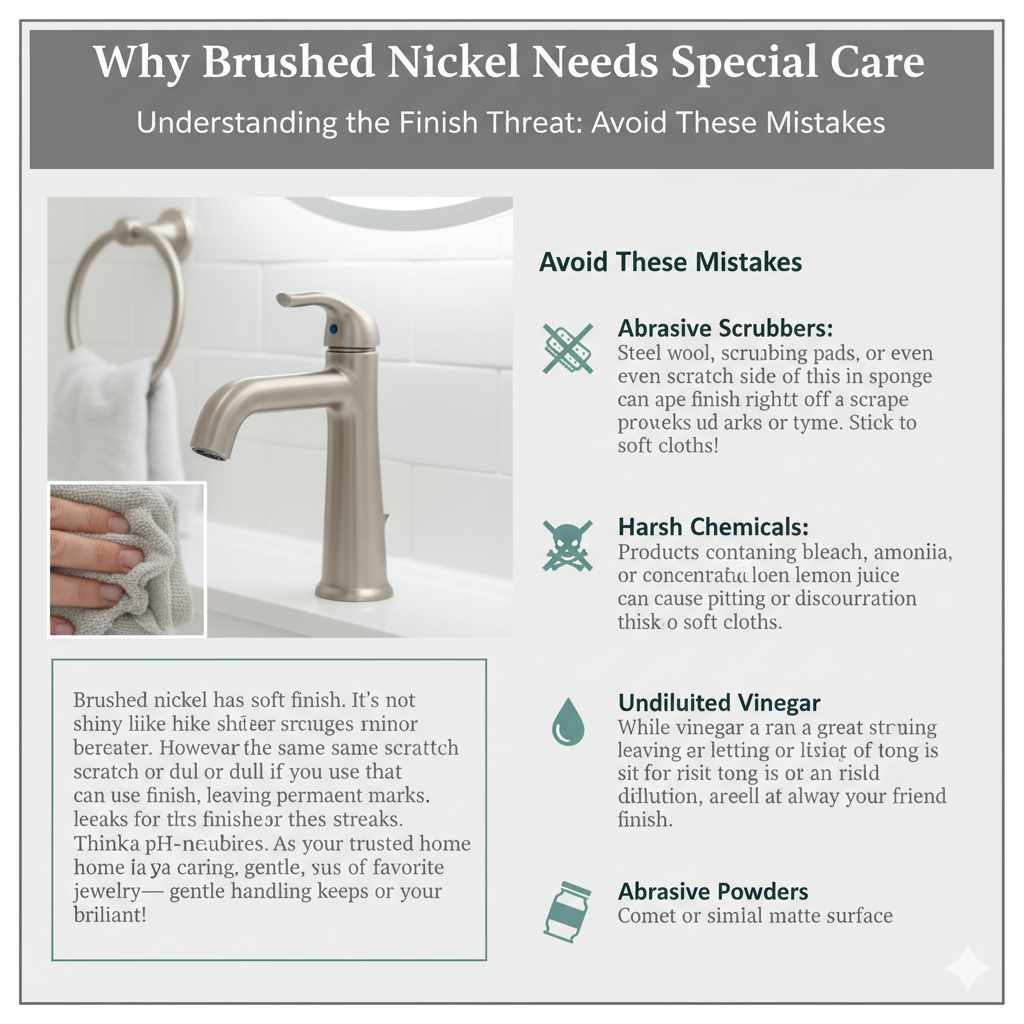
Why Brushed Nickel Needs Special Care
Brushed nickel has a soft, satin finish. It’s not shiny like polished chrome, which means it hides minor smudges better. However, that same soft texture means it can scratch or dull if you use the wrong cleaning products. Harsh abrasives or strong chemicals can strip away that delicate finish, leaving permanent marks or streaks.
As your trusted home style guide, I always recommend gentle, pH-neutral cleaners for these finishes. Think of it like caring for a favorite piece of jewelry—gentle handling keeps it brilliant!
Understanding the Finish Threat: Avoid These Mistakes
To keep your nickel looking its best, prevention is key. Before we dive into the cleaning routine, let’s look at what ingredients you must keep away from your faucets, showerheads, and towel bars:
- Abrasive Scrubbers: Steel wool, scrubbing pads, or even the scratchy side of a sponge can scrape the finish right off. Stick to soft cloths!
- Harsh Chemicals: Products containing bleach, ammonia, or concentrated lemon juice can cause pitting or discoloration over time.
- Undiluted Vinegar: While vinegar is a great cleaner, leaving it too strong or letting it sit too long is a risk for any plated finish. Dilution is always your friend here.
- Abrasive Powders: Comet or similar scouring powders will definitely dull the matte surface.
The Essential Toolkit: What You’ll Need
You probably already own everything required for a fantastic cleaning session. Keeping your cleaning stash simple is affordable and much safer for your plumbing fixtures. Here’s your easy shopping list—or rather, your easy pantry list!
| Cleaning Tool | Purpose |
|---|---|
| Microfiber Cloths (Soft) | Dusting, applying cleaner, and gentle drying to prevent streaks. |
| Soft Sponge or Washcloth | For light scrubbing of stubborn spots (use the soft side only!). |
| Distilled White Vinegar | Excellent for dissolving mineral deposits and hard water spots. |
| Mild Dish Soap (Dawn or similar) | Best everyday cleaner for general grime and fingerprints. |
| Distilled Water (Optional but recommended) | For the final rinse if your tap water is very hard. |
Method 1: Everyday Cleaning for a Quick Shine (Soap & Water)
For daily smudges and light dust, you don’t need to pull out the heavy hitters. This is the maintenance cleaning that keeps the frustration away between deeper cleanings. This method is excellent for high-traffic areas like the sink faucet handles.
Step-by-Step Daily Wipe-Down
- Prepare Your Solution: Mix about one teaspoon of mild dish soap into two cups of warm water in a small bowl. Stir gently so you don’t create too many suds.
- Dampen the Cloth: Dip your soft microfiber cloth into the soapy water and wring it out thoroughly. The cloth should be damp, not dripping wet. A dripping cloth leaves more water behind, causing more spots!
- Wipe Gently: Starting from the top of the fixture and moving down, gently wipe all surfaces—faucets, handles, soap dispenser pumps, and drain rings. Don’t press hard; let the soap do the work.
- Rinse Thoroughly: Dip a second, clean cloth into plain warm water (no soap). Wipe down the fixtures again to remove any soap residue. Any leftover soap will turn cloudy when dry.
- Buff Dry Immediately: This is the most crucial step for a streak-free look! Use a third, completely dry microfiber cloth to buff every part of the fixture until it shines. Drying prevents water spots from forming as the water evaporates.
Method 2: Deep Cleaning for Hard Water Stains (The Vinegar Power Lift)
If you live in an area with hard water—and many of us do!—those chalky white spots will eventually build up on your brushed nickel. Vinegar is acidic enough to soften these mineral deposits without being harmful like industrial cleaners, provided you use it correctly.
Creating the Safe Vinegar Spot Treatment
We never want pure vinegar sitting on the nickel. Always dilute it for direct application. For faucet heads and sprayers, we’ll use a bag method.
For General Light Staining on Fixtures:
- Mix the Solution: Combine equal parts distilled white vinegar and warm water (50/50). For extremely stubborn spots, you can try a ratio of 2 parts vinegar to 1 part water, but keep the contact time short.
- Apply with Caution: Dip your soft cloth into the diluted vinegar solution and wring it out well.
- Wipe Down: Gently wipe the stained areas. For noticeable spots, you can let the damp cloth sit on the spot for about 5 minutes. Do not let it sit for longer than 10 minutes.
- Neutralize and Rinse: Immediately wipe the area down with a cloth dampened with your mild dish soap and water solution. This step neutralizes the vinegar’s acidity, protecting the finish.
- Final Buff: Rinse one last time with plain water, then dry and buff thoroughly with a clean, dry cloth.
For Clogged Showerheads or Faucets (The Bag Method):
If the water flow is weak due to mineral buildup inside the spout or showerhead, this technique works wonders without disassembly. (This is a method often recommended by home maintenance experts due to its effectiveness in dissolving calcium deposits.)
- Fill the Bag: Fill a sturdy, clear plastic bag (like a sturdy sandwich bag or Ziploc) about halfway with undiluted white vinegar.
- Submerge the Fixture: Carefully place the bag over the showerhead or faucet spout so that the entire head is submerged in the vinegar.
- Secure the Bag: Use a sturdy rubber band or twist tie to secure the bag tightly around the neck of the faucet or shower arm so it stays in place and the vinegar stays touching the metal.
- Wait Patiently: Let the fixture soak for 30 minutes to 1 hour. For extreme buildup, you might try up to 3 hours, but check every 30 minutes.
- Remove and Flush: Carefully remove the bag (watch out for drips!) and dispose of the vinegar. Turn on the hot water tap for a few minutes to flush out any loosened mineral debris from inside.
- Wipe and Dry: Wipe down the outside of the now-clean fixture with your soapy water solution and buff dry.
Tackling Tough Blemishes: Beyond Water Spots
Sometimes your fixtures face challenges other than just mineral deposits. Soap scum, toothpaste splatters, or even hairspray residue can leave behind a sticky film.
Removing Stubborn Soap Scum and Grime
Soap scum is a combination of body oils, soap residue, and hard water minerals. Since it is sticky, gentle friction helps lift it.
- Create a Paste: Mix a small amount of baking soda with just enough water (or diluted vinegar) to create a thin paste, about the consistency of toothpaste. Baking soda is a very mild abrasive—gentler than salt but effective.
- Apply Carefully: Dab a small amount of the paste onto a soft, damp cloth.
- Gentle Scrub: Very lightly rub the paste onto the affected area. Use the softest part of the cloth and use very little pressure. You are gently buffing the surface, not scouring it.
- Rinse, Rinse, Rinse: It is vital to remove all traces of the baking soda. Rinse thoroughly with clean water several times.
- Dry Completely: Buff dry immediately to restore that beautiful brushed look.
Polishing for Added Luster (Optional but Luxurious)
If you want your fixtures to look brand new, a tiny bit of oil can enhance the luster beautifully. This works best on fixtures that are already clean and dry.
- Use a clean, dry microfiber cloth.
- Place one single drop of mineral oil, baby oil, or even olive oil onto the cloth. Less is truly more here!
- Lightly rub the oil over the entire fixture. It should look subtle, not oily.
- Use a fresh, dry section of the cloth to gently buff away any excess. This leaves a protective coating that helps repel fingerprints until the next cleaning day.
Caring for Specific Brushed Nickel Components
Not all parts of a fixture are created equal. The handle might get more hand-contact grime, while the aerator (the screen at the tip of the faucet) needs focused attention for water flow.
| Fixture Part | Primary Issue | Best Cleaning Tip |
|---|---|---|
| Faucet Handles/Levers | Fingerprints, oils, soap residue | Daily soap and water wipe-down, followed by immediate drying. |
| Showerhead Nozzles | Mineral deposits (slow flow) | The vinegar bag soak method (Method 2). |
| Drain Stopper/Ring | Gunk buildup, mildew | A soft toothbrush dipped in soapy water can gently clean the crevices around the stopper mechanism. |
| Towel Bars/Rods | Dust, light splashes | Simple dry microfiber dusting keeps them lint-free and shiny. |
Tips for Long-Term Maintenance and Protection
The best way to clean brushed nickel is to make sure it rarely gets deeply soiled! Establishing a simple routine will save you serious time later on. Remember, keeping your bathroom beautiful should feel relaxing, not stressful.
Establishing an Easy Cleaning Cadence
Think of your cleaning schedule in three layers:
- Daily Quick Wipe: Keep a small, clean microfiber cloth near the sink. After someone uses the sink or after you dry your hands, give the faucet a quick wipe. This takes five seconds.
- Weekly Deep Clean: Once a week, do the full soap-and-water cleaning routine (Method 1). This prevents soap scum from cementing itself onto the surface.
- Monthly Mineral Check: If you notice hints of white spots forming, tackle them immediately with the diluted vinegar solution (Method 2). Don’t let them sit for months!
The Importance of Manufacturer Guidelines
Always remember that fixture manufacturers stand by their products. If you are hesitant about any cleaner, spend a quick minute on the brand’s website. They often publish care guidelines specific to their plating process. For example, well-respected industry groups often publish maintenance guides that align with manufacturer recommendations.
For instance, according to industry standards regarding surface finishes, maintaining the proper pH balance during cleaning is crucial to protect the integrity of factory-applied layered finishes. You can find resources outlining best cleaning practices from organizations focused on home care standards which often highlight the need for pH-neutral solutions to protect metal surfaces.
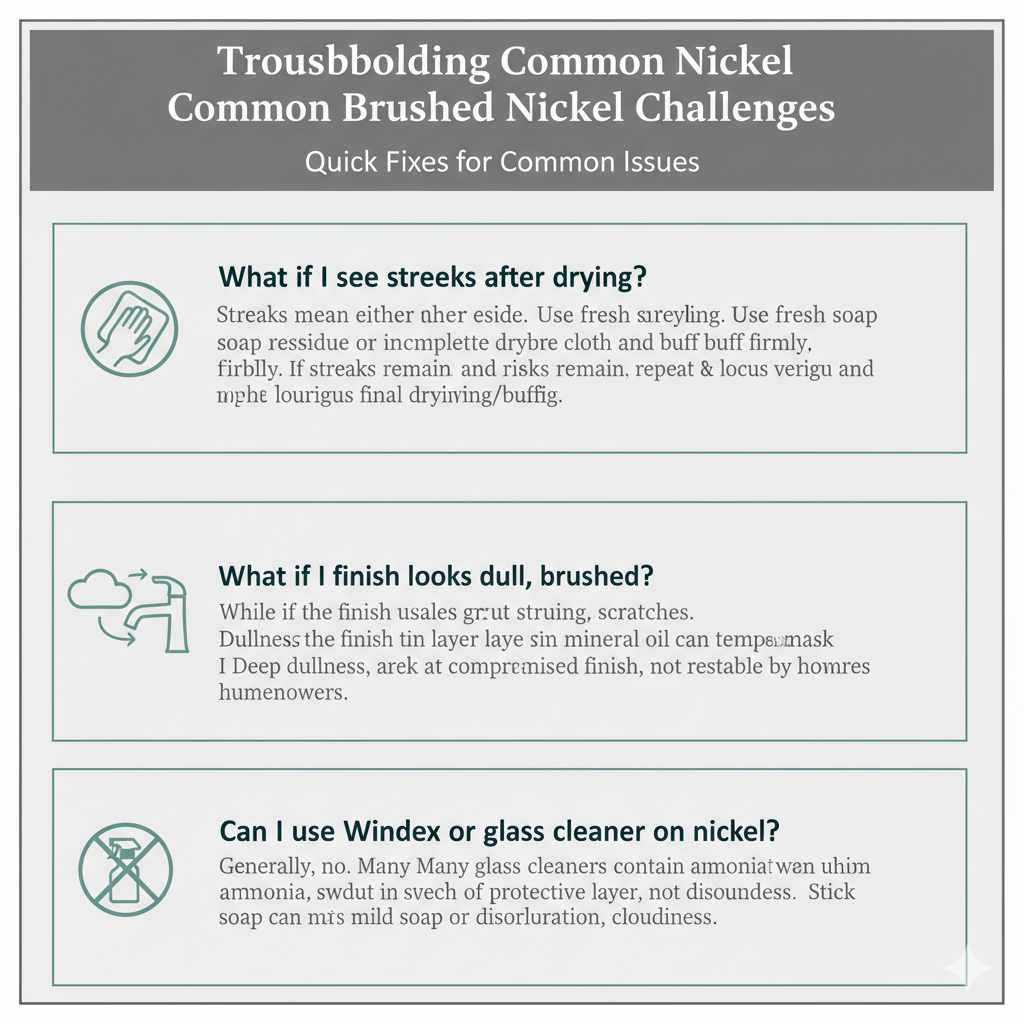
Troubleshooting Common Brushed Nickel Challenges
Sometimes, even with the best intentions, things go slightly wrong. Here are quick fixes for common issues beginner cleaners encounter.
What if I see streaks after drying?
Streaks almost always mean one of two things: either you left soap residue behind, or you didn’t dry the fixture completely. Grab a fresh, completely dry microfiber cloth and buff the streak firmly. If the streak remains, repeat the cleaning process (Method 1), but focus extra hard on that final, vigorous drying/buffing step.
What if the finish looks dull, not brushed?
A dull look usually means the finish has been lightly scratched over time with abrasive cleaners or scrubbing pads. If it hasn’t been severely damaged, sometimes applying a very thin layer of mineral oil (as described in the polishing section) can temporarily mask the micro-scratches and restore some of the luster. For deep dullness, unfortunately, the finish may be compromised, and deep restoration is usually not possible for homeowners.
Can I use Windex or glass cleaner on nickel?
Generally, no. While glass cleaners are great for glass, many contain ammonia, which can break down the protective layer on brushed nickel finishes, leading to discoloration or cloudiness over time. Stick to mild soap or diluted vinegar.
Frequently Asked Questions (FAQ) About Cleaning Brushed Nickel
Q1: Is it safe to use lemon juice on my brushed nickel faucet?
A: No, it is not recommended. While lemon juice is acidic like vinegar, it is much stronger and often contains residue that can etch or pit the finish if left on too long. Stick to diluted white vinegar for tackling tough spots.
Q2: How often should I deep clean my brushed nickel fixtures?
A: For most homes, a deep clean using vinegar (if needed) once a month is plenty. The most important thing is the daily or weekly wipe-down to prevent buildup.
Q3: What kind of cloth should I absolutely avoid using?
A: Avoid any scouring pads, steel wool, abrasive sponges (like the green side of a standard kitchen sponge), or brushes with stiff nylon bristles. Always choose soft microfiber or 100% cotton cloths.
Q4: My showerhead is built into the wall. Can I still use the vinegar bag method?
A: Yes, as long as the entire showerhead can be submerged or wrapped. Just ensure the bag is secured tightly so the vinegar covers all the nozzles while you soak it.
Q5: What do I do if I accidentally sprayed bleach near my nickel hardware?
A: React immediately! Rinse the area thoroughly and immediately flush it with plenty of clean water. Then, clean the area with a mild soapy solution to neutralize any residue, and dry completely. Bleach exposure should be as brief as possible.
Q6: Does this cleaning advice apply to brushed bronze fixtures too?
A: While the mild soap and water method is safe for almost all finishes, brushed bronze often has an oil-rubbed coating that needs even gentler care. For bronze, avoid vinegar entirely and use only very mild soap and water.
Conclusion: Enjoying Your Sparkling Bathroom Style
See? Keeping your lovely brushed nickel fixtures looking sophisticated and welcoming is straightforward once you know the gentle secrets. It’s all about avoiding those harsh scrubbers and making sure you dry everything completely after cleaning. By establishing a quick, consistent routine—a 5-second daily wipe, a weekly gentle wash—you take the stress out of maintenance.
You now have the confidence and the simple tools to tackle everyday smudges and stubborn hard water spots safely. Take a moment to admire the warm, matte sheen of your fixtures. They truly enhance the style of your space, and with this easy know-how, they will continue to do so beautifully for years to come. Enjoy designing your beautiful, comfortable home—you’ve got this!


