
Is your favorite chair looking a bit sad? Maybe the fabric is torn, faded, or just not your style anymore. It’s a common problem.
Many people feel stuck with old furniture. They think replacing it is the only option. But what if I told you there’s a simpler, more rewarding way?
You can often bring that chair back to life yourself. This guide is here to help. We’ll walk through how to recover a chair.
You’ll learn to fix it up and make it feel new again. This skill can save you money and boost your confidence.
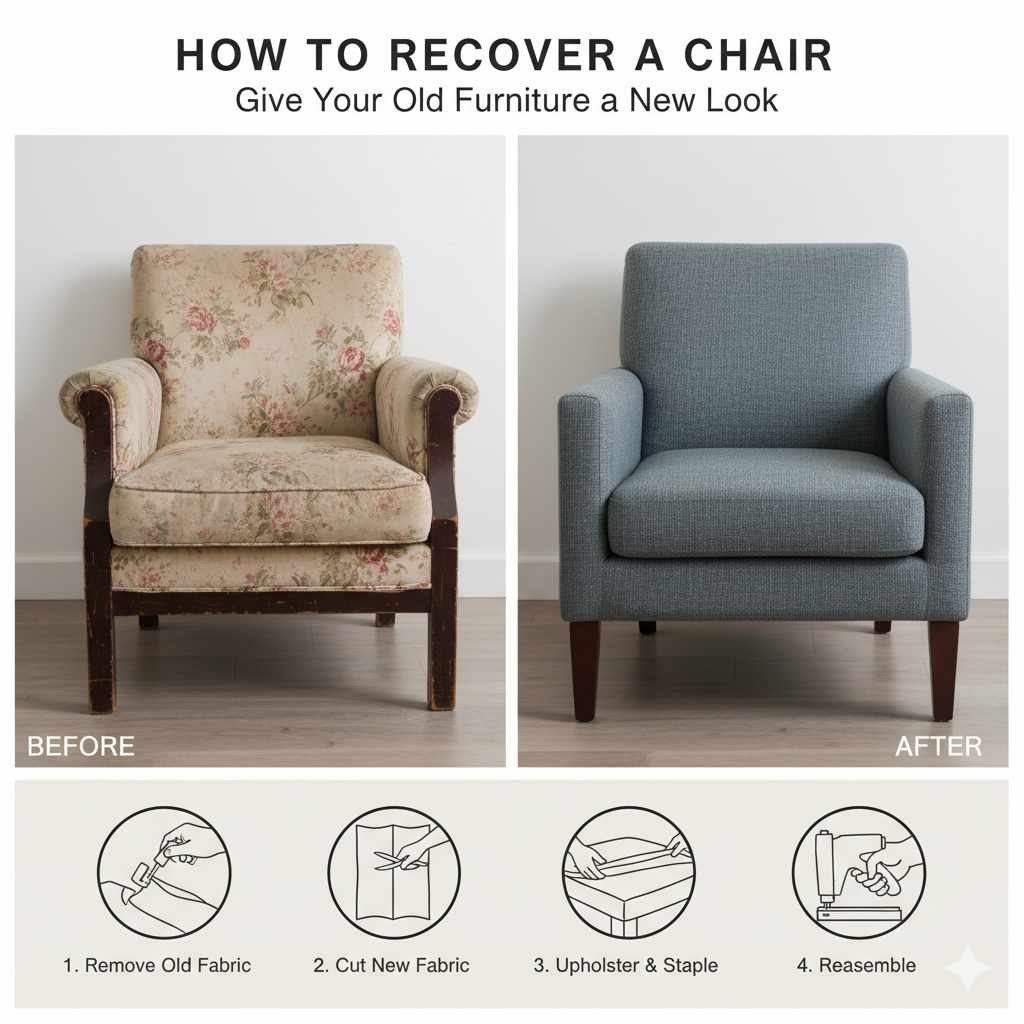
Recovering a chair involves removing old fabric, padding, and staples. Then, you cut new fabric to fit, attach it smoothly, and secure it with staples. This process updates the chair’s look and feel, making it functional and stylish again.
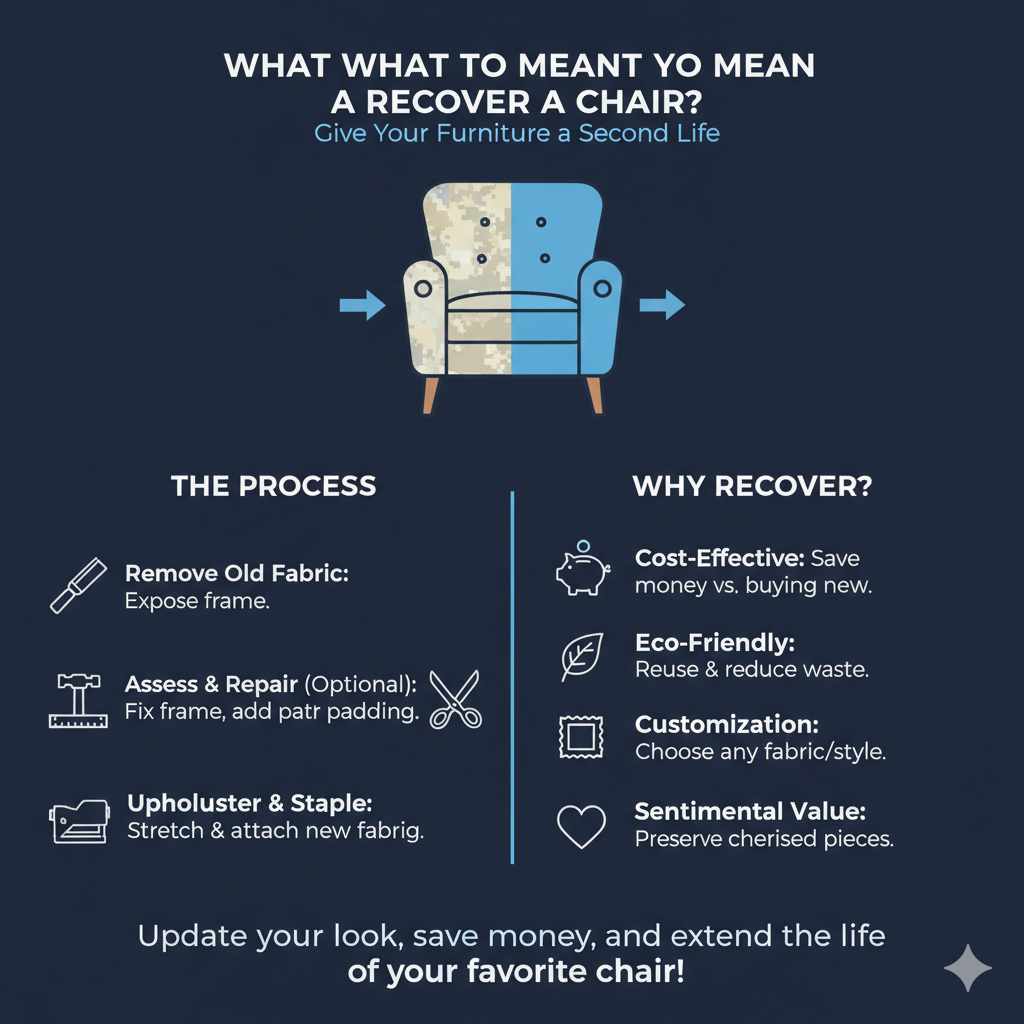
What Does It Mean to Recover a Chair?
Recovering a chair means changing its outer fabric. It’s like giving the chair a fresh new outfit. The old, worn-out material comes off.
New material goes on. This can cover rips, stains, or just an outdated look. It’s a way to update your furniture without buying something new.
Many chairs have a solid frame and good structure. Only the fabric part wears out over time. Replacing this fabric is what we call recovering.
This process usually involves removing the old upholstery. You then add new padding if needed. Finally, you stretch and attach new fabric.
This makes the chair look and feel much better. It’s a project many people can do at home. You don’t need to be a master craftsman.
Just a little patience and the right tools will do.
Why do people recover chairs? Often, it’s because the chair is still sturdy. The frame might be solid wood.
The shape might be perfect for a spot in the room. But the fabric has seen better days. It might be ripped from pets.
It could be faded from the sun. Or maybe you just bought a house with existing furniture. The color doesn’t match your new decor.
Recovering is a smart solution for these issues.
It’s also very satisfying. You take something old and make it beautiful again. You learn a new skill.
You can choose any fabric you like. This means you can match your room’s style exactly. Think about the money you save too.
New upholstered chairs can be very expensive. Recovering your own chair costs much less. It’s a win-win situation for your wallet and your home.
My Own Chair Recovery Story
I remember looking at my old armchair. It was a gift, and I loved its shape. But the floral pattern was very 1990s.
The arms were worn thin. One day, I saw a gorgeous velvet fabric at the store. It was a deep emerald green.
I thought, “What if I tried to change my chair?” I was a little nervous. I had never done anything like this before. I pictured myself ruining the chair forever.
I started by looking up guides online, much like you are now. I gathered my tools: a staple gun, pliers, and a screwdriver. Taking off the old fabric felt like unwrapping a present.
It was dusty and came off in pieces. Underneath, the foam was a bit flattened. I decided to add a thin layer of new batting.
Then came the moment of truth: cutting and placing the new velvet. It felt so soft and luxurious.
Stretching the fabric was the hardest part. I pulled it tight. I used the staple gun to secure it.
It took me a whole weekend. My fingers were a little sore from the staples. But when I finished, I gasped.
The chair looked brand new. It was a completely different piece of furniture. It fit my living room perfectly.
That feeling of accomplishment was amazing. It made me realize I could tackle other projects too.
The biggest challenge was getting the fabric smooth. Especially around the curves and corners. I had to redo a few spots.
I learned to pull the fabric really tight. I also learned to make neat pleats. This makes a big difference in the final look.
The old chair was transformed. It was no longer an eyesore. It was a statement piece.
And it cost me a fraction of what a new velvet chair would have cost. That experience sparked a love for DIY upholstery in me.
It taught me a lot about patience. It also showed me that sometimes, the things we think are too hard are actually quite doable. With the right approach, anyone can learn to recover a chair.
You just need to take it step by step. Don’t be afraid to make mistakes. They are part of the learning process.
And the final result is so worth it. You get a custom piece of furniture you made yourself.
Chair Recovery: Quick Snapshot
What you need: New fabric, staple gun, staples, pliers, screwdriver, scissors, measuring tape, small foam roller or putty knife.
Key steps: Remove old fabric, check padding, cut new fabric, attach new fabric, trim excess.
Why do it: Save money, update style, repair damage, personalize furniture.
Difficulty: Beginner to Intermediate, depending on chair complexity.
Getting Ready to Recover Your Chair
Before you start, gathering your supplies is important. This makes the whole process go smoother. You don’t want to stop midway to find a tool.
Think of it like preparing for a big baking project. You measure everything out first.
First, you need fabric. The amount depends on your chair’s size. It’s best to buy a little extra.
You can always trim it. For most dining chairs or small accent chairs, two yards should be enough. For larger armchairs, you might need three or four yards.
Next, you’ll need a good staple gun. Electric or pneumatic ones are easier. But a manual one works too.
Make sure you have plenty of staples. You will use a lot! Pliers are essential.
They help you pull out old staples. They also help you stretch the new fabric taut.
A screwdriver is needed if your chair has screws holding the seat on. You’ll also need sharp scissors for cutting fabric. A measuring tape helps you figure out how much fabric to buy.
And how to cut your new pieces. A seam ripper can be handy for carefully removing old staples.
Don’t forget a thin layer of batting. This is fluffy material. It goes between the foam and the fabric.
It makes the seat feel softer and fuller. It also helps the fabric drape nicely. You can buy it at fabric stores.
A small foam roller or a putty knife is also helpful. It helps smooth out the fabric as you go.
Consider the type of fabric. For high-traffic areas, choose durable materials. Think of cotton blends, microfibers, or outdoor fabrics.
For a luxurious feel, velvet or faux leather work well. If you have pets, look for scratch-resistant fabrics. Always check the fabric’s cleaning instructions.
Think about the chair itself. Is the seat removable? This is the easiest type of chair to recover.
Are there curves or intricate details? These can be trickier. Knowing your chair helps you plan.
It also helps you choose the best method for attaching the fabric.
Essential Tools Checklist
- New Upholstery Fabric (enough for your chair + extra)
- Heavy-Duty Staple Gun (manual, electric, or pneumatic)
- Box of Staples (appropriate size for your gun)
- Pliers (for removing old staples)
- Screwdriver Set (if needed for disassembly)
- Sharp Fabric Scissors
- Measuring Tape
- Seam Ripper (optional, but helpful)
- Upholstery Batting (optional, for extra softness)
- Foam Roller or Putty Knife (for smoothing fabric)
- Safety Glasses (highly recommended for stapling)
Step-by-Step: Recovering Your Chair Seat
Let’s dive into the actual process. We’ll focus on a chair with a removable seat first. This is the most common and beginner-friendly type.
Take your time with each step. Accuracy now saves you trouble later.
1. Remove the Seat Cushion
Most chair seats are attached with screws. Look underneath the chair frame. You’ll usually find them.
Use your screwdriver to carefully remove these screws. Keep them in a safe place. A small bag works well.
Once the screws are out, the seat cushion should lift away from the chair frame.
Sometimes, the seat might just be held on by the fabric itself. If you don’t see screws, don’t force it. Just proceed to the next step of removing the fabric.
It will detach from the frame as you work.
2. Remove Old Fabric and Staples
This is where your pliers and seam ripper come in handy. Start peeling back the old fabric. Look for where it’s stapled to the underside of the seat.
Use your pliers to grip each staple. Pull them straight out. If a staple is stubborn, a seam ripper can help lift it first.
Work your way around the entire seat. Remove all the old staples. Also remove any old fabric remnants.
Take your time here. Missing even a few staples can make the new fabric uneven. You want a clean surface to work on.
Sometimes, you’ll find a protective layer of fabric or cardboard underneath. This is called decking. You can leave it on or remove it.
If it’s damaged, replace it.
3. Assess and Add Padding (Optional)
Once the old fabric is off, look at the foam padding. Is it flat, lumpy, or torn? If it’s in good shape, great.
If it’s a bit worn, you can add a thin layer of upholstery batting. This is like a soft blanket. Lay the batting over the old foam.
Trim any excess that hangs over the edges.
You can also replace the foam entirely if it’s beyond repair. Just measure the old foam and buy a new piece of the same thickness and density. You might need to glue the new foam to the seat base.
4. Cut Your New Fabric
Lay your new fabric flat. Place the old seat cushion on top of it. Make sure the fabric is smooth and wrinkle-free.
You need enough fabric to wrap around the edges. Add about 4–6 inches of fabric all around the cushion. This extra is for pulling it taut and stapling.
Use your scissors to cut the fabric. Cut a neat square or rectangle. Make sure the pattern, if any, is straight.
If your fabric has a nap (like velvet), make sure the nap runs in the same direction on all sides. This helps the color look consistent.
Fabric Cutting Tips
- Measure Twice, Cut Once: Always add extra fabric for wrapping.
- Pattern Alignment: If using a patterned fabric, ensure the pattern is centered and straight.
- Nap Direction: For fabrics like velvet, ensure the nap runs the same way on all sides of the chair.
- Smooth Surface: Cut on a large, flat surface to avoid wrinkles in the fabric.
5. Attach the New Fabric
This is the most crucial step. Lay your new fabric wrong-side up on your work surface. Place the seat cushion on top of the fabric.
Center it. Start by stapling the fabric to the center of one side. Pull the fabric taut.
Use your staple gun to make a few staples. Then, go to the opposite side. Pull the fabric tightly across the cushion.
Staple it in the center there too.
Continue this process. Move to the next side, pull fabric taut, and staple. Then do the opposite side.
You are creating a balanced tension. This ensures the fabric is smooth and wrinkle-free on top. Work your way around the edges.
Staple every 1–2 inches. Keep the fabric pulled tight.
Corners can be tricky. Fold the fabric neatly. You can create pleats or a diagonal fold.
Think about how wrapping a gift works. You want smooth, flat corners. Staple these folds securely.
Trim away any bulky excess fabric. This prevents a lumpy underside.
As you staple, use your foam roller or putty knife. Gently smooth the fabric over the cushion. This helps prevent wrinkles from forming underneath.
Don’t be afraid to pull firmly. The fabric needs to be very tight. This will prevent sagging over time.
It also gives a professional finish.
6. Reattach the Seat Cushion
Once all the fabric is stapled securely, flip the seat over. Look at the top. It should be smooth and wrinkle-free.
If there are small wrinkles, you might need to pull and re-staple in that area. Once you’re happy, place the seat cushion back onto the chair frame.
Use your screwdriver to reattach the screws you removed earlier. Make sure they are snug but don’t overtighten. This could strip the wood.
And that’s it! You’ve just recovered your chair seat. Stand back and admire your work.
It’s a big accomplishment.
Upholstery Stapling Technique
Start in the Middle: Always begin stapling at the center of each side. This helps distribute tension evenly.
Pull Taut: Keep the fabric pulled tight as you work your way around. This is key for a smooth finish.
Opposite Sides: Work on opposite sides of the seat to create balanced tension.
Staple Spacing: Aim for staples about 1 to 2 inches apart for a secure hold.
Neat Corners: Fold fabric neatly at corners, creating small pleats or folds. Trim excess fabric.
Recovering Chairs with Attached Upholstery
Some chairs don’t have a removable seat. The fabric is stapled directly to the chair frame itself. This includes dining chairs with padded seats, or chairs where the back and seat are one unit.
Recovering these can be a bit more involved. But the basic principles are the same.
The main difference is that you’ll be working directly on the chair. You won’t be removing a separate seat cushion. You’ll need to be careful not to damage the chair frame itself.
Protect the floor with a drop cloth.
You’ll still start by removing the old fabric and staples. You might need to remove decorative trim or gimp first. This hides the staples.
Use pliers to carefully pull out all the staples. Then, remove the old fabric. Keep the old fabric pieces as a template if possible.
When you cut your new fabric, make sure it’s large enough. You need enough to wrap around the edges and be stapled securely to the underside or back of the frame. Pay close attention to how the original fabric was attached.
This will guide you.
Stretching and stapling will happen directly onto the chair frame. Work in sections. Pull the fabric taut.
Staple at intervals. Take your time with curves and corners. You might need to make small relief cuts in the fabric to help it lay flat around tricky shapes.
Be sure these cuts are hidden when the fabric is secured.
If your chair has a separate padded back, you will repeat the process for the backrest. Sometimes the back is upholstered from the front, with staples hidden on the back. Other times, the fabric wraps around the frame like the seat.
This type of recovery requires patience. It’s about making the fabric look smooth. And ensuring it’s firmly attached.
Don’t rush the stapling. It’s what holds everything together.
Attached Upholstery: Key Differences
- Working Directly on Frame: No removable seat means you staple onto the chair’s structure.
- Tricky Corners: More complex curves and angles require careful folding and stapling.
- Protect the Frame: Use a drop cloth to prevent scratches on the chair legs and frame.
- Hidden Staples: Sometimes, trim or gimp is used to cover staple lines.
Choosing the Right Fabric for Your Chair
Picking the perfect fabric is exciting. It’s where you express your style. But it’s also important to be practical.
The best fabric depends on how you use the chair. And where it will live in your home.
Durability: If the chair is in a high-traffic area, like a family room sofa or a dining chair used daily, you need a durable fabric. Look for materials like microfibers, tightly woven cotton blends, or durable polyesters. These can withstand wear and tear.
Check the Martindale or Wyzenbeek rub counts. Higher numbers mean more durability.
Cleanability: Accidents happen. Especially with kids and pets. Fabrics that are easy to clean are a lifesaver.
Many synthetic fabrics resist stains. Some cottons have stain-resistant treatments. Always check the fabric’s care label.
Some fabrics can only be cleaned with water. Others require dry cleaning.
Pets: If you have cats or dogs, this is a big one. Cats love to scratch. Dogs can snag fabric with their claws.
Look for fabrics that are tightly woven. They are less likely to snag. Microfibers can be good.
Some performance fabrics are specifically designed to resist pet claws and hair.
Style and Feel: This is where you get creative! Velvet offers a luxurious look and feel. Linen gives a natural, casual vibe.
Leather or faux leather adds a classic, rich feel. Bold patterns can make a statement. Solid colors offer versatility.
Sunlight Exposure: If your chair sits near a sunny window, be mindful of fading. Some fabrics fade more than others. Cotton and linen can fade quickly.
Solution-dyed acrylics are very fade-resistant. They are often used for outdoor furniture.
Comfort: How will the chair be used? For lounging, a soft, comfortable fabric is key. For a more formal chair, a firmer fabric might be fine.
Think about how the fabric feels against your skin.
When in doubt, get fabric samples. Bring them home. See how they look in your room’s lighting.
Feel them. Imagine using them every day. This small step can prevent big regrets later.
Fabric Comparison Chart
| Fabric Type | Pros | Cons | Best For |
|---|---|---|---|
| Cotton Blend | Breathable, comfortable, wide variety | Can wrinkle, may fade, moderate durability | Living rooms, accent chairs |
| Microfiber | Soft, durable, stain-resistant, easy to clean | Can attract pet hair (some types), synthetic feel | High-traffic areas, families, pets |
| Velvet | Luxurious, soft, rich look | Can be delicate, shows wear patterns, harder to clean | Accent chairs, formal seating |
| Linen | Natural, breathable, elegant | Wrinkles easily, stains easily, can fade | Formal seating, rooms with less wear |
| Faux Leather | Durable, easy to clean, modern look | Can crack over time, less breathable | Dining chairs, modern accent chairs |
When to Call a Professional
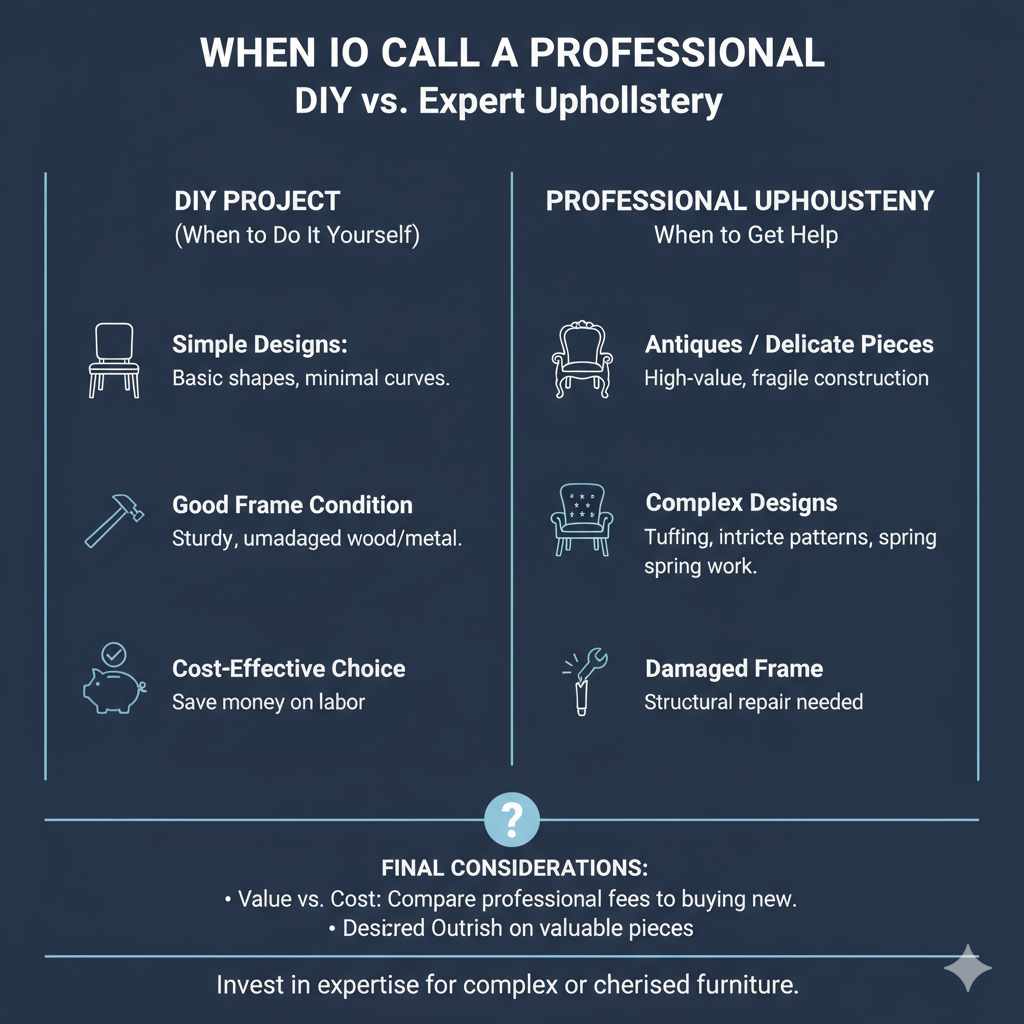
While recovering a chair can be a rewarding DIY project, there are times when professional help is better. If your chair is an antique with delicate construction, you might not want to risk it. High-value vintage pieces often require special techniques.
These preserve their integrity.
Chairs with intricate tufting or complex upholstery work are also challenging for beginners. These often involve sewing specific patterns and working with internal springs. Getting this wrong can affect the chair’s comfort and support.
If the chair frame itself is damaged, a professional upholsterer can repair it. They have the tools and expertise to fix broken wood or reinforce weak spots. This structural repair is often needed before new fabric can be applied.
Also, if you simply don’t have the time or desire to tackle the project, hiring a pro is a good option. They can transform your chair efficiently. You get a professionally finished piece without the effort.
Consider the cost. Professional upholstery can be expensive. Compare the cost of professional recovery versus buying a new chair.
For very simple chairs, DIY is usually far more cost-effective. For complex or valuable pieces, the professional cost might be worth it.
Think about the outcome you want. If you want a perfect, flawless finish on a valuable piece, a professional is likely your best bet. If you are happy with a good, solid result and the satisfaction of doing it yourself, then DIY is great!
DIY vs. Professional: Key Considerations
- Chair Value: Is it an antique or valuable piece?
- Complexity: Does it have intricate details, tufting, or springs?
- Frame Condition: Is the wood frame damaged?
- Your Time & Skill: Do you have the time and patience for the project?
- Budget: How much are you willing to spend?
Frequently Asked Questions About Recovering Chairs
How long does it take to recover a chair?
It really depends on the chair and your experience. A simple dining chair seat might take 1-2 hours. A more complex armchair could take a full weekend.
If it’s your first time, expect it to take longer. Enjoy the process and don’t rush.
Can I use any fabric to recover a chair?
You can use many types of fabric. But some are better than others. For durability, choose upholstery-grade fabrics.
They are made to withstand wear. Consider how the fabric will be used. Avoid very delicate fabrics for high-traffic areas.
How do I make the fabric smooth without wrinkles?
The key is to pull the fabric very taut as you staple. Start stapling in the center of each side. Then work your way around, pulling the fabric tight.
Use a foam roller or putty knife to smooth it as you go. Release staples and re-staple if you see major wrinkles.
What if I don’t have a staple gun?
A staple gun is highly recommended. It’s the easiest and most effective way to attach upholstery fabric. You can rent them if you don’t want to buy one.
Some very simple chairs might be attachable with heavy-duty tacks and a hammer, but this is much harder and less durable.
How much fabric do I need?
For a standard dining chair seat, about half a yard to a full yard is usually enough. For a small accent chair, 1.5 to 2 yards. Larger armchairs might need 3 to 4 yards.
It’s always better to buy a little extra just in case. You can always trim excess.
Do I need to replace the foam?
Not always. If your existing foam is still firm and supportive, you can keep it. You might want to add a thin layer of new batting over it for extra softness and a smooth finish.
If the foam is flat, lumpy, or torn, it’s best to replace it.
Conclusion: Your Renewed Chair Awaits
Recovering a chair is a fantastic way to update your home. It’s a project that offers big rewards. You save money.
You get a custom look. And you gain a new skill. Don’t be afraid to try it.
Start with a simple chair. Take your time. Follow the steps.
You’ll be amazed at what you can do.
Your furniture can have a second life. It’s a journey of creativity and practicality. Enjoy the process.
And most importantly, enjoy your beautifully recovered chair!


