
Taking apart a futon can feel like a puzzle sometimes. You might be moving to a new place. Or maybe you just want to clean it really well.
Whatever the reason, it’s good to know how to do it right. This guide will walk you through each part. We’ll make sure you don’t get stuck.
It’s easier than you think when you know the steps.
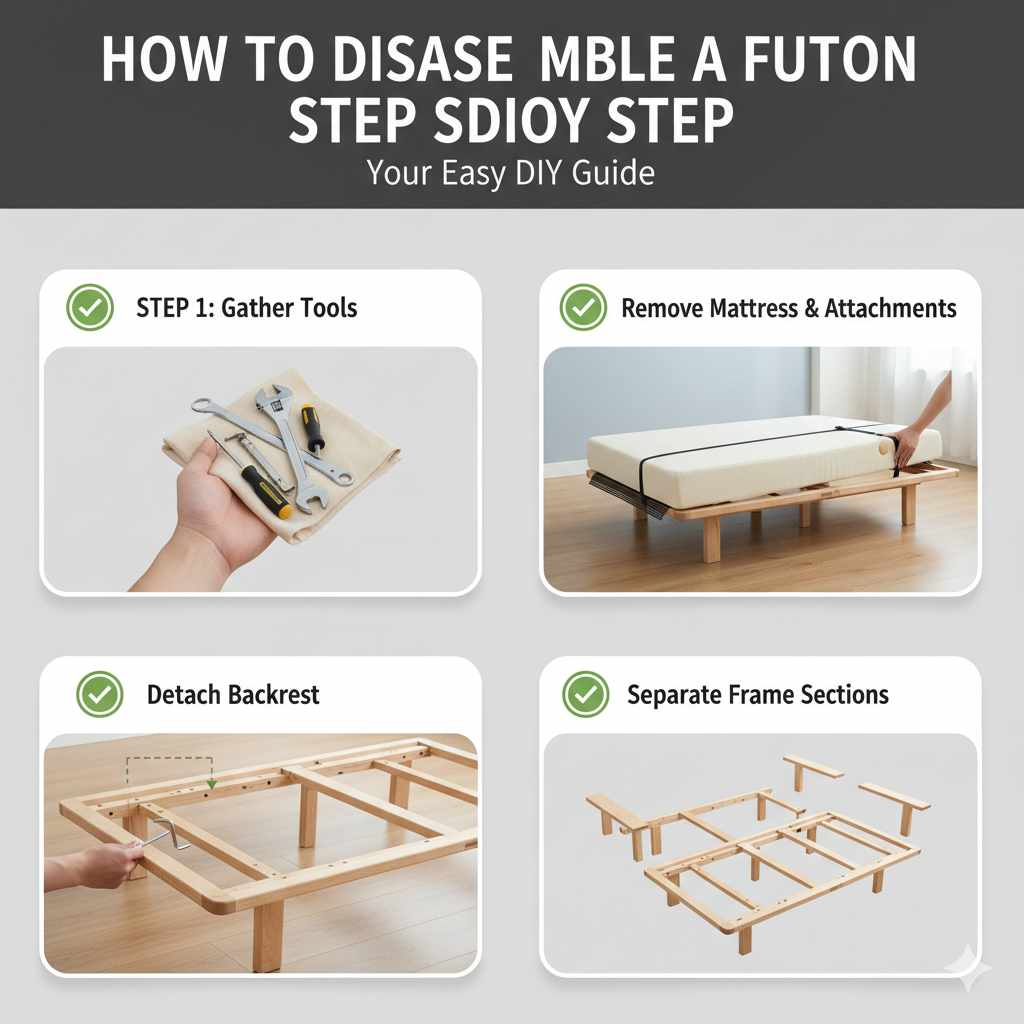
Disassembling a futon involves carefully removing cushions, then the mattress, and then taking apart the frame’s main components like the back, seat, and legs. Understanding the type of futon and its connection points is key. Always have the right tools and work on a clear floor space.
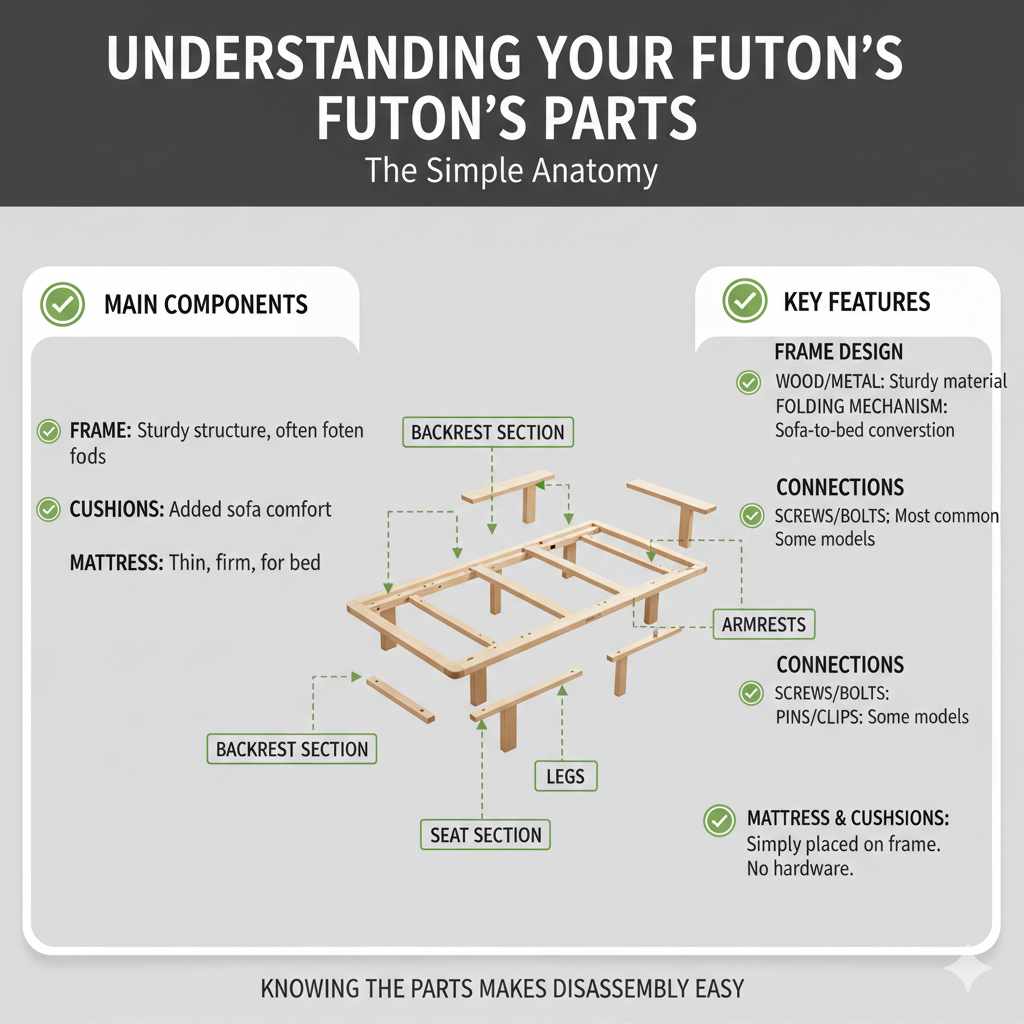
Understanding Your Futon’s Parts
Before you start, let’s get familiar with what makes up a futon. Most futons have a few main pieces. There’s the frame, which is the sturdy structure.
This frame often folds between a sofa and a bed. Then there are the cushions. These make it comfy when it’s a sofa.
And finally, there’s the mattress. This is usually a thin, firm mattress that lies flat for a bed.
The frame itself is usually made of wood or metal. It has different parts that connect. You’ll see legs that hold it up.
There’s a backrest part and a seat part. Sometimes these are one big piece. Other times, they are separate.
Knowing these parts helps you see how they come apart. It’s like looking at a simple machine. Each piece has a job.
The way these pieces connect is important. Most futons use screws or bolts. Some might have pins or clips.
Older futons might have simpler designs. Newer ones could have more hidden parts. The mattress and cushions are usually just placed on the frame.
They don’t connect with hardware. This makes them the easiest parts to deal with first.
Gathering Your Tools
Having the right tools makes the job much smoother. You don’t need a whole workshop. Just a few basic things will do.
First, you’ll likely need a screwdriver. A Phillips head screwdriver is very common. Some futons use flathead screws too.
So, it’s good to have both types.
You might also need a wrench or a socket set. This is for bolts. Many futon frames use bolts to hold them together.
Check the size of the bolts first. Usually, a few common sizes cover most futons. An adjustable wrench is also handy.
It can fit many different bolt sizes.
It’s also wise to have a small pry bar or a flat tool. This can help gently separate parts that are stuck. Sometimes wood or metal pieces get wedged together.
A little gentle persuasion is all they need. Don’t force it, though. You don’t want to damage anything.
A clean, flat surface is also a must. A large open floor space is ideal. You’ll be taking pieces off.
You need room to lay them out. This prevents parts from getting lost. It also stops you from scratching your floor or the futon.
Step 1: Remove Cushions and Mattress
This is the easy part. Start by taking off any loose cushions. These are the ones that just sit on the futon.
Set them aside somewhere clean. They don’t usually have any hardware attached.
Next, you’ll deal with the mattress. Futon mattresses are often held in place by straps or ties. Look for Velcro strips too.
Undo these. Then, carefully lift the mattress off the frame. It can be a bit bulky.
If it is, ask for help. Lay it flat on the floor or on a clean sheet.
This step clears the frame. Now you can see all the connection points clearly. It’s also a good time to give the mattress a good airing out.
If you’re storing it, this is a good practice.
Quick Futon Parts Checklist
Frame: The main structure. Often wood or metal.
Mattress: The part you sleep on. Usually thin and firm.
Cushions: For seating comfort. Sometimes decorative.
Hardware: Screws, bolts, pins that hold it all together.
Step 2: Inspect the Frame
Now, look closely at the futon frame. How is it built? Is it made of wood or metal?
This will guide you. Wooden frames often have screws or dowels. Metal frames usually have bolts and nuts.
You might see hinges or sliding mechanisms.
Most futons fold out using a simple mechanism. The backrest and seat are often connected. They might pivot.
Some have legs that swing out. Identifying these moving parts helps you see where to start taking things apart. You want to start with the parts that seem most independent.
Take note of any labels or markings. Sometimes manufacturers put instructions or part numbers on the frame. This isn’t always the case, but it’s worth a look.
This inspection phase is key. It’s like reading a map before a journey.
Step 3: Detach Removable Legs
Many futons have legs that screw directly into the frame. These are usually the easiest parts to remove. Go to each leg.
Check if it just twists off. Some might have a bolt holding them in place. If it twists off, hold the frame steady and turn the leg counter-clockwise.
If there’s a bolt, use your wrench or socket set. Loosen the bolt. Once it’s loose enough, the leg should slide off.
Keep all the legs and their hardware in a safe place. Small plastic bags work well for this. Label them “Legs.”
This step lightens the frame a bit. It also makes the frame more stable on the floor. You don’t want it rocking around as you take it apart.
Taking off the legs first can prevent accidental tipping.
Legs: Types and Removal
Screw-in Legs: Twist counter-clockwise to remove. Common for lighter frames.
Bolted Legs: Secured with one or more bolts. Use a wrench to loosen.
Retractable Legs: Often found on metal frames. May have pins or levers.
Step 4: Separate the Seat and Back Sections
This is often the most involved step. Futons usually have a frame that is divided into two main sections. These are the seat and the back.
They are joined together so they can pivot. You need to find where they connect and how to disconnect them.
Look for hinges or pivot points. These are usually at the sides of the futon. You might see bolts going through these points.
Carefully loosen and remove these bolts. Sometimes, there are pins that hold these sections together. You might need to pull them out.
A pair of pliers can help grip a stubborn pin.
If the back and seat are separate pieces that slide into slots, find the end of the slot. You might need to lift or angle the pieces to slide them out. Some futon frames have a locking mechanism.
You might need to press a button or lever to release it.
I remember one time I was helping a friend move. We had a futon that seemed impossible to take apart. We spent nearly an hour just staring at it.
Then, my friend noticed a small lever hidden under the armrest. It released a hidden pin. It was such a simple thing, but we totally missed it.
It taught me to look everywhere, even in the hidden spots.
Always work slowly here. If you’re not sure, stop and look again. Forcing parts can break them.
You want to be able to put it back together later. Keep track of all the bolts and nuts you remove from this section. Use a separate bag and label it “Pivot Bolts.”
Step 5: Dismantle the Armrests (If Applicable)
Some futons have armrests that are separate pieces. These are usually attached to the main frame. Look at how they are connected.
They might be screwed in from the inside or underneath.
Find the screws or bolts. Use your screwdriver or wrench to take them out. Be careful as you remove the last screw.
The armrest might be heavier than it looks. It could fall if not supported. Have a hand ready to catch it.
If the armrests are part of the main seat or back structure, you won’t need to remove them separately. They are already connected to the larger pieces you’ll be working with.
Armrest Attachment Methods
Screws: Look for screws on the inside or underside.
Bolts: May be used for sturdier armrests.
Integrated: Armrests that are part of the main frame, no separate removal needed.
Step 6: Take Apart the Base or Support Structure
The base of the futon frame provides support. This might be a solid piece or a slatted structure. Depending on the futon design, this might be attached to the seat and back sections.
Or it might be a separate unit.
If it’s attached, you’ll need to undo those connections. Look for screws, bolts, or pins. If the base is a slatted part, it might slide out or be held by small brackets.
Carefully remove each part.
If your futon has a metal frame, you might find that the parts slide into each other. Look for locking pins or small screws that secure these sliding sections. You’ll need to release these to pull the frame apart.
What really stood out to me with one metal futon was how the main supports were held by these clever little clips. I was about to try and force them apart with a screwdriver. But a closer look showed tiny buttons.
Pushing those released the clips. It was a moment of relief and learning. Always look for those small release mechanisms.
For wooden bases, you might find wooden dowels. These are like small wooden pegs that fit into holes. They help align the pieces.
You might need to gently tap them with a rubber mallet to loosen them. Don’t hit too hard. You don’t want to split the wood.
Step 7: Final Frame Separation
At this point, you should have your futon frame in several large pieces. These are usually the seat section, the back section, and possibly a base or leg assembly. The goal now is to get these main pieces separated if they are still connected.
Review your work. See where these main pieces join. There might be a few remaining bolts or screws.
Remove them carefully. Sometimes, the frame is designed to collapse or fold in a specific way. You might need to gently guide it into that position to help it come apart.
If you have a metal frame, you might find that the main sections slide apart. Look for where one tube fits inside another. There might be screws holding them together.
Loosen these screws. Then, try to pull the sections apart. They might be a tight fit.
Frame Separation Tips
Pivot Points: Check where the seat and back meet.
Sliding Joints: Common in metal frames. Look for screws or pins.
Hinges: May need bolts removed.
Collapsible Design: Guide the frame into its folding position.
Step 8: Organize and Label Parts
This is a crucial step for reassembly. As you take things apart, put hardware into small bags. Label each bag clearly.
For example, “Leg Bolts,” “Pivot Screws,” “Armrest Hardware.” This saves so much time when you want to put it back together.
Lay out the larger frame pieces. If you have room, arrange them in a way that makes sense. Maybe place them in order of how they connect.
This helps you visualize the whole structure. It also makes it easier to pack or move them.
Take pictures as you go. Before you remove a piece, snap a photo of how it’s connected. This is a great visual reference.
You can look back at the pictures if you forget how something went together.
I once moved apartments and had to reassemble a futon. I thought I was super organized. I had bags of screws.
But I’d forgotten to label one crucial bag. It had the bolts for the main pivot. I spent a whole afternoon trying to figure out which bolts went where.
Now, I label everything, even the obvious stuff.
If you are storing the futon, make sure the parts are clean and dry. This prevents rust or mold. Wrapping larger pieces in blankets or plastic wrap can protect them from dust and scratches.
Common Challenges and How to Solve Them
Sometimes, futon disassembly isn’t perfectly smooth. Here are a few common issues and how to tackle them.
Common Futon Disassembly Issues
Stuck Bolts: If a bolt is rusted or stripped, try using a penetrating lubricant like WD-40. Let it sit for a few minutes. If the head is stripped, you might need a screw extractor kit.
Wobbly Frame: If a part feels loose but there are no screws, it might be a press-fit or dowel joint. Gentle wiggling or tapping might help. Avoid excessive force.
Hidden Mechanisms: Some futons have clever ways of hiding screws or latches. Look under flaps, inside fabric covers, or in less obvious spots.
Missing Parts: If you find you’re missing a key bolt or screw during disassembly, check your area thoroughly. If it’s truly missing, you may need to buy a
One of the biggest frustrations for people is when a bolt just won’t budge. It feels like it’s fused to the metal or wood. This is where that penetrating oil I mentioned can be a lifesaver.
You spray it on the threads, let it soak in, and then try again. Sometimes, a bit of patience is all that’s needed.
Another issue is when parts seem stuck together. It might be because of years of pressure or slight warping. A gentle rocking motion can help break the seal.
Or a light tap with a rubber mallet. Never use a regular hammer directly on wood or painted metal. You’ll likely cause damage.
A rubber mallet distributes the force more evenly.
Putting It Back Together (Quick Tips)
Reassembly is usually the reverse of disassembly. Use the pictures you took and the labels you made. Start with the main frame sections.
Connect the seat and back first.
Attach the base and legs. Then add any armrests or decorative pieces. Finally, place the mattress and cushions back on the frame.
Make sure straps are secured.
Don’t tighten all bolts fully until the section is together. This allows for small adjustments. Once everything is aligned, go back and tighten all hardware securely.
But don’t overtighten, especially in wood, as you could strip the holes.
Real-World Context: Moving Day
Imagine moving day. You’re tired, stressed, and have a million things to pack. The futon is one of the last big items.
You need to get it down the stairs and into the truck. Taking it apart makes it much lighter and easier to manage. The mattress might be the heaviest part, but the frame sections are usually bulky.
By breaking it down, you can carry pieces one by one. This prevents strain and damage to the furniture and your back.
In a small apartment, the futon might be the only seating and sleeping option. When you move, you need to do this process efficiently. Knowing how to disassemble and reassemble it quickly is a life skill for apartment dwellers.
It means less time struggling and more time settling into your new space.
Moving Day Futon Prep
Why Disassemble: Easier to carry, fits through doorways better, prevents damage.
Best Time: Do it the day before or morning of the move.
Packing Strategy: Keep hardware in labeled bags attached to the frame pieces with tape.
Protection: Wrap frame pieces in blankets or bubble wrap.
When Is It Okay to Leave It Assembled?
There are times when you don’t need to take your futon apart. If you are moving it to another room in your home, and it fits through all the doors, you can often just slide or carry it as is. This saves time and effort.
If you are transporting it a very short distance, like across a yard or to a garage, and it’s still manageable, you might skip the disassembly. It really depends on the size of the futon and the path it needs to take.
Also, some futons are designed with frames that are welded together. These can’t be taken apart. If you have one of these, you’ll have to move it as one piece.
Always check your specific model.
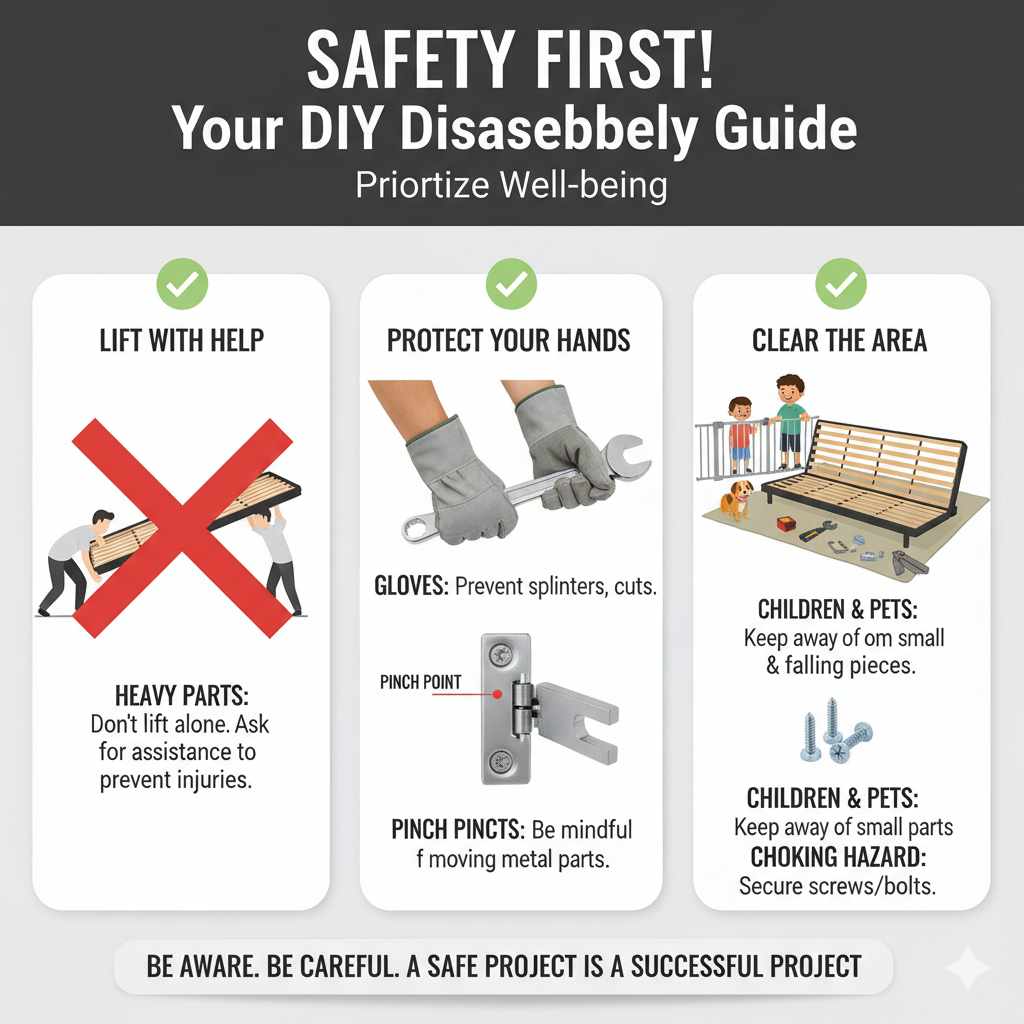
Safety First!
Always prioritize safety. If you are struggling with a heavy part, ask for help. Don’t try to lift something too heavy on your own.
This can lead to injuries.
Wear gloves if you have them. This protects your hands from splinters or sharp edges. If you are working with metal, be mindful of pinch points.
They can catch your fingers.
Keep children and pets away from the area. There will be small parts like screws and bolts. You don’t want anyone to swallow them.
Also, the frame parts can be heavy and might fall.
Frequently Asked Questions about Futon Disassembly
Do all futons come apart?
Not all futons are designed to be disassembled. Some have frames that are welded together. Most futons sold for home use, especially those designed to fold, can be taken apart into several large sections.
How long does it take to disassemble a futon?
For most standard futons, it takes about 30 to 60 minutes. This can vary depending on the complexity of the frame and your experience. If it’s your first time, give yourself a bit more time.
Can I disassemble a futon by myself?
Yes, you can often disassemble a futon by yourself. However, some pieces can be large or heavy. It’s always best to have a second person help, especially when moving larger frame sections or the mattress.
What if I lose the screws or bolts?
It’s a common issue! Keep all hardware in labeled bags. If you do lose some, take a piece of the frame to a hardware store.
They can help you find replacement screws or bolts of the correct size and thread. You can also often find replacement hardware kits online.
Is it safe to store a disassembled futon?
Yes, it is safe. Just make sure the parts are clean and dry before storing them. Protect them from dust and moisture.
Wrapping larger pieces in plastic or blankets can help.
Do I need a manual to take apart my futon?
Many futons do not come with detailed disassembly manuals. The best approach is to inspect the frame carefully for how parts are connected. Taking photos as you work is a great substitute for a manual.
Final Thoughts on Futon Disassembly
Taking apart a futon doesn’t have to be a daunting task. With a little preparation and the right approach, you can do it efficiently. Remember to gather your tools, work methodically, and keep your parts organized.
It’s a process that’s very doable for anyone. You’ll have your futon ready for its next move or use in no time.


