To clean the inside of your tea kettle easily, boil a simple mixture of white vinegar and water inside it. Let it sit for a bit, then rinse thoroughly. This natural method safely removes white, chalky mineral deposits (limescale) without harsh chemicals, making your kettle spotless and ready for great-tasting tea.
You love your morning tea. But lately, that hot water tastes just a little… off. Look closely inside your kettle—do you see white, chalky buildup coating the bottom? That’s limescale. It happens because tap water contains minerals, especially in hard water areas. This buildup looks unsightly and can make heating water slower. Don’t worry! Cleaning the inside of a tea kettle is one of the easiest DIY tasks you can do. You don’t need expensive cleaners or complicated tools. We’re going to walk through simple, safe methods that restore your kettle to its shiny, clean best, ensuring every cup of tea tastes perfect. Let’s get those minerals gone!
Why Cleaning Your Tea Kettle Matters More Than You Think
As a car guy, I always tell people that maintenance keeps things running right. The same goes for your kitchen tools! Your tea kettle is a workhorse, boiling water hundreds of times a year. Ignoring that white buildup isn’t just about looks.
The Nuisance of Limescale
Limescale is just calcium and magnesium—minerals left behind when water evaporates. It clings to the heating element or the bottom surface. Here’s why it’s a problem:
- Worse Tasting Water: These minerals can affect the flavor of your tea or coffee.
- Slower Heating: A layer of scale acts like insulation, forcing your kettle to use more energy and take longer to boil water. Think of it like crud building up on a car battery terminal—it blocks the flow!
- Potential Damage: Over time, heavy scaling can cause internal components to overheat or fail, especially in electric kettles.
Safety First: Choosing the Right Cleaner
When we clean things around the house, we often reach for the strongest chemical. For a kettle, that’s a big mistake. Since you boil water in it daily and consume that water, using harsh chemicals like bleach or strong commercial descalers is risky. We want safe, food-grade solutions. Think about it like using the right oil for your engine—wrong type causes trouble! We will focus on two kitchen staples that work like magic: white vinegar and lemon juice.

Gathering Your Cleaning Crew (Tools You Need)
Before we start the easy process for how to clean the inside of a tea kettle, let’s make sure you have the right gear. The good news is you probably already own everything you need. Keeping things simple is key to DIY success.
Essential Supplies List
| Item | Why You Need It |
|---|---|
| White Distilled Vinegar | The powerhouse acid that dissolves mineral deposits (limescale). |
| Fresh Lemon or Lemon Juice | A gentler alternative/addition that smells great. |
| Water | For mixing the solution and final rinsing. |
| Soft Sponge or Cloth | For light scrubbing after soaking (optional). Never use steel wool! |
Method 1: The Vinegar Power Soak (Best for Heavy Buildup)
White vinegar is slightly acidic (usually around 5% acetic acid), which is perfect for attacking the basic mineral deposits in your kettle. This is the most recommended and effective way to clean the inside of a tea kettle.
Step-by-Step Vinegar Cleaning Guide
Follow these simple steps. Remember, safety means working with the kettle unplugged if it’s electric!
- Unplug and Empty: If you have an electric kettle, make sure it’s unplugged from the wall. Dump out any old water left inside.
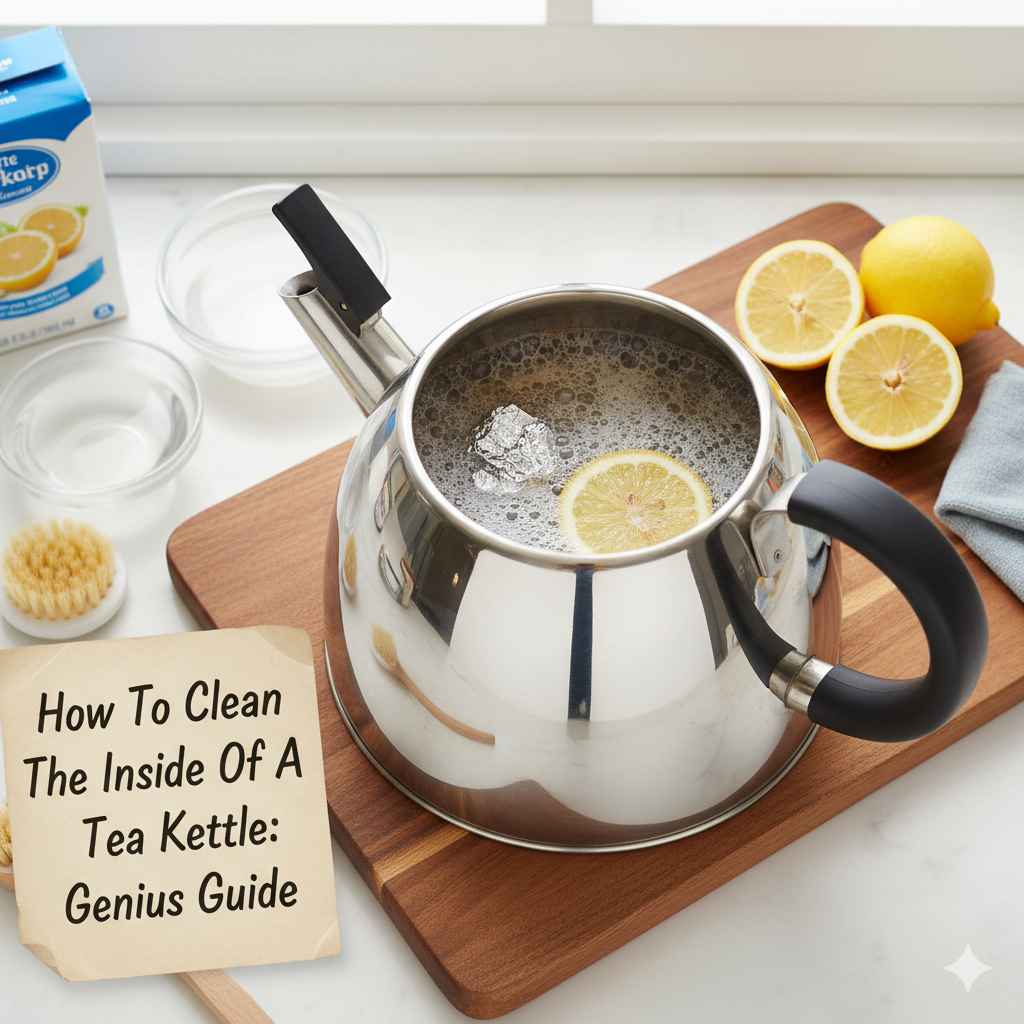
- Mix the Solution: You need a mixture strong enough to work but weak enough to rinse out easily. A 1:2 ratio is a great starting point. Fill your kettle about one-third full with white distilled vinegar. Top up the rest with water until the kettle is about three-quarters full.
Dustin’s Tip: If the scale looks really thick, use a 1:1 ratio (half vinegar, half water).
- Boil the Mixture: Place the kettle on the stove or plug in your electric model. Bring the vinegar-water solution to a full, rolling boil. Turn off the heat immediately once it boils.
- Let It Sit (The Magic Happens Here): This is crucial! Let the hot solution sit inside the kettle for at least 30 minutes. For very heavy scale, letting it sit for a few hours, or even overnight, works wonders. The acid needs time to break down the hardened minerals.
- Inspect and Drain: Pour the cloudy vinegar mixture down the sink. Take a look inside. Many deposits should have flaked off. If you see any stubborn spots, proceed to the light scrub below.
- Rinse, Rinse, Rinse: This is vital for removing the vinegar smell and taste. Fill the kettle completely with clean tap water. Bring it to a boil. Dump it out. Repeat this clean-water boiling process two more times (for a total of three rinses).
- Final Wipe (Optional): If you want extra shine, use a soft cloth or non-scratch sponge dipped in clean water to wipe the interior surfaces gently. Dry the outside.
Handling Tough Spots with Vinegar
Sometimes, even after boiling, a few hard patches remain. Don’t panic! We don’t need to scrub hard enough to scratch the metal.
- Refill the kettle with just a small amount of straight, full-strength vinegar (no water needed).
- Use a soft bottle brush or a non-abrasive sponge to gently agitate the remaining scale deposits. The acid should have softened them significantly, making light scrubbing very effective.
- Rinse thoroughly three times with fresh water, as described above, to eliminate all traces of vinegar.
Method 2: Lemon Juice Solution (For Mild Buildup and Odor Removal)
If your kettle only has a light film of scale, or if you really dislike the strong smell of vinegar, lemon juice is a fantastic, food-safe alternative. Lemons contain citric acid, which is also great at dissolving minerals. Plus, you get a fresh, clean citrus scent!
Using Citric Acid Power
This method works best for routine cleaning rather than major restorations. Remember, we are aiming for great engine performance!
- Preparation: Empty your kettle.
- Add Lemon: Squeeze the juice of one full lemon into the bottom of the kettle. If you don’t have fresh lemons, use about 2-3 tablespoons of concentrated lemon juice.
- Fill with Water: Fill the kettle about halfway or two-thirds full with clean water. You don’t need a full tank of water for this cleaning cycle.
- Boil and Soak: Bring the mixture to a boil. Turn it off and let the hot lemon water sit for about 15 to 20 minutes. Give the minerals time to react with the citric acid.
- Inspection and Rinse: Pour out the water. If the scale is gone, great! Proceed immediately to rinse cycles.
- Rinse Thoroughly: Boil and dump two full kettles of plain water through the system to wash away any residual lemon oils or acid.
Cleaning Different Kettle Materials
While the vinegar and lemon solutions work universally, the material of your kettle might affect how aggressively you clean the exterior or how quickly you should rinse.
Stainless Steel Kettles
Stainless steel is tough. It handles the heat and the acid well. The main concern is water spots on the outside. After you finish the interior cleaning, wipe down the exterior with a clean cloth dampened with a 50/50 water and vinegar solution. This helps bring back the shine and prevents water marks. Always dry immediately!
Glass Kettles
Glass shows buildup easily, but it also scratches easily. Never use abrasive scouring pads or steel wool inside a glass kettle. Stick strictly to the boiling/soaking methods described above. If scrubbing is necessary, use only a soft microfiber cloth or a designated bottle brush. We want clarity, not scratches.
Plastic Kettles
Plastic handles heat slightly differently, but the cleaning process is the same. The key here is the rinsing stage. Plastic can sometimes hold onto smells longer than metal or glass. Ensure you complete at least three full boil-and-dump cycles with plain water after using vinegar to guarantee no lingering scent remains.
Kettles with Concealed Heating Elements
Many modern electric kettles have the heating element hidden beneath a metal plate at the bottom. This is the most common place for scale to collect because the element gets very hot, speeding up mineral deposit formation. The boiling method is perfect for these models because the heat transfers directly through the base plate to the scale, making the vinegar or lemon solution highly effective without you having to touch the element directly. For these, letting the solution soak for the full hour might be necessary to reach all the scale attached underneath that plate.
What About Commercial Descalers?
For the everyday driver checking in on maintenance, commercial descalers often feel like overkill—like using an engine degreaser when a simple wash will do. However, they have their place. If your kettle has extreme, years-old buildup that the vinegar didn’t touch, a specialized descaling agent might be the ticket. Always check the manufacturer’s instructions. Often, these products use food-safe acids, but they work much faster. If you use one, follow the dilution instructions precisely, and rinse at least five times afterward. For reference, organizations like the FDA provide general guidance on substances used in food preparation, emphasizing that rinsing is paramount.
Preventative Maintenance: Keeping Scale Away Long Term
The best way to handle cleaning is to prevent the mess in the first place! Think of this as your tune-up schedule. If you keep the water quality consistent, you won’t need deep cleans often.
Simple Habits for a Scaleless Kettle
- Don’t Store Water: Never leave water sitting in your kettle between uses, especially if you own the kettle for only part of the week. When water sits, minerals precipitate out. Empty it after every use.
- Use Filtered Water: If you live in an area with very hard water, consider using a simple pitcher water filter (like a Brita) to remove some of the calcium and magnesium before it even enters your kettle. This is the gold standard for great-tasting water and easier kettle maintenance.
- Wipe Down After Use: After emptying the kettle, quickly wipe the inside with a soft, dry cloth. This removes surface moisture where scale begins to form.
- Quick Acid Dip Monthly: Even if you don’t see buildup, run a quick, diluted vinegar cycle (half the time soak) once a month. This proactive maintenance prevents deposits from hardening into immovable rock.
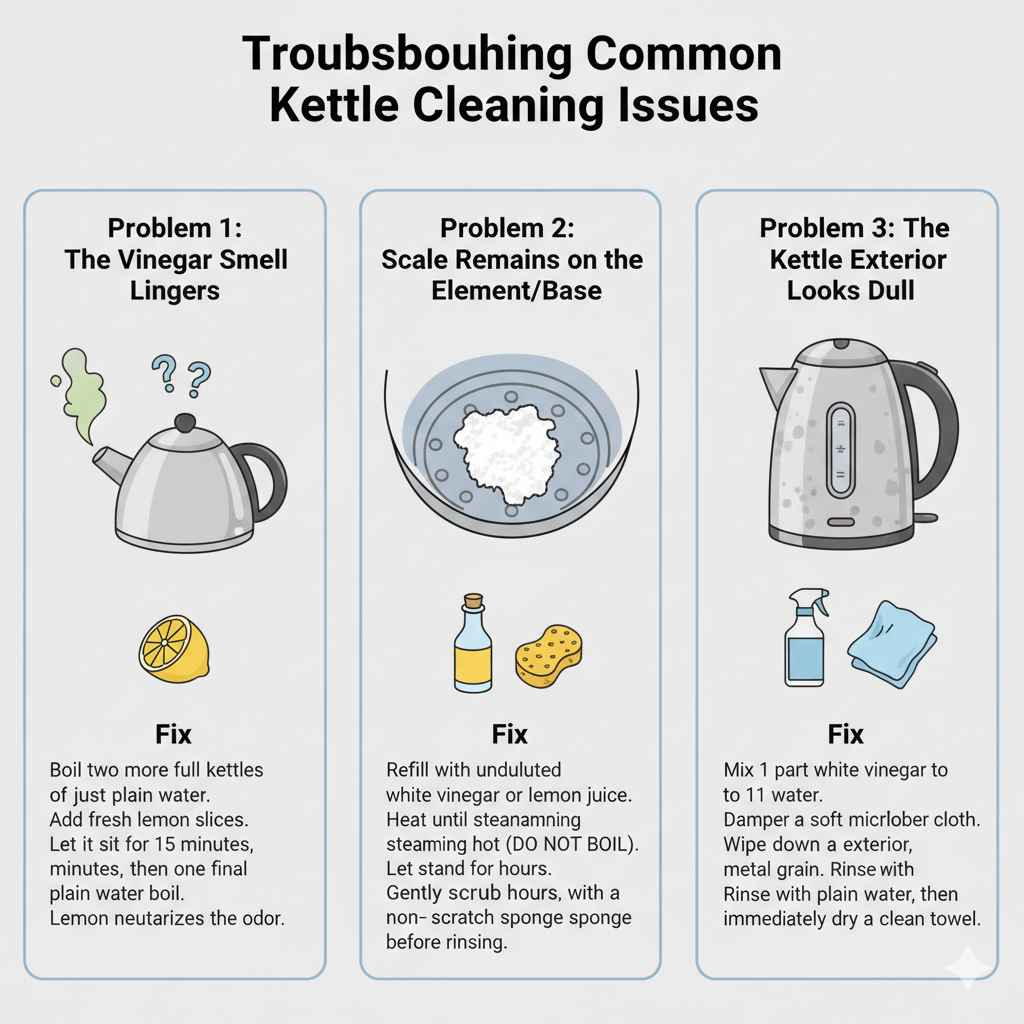
Troubleshooting Common Kettle Cleaning Issues
Sometimes things don’t go perfectly. Here are a few common hiccups and how to fix them, much like diagnosing a strange rattle in your ride.
Problem 1: The Vinegar Smell Lingers
This is the most common complaint. Even after boiling three times, you smell vinegar. This usually means the rinse water didn’t get hot enough or you didn’t fill the kettle high enough during the rinse cycle.
The Fix: Boil two more full kettles of just plain water. While they are still hot, add a couple of fresh lemon slices and let the water sit for 15 minutes. Dump, then finish with one final plain water boil. The lemon neutralizes the odor effectively.
Problem 2: Scale Remains on the Element/Base
If the majority of the scale is gone but a small patch remains clinging fiercely to the heating surface.
The Fix: Refill the kettle with only undiluted white vinegar (or straight lemon juice if you prefer). Gently heat this on the stove until it is steaming hot but DO NOT BOIL. Turn it off, let it stand for several hours, then manually scrub the area gently with a non-scratch sponge before rinsing multiple times.
Problem 3: The Kettle Exterior Looks Dull
If your stainless steel kettle looks hazy or spotted on the outside.
The Fix: Mix one part white vinegar to one part water. Dampen a soft cloth (microfiber works best) with this solution. Wipe down the exterior surface, following the grain of the metal if visible. Rinse the cloth clean, wipe the kettle again with plain water, and immediately dry with a clean towel to prevent new water spots.
Quick Comparison: Vinegar vs. Lemon Juice
Which one should you use? It depends on the job at hand. Here is a quick summary to help you choose your cleaning agent.
| Factor | White Vinegar | Lemon Juice (Citric Acid) |
|---|---|---|
| Cleaning Power | High (Excellent for heavy scale) | Medium (Best for light films) |
| Smell Residue | Strong, temporary vinegar smell | Pleasant citrus smell |
| Cost-Effectiveness | Very inexpensive | More expensive per acidic unit |
| Best Use Case | Restoring neglected kettles | Routine maintenance and freshening |
Frequently Asked Questions (FAQ) About Kettle Cleaning
Q1: Can I use baking soda to clean my tea kettle?
A: Baking soda is a mild abrasive, not an acid. It works well for scrubbing light residue if you have a soft sponge, but it will not dissolve hard limescale like vinegar or lemon juice will. It’s better used for an exterior polish.
Q2: How often should I clean the inside of my electric kettle?
A: If you use hard water daily, aim to run the vinegar solution through once a month. If your water is very soft, cleaning every two to three months might be enough to keep performance high.
Q3: Is it safe if a little bit of vinegar gets into my tea later?
A: Yes, a tiny trace amount won’t hurt you! However, if you can still taste it strongly, you haven’t rinsed enough. Always prioritize thorough rinsing after any cleaning cycle to ensure pure flavor.
Q4: What if my kettle has a stainless steel exterior that’s stained brown?
A: Brown stains are likely not mineral scale but surface rust or staining from hard water contact. Use a paste of baking soda and water, scrub very gently with a soft cloth, and rinse well. For tough spots, a specialized stainless steel cleaner meant for kitchen use can help bring back the luster.
Q5: Should I ever boil just water and salt to clean it?
A: Salt (sodium chloride) is not acidic and will not dissolve limescale safely or effectively. Stick to vinegar (acetic acid) or lemon juice (citric acid) for guaranteed descaling results.
Q6: My kettle whistles, should I clean the spout? How?
A: If your stovetop kettle’s whistle is weak, the spout might be clogged with mineral deposits. After cleaning the interior, fill the kettle almost to the top, insert a small pipe cleaner or thin wire brush (carefully) into the spout from the inside, and scrub gently. Follow immediately with a full boil cycle.
Conclusion: Keep Your Kettle Ready for Action
You handled that maintenance task like a pro! Cleaning the inside of a tea kettle is far less intimidating than changing your own oil, but both follow the same simple logic: use the right, safe substance, allow time for it to work, and rinse thoroughly afterward. Whether you chose the heavy-duty power of white vinegar or the fresh scent of lemon juice, your kettle’s heating element is now free of insulating scale, ready to boil water faster and yield better-tasting tea.
By integrating these simple, preventative cleaning habits—like emptying the kettle daily—you save energy, extend the life of your appliance, and guarantee that your next cup of tea is exactly how it should be: perfect. Go ahead, put the kettle on. You now have the confidence and the know-how to keep all your essential kitchen gear running reliably for years to come.