How To Adjust Cabinet Door Hinges
Cabinet doors that won’t close properly, sag, or rub against each other can quickly turn your kitchen or bathroom from functional to frustrating. Whether you’re a homeowner looking to boost your space’s appeal or a DIY enthusiast keen on perfecting every detail, adjusting cabinet door hinges is a crucial yet often overlooked skill. The good news? You don’t need to be a professional carpenter to achieve smooth, perfectly aligned cabinet doors, just a bit of know-how, some simple tools, and a careful approach.
In my experience, taking the time to precisely adjust cabinet hinges not only enhances the room’s aesthetics but also extends the life of your cabinetry. Misaligned doors can cause premature wear, lead to chipped finishes, and even damage adjacent cabinets.
This comprehensive guide will walk you through the entire process of adjusting various types of cabinet hinges, troubleshooting common problems, and achieving a flawless finish for both new installations and older cabinets.
Key Takeaways
- Proper hinge adjustment is essential for cabinet longevity, door alignment, and seamless operation.
- Most modern cabinets use European-style concealed hinges, which offer easy three-way adjustment.
- Key adjustments include side-to-side (horizontal), height (vertical), and in-and-out (depth) positioning.
- Understanding your hinge type is crucial, methods differ for concealed, traditional, and specialty hinges.
- Regular maintenance and minor tweaks prevent costly repairs and keep your cabinets looking and functioning at their best.
/how-to-adjust-cabinet-hinges-1822181-01-9518583bf0374f2a8d3b87cadd5fc25f.jpg)
Credit: www.thespruce.com
Understanding Cabinet Door Hinges
Cabinet hinges may seem like minor hardware, but their function and design dramatically impact usability. To adjust cabinet doors effectively, it’s important to recognize the hinge type, understand its mechanism, and identify any alignment issues.
Common Types Of Cabinet Hinges
There are several hinge styles found in residential cabinetry. The most common include:
- European (concealed) hinges: Hidden from view when the door is closed, these offer easy three-way adjustment.
- Face frame (butt) hinges: Visible on the outside of the cabinet, often used in traditional cabinetry.
- Surface-mount hinges: Mounted entirely on the surface of the door and frame, visible when closed.
- Inset and overlay hinges: Dictate how the door sits relative to the cabinet frame, either flush (inset) or overlapping (overlay).
Each hinge type offers different adjustment mechanisms, so identifying yours is the first step. For a deeper dive into hinge styles, consult the Wikipedia page on hinges.
Anatomy Of A Cabinet Hinge
Understanding the hinge’s parts helps you locate the correct screws for each adjustment. Most modern concealed hinges have:
- Mounting plate: Attaches to the cabinet body.
- Cup: Fits into a hole drilled in the cabinet door.
- Arm: Connects the cup to the mounting plate.
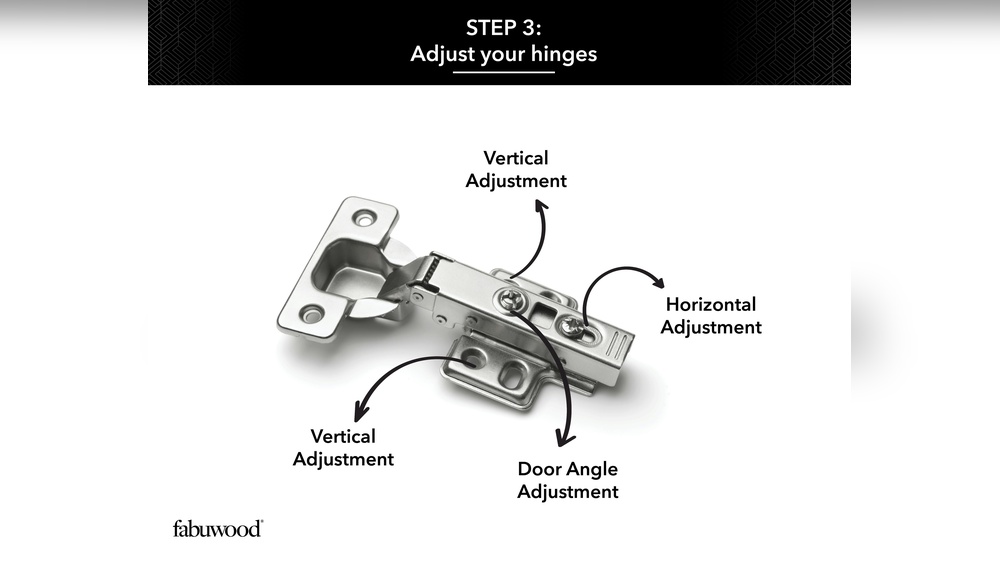
- Adjustment screws: Usually three; for side-to-side, height, and depth adjustments.
Why Proper Adjustment Matters
Misaligned cabinet doors can cause:
- Gaps between doors and frames
- Doors that won’t close or latch
- Uneven spacing, leading to aesthetic and functional issues
Proper alignment also prevents unnecessary stress on hinges and the cabinet structure, reducing long-term maintenance.
Identifying Your Adjustment Needs
Before you pick up a screwdriver, observe your cabinet doors for:
- Horizontal misalignment: Uneven gaps between doors or frames.
- Vertical misalignment: Doors too high or low relative to each other.
- Depth issues: Doors not sitting flush with the cabinet face or rubbing inside.
Pro Tip: Take photos of the current alignment before making adjustments. This provides a reference if you need to revert changes.
Credit: www.youtube.com
Tools And Preparation: What You’ll Need
Having the right tools and workspace can make adjusting cabinet hinges straightforward and efficient. Here’s what you’ll need for most jobs:
Essential Tools
- Phillips screwdriver (or the type matching your hinge screws)
- Flat-head screwdriver (for certain hinge types)
- Measuring tape or ruler
- Level (small torpedo level is ideal)
- Soft pencil or masking tape (for marking)
- Work light (cabinet interiors can be dim)
Optional Tools
- Cordless drill/driver (for quicker screw turning)
- Cabinet jack or wedge (to support heavy or large doors)
- Replacement screws (in case originals are stripped)
- Lubricant (for squeaky or sticky hinges)
Preparation Steps
- Clear the area: Remove items from inside the cabinet and clear the countertop.
- Clean the hinges: Dust and debris can interfere with adjustments.
- Inspect for damage: Check for stripped screws, cracked doors, or bent hinges. Replace damaged parts before adjusting.
Pro Tip: If you’re dealing with painted cabinets, place painter’s tape around hinge areas to prevent scratching the finish during adjustments.

Credit: www.tmhardware.com
Step-by-step Guide: Adjusting Cabinet Door Hinges
The exact process depends on your hinge type, but most modern kitchens use European-style concealed hinges. Here’s a detailed approach for the most common scenarios.
How To Adjust European-style Concealed Hinges
These hinges have three key adjustments:
1. Side-to-side (horizontal) Adjustment
Purpose: Aligns the gap between doors or between the door and cabinet frame.
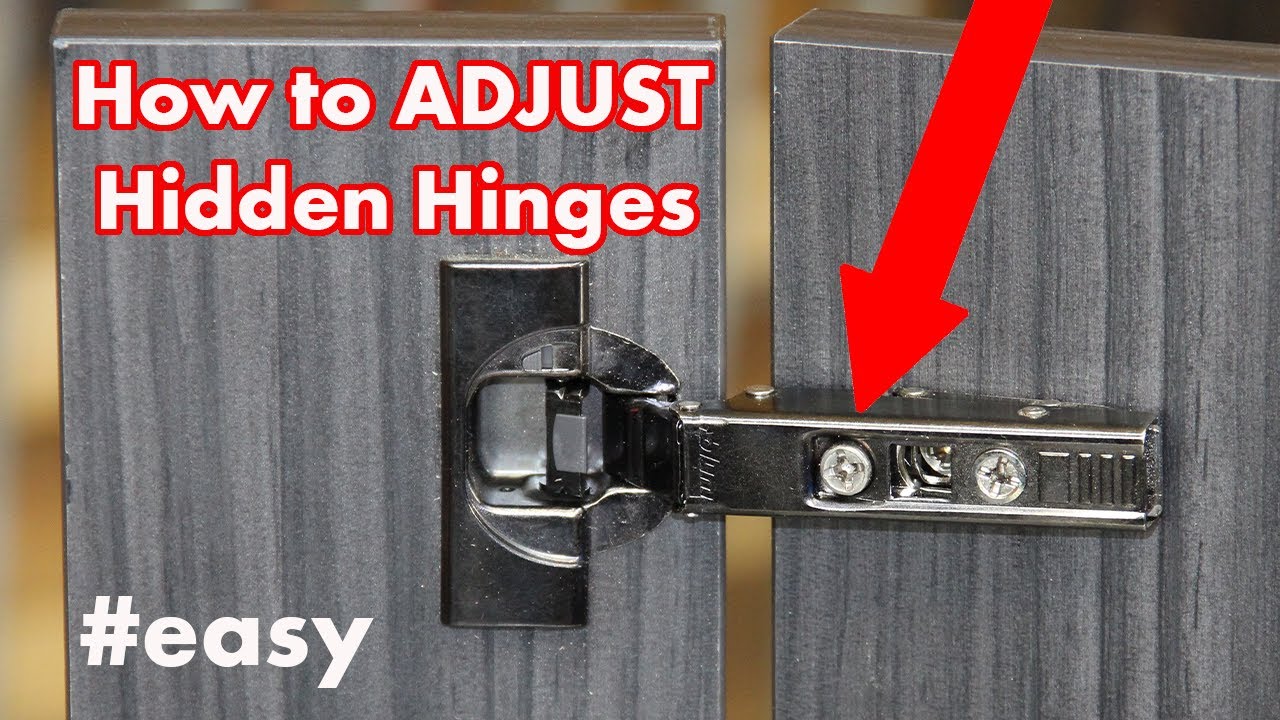
- Locate the side adjustment screw (usually closest to the cabinet face).
- Turn clockwise to move the door closer to the hinge side; counterclockwise to move it away.
- Adjust in small increments, checking the gap visually and with a ruler.
2. Height (vertical) Adjustment
Purpose: Moves the door up or down to align top and bottom edges with adjacent doors.
- Loosen (do not remove) the mounting screws on the hinge plate attached to the cabinet.
- Slide the door up or down as needed.
- Retighten the screws while holding the door in position.
3. Depth (in-and-out) Adjustment
Purpose: Controls how far the door sits from the cabinet frame.
- Locate the depth adjustment screw (often the screw furthest from the cabinet face).
- Turn clockwise to move the door inward (closer to the cabinet); counterclockwise to move it outward.
- Check that the door sits flush and does not rub on the frame.
Example: When I tested a set of IKEA kitchen cabinets, a minor clockwise twist of the depth screw brought a stubbornly misaligned door perfectly flush with its neighbor.
Adjusting Traditional Face Frame Or Butt Hinges
These hinges are less adjustable but can still be fine-tuned:
- Vertical alignment: Loosen mounting screws and shift the door up or down.
- Side-to-side: Slightly enlarge the screw holes with a drill if extra movement is needed, then reposition the hinge.
- Depth: Add thin cardboard or plastic shims behind the hinge leaf to bring the door out.
Fine-tuning Surface-mount Hinges
- Adjust by loosening mounting screws and repositioning the hinge.
- Use a level to check for plumb and straightness.
Addressing Specialty Hinges (inset, Overlay, Soft-close)
- Inset hinges: Adjust like butt hinges, but precision is critical for flush fit.
- Overlay hinges: Adjust overlay distance with the side screw.
- Soft-close hinges: Use built-in dampening adjustment (if available) to set closing force.
Step-by-step Checklist
- Open the cabinet and inspect all hinges.
- Identify the adjustment screw(s) for each direction.
- Adjust horizontally, then vertically, then depth.
- Test door swing and closing after each adjustment.
- Repeat for all doors, working methodically across the cabinet run.
Pro Tip: Adjust upper and lower hinges equally to avoid twisting the door.
Example: Real-world Alignment Challenge
A homeowner notices their new kitchen doors rub at the top but have a gap at the bottom. By adjusting the side screws on the top hinge only, the problem worsens. Instead, adjusting both top and bottom hinges equally, moving the entire door horizontally, resolves the issue without warping the door.
Troubleshooting Common Cabinet Door Problems
Even after adjustment, some issues may persist. Here’s how to address them:
Doors Won’t Stay Closed
Causes:
- Weak or damaged hinge springs
- Misaligned doors not engaging magnetic catches
Solutions:
- Replace faulty hinges or catches
- Adjust depth so the door sits firmly against the frame
Doors Rub Or Bind
Causes:
- Incorrect side-to-side or vertical adjustment
- Warped doors (common in humid environments)
Solutions:
- Re-adjust hinges as described above
- For warped doors, try gentle pressure over time or consult a professional
Doors Sag Over Time
Causes:
- Heavy doors or overloaded shelves
- Loose mounting screws
Solutions:
- Tighten all screws (replace with longer screws if holes are stripped)
- Use a cabinet jack or wedge to support the door during adjustment
Hinges Squeak Or Feel Stiff
Causes:
- Dirt, debris, or lack of lubrication
Solutions:
- Clean hinges with a soft brush
- Apply a drop of silicone-based lubricant
Gaps Are Uneven
Causes:
- Cabinet frames out of square
- Incorrect hinge installation
Solutions:
- Adjust hinges for best compromise
- In severe cases, re-mount hinges or consult a carpenter
Example: In one kitchen remodel, a client’s 30-year-old cabinets had uneven gaps due to settling of the house. No amount of hinge adjustment provided a perfect result; shimming the cabinet frames and re-mounting the doors provided the only long-term solution.
Comparison Of Hinge Types And Adjustability
Not all hinges offer the same level of adjustability. Here’s a side-by-side comparison.
| Hinge Type | Visibility | Adjustability | Best For |
|---|---|---|---|
| European (Concealed) | Hidden | High (3-way) | Modern kitchens, custom cabinetry |
| Face Frame (Butt) | Visible | Low | Traditional or vintage cabinets |
| Surface-Mount | Visible | Medium | Retrofits, budget options |
| Inset | Depends | Low | High-end, flush cabinet designs |
| Soft-Close (Concealed) | Hidden | High (plus closing force) | Premium kitchens, quiet environments |
Advanced Tips For Perfect Door Alignment
Getting doors perfectly aligned can be an art. Here are some advanced techniques for flawless results.
Use A Cabinet Door Gauge
A cabinet door gauge helps measure and set even gaps (also called reveals) between doors, leading to a professional finish. These are available at hardware stores and are especially useful for large kitchens or when installing multiple doors.
Shimming For Micro-adjustments
If the door still doesn’t sit perfectly after adjustments, try:
- Placing thin shims behind the mounting plate for fractional movement.
- Using adhesive felt pads to quiet minor door-to-frame contact.
Replacing Worn Hinges
Old or cheap hinges can lose their tension and become loose over time. If you notice persistent sagging or play, replacing the hinges may be the best solution. When selecting replacements, match the overlay and cup size for a seamless fit.
Dealing With Out-of-square Cabinets
Older homes often have cabinets that are no longer perfectly square. In these cases:
- Adjust hinges for the best possible visual alignment.
- Consider planing the door edge if it’s binding excessively.
- In severe cases, professional cabinet repair may be needed.
Pro Tip: When installing new cabinets, always check for level and plumb before mounting doors. This minimizes future alignment issues.
Maintenance And Preventative Care
Proper adjustment is only part of the equation. Routine maintenance keeps your cabinet doors operating smoothly for years.
Regular Tightening
Check hinge screws every 6-12 months, especially in high-use areas like kitchens and bathrooms. Wood can expand and contract with humidity, causing screws to loosen over time.
Cleaning And Lubrication
Dust and clean hinges with a soft cloth. For squeaks, a drop of silicone or graphite lubricant is preferred over oil, which can attract dust.
Avoid Overloading Doors
Heavy items on door-mounted racks or organizers add stress to hinges and can lead to sagging. Distribute weight evenly and avoid hanging heavy objects on cabinet doors.
Inspect For Wear
Look for signs of rust, corrosion, or cracks. Replace any compromised hardware promptly to prevent further damage.
Seasonal Checks
Humidity can cause wood to swell or contract. If you notice seasonal misalignment, minor hinge tweaks may be needed.
Pro Tip: If you’re preserving canned goods or other food items in cabinets, ensure doors seal well to keep out pests. For more on safe storage, see choosing the right canning jar.
Case Studies: Real-world Cabinet Hinge Adjustments
Case Study 1: Modern Kitchen Makeover
A homeowner with new frameless cabinets noticed uneven gaps after installation. Using a cabinet door gauge and following the three-way adjustment process, they achieved uniform 1/8-inch reveals across all doors. The result was a sleek, custom look that matched the high-end hardware.
Case Study 2: Vintage Cabinet Restoration
In a 1950s home, original face frame hinges were causing doors to droop. By filling stripped screw holes with wood glue and dowels, then re-drilling and re-mounting the hinges, the homeowner restored function and extended the life of the cabinets by years.
Case Study 3: Soft-close Hinge Upgrade
A DIYer upgraded to soft-close concealed hinges in their bathroom. After installing, they fine-tuned the closing force using the dampener adjustment, eliminating slamming and providing a gentle, controlled close.
Data Table: Common Hinge Problems And Solutions
| Problem | Likely Cause | Solution |
|---|---|---|
| Doors won’t close fully | Depth misalignment, weak spring | Adjust depth screw, replace hinge |
| Doors sag over time | Loose screws, heavy door | Tighten/reinforce screws, add support |
| Uneven gaps between doors | Side-to-side misalignment | Adjust side screws, use gauge |
| Doors rub or bind | Vertical/horizontal misalignment, swelling | Adjust hinges, check humidity |
| Hinges squeak | Dirt, lack of lubricant | Clean and lubricate hinge |
Diy Vs Professional Adjustment: When To Call An Expert
Adjusting cabinet hinges is usually a manageable DIY task, but there are situations where professional help is warranted.
When Diy Is Appropriate
- Minor misalignments on modern cabinets
- Replacing or upgrading hinges with compatible hardware
- Regular maintenance and tightening
When To Hire A Professional
- Cabinets are out of square and require carpentry
- Doors or frames are warped or damaged
- Hinges need to be relocated or new holes drilled
- Large-scale kitchen or bath remodels
Professional cabinet installers have specialized tools and experience, ensuring a flawless result, especially for high-end or custom cabinetry.
Pro Tip: If you’re unsure, many hardware stores offer free clinics or advice, take advantage of local expertise for tricky adjustments.
Comparison Table: Diy Vs Professional Adjustment
| Aspect | DIY | Professional |
|---|---|---|
| Cost | Low (just tools/supplies) | Varies, usually $50, $150 per hour |
| Skill Required | Basic to moderate | Expert |
| Time Investment | 1, 2 hours for full kitchen | Faster for complex jobs |
| Risk of Damage | Possible if inexperienced | Minimal |
| Ideal For | Simple adjustments, maintenance | Major repairs, high-value cabinets |
Frequently Asked Questions
How Often Should I Check And Adjust My Cabinet Door Hinges?
It’s recommended to check cabinet hinges every 6 to 12 months, especially in high-traffic areas like kitchens and bathrooms. Seasonal changes in humidity can cause wood to expand or contract, leading to misalignment. Regular tightening and minor adjustments help prevent major issues down the line.
Can I Adjust Old Or Painted-over Hinges Without Damaging The Finish?
Yes, but proceed carefully. Use a soft cloth or painter’s tape around hinge areas to protect the finish. If hinges are painted over, gently score the paint line with a utility knife before loosening screws. Clean off any paint buildup that may prevent smooth movement. For antique or specialty hardware, consider consulting a restoration specialist.
What Should I Do If My Cabinet Doors Still Don’t Align After Adjusting The Hinges?
If adjustments don’t solve the problem, check for warped doors, out-of-square cabinets, or stripped screw holes. Sometimes, the cabinet box or door may need repair, or shims may be required behind the hinge mounting plate. Persistent misalignment may indicate structural issues, which could require professional attention.
Are There Alternatives To Replacing Hinges If The Doors Keep Sagging?
If hinges are in good condition but doors sag, try reinforcing the screw holes with wood glue and dowels or toothpicks. Tighten screws fully, or use longer screws that reach deeper into the cabinet frame. For heavy doors, installing a third hinge or a magnetic catch can provide extra support.
What Is The Difference Between Overlay And Inset Hinges, And How Does It Affect Adjustment?
Overlay hinges attach so the door overlaps the cabinet frame, while inset hinges allow the door to sit flush inside the frame. Overlay hinges typically offer more adjustability, especially in modern concealed designs. Inset hinges require precise installation and offer less room for adjustment, making initial placement critical for perfect alignment. For more on cabinet hardware, see the guide on Rockler Woodworking.
Taking the time to properly adjust your cabinet door hinges pays off in both function and appearance. With the right tools and know-how, you can achieve smooth, perfectly aligned doors that enhance your home’s value and usability. Whether you’re tackling a single misaligned door or fine-tuning an entire kitchen, these techniques offer a professional finish. For other home improvement projects or to learn more about food storage, check out helpful resources such as Freeze-drying vs canning and Steam Canning vs Pressure Canning. With attention to detail and regular maintenance, your cabinets will remain beautiful and functional for years to come.
Products related to this article
Sponsored / affiliate links. As an Amazon Associate I earn from qualifying purchases. I may earn additional commission from eligible campaigns.