How To Hang Cabinet Doors With Exposed Hinges
Hanging cabinet doors with exposed hinges is a project that blends precise craftsmanship with practical home improvement. Whether you’re restoring vintage cabinetry, updating your kitchen, or building new custom cabinets, knowing how to hang doors with visible hinges is an essential skill for DIYers and professionals alike.
Exposed hinges not only offer functional support but also add a decorative, classic touch that suits various interior styles, especially in traditional, farmhouse, or cottage kitchens.
However, achieving a flawless look and smooth door operation requires attention to detail. Many homeowners encounter problems such as misaligned doors, uneven gaps, or sagging over time. With the right tools, careful measurements, and a systematic approach, you can avoid these pitfalls and ensure long-lasting, attractive results.
This guide provides a step-by-step walkthrough, including planning, installation, troubleshooting, and finishing techniques, so you can confidently tackle your next cabinetry project.
Key Takeaways
- Exposed hinges provide both structural support and decorative appeal, making them ideal for classic cabinetry styles.
- Accurate measuring and marking are critical for proper door alignment and smooth operation.
- Using the right tools and materials, including a drill, level, and hinge-specific screws, ensures a professional finish.
- Preparation steps like checking for level and pre-drilling holes can prevent common installation errors.
- Routine maintenance can maximize the longevity and appearance of your cabinet doors.
- Real-world examples and troubleshooting tips help you handle unique installation challenges.

Credit: www.homedepot.com
Understanding Exposed Hinges And Their Role In Cabinetry
The type of hinge you select has a significant impact on your cabinet’s functionality and appearance. Exposed hinges, also known as surface-mounted or decorative hinges, are visible when the cabinet doors are closed. Their design stands in contrast to concealed hinges, which remain hidden inside the cabinet box.
Types Of Exposed Hinges
Exposed hinges come in several styles, each suited to specific cabinet constructions and aesthetics:
- Butt hinges: Simple and traditional, these are most commonly used for face-frame cabinets.
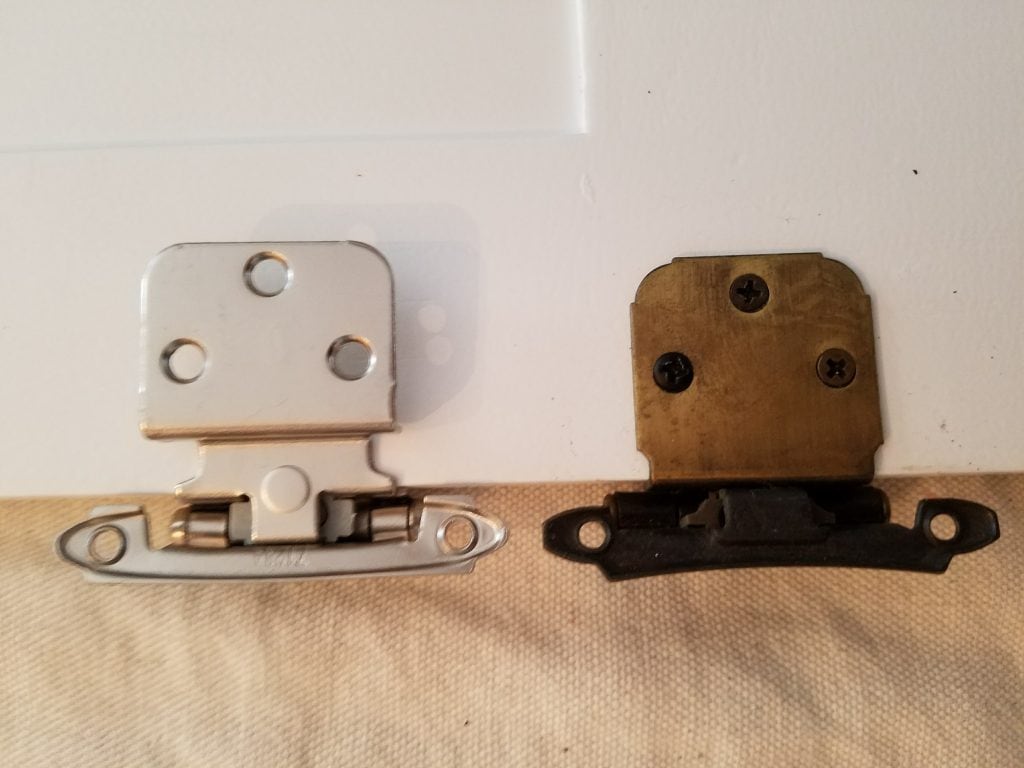
- Surface-mount hinges: The entire hinge is mounted on the cabinet’s surface, making installation straightforward.
- Strap hinges: Feature long decorative “arms” and are often used on rustic or vintage cabinetry.
- Inset hinges: For doors that fit flush within the cabinet frame, providing a refined, classic look.
Exposed Hinges Vs. Concealed Hinges
Choosing between exposed and concealed hinges depends on both function and design preference. The table below summarizes key differences:
| Feature | Exposed Hinges | Concealed Hinges |
|---|---|---|
| Visibility | Visible when door is closed | Hidden from view |
| Installation Difficulty | Generally easier | Requires precise drilling and adjustment |
| Style Suitability | Best for traditional, vintage, or decorative styles | Best for modern, minimalist, or frameless cabinets |
| Adjustment | Limited fine-tuning | Often adjustable in three directions |
| Cost | Usually less expensive | Often more expensive |
When To Choose Exposed Hinges
Opt for exposed hinges if you want your cabinet doors to feature decorative hardware, if your cabinets have face frames, or if you’re restoring period furniture. These hinges are also a practical choice for DIYers seeking a manageable installation process without specialized tools.
Example: Vintage Kitchen Cabinet Restoration
When restoring a 1920s kitchen, a homeowner chose butt hinges with an antique brass finish. The exposed hardware complemented the original cabinetry, and the simple installation process allowed for precise alignment with the existing face frames.
Tools And Materials Needed For Hanging Cabinet Doors
A successful installation starts with gathering the correct tools and materials. Investing in quality supplies not only simplifies the process but also enhances the durability of your finished work.
Essential Tools
- Drill/driver with a selection of bits
- Screwdrivers (flathead and Phillips)
- Tape measure for precise measurements
- Combination square or carpenter’s square
- Level (preferably a small torpedo level)
- Pencil or marking knife for layout lines
- Clamps to hold doors in position
- Awl or center punch for starting screw holes
Materials And Hardware
- Exposed hinges (verify size and style for your project)
- Appropriate screws (usually supplied with hinges; verify length)
- Cabinet doors (pre-finished or unfinished)
- Cabinet frames or boxes
- Wood filler or putty (for adjustments or repair)
- Touch-up paint or finish for final details
Optional But Useful Supplies
- Hinge template or jig for repetitive installations
- Painter’s tape to mark reference points without marring wood
- Shims for leveling and adjusting door position
Example: Diyer’s Shopping List
A DIY renovator working on a set of shaker-style cabinets selected surface-mount hinges, matching screws, and a compact cordless drill. They also used a hinge jig to streamline marking and drilling.
Credit: thepickypainters.com
Planning And Preparation Before Installation
Laying the groundwork is crucial for a seamless installation. Skipping these steps often leads to headaches such as misaligned or binding doors.
Measuring And Marking Hinge Placement
- Determine hinge quantity: Most standard cabinet doors (24-36 inches tall) require two hinges. Use three for taller or heavier doors.
- Locate hinge positions: Measure equal distances from the top and bottom edges (typically 2-3 inches) for even load distribution.
- Mark hinge outlines: Hold the hinge in place and trace around the leaf for accurate screw placement.
- Check for obstructions: Ensure there’s no interference with shelves, hardware, or adjacent doors.
Ensuring Cabinets And Doors Are Level And Square
- Use a level to check the cabinet box and door alignment.
- If installing multiple doors, measure the gap between them to ensure consistency.
- Use shims to adjust doors or cabinet frames that are out of level.
Pre-drilling And Door Preparation
- Pre-drill all screw holes to prevent splitting, especially in hardwoods.
- Lightly sand any rough edges on doors or frames.
- If painting or staining, apply finish before hinge installation for a clean result.
Example: Avoiding Common Mistakes
A homeowner skipping the leveling step found their new cabinet doors wouldn’t close properly. After correcting the cabinet box with shims and re-installing the hinges, the doors operated smoothly and gaps were uniform.

Credit: highlandcabinetry.com
Step-by-step Guide To Hanging Cabinet Doors With Exposed Hinges
This section provides a detailed, actionable process for mounting cabinet doors using visible hinges. These steps ensure professional results and minimize the risk of errors.
Step 1: Attach Hinges To The Door
- Position the hinge on the door edge, aligning it with your layout marks.
- Mark screw holes using a pencil or awl.
- Pre-drill pilot holes for each screw.
- Secure the hinge to the door with screws, ensuring it sits flush with the surface.
Step 2: Align The Door On The Cabinet Frame
- With the hinges attached, hold the door in its intended closed position against the cabinet frame.
- Use a level to verify vertical and horizontal alignment.
- Maintain a consistent reveal (gap) around the door, typically 1/8 inch.
Step 3: Mark And Pre-drill Frame Holes
- With the door held in place (a helper or clamps are invaluable here), mark the hinge screw holes onto the cabinet frame.
- Open the door to access marks, then pre-drill pilot holes in the frame.
Step 4: Attach Hinges To The Frame
- Secure the hinges to the cabinet frame, partially tightening screws at first.
- Close the door and check for smooth operation and even gaps.
- Adjust as needed before fully tightening all screws.
Step 5: Test Operation And Make Adjustments
- Open and close the door several times to ensure there’s no binding or rubbing.
- If necessary, loosen screws slightly and shift the door for fine-tuning.
- Once satisfied, tighten all hardware securely.
Pro Tip:
If installing several doors, use a hinge jig or create a cardboard template to speed up marking and ensure consistent hinge placement.
Example: Face Frame Cabinet Installation
When working with face-frame cabinets, a contractor used surface-mount hinges and a clamp to hold the door in place during installation. This ensured consistent alignment across a long row of upper cabinets.
Troubleshooting Common Problems And How To Fix Them
Even with careful preparation, issues can arise during or after installation. Addressing these promptly prevents further complications.
Door Misalignment
- Symptom: Door appears crooked or uneven.
- Fix: Loosen hinge screws and adjust the door’s position. If the frame is out of square, use shims behind the hinge leaf.
Gaps That Are Too Large Or Too Small
- Symptom: Visible uneven gaps between the door and cabinet frame.
- Fix: Adjust the door up/down or side-to-side by repositioning the hinge. For small gaps, consider minor sanding or filling and re-finishing.
Door Binding Or Not Closing Properly
- Symptom: Door rubs against the frame or won’t close fully.
- Fix: Check for high spots or obstructions. Slightly reposition the hinge or sand the edge of the door.
Screw Holes Stripped Or Loose
- Symptom: Screws won’t hold securely.
- Fix: Fill the hole with a wood dowel and glue, let dry, then re-drill and re-install the screw.
Example: Fixing Sagging Doors
A cabinet door started sagging after months of use. The cause was loose screws in softwood. The homeowner repaired the holes with glued toothpicks, re-attached the hinge, and restored proper alignment.
Finishing Touches: Painting, Staining, And Maintaining Cabinet Doors
A quality finish not only enhances the cabinet’s appearance but also protects the wood and hardware over time.
Painting And Staining Exposed Hinges And Doors
- Remove doors and hardware if painting for the smoothest result.
- Use a high-quality primer and paint or wood stain, applying thin, even coats.
- Allow adequate drying time before re-installing hinges.
Protecting And Cleaning Hinges
- Wipe exposed hinges with a damp cloth to remove dust and fingerprints.
- Use a non-abrasive metal cleaner for brass or chrome finishes.
- Avoid harsh chemicals that can damage finishes.
Regular Maintenance
- Periodically check and tighten hinge screws.
- Lubricate hinges with a drop of light machine oil if they squeak.
- Inspect for signs of wear, rust, or misalignment and address promptly.
Pro Tip:
If matching new hinges to vintage hardware, bring a sample to your hardware store or consult with a specialty supplier. Some styles can be custom-ordered or refinished to match existing cabinetry.
Real-world Examples And Case Studies
Examining real installations highlights practical challenges and solutions you can apply to your own project.
Case Study 1: Farmhouse Kitchen Update
A homeowner updated a 1950s farmhouse kitchen with new strap hinges in matte black. They used a hinge template for consistent placement and replaced mismatched screws with period-appropriate hardware. The result was a cohesive, functional look that matched the kitchen’s rustic charm.
Case Study 2: Modern Cottage Cabinets
In a cottage remodel, DIYers chose surface-mount hinges with decorative finials. They pre-finished cabinet doors, used a level to align multiple doors, and installed soft-close bumpers for added comfort.
Case Study 3: Professional Workshop Installation
A carpenter installing cabinets in a woodworking shop used butt hinges for strength. They relied on a laser level for precision and installed an extra hinge on taller doors to prevent sagging under heavy use.
Table: Hinge Type Selection For Different Cabinet Styles
| Cabinet Style | Recommended Hinge | Finish Options | Notes |
|---|---|---|---|
| Shaker | Butt or Surface-Mount | Brass, Nickel, Black | Simple, clean lines |
| Farmhouse | Strap | Antique Iron, Bronze | Decorative, rustic appearance |
| Inset | Inset Exposed | Brass, Oil-Rubbed Bronze | Flush with frame for a classic look |
| Face Frame | Surface-Mount | Varies | Easy alignment for DIYers |
Comparing Exposed Hinges: Cost, Durability, And Aesthetics
Selecting the right hardware means balancing price, performance, and style. The table below compares popular hinge types for cabinetry projects.
| Hinge Type | Average Cost (per pair) | Durability | Best For |
|---|---|---|---|
| Butt | $3 – $6 | High | Face-frame, traditional cabinets |
| Surface-Mount | $2 – $5 | Moderate | DIY, quick installs |
| Strap | $6 – $15 | High | Farmhouse, rustic projects |
| Inset | $4 – $10 | High | Flush inset doors |
Pro Tip: If you’re on a tight budget, surface-mount hinges offer good value and are widely available at home centers and online. For a high-end look, consider investing in custom-finished or specialty hardware.
Safety Considerations And Best Practices
While hanging cabinet doors is a relatively safe DIY project, following best practices ensures both your safety and a lasting installation.
Safe Tool Usage
- Wear safety glasses when drilling or using power tools.
- Keep hands clear of drill bits and sharp edges.
- Unplug tools when changing bits or making adjustments.
Handling Doors And Hardware
- Cabinet doors can be heavy; use two people for large or solid wood doors.
- Place doors on a soft surface during preparation to avoid scratches.
Protecting Finished Surfaces
- Use painter’s tape to mask areas near hinges, preventing accidental scratches from tools.
- Clean up dust and debris promptly to protect finishes.
Environmental Factors
- Install doors in a climate-controlled environment to prevent wood warping.
- Allow freshly painted or stained doors to cure fully before mounting.
Example: Preventing Damage In A Tight Space
When installing doors in a small kitchen, a DIYer used drop cloths and painter’s tape to protect countertops and flooring from scratches and spills.
Integrating Your Cabinet Project With Other Diy Efforts
Cabinet upgrades often coincide with other home improvement projects. Coordinating these efforts can save time and produce better results.
Upgrading Hardware And Storage
- Consider replacing knobs and pulls at the same time as hinges for a cohesive look.
- Install soft-close bumpers or catches for a quieter kitchen.
Enhancing Functionality
- Add pull-out shelves or organizers before re-hanging doors.
- If refinishing, coordinate paint colors with other kitchen elements like trim or backsplash.
Related Resources
If you’re also interested in kitchen storage or food preservation projects, check these related guides:
- Choosing the right canning jar makes preserving food easier
- Vacuum sealing vs canning: Which is best for food preservation?
- Steam canning vs pressure canning: Key differences
For in-depth technical information on hinge types and woodworking standards, see the Wikipedia: Hinge article.
Frequently Asked Questions
What’s The Difference Between Exposed And Concealed Hinges, And Which Is Stronger?
Exposed hinges are visible on the outside of the cabinet door and frame, contributing to the cabinet’s decorative look. Concealed hinges are hidden inside the cabinet and allow for more precise adjustments in three directions. In terms of strength, both types are robust when properly installed, but exposed hinges tend to be easier to repair or replace if needed.
Can I Install Exposed Hinges On Frameless Cabinets?
Exposed hinges are designed primarily for face-frame cabinets. For frameless cabinets, specialized European-style concealed hinges are recommended for best results and a clean aesthetic. However, some surface-mount hinges can be adapted for frameless construction, but they may not offer the same level of support or appearance.
How Do I Match New Hinges To Old Or Existing Hardware?
Matching new hinges to vintage or existing hardware can be challenging due to differences in size, finish, and screw hole placement. Bring a sample hinge to your hardware supplier, or consult online specialty retailers who offer custom finishes and sizing.
Some companies provide matching screws and mounting templates for seamless integration.
What’s The Best Way To Fix A Stripped Screw Hole In A Cabinet?
To repair a stripped screw hole, fill it with a wooden dowel or toothpicks and wood glue. Allow the glue to dry completely, trim the excess, then re-drill a pilot hole for the screw. This creates a strong anchor point for the hinge and prevents future loosening.
Do Exposed Hinges Require Special Maintenance?
Exposed hinges require minimal maintenance. Periodically clean with a damp cloth, check for loose screws, and apply a drop of light oil if the hinge squeaks. Avoid harsh cleaners that can damage finishes, especially on brass or painted hinges. Routine attention will keep doors operating smoothly for years.
References
- This Old House: How to Hang Cabinet Doors
- Wikipedia: Hinge
Completing a cabinet door project with exposed hinges combines practicality and design. In my experience, taking the time to plan, measure, and execute each step pays off with doors that not only look beautiful but work flawlessly for years. With this comprehensive guide, you’re well-equipped to enhance your cabinetry, whether you’re restoring a vintage kitchen or upgrading to a more functional, stylish space.
Products related to this article
Sponsored / affiliate links. As an Amazon Associate I earn from qualifying purchases. I may earn additional commission from eligible campaigns.