How To Stain Oak Cabinets
Oak cabinets are prized for their natural beauty, durability, and timeless appeal. Yet, even the most well-crafted oak cabinetry can begin to look dated or dull over time. Staining oak cabinets is a powerful way to enhance their grain, update their color, and breathe fresh life into your kitchen or bathroom, all without the expense of a full replacement.
Whether you’re aiming for a modern espresso tone or a classic honey finish, staining oak cabinets is a rewarding project that can dramatically transform your living space.
The process, however, requires careful planning, the right materials, and an understanding of oak’s unique properties. Oak’s prominent grain and open pores set it apart from other woods, affecting how stains penetrate and appear. From selecting the perfect stain to preparing the surface and achieving a flawless finish, this comprehensive guide walks you through every step.
Along the way, you’ll find expert tips, real-world examples, and side-by-side comparisons to ensure your project succeeds, whether you’re a seasoned DIYer or tackling cabinet staining for the first time.
Key Takeaways
- Staining oak cabinets enhances their natural grain and updates your space at a fraction of the cost of replacement.
- Proper preparation, including deep cleaning, sanding, and conditioning, is essential for even stain absorption.
- The choice of stain type and color dramatically impacts the final look, with oil-based and water-based options offering distinct benefits.
- Applying multiple coats and sealing your cabinets ensures long-lasting, professional results.
- Mistakes such as inadequate sanding or skipping the sealer can compromise your finish; learn how to avoid and fix them.
- Real-world examples demonstrate the impact of stain choices, preparation techniques, and finishing details.
Understanding Oak Cabinets: Characteristics And Challenges
Oak is among the most popular cabinet woods in North America, celebrated for its distinctive grain pattern and robustness. But these same qualities create unique challenges when staining.
The Grain Factor
Oak’s prominent, open grain absorbs stain unevenly compared to tighter-grained woods like maple or cherry. This means:
- Deeper contrast: The grain darkens more than the surrounding wood, highlighting patterns.
- Potential blotchiness: Without proper prep, stain can pool in the open pores.
Red Oak Vs. White Oak
Oak comes in two main varieties for cabinetry:
| Characteristic | Red Oak | White Oak |
|---|---|---|
| Grain Appearance | More pronounced, wider | Tighter, straighter |
| Color Tone | Reddish, warm | Neutral to cool, grayish |
| Porosity | Higher | Less porous |
| Stain Absorption | More dramatic contrast | Smoother, even finish |
Challenges With Oak
- Open pores can lead to uneven stain absorption.
- Old finishes (varnish, lacquer) must be fully removed before staining.
- Wood movement: Oak can expand and contract with humidity, affecting long-term finish durability.
Pro Tip: Always test your chosen stain on a hidden cabinet section. Oak’s grain can create surprisingly different effects depending on species and cut.
Preparing Oak Cabinets For Staining
Preparation is the cornerstone of a professional-quality finish. Rushing or skipping steps here can lead to blotchy, uneven, or quickly failing results.
Removing Old Finish
Most oak cabinets are coated with varnish or polyurethane. These must be removed to allow new stain to penetrate.
- Chemical strippers: Effective for thick finishes but require safety precautions (gloves, ventilation).
- Sanding: Use a progression (80, 120, 220 grit) to remove finish and smooth the surface.
- Scraping: For stubborn corners and profiles, use a cabinet scraper or steel wool.
Cleaning And Degreasing
Kitchens introduce grease, oils, and residue that inhibit stain absorption.
- Degrease using a solution of warm water and TSP (trisodium phosphate).
- Rinse thoroughly and let dry.
- Wipe down with a tack cloth to remove dust.
Sanding: Creating An Even Surface
- Start with medium-grit (120) sandpaper to remove remaining finish and roughness.
- Progress to fine-grit (220) for a smooth, ready-to-stain surface.
- Sand with the grain to avoid scratches that show through the stain.
Example: In my experience, sanding oak cabinets thoroughly, especially around handles and corners, makes the difference between a flawless finish and visible streaks.
Repairing Damage
- Fill holes or gouges with a stainable wood filler.
- Sand flush and ensure repairs are invisible to the touch.
Masking And Protecting Surroundings
- Use painter’s tape to mask off walls, countertops, and adjacent surfaces.
- Protect floors with drop cloths.

Credit: www.reddit.com
Choosing The Right Stain For Oak Cabinets
The choice of stain dramatically impacts the final appearance and durability of your cabinets. Oak’s grain and color respond differently to various stain types and colors.
Types Of Stains
| Stain Type | Advantages | Drawbacks |
|---|---|---|
| Oil-Based | Rich color, long open time, easy blending | Longer drying, strong odor, requires mineral spirits for cleanup |
| Water-Based | Quick drying, low odor, easy soap-and-water cleanup | Raises wood grain, less time to blend, can dry unevenly if not careful |
| Gel Stain | Thicker, less drippy, good for vertical surfaces, masks uneven grain | May obscure grain if overapplied, longer drying time |
| Wiping Stain | Easy to control, subtle color enhancement | Requires multiple coats for deep color |
Popular Stain Colors For Oak
- Classic oak/honey: Enhances the natural warmth.
- Espresso/dark walnut: Modern, dramatic look.
- Gray/whitewash: Lightens and modernizes, highlights grain.
- Cherry/mahogany: Adds richness, red undertones.
Stain And Topcoat Compatibility
Not all stains work with every sealer or topcoat. Always check manufacturer recommendations to ensure compatibility.
Environmental Considerations
- Low-VOC stains are healthier for indoor use but may behave differently than traditional formulas.
- Disposal: Oil-based products require special handling. Consult your municipality for disposal regulations.
Example: A recent kitchen remodel used a water-based stain for minimal odor. The quick drying time was ideal for a busy household, though extra attention was required to avoid lap marks.
Testing And Sampling
- Always test stain colors on scrap oak or a hidden cabinet area.
- Evaluate color in different lighting (day and night).
- Consider how surrounding decor and countertops will interact with the new cabinet color.
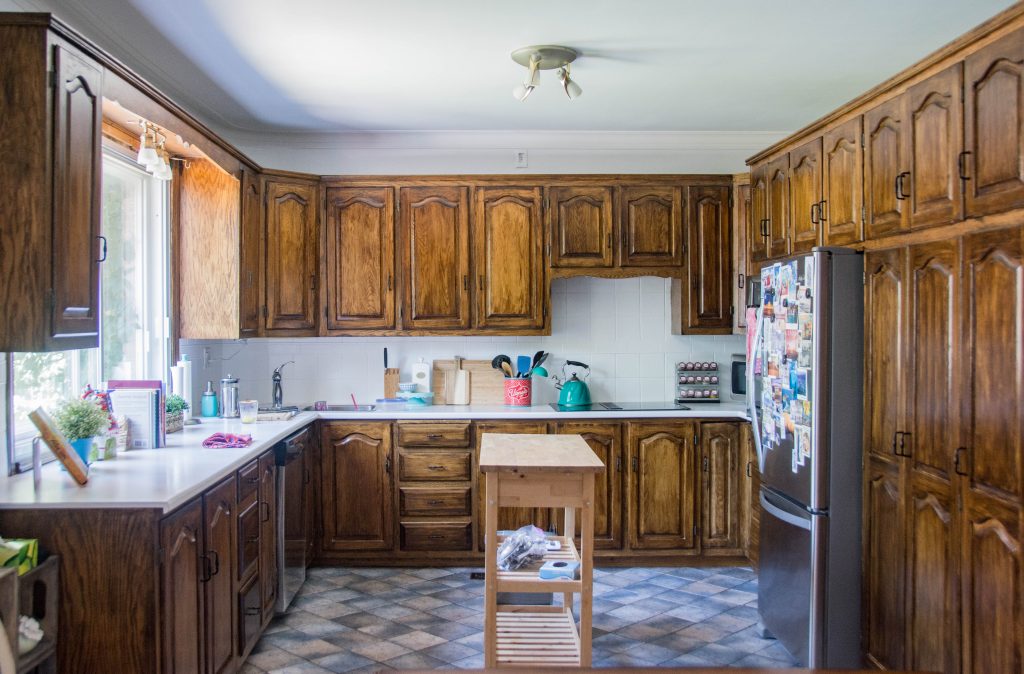
Credit: www.eclectic-spark.com
Step-by-step Process: How To Stain Oak Cabinets
Achieving a professional result requires patience and attention to detail at every stage.
Step 1: Remove Cabinet Doors And Hardware
- Unscrew doors, drawers, and all hardware (handles, hinges).
- Label or map hardware locations for easy reassembly.
Step 2: Final Cleaning And Surface Prep
- Wipe down all surfaces with a tack cloth to remove residual dust.
- Inspect for missed finish or rough patches and sand as needed.
Step 3: Apply Wood Conditioner (pre-stain)
Oak’s open grain can absorb stain unevenly. A wood conditioner helps prevent blotchiness.
- Brush or wipe on a pre-stain conditioner, following the manufacturer’s instructions.
- Allow to penetrate for 5, 15 minutes; wipe off excess.
- Stain within the specified window (usually 2 hours).
Step 4: Stain Application
- Stir (don’t shake) the stain to avoid bubbles.
- Apply with a brush, foam applicator, or clean rag with the grain.
- Work in manageable sections (e.g., one door at a time).
Pro Tip: Wipe off excess stain with a clean, lint-free cloth after 2, 5 minutes. The longer the stain sits, the deeper the color.
- Let dry per product instructions (typically 6, 24 hours).
- Assess color depth; add a second coat if desired.
Step 5: Finishing Touches
- Inspect for uneven spots; touch up as needed.
- Let stain cure fully before applying sealer.
Step 6: Apply Protective Topcoat
- Choose between polyurethane (oil- or water-based), lacquer, or conversion varnish.
- Apply thin, even coats using a brush or sprayer.
- Sand lightly with 320-grit paper between coats.
- Apply at least two coats for durability.
Step 7: Reassemble Cabinets
- Allow all components to cure for the recommended time (72 hours is typical).
- Reinstall doors, drawers, and hardware using your labels or map.
Example: On a recent project, skipping the wood conditioner resulted in visible blotchiness on several panels. After sanding and reapplying conditioner, the second attempt produced a beautifully even finish.
Real-world Examples: Oak Cabinet Staining Transformations
Real-life projects illustrate the impact of careful stain selection and preparation on oak cabinets.
Example 1: Traditional To Modern Makeover
A 1980s kitchen with honey oak cabinets was updated using a dark espresso gel stain. The result was a contemporary look that highlighted the grain without overpowering the space. The homeowners saved thousands compared to replacement and reported increased satisfaction with their kitchen’s ambiance.
Example 2: Whitewashed Oak For A Light, Airy Space
A small bathroom with dated red oak cabinetry was transformed using a water-based whitewash stain. The grain pattern remained visible, but the overall effect was much lighter and more modern. Strategic sanding and two coats of sealer produced a durable, moisture-resistant finish.
Example 3: Restoring Antique Oak Cabinets
A historic home’s original oak cabinets had suffered decades of wear and yellowed varnish. Using a careful stripping, sanding, and a classic golden oak stain, the restoration preserved the period character while revitalizing the wood’s natural beauty.
Mistakes To Avoid When Staining Oak Cabinets
Staining oak cabinets is straightforward, but several common errors can undermine your efforts.
Skipping Proper Surface Prep
- Failing to remove old finishes or residue leads to uneven stain absorption.
- Inadequate sanding leaves scratches that absorb stain differently.
Not Using Wood Conditioner
- Especially with red oak, skipping conditioner almost guarantees blotchy, uneven color.
Overapplying Stain
- Applying too much stain or letting it sit too long can create a sticky, uneven surface that never fully dries.
Rushing The Drying/curing Process
- Not allowing sufficient drying between coats or before sealing can cause peeling and poor adhesion.
Neglecting Topcoat Protection
- Unsealed stained oak is vulnerable to moisture, stains, and wear.
Failing To Test
- Not sampling stain on your actual cabinets (or identical scrap) can result in unexpected color outcomes.
Ignoring Environmental Conditions
- High humidity or low temperatures can interfere with stain and finish drying.
Warning: Always work in a well-ventilated area, and wear appropriate protective equipment when using chemical strippers, stains, or sealers.
Care And Maintenance Of Stained Oak Cabinets
Preserving your newly stained cabinets is as important as the staining process itself.
Routine Cleaning
- Wipe with a soft, damp cloth; avoid harsh abrasives or ammonia-based cleaners.
- Dry immediately to prevent water spots.
Protecting The Finish
- Use coasters or mats under items that could scratch or stain the surface.
- Fix chips or scratches promptly with matching stain and sealer.
Humidity And Sunlight
- Maintain moderate humidity to prevent wood movement.
- Protect from direct sunlight, which can fade stains over time.
Long-term Rejuvenation
- Every few years, clean thoroughly and apply a fresh coat of compatible finish to restore luster and protection.
Example: A homeowner who regularly cleaned and occasionally recoated their stained oak cabinets reported minimal wear and retained color vibrancy after five years.
Comparing Professional Vs. Diy Oak Cabinet Staining
Deciding between hiring a professional or undertaking the project yourself involves balancing cost, time, skill, and results.
| Aspect | Professional | DIY |
|---|---|---|
| Cost | $2,000, $5,000+ (full kitchen) | $150, $500 (materials only) |
| Time Required | 3, 5 days | 1, 2 weeks (part-time) |
| Skill Level | Expert, consistent results | Beginner to advanced (learning curve) |
| Warranty | Often included | None |
| Customization | Limited to available services | Full control over color, finish, timing |
Pro Tip: If your cabinets are heavily damaged, have complex moldings, or you lack the time for meticulous prep, consider consulting a professional refinisher.
Frequently Asked Questions
How Can I Achieve A Smooth, Professional Finish On Oak Cabinets?
To ensure a smooth, professional finish, focus on each preparation stage: remove all old finish, sand thoroughly with progressively finer grits, and use a wood conditioner to minimize blotchiness. Apply thin, even coats of stain, always wiping with the grain, and let each layer dry fully before proceeding. Between topcoat layers, use a 320-grit sandpaper to smooth minor imperfections. Investing time in these steps produces a finish that rivals professional work.
Can I Stain Oak Cabinets Without Sanding?
While some products claim to allow staining without sanding, sanding is essential for the best, most durable results on oak. Sanding not only removes old finishes but also opens up the wood’s pores, allowing the stain to penetrate evenly. If you skip sanding, your stain may not adhere properly and could peel or look uneven. For minor touch-ups or color shifts, you might use a gel stain over existing finish, but this usually yields less dramatic, less lasting results.
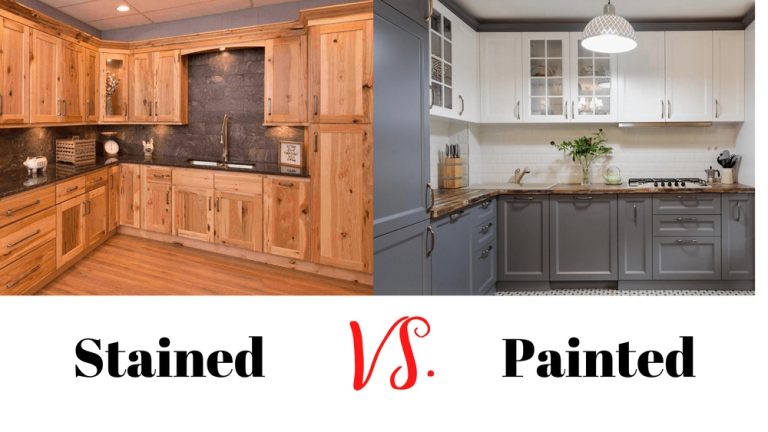
What’s The Difference Between Staining And Painting Oak Cabinets?
Staining penetrates the wood, highlighting its natural grain and character, while painting covers the surface with an opaque layer, hiding the grain. Stained oak cabinets retain their distinctive texture and depth, whereas painted cabinets offer a smooth, uniform color. The choice depends on your desired look and the existing condition of your cabinets. If you want to preserve or accentuate oak’s natural beauty, staining is the preferred method.
How Long Does It Take To Stain Oak Cabinets From Start To Finish?
The timeline for staining oak cabinets depends on the size of your project and the products used. A typical kitchen can take 5, 7 days for DIYers, including time for preparation, staining, drying, and sealing. Water-based stains and finishes dry faster, potentially shortening the process by a day or two. Always factor in extra time for unexpected repairs, touch-ups, or humidity-related delays.
Are There Environmentally Friendly Stain Options For Oak Cabinets?
Yes, there are low-VOC and water-based stains designed to minimize indoor air pollution and reduce environmental impact. These products are widely available and can be used safely indoors with minimal odor. However, they may behave differently than traditional oil-based stains, so test on a small area first. For more information, see the EPA’s guidelines on safer wood finishing products at EPA Safer Choice.
Updating your oak cabinets with stain is a transformative project that can add value, style, and renewed enjoyment to your home. By following careful preparation, making informed product choices, and applying each layer with attention to detail, you can achieve a finish that’s both beautiful and durable. For further reading on related home improvement topics, explore guides like choosing the right canning jar makes preserving food easier or Real Milk Paint’s guide to staining oak cabinets. With patience and the right approach, your oak cabinets can remain a focal point of your space for years to come.
Products related to this article
Sponsored / affiliate links. As an Amazon Associate I earn from qualifying purchases. I may earn additional commission from eligible campaigns.