How to Season a Cast Iron Skillet the Right Way
Learning how to season a cast iron skillet is the secret to creating a naturally non-stick, rust-resistant cooking surface that lasts for generations. This step-by-step guide walks you through every part of the process, from choosing the right oil to baking the perfect patina right in your own kitchen.
Simply put, seasoning a cast iron skillet means baking a thin layer of oil onto the pan to create a hard, non-stick polymer coating. This process protects the iron from rust and provides a smooth cooking surface. It is easy to do at home with just oil, heat, and a little patience.
Key Takeaways
- Seasoning a cast iron skillet creates a natural non-stick coating through a chemical process called polymerization.
- Always use oils with high smoke points like flaxseed, grapeseed, or canola oil for the most durable finish.
- Apply the thinnest layer of oil possible and bake the skillet upside down to prevent sticky spots or pooling.
- Regular cooking with fats like bacon or vegetable oil naturally strengthens the existing seasoning over time.
What Is Seasoning a Cast Iron Skillet?
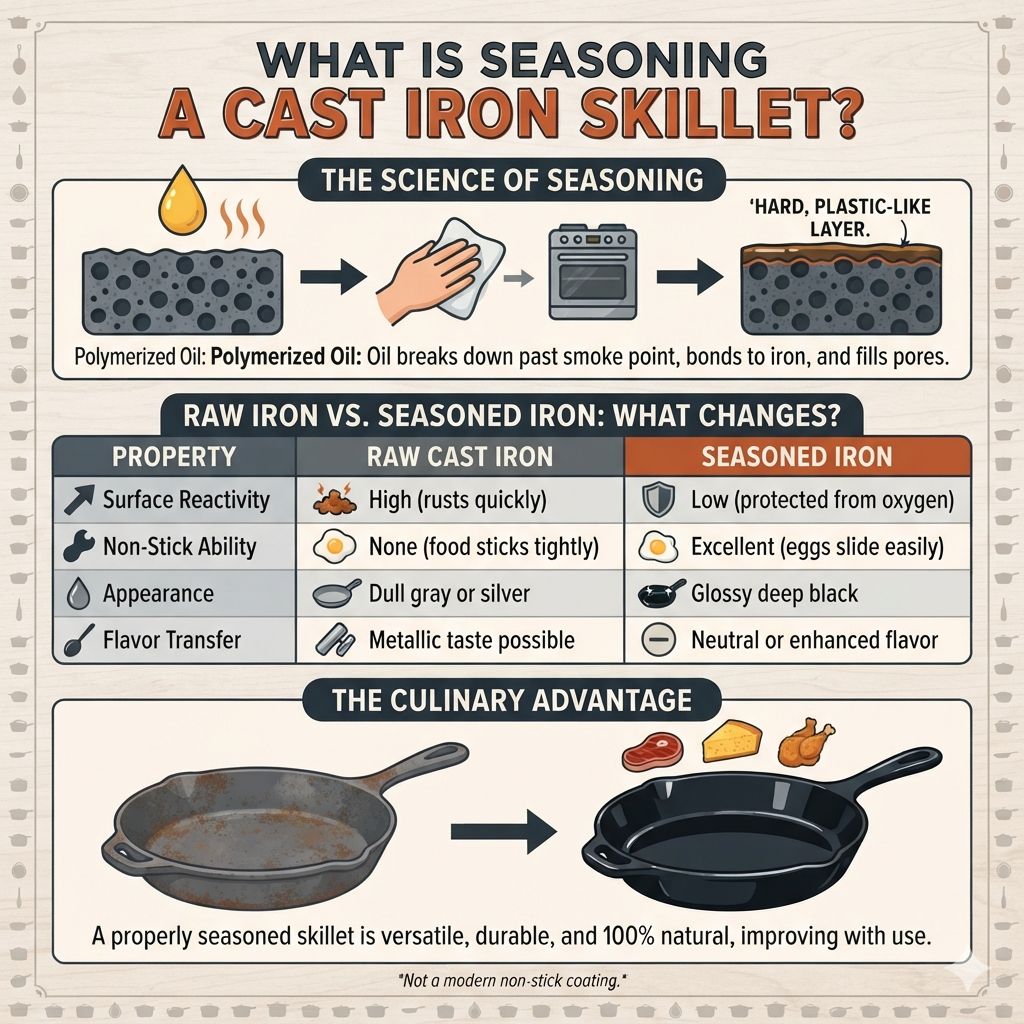
Seasoning is not just a surface coating; it is a chemical transformation. When you heat a thin layer of oil on cast iron past its smoke point, the oil breaks down and bonds to the metal. This creates a hard, plastic-like layer of polymerized oil that fills the pores of the iron.
This polymerized layer is what gives cast iron its characteristic black color and slippery surface. Unlike modern non-stick coatings made of PTFE or ceramic, seasoning is 100% natural and actually improves with regular use.
Think of it as a protective shield. Each time you cook with fat or oil, you add another microscopic layer to this shield. Over months and years, the seasoning builds up into a dense, glassy patina that becomes virtually indestructible.
Raw Iron vs. Seasoned Iron: What Changes?
| Property | Raw Cast Iron | Seasoned Cast Iron |
|---|---|---|
| Surface Reactivity | High (rusts quickly) | Low (protected from oxygen) |
| Non-Stick Ability | None (food sticks tightly) | Excellent (eggs slide easily) |
| Appearance | Dull gray or silver | Glossy deep black |
| Flavor Transfer | Metallic taste possible | Neutral or enhanced flavor |
The transformation from raw gray iron to slick black cookware is dramatic. A properly seasoned skillet becomes one of the most versatile tools in your kitchen, capable of searing steaks, baking cornbread, and frying chicken without sticking.
Why Is Seasoning Important for Cast Iron?
Without seasoning, cast iron is just raw metal. It rusts easily, reacts with acidic foods, and offers zero non-stick performance. Seasoning solves all three of these problems at once.
The primary purpose of seasoning is to create a barrier between the iron and the elements. Oxygen in the air causes iron to rust, but a solid layer of polymerized oil seals the metal completely. This is why antique cast iron pans that are 100 years old are still in perfect working condition today.
According to the American Cast Iron Cookware Association, a properly maintained seasoned skillet can last over 100 years and be passed down through multiple generations. This makes it one of the most sustainable cookware options available.
Benefits of a Well-Seasoned Skillet
- Natural non-stick surface: Seasoning creates a smooth surface that releases food easily without chemical coatings.
- Rust protection: The polymerized oil layer prevents moisture from reaching the raw iron beneath.
- Improved cooking performance: Seasoning holds heat evenly and provides a superior surface for browning and searing.
- Chemical-free cooking: Unlike modern non-stick pans, seasoned cast iron contains no PTFE, PFOA, or synthetic chemicals.
- Cost effectiveness: You can restore a rusty skillet bought at a garage sale for under 10 dollars back to perfect condition.
- Flavor development: Over time, seasoning absorbs flavors from past meals, adding depth to everything you cook.
What You Need to Season a Cast Iron Skillet
Before you start, gather the right materials. The process is simple, but using the wrong tools can ruin your efforts. Here is exactly what you need to get a perfect seasoning every time.
The most critical factor is your choice of oil. You need an oil with a high smoke point so it polymerizes properly before burning. Avoid butter, margarine, or extra virgin olive oil as they burn at low temperatures and leave sticky residue.
Best Oils for Seasoning Cast Iron
| Oil Type | Smoke Point | Durability | Best For |
|---|---|---|---|
| Flaxseed Oil | 225°F (107°C) | Very Hard | Initial seasoning layers |
| Grapeseed Oil | 420°F (216°C) | High | All-purpose seasoning |
| Canola Oil | 400°F (204°C) | Medium | Everyday cooking and maintenance |
| Crisco Shortening | 360°F (182°C) | High | Traditional seasoning method |
| Vegetable Oil | 400°F (204°C) | Medium | Budget-friendly option |
You also need a few basic tools from your kitchen:
- Stiff-bristled brush or chainmail scrubber for cleaning.
- Mild dish soap (for the initial wash only).
- Lint-free cloth or paper towels.
- Aluminum foil or a baking sheet to catch drips.
- An oven that reaches at least 450°F (232°C).
Step-by-Step Guide to Season a Cast Iron Skillet
Follow these steps exactly, and you will have a factory-quality seasoning in just a few hours. The entire process is done in your oven and requires only active attention for about 10 minutes total.
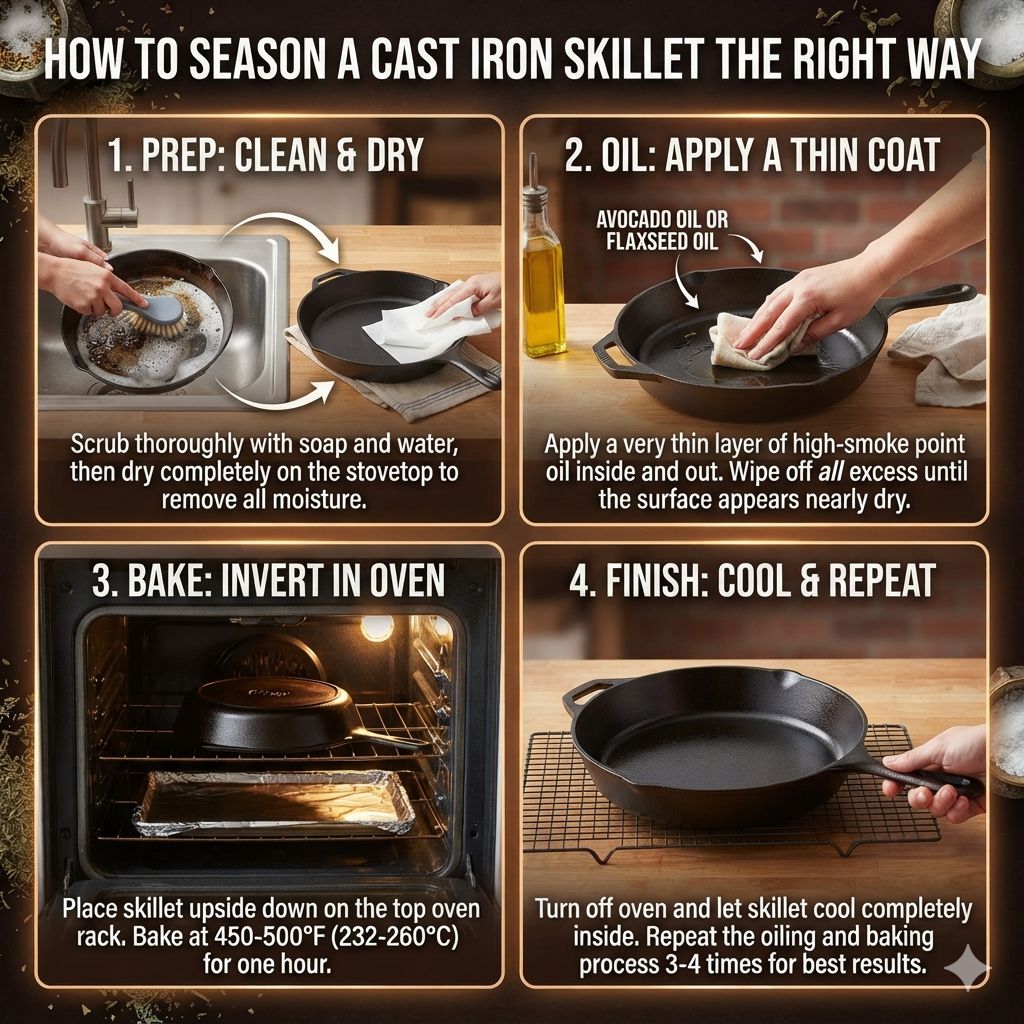
Step 1: Scrub the Skillet Thoroughly
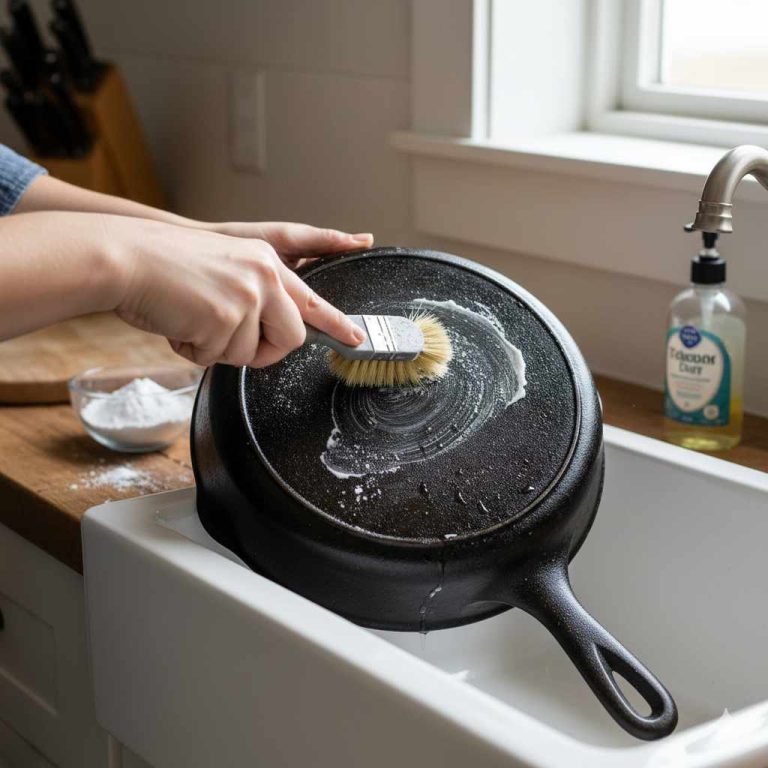
Start by washing the skillet with hot water and a small amount of mild dish soap. Use your stiff brush or chainmail scrubber to remove any existing rust, food residue, or old flaking seasoning. Seasoning a cast iron skillet requires a completely clean base to bond properly.
If the skillet is new, this initial wash removes the protective wax coating applied by manufacturers. Dry the pan immediately with a clean towel to prevent flash rusting.
Warning: Do not soak cast iron in water or put it in the dishwasher. This causes immediate rust and can ruin the pan permanently.
Step 2: Dry Completely
Place the wet skillet over medium heat on your stovetop for 2 to 3 minutes. Watch until every drop of water evaporates. Any moisture left behind will cause rust spots to form under your new seasoning layer.
Let the pan cool for a few minutes until it is warm to the touch but not hot. Warm metal helps the oil spread evenly in the next step, but hot metal can cause the oil to burn before you spread it.
Step 3: Apply a Thin Layer of Oil
Pour a small amount of your chosen oil into the skillet. Use a lint-free cloth or paper towel to rub the oil all over the pan, including the interior cooking surface, the walls, the handle, and the bottom exterior.
Here is the most important rule of seasoning a cast iron skillet: after you apply the oil, take a clean paper towel and try to wipe all of it off. You want the surface to look dry and matte, not glossy. Only the microscopic layer of oil that remains will polymerize correctly.
Tip: If you see visible streaks or puddles of oil, you have used too much. Thick oil layers become sticky and tacky instead of hard and smooth. Less is always more when seasoning cast iron.
Step 4: Bake in the Oven Upside Down
Preheat your oven to 450°F to 500°F (232°C to 260°C), depending on the smoke point of your oil. Place a sheet of aluminum foil on the bottom rack of the oven to catch any drips.
Put the oiled skillet upside down on the top rack. Baking it upside down prevents oil from pooling in the bottom of the pan, which causes uneven seasoning spots. Bake for exactly one hour.
After the hour is up, turn off the oven and let the skillet cool completely inside the oven. Do not open the door during the cooling process. This gradual cooling helps the seasoning bond firmly to the iron surface.
Step 5: Repeat the Process
A single layer of seasoning is good, but multiple layers are great. For a brand new skillet or one that was completely stripped, repeat steps 3 and 4 three to four times. Each additional layer adds hardness and depth to the protective coating.
Between layers, the pan should be cool enough to handle comfortably. You can speed this up by removing the pan from the oven after 30 minutes of cooling, but be careful of residual heat.
- First coat: Bonds directly to the raw iron. Forms the foundation.
- Second coat: Fills in microscopic gaps in the first layer.
- Third coat: Creates a uniform, slick surface.
- Fourth coat: Provides that deep, glassy black appearance.
Common Mistakes to Avoid When Seasoning Cast Iron
Even experienced cooks make mistakes when seasoning their pans. Here are the most common problems and exactly how to avoid them so you get perfect results every time.
The majority of seasoning failures come down to three things: using the wrong oil, applying too much oil, or not getting the oven hot enough. Fixing these issues will immediately improve your results.
Mistake 1: Using Too Much Oil
This is the number one mistake people make. Thick oil does not polymerize properly. Instead, it turns into a sticky, gummy residue that attracts dust and makes food stick.
Always wipe the oil off as if you made a mistake putting it on.
Mistake 2: Using Low Smoke Point Oils
Butter, coconut oil, and extra virgin olive oil burn before they polymerize. This leaves behind a carbonized black crust that flakes off easily. Stick to refined oils like grapeseed, canola, or vegetable oil for the best results.
Mistake 3: Not Heating the Oven High Enough
The polymerization reaction requires temperatures above 400°F (204°C). If your oven runs cool or you set it too low, the oil never crosses its smoke point and remains a liquid. Use an oven thermometer to verify your actual oven temperature.
Mistake 4: Rushing the Cooling Process
Taking the hot pan out of the oven immediately and running it under cold water causes thermal shock. This can warp the pan or crack the seasoning. Always let the pan cool naturally in the oven for at least two hours.
Mistake 5: Skipping the Initial Clean
New pans come coated with a factory wax that protects them during shipping. If you do not scrub this off completely, your seasoning will not bond to the iron and will peel off the first time you cook.
Important: If your seasoning turns out patchy or sticky, do not panic. Simply scrub the pan with hot water and a stiff brush to remove the bad layer, dry it thoroughly, and start the seasoning process again from step 1.
How to Maintain Your Seasoned Cast Iron Skillet
Once you have built a solid seasoning layer, maintaining it is easy. Your daily cooking habits will actually strengthen the seasoning over time. The key is knowing how to clean and store your pan correctly.
Contrary to old myths, you can use a small amount of mild soap on a well-seasoned pan. Modern dish soaps do not contain lye, so they will not damage polymerized oil. However, for most messes, you do not even need soap.
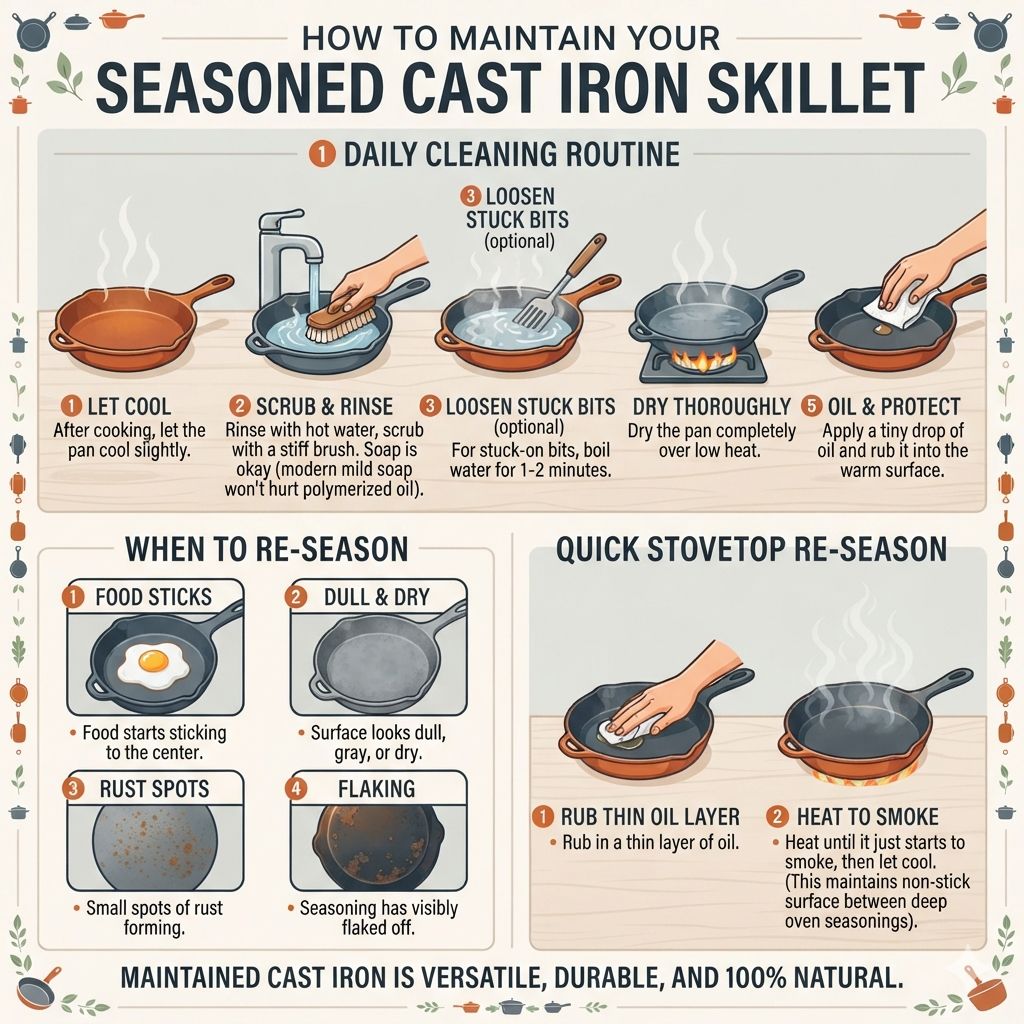
Daily Cleaning Routine
- After cooking, let the pan cool slightly.
- Rinse with hot water and scrub with a stiff brush. Most food residue comes off easily.
- For stuck-on bits, boil a small amount of water in the pan for 1-2 minutes to loosen debris.
- Dry the pan thoroughly over low heat on the stovetop.
- Apply a tiny drop of oil and rub it into the warm surface with a paper towel for protection.
When to Re-Season
You do not need to repeat the full oven seasoning process after every use. In fact, simply cooking with oil or fat adds to the seasoning naturally. Re-season only when you notice the following signs:
- Food starts sticking to the center of the pan.
- The surface looks dull, gray, or dry.
- You see small spots of rust forming.
- The seasoning has visibly flaked off in patches.
When you do re-season, a single stovetop treatment is often enough for minor touch-ups. Rub in a thin layer of oil and heat the pan until it just starts to smoke, then let it cool. This quick method maintains the non-stick surface between deep oven seasonings.
Frequently Asked Questions
Can I use soap on my cast iron skillet?
Yes, you can use a small amount of mild dish soap on a well-seasoned cast iron skillet. Modern detergents do not contain lye or harsh alkali, so they will not damage the polymerized seasoning. Avoid using large amounts of soap or soaking the pan.
What is the best oil for seasoning cast iron?
The best oils for seasoning are those with high smoke points and a tendency to polymerize into a hard film. Flaxseed oil creates the hardest coating, while grapeseed and canola oil offer excellent durability for everyday cooking. Avoid low smoke point oils like butter or unrefined olive oil.
How often should I season my cast iron skillet?
You should perform a full oven seasoning session only when the pan starts to look dry or food begins sticking. For most home cooks, this happens once or twice a year. Regular cooking with oil maintains the seasoning naturally between deep treatments.
Why does my cast iron seasoning look patchy?
Patchy seasoning is usually caused by applying oil too thickly or unevenly. When thick oil heats up, it pools in the center of the pan instead of forming an even layer. To fix this, scrub off the patchy coating and re-season with much thinner oil applications.
Can I season a rusty cast iron skillet?
Yes, you can restore a rusty skillet completely. First, scrub off the rust using steel wool or a chainmail scrubber until you see bare gray metal. Dry the pan immediately, then apply a thin coat of oil and proceed with the full oven seasoning process.
Rust removal is a critical first step for a lasting seasoning.
Final Thoughts
Mastering how to season a cast iron skillet opens up a world of better cooking with minimal expense. The process takes a few hours of oven time but only minutes of active work. Once you have built that perfect black patina, your skillet will reward you with decades of reliable, non-stick performance that no modern pan can match.
Start with a clean pan, use the thinnest oil layer possible, and bake at the right temperature. Your future self will thank you every time a fried egg slides right out of the pan.
Products related to this article
Sponsored / affiliate links. As an Amazon Associate I earn from qualifying purchases. I may earn additional commission from eligible campaigns.