

To remove door hinge pins easily and safely, you will need a hammer and a punch or a long nail. Start by gently tapping the bottom of the pin upwards until it loosens. Support the hinge properly, keep your hammer taps light, and remember that patience is key for a smooth DIY experience.
Hello there, design friend! Are you updating your home decor, painting a room a fresh new color, or maybe just dealing with a squeaky door? Sometimes, a big refresh starts with a small, tricky piece—like those stubborn pins holding your door hinges together. It can feel frustrating when a simple task turns into a wrestling match with metal! Don’t worry one bit. Removing hinge pins is completely doable for any beginner. We are going to walk through this together, step by step, turning that annoyance into another successful DIY win. Get ready to say goodbye to stuck pins and hello to easy updates!
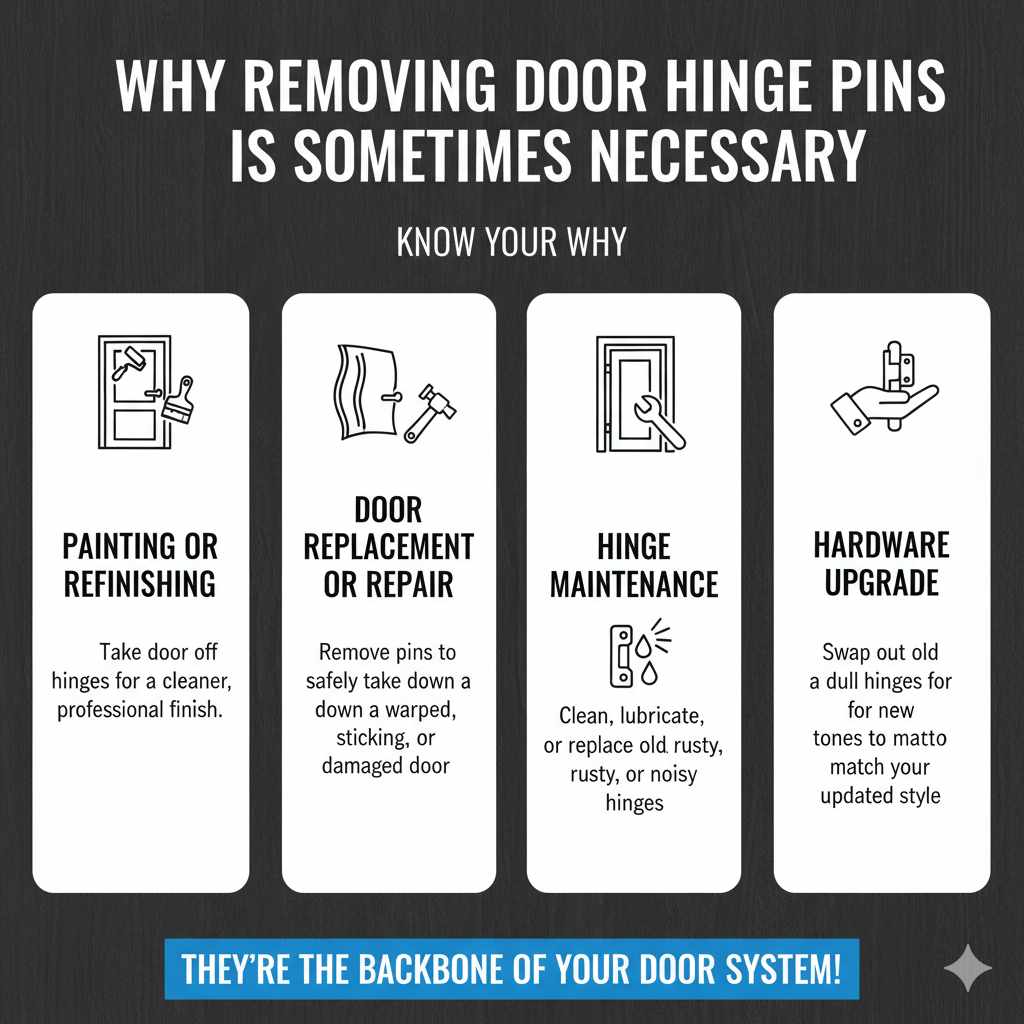
Why Removing Door Hinge Pins Is Sometimes Necessary
Before we grab our tools, let’s chat briefly about why anyone would need to remove these little metal rods. Knowing the “why” makes the “how” much clearer. Hinge pins are the backbone of your door system, allowing it to swing smoothly. When they need to come out, it’s usually for a few very good reasons:
- Painting or Refinishing: If you are painting your doors or the surrounding trim, taking the door off its hinges makes for a much cleaner, professional-looking finish.
- Door Replacement or Repair: If the door is warped, sticking, or needs to be completely replaced, you must remove the pins to safely take the door down.
- Hinge Maintenance: Sometimes, old, rusty, or squeaky hinges just need a good cleaning, lubrication, or outright replacement.
- Hardware Upgrade: Perhaps you’re swapping out old, dull hinges for beautiful new ones that match your updated style—a huge win for curb appeal!
Essential Tools You Will Need
This job doesn’t require a trip to a professional hardware store! The beauty of this fix is that most necessary items are probably already hiding in your toolbox. Keeping your toolset simple is key when you are just starting out with DIY projects.
Gather these simple items. They are what we call the “Hinge Pin Removal Trio”:
- A Hammer: A standard claw hammer works great. You don’t need a heavy sledgehammer; lighter, controlled taps are much better.
- A Pin Punch or Nail Set: This is the magic tool. You need something thin and strong enough to push the pin up. A long nail (like a 10d common nail) or a metal dowel works perfectly if you don’t have a specialized punch. Make sure it is significantly thinner than the hole in the hinge barrel.
- A Support Block or Soft Cloth: This protects your floor or the door frame from scratches when the heavy door inevitably swings or shifts slightly. A small scrap of wood or a thick folded towel works wonders.
For safety and to keep things tidy, you might also want:
- Safety Glasses (Always a good idea when hammering!)
- A clean rag or paper towels for wiping down the pins afterward.
Step-by-Step Guide: How to Get Pins Out of Door Hinges
Ready to roll up those sleeves? We are going to tackle this methodically. Remember, patience makes the process faster and prevents accidental damage. We are lifting the pin, not fighting it!
Step 1: Prepare the Door and Workspace
First things first: stabilize the door. If the door can swing freely while you are working, it can cause the hinge knuckles to misalign, trapping the pin even tighter. You need the door to stay absolutely still.
- Close the Door: Keep the door fully closed while you work on the hinges.
- Identify the Bottom Pin: Doors typically have two or three hinges. Start with the bottom hinge first. The pins generally come out from the bottom.
- Support the Door: Place your wooden block or a wedge under the edge of the door near the hinge you are working on. This prevents the door from dropping slightly when the pin is removed, which can bind the remaining hinges.
Step 2: Position Your Punch
This is where precision matters. We need to target the very bottom of the pin, which usually sticks out just slightly from the hinge barrel.
- Locate the Pin Tip: Look at the very bottom of the hinge barrel where the pin rests. You should see the end of the pin poking out slightly.
- Place the Tool: Position the tip of your nail or punch directly against the center of the pin end. Hold your holding tool (nail/punch) straight up and down.
- Grip Safely: Hold the punch firmly, keeping your fingers clear of where the hammer will strike. If you are concerned about slippage, wear work gloves.
Step 3: Apply Gentle, Upward Force
This is the critical moment. The goal is to move the pin up and out, not smash it inward. Never try to drive the pin further into the door.
The Technique:
- Initiate the Tap: Use the hammer to deliver one or two light, controlled taps directly downward onto the top of your punch. Think gentle persuasion, not demolition!
- Check Progress: Stop and check the pin. Has it moved even a hair? If yes, fantastic! If not, continue with light taps.
- Increase Force Slightly (If Needed): If the pin is resisting softly, you can increase the strength of your taps slightly. Always aim for steady, rhythmic tapping rather than one huge, jarring hit.
Pro Tip for Beginners: If the pin barely budges after several light taps, rest your hammer on the punch and push down firmly with your body weight for a moment to ensure good contact before tapping again. Sometimes, just seating the tool correctly makes all the difference.
Step 4: Removing the Pin Once Loosened
Once the pin is sticking out enough—say, about half an inch—the hammer and punch technique becomes less effective, and you risk bending your tool.
- Switch Tools: Use the claw end of your hammer or a sturdy pair of needle-nose pliers.
- Grip and Pull: If there is enough sticking out, grip the top of the pin firmly with the pliers and pull straight up.
- Using the Hammer Claw: If you can gently wedge the claw of the hammer under the head or top of the pin, use the hammer like a lever to rock the pin upwards and out.
Step 5: Repeat for Other Hinges
Once the first pin is out, the door will likely be easier to manage, especially if you are removing the second pin on a two-hinge door. If you have three hinges, remove the middle one next (if you plan to take the door completely down), or finish the top one if you just need to temporarily pivot the door open.
Crucially, if the door is heavy and you are worried about stress on the frame, it is often recommended to remove the pins in sequence: bottom, then top, then middle (if applicable).
Troubleshooting Common Hinge Pin Problems
Even with the best guidance, sometimes hinges can present a small style challenge. Here are the most common roadblocks and how to solve them with simple fixes.
Problem 1: The Pin Won’t Move At All (It’s Stuck Fast!)
This usually means rust, paint buildup (if the door was painted shut), or simple corrosion has seized the metal.
The Solution: Lubrication and Patience.
- Apply Penetrating Oil: Spray a small amount of a penetrating lubricant like WD-40 or PB Blaster around the top and bottom edges of the hinge where the pin enters the barrel. Let it sit for 15–20 minutes to seep in.
- Tap Firmly (But Carefully): Return to your hammer and punch method. The lubricant may have loosened the grip.
- Try Heat (Use Caution!): For extremely stubborn pins—and only if the door and frame are solid wood and NOT near any plastic or sensitive finishes—you can carefully apply a hairdryer on high heat to the hinge barrel for a minute. Heat causes metal to expand slightly, sometimes breaking the rust bond. Do not overheat painted areas.
Problem 2: The Pin Head Breaks Off
This is rare but happens, typically with older, heavily corroded pins. If the head snaps off, you can no longer strike it from the bottom.
The Solution: Drilling or Prying.
If the pin is flush with the bottom of the hinge, you may need to drill it out very carefully, starting with a very small bit and moving up. Alternatively, if you can get the claw of the hammer under the remaining shaft, try to pry the remaining piece up gently, slowly working it side to side.
Problem 3: The Hinge Knuckles Are Misaligned
If you tried to open the door while only two out of three pins were in, the door frame might shift, making the remaining pin extremely tight because the metal barrels aren’t perfectly stacked anymore.
The Solution: Realign the Door.
Gently push or pull the door to line up the hinge barrels as perfectly as possible. You may need a helper to hold the door steady right where the hinge is while you tap the pin. Perfect alignment minimizes friction!
Hinge Pin Types and When They Differ
Most interior residential doors use standard, removable hinge pins. However, it’s good to know that not all hinges are created equal, which can slightly change how you approach the removal.
Here is a quick comparison of common types:
| Hinge Pin Type | Appearance/Feature | Removal Difficulty |
|---|---|---|
| Standard Removable Pin | Pin sticks out slightly at the bottom. | Easy to Moderate |
| Tight-fit Pin (No Head) | Pin is often flush or only visible from the top/bottom, sometimes requiring a screw to pull it out. | Moderate to Difficult |
| Ball-and-Claw Pin | Often used on decorative exterior doors; decorative cap on top. | Easy, once cap is assessed |
| Non-Removable Pin (NRP) | Rarely used on standard doors; pins are permanently set by the manufacturer. | Requires hinge replacement |
For the vast majority of your home DIY projects, you will only encounter the Standard Removable Pin. If you are dealing with an NRP, that means the entire hinge must be unscrewed and replaced—a different but equally achievable project!
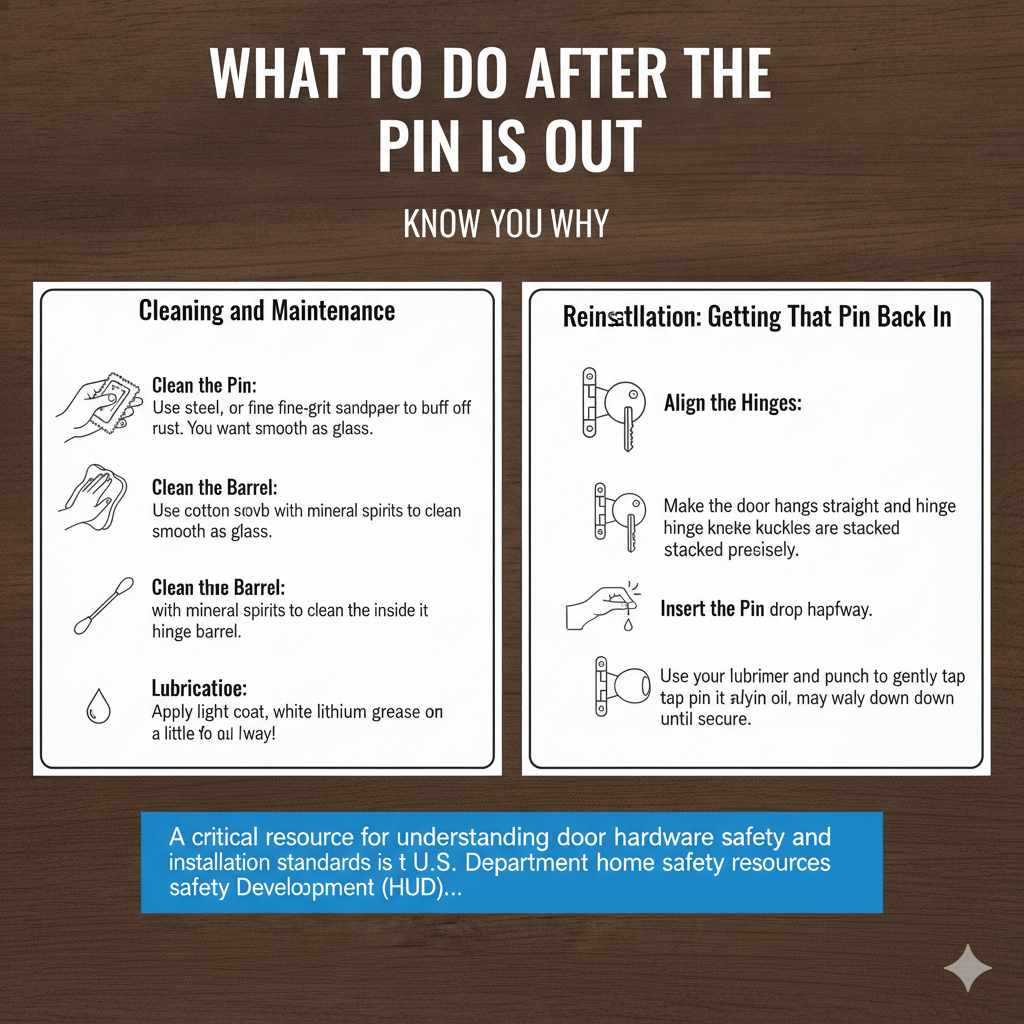
What to Do After the Pin is Out
Congratulations! You’ve successfully removed the hinge pin. Now what? This part is actually the fun, restorative part of the project.
Cleaning and Maintenance
If you are keeping the old hinges, this is the perfect time to make them look brand new. Rust and grime can slow down the door or make it look tired.
- Clean the Pin: Use steel wool or fine-grit sandpaper to gently buff off any rust or paint from the removed pin. You want it smooth as glass.
- Clean the Barrel: If possible, use a cotton swab dipped in mineral spirits to clean the inside of the hinge barrel (where the pin slides). For deep cleaning, vacuum out any debris.
- Lubricate: Apply a light coat of white lithium grease or a quality multi-purpose oil to the entire length of the pin. This ensures smooth, quiet operation later. A little goes a long way!
Reinstallation: Getting That Pin Back In
Putting the pin back in is generally much easier than taking it out, but it requires careful alignment.
- Align the Hinges: Make sure the door is hanging perfectly straight and the hinge knuckles are stacked precisely on top of each other. If you removed all pins, re-hang the door first.
- Insert the Pin: Hold the lubricated pin above the top hinge barrel. Gently set the pin into the top barrel. It may drop halfway on its own.
- Tap It Home: Use your hammer and punch (or a scrap piece of wood placed on top of the pin) to gently tap the pin all the way down through all the knuckles until it sits securely in the bottom hinge.
A critical resource for understanding door hardware safety and installation standards is the U.S. Department of Housing and Urban Development (HUD), which offers guidelines that often inform standard residential construction practices. Ensuring your door swings properly is important for safety compliance regarding egress and fire ratings in some constructions.
Styling Tip: Choosing New Hinges
If you removed the pins because you are upgrading your hardware, this is a great moment to boost your home’s aesthetic! Hinges are like jewelry for your door. A simple metal swap can feel like an entirely new door unit.
Consider finishing options that match other metals in the room, like doorknobs, light fixtures, or cabinet pulls. This creates a cohesive, designer look without costing a fortune.
| Style Goal | Recommended Finish | Why It Works |
|---|---|---|
| Modern & Minimalist | Matte Black or Satin Chrome | Clean lines disappear against the door or provide a striking contrast. |
| Farmhouse or Traditional | Oil-Rubbed Bronze or Antique Brass | Adds warmth and an aged, collected feel. |
| Light & Airy Coastal | Brushed Nickel or Polished Brass | Reflects light and keeps the focus on the beautiful paint color. |
Frequently Asked Questions (FAQ)
Q1: Can I use a screwdriver instead of a punch to get the hinge pin out?
A: While you might be tempted, it is strongly discouraged. A screwdriver tip is often wider than a punch, meaning it won’t seat properly on the pin end. This usually leads to the screwdriver slipping, damaging the hinge barrel, or causing injury. Stick to the punch or a sturdy nail.
Q2: How do I remove the pin if the door is completely off the frame?
A: If the door is already removed and lying flat (propped safely on sawhorses or sturdy blocks), this is actually easier! You can tap the pin out from the top down, which is the natural removal direction for most hinges. Take care not to ding the door surface where the hinge sits.
Q3: My hinges are painted shut. What’s the best way to deal with the paint?
A: First, try gently tapping the pin as usual—sometimes light force is enough to break the paint seal. If that doesn’t work, carefully score around the hinge barrel and the top or bottom of the pin using a utility knife. This helps break the dried paint bond without damaging the hinge. After scoring, apply a small amount of lubricant and wait a few minutes before trying again with your hammer and punch. Patience here prevents chipped paint and keeps your finish looking clean.
Q4: Is it safe to remove hinge pins by myself, or do I need help?
A: It depends on the door’s weight. For lightweight interior doors, you can usually handle the job solo with proper support underneath. However, for heavier solid-core or exterior doors, it’s safer to have someone assist you. A helper can stabilize the door while you remove the pins, preventing sudden shifts that could cause injury or damage.
Q5: How can I stop my door from squeaking after reinstalling the hinge pins?
A: Before reinserting the pins, clean them thoroughly and apply a light lubricant such as white lithium grease or household oil. This reduces friction between the hinge components and keeps the door swinging quietly. Regular maintenance like this not only eliminates squeaks but also extends the life of your hinges.
Conclusion: Small Fix, Big Impact for Your Home
Removing door hinge pins might seem like a tiny task, but it’s one of those simple DIY skills that unlocks a world of home improvement possibilities. Whether you’re refreshing your space with a new coat of paint, fixing a stubborn squeak, or upgrading your hardware for a more stylish look, mastering this process gives you confidence and control over your home.
The key takeaway? Stay patient, use the right tools, and focus on gentle, steady movements rather than force. Most hinge pin challenges come down to alignment, paint buildup, or lack of lubrication—and now you know exactly how to handle all three like a pro.
With just a little effort, you can turn a frustrating, stuck hinge into a smooth, satisfying success. So next time you face a stubborn door, you won’t hesitate—you’ll know exactly what to do. Happy DIYing, and enjoy the fresh, polished feel of your updated space!


