
Quick Summary:
To test a light fixture before installing, first, turn off the power at the breaker box. Then, carefully inspect the fixture’s wiring for any damage. Use a non-contact voltage tester on the existing wires in the ceiling box to ensure the power is truly off. Finally, connect the fixture’s wires according to instructions, restore power, and test the light.
Welcome, home decor enthusiasts! Ever found a gorgeous new light fixture and couldn’t wait to hang it up, only to be a little unsure about the electrical part? You’re not alone! Dealing with new lighting can feel a bit intimidating, especially if you’re new to DIY. But don’t worry, I’m here to walk you through it with simple, confidence-building steps. We want your beautiful new light to shine safely and brightly, and testing it beforehand is the key to a stress-free installation and a perfectly lit room.
This guide is all about making sure your new light fixture is ready to go before it ever sees its permanent home. We’ll go through everything you need to know, from safety precautions to the actual testing process. By the end, you’ll feel totally equipped to handle this common home improvement task, ensuring your space is both stylish and safely illuminated.
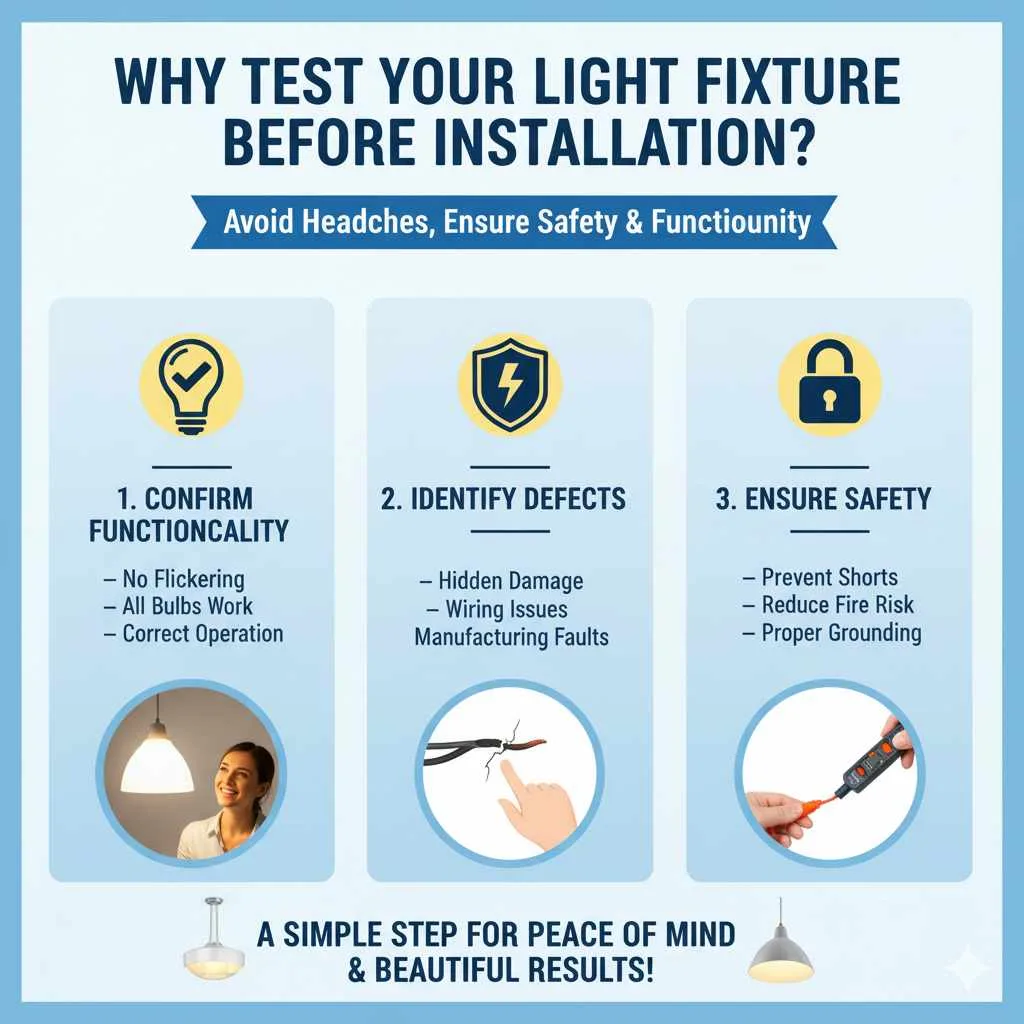
Why Test Your Light Fixture Before Installation?
You’ve picked out the perfect pendant light for your kitchen or that stunning chandelier for your dining room. Exciting! But before you start unscrewing the old and screwing in the new, a little pre-installation check can save you a lot of headaches. Think of it like test-driving a car before you buy it – you want to know it’s in good working order.
Testing your light fixture ahead of time ensures it works correctly, has no hidden defects, and will be safe to install. This proactive step can prevent issues like flickering lights, non-working bulbs, or even more serious electrical problems down the line. It’s a simple way to ensure your investment in new decor delivers the beautiful, functional results you’re dreaming of.
Gathering Your Tools: What You’ll Need
Before we dive into the testing steps, let’s make sure you have everything ready. Having the right tools makes any DIY project smoother and safer. Don’t worry if you don’t have everything; many of these are standard items for any basic toolkit.
- Non-Contact Voltage Tester: This is your best friend for safety! It tells you if a wire is live without you having to touch it. Look for one with a good reputation, like those from brands such as Klein Tools or Fluke.
- Screwdrivers: You’ll likely need a Phillips head and a flathead screwdriver, usually in a couple of different sizes.
- Wire Strippers/Cutters: These are helpful for preparing wires if you need to trim or strip them.
- Wire Nuts: You’ll usually get these with your new fixture, but it’s good to have a few extras on hand in case.
- Assorted Pliers: Needle-nose pliers can be handy for manipulating wires.
- Ladder or Step Stool: For safely reaching your existing ceiling electrical box.
- Light Bulbs: Make sure you have the correct type and wattage for your new fixture.
- Your New Light Fixture: Of course! And its instruction manual.
- Safety Glasses: Always protect your eyes, especially when working overhead.
Step-by-Step Guide: How to Test a Light Fixture
Now that you have your tools and your new fixture, let’s get to the exciting part: testing! We’ll break this down into simple, easy-to-follow steps.
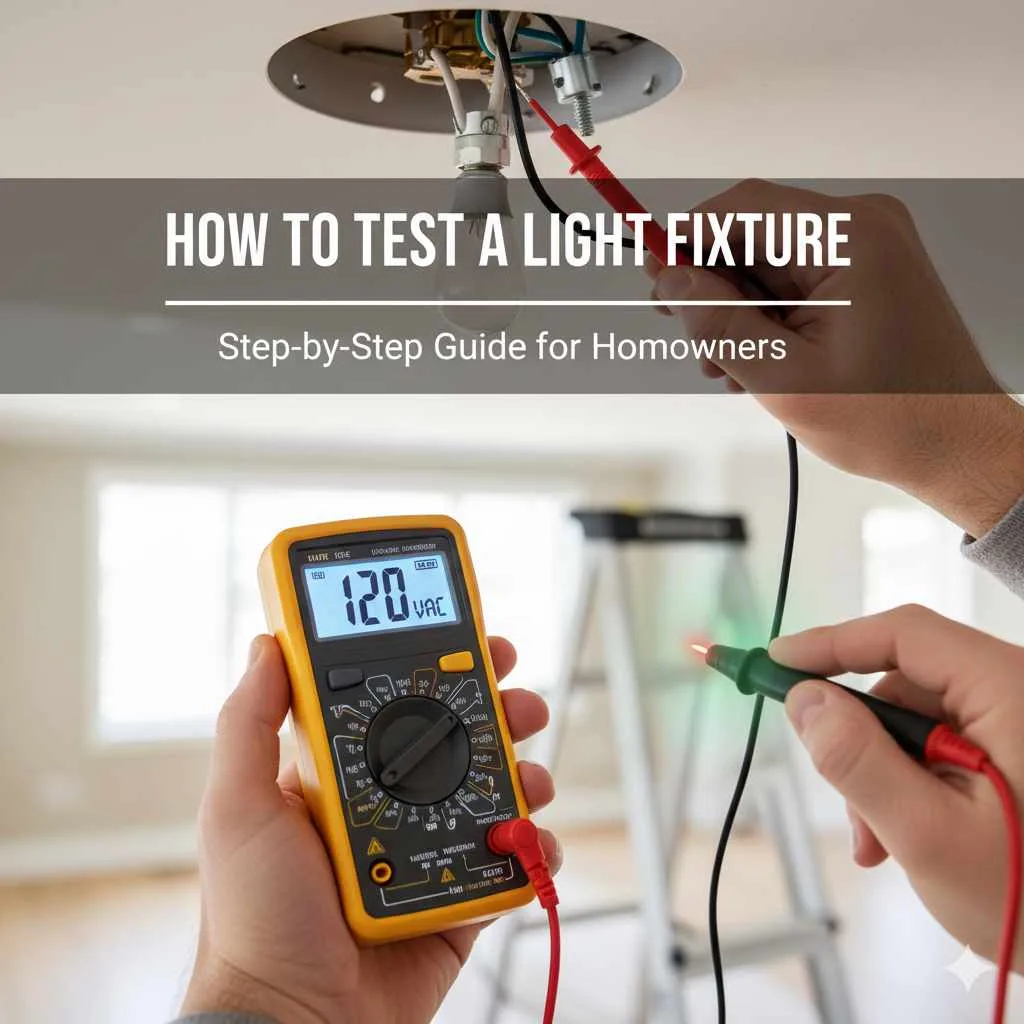
Step 1: Safety First! Turn Off the Power
This is the MOST important step. You absolutely must turn off the power to the circuit you’ll be working on. Don’t rely on just flipping the light switch off; you need to go to your home’s main electrical panel (breaker box).
Find the breaker that controls the lights in the area where you’ll be installing the fixture. If the breakers aren’t clearly labeled, you might need to do a little detective work. Flip the correct breaker to the “OFF” position. For extra safety, it’s a good practice to place a piece of tape over the breaker switch to prevent someone from accidentally turning it back on while you’re working.
Step 2: Verify Power is Off at the Source
Even with the breaker off, it’s crucial to double-check that the power is completely off at the ceiling box where the fixture will be installed. This is where your non-contact voltage tester comes in.
Carefully remove the old light fixture or the decorative canopy of the new fixture if you’re testing it before mounting. You should see the electrical wires coming from the ceiling box. Gently hold the tip of your non-contact voltage tester near each of the wires (usually black, white, and bare copper/green for ground). If the tester lights up or beeps, there’s still power! Go back to the breaker box and find the correct breaker. Repeat the testing until you’re absolutely sure the power is off.
You can learn more about electrical safety and basic testing from resources like the Consumer Product Safety Commission (CPSC), which offers excellent guidance on home electrical safety.
Step 3: Inspect the New Light Fixture’s Wiring
Now, let’s examine your new light fixture. Take it out of its packaging and lay it out so you can see the wires coming from it. Typically, you’ll see:
- Black wire: This is the “hot” wire.
- White wire: This is the “neutral” wire.
- Green or bare copper wire: This is the “ground” wire.
Check these wires carefully. Are they securely attached to the fixture? Are there any nicks, cuts, or signs of fraying? Gently tug on them (where they connect to the fixture) to ensure they feel firm. Sometimes, wires can be slightly loose from transit. If you see any damage, consult the manufacturer’s manual or consider contacting them, as this could be a defect.
Step 4: Test the Fixture with Temporary Power (Optional but Recommended)
This step is where you test the fixture itself before connecting it permanently to your home’s wiring. This is especially useful for more complex fixtures or if you want that extra peace of mind.
Option A: Using a Plug and Cord (for fixtures with a plug): If your fixture comes with a cord and plug (like a plug-in lamp), you can simply plug it into a known working outlet to see if the bulb lights up. Make sure to use the correct wattage bulb.
Option B: Using a Battery Pack (for hardwired fixtures): This method simulates power. You’ll need a battery pack suitable for the voltage of your fixture (usually 120V for standard home fixtures, but double-check!). You’ll then carefully connect the fixture’s wires to the battery pack’s output terminals. Usually, this involves connecting:
- Fixture’s black wire to the positive (+) terminal of the battery pack.
- Fixture’s white wire to the negative (-) terminal of the battery pack.
- The fixture might not have a separate ground wire in this test, or a temporary ground can be connected.
Important Note: This battery pack method is a bit more advanced and requires careful attention to detail and understanding of basic electrical principles. If you are uncomfortable with this, skip it! Simply proceeding to the installation phase after verifying wiring integrity is often sufficient for most basic fixtures.
Insert the appropriate light bulb into your fixture for this test. If the bulb lights up, the fixture itself is likely in good working order!
Step 5: Connect the Fixture Wires (When Ready for Installation)
Once you’ve confirmed the power is off and the fixture appears sound, you’re ready to make the actual connections. This is usually done inside the ceiling electrical box.
Typically, you’ll connect wires as follows:
- Ground Wires: Connect the green or bare copper wire from the ceiling box to the green or bare copper wire from your fixture. Use a wire nut.
- Neutral Wires: Connect the white wire from the ceiling box to the white wire from your fixture. Use a wire nut.
- Hot Wires: Connect the black wire from the ceiling box to the black wire from your fixture. Use a wire nut.
If your fixture has different colored wires (e.g., a red or blue wire for a different switch), consult the fixture’s manual carefully for its specific instructions.
Make sure all wire nut connections are snug. Gently tug each connection to be sure. The wires should then be carefully pushed back into the electrical box, and the fixture’s canopy or base should be secured to the ceiling.
Step 6: Restore Power and Test the Light
With the fixture securely installed and all connections made, it’s time for the moment of truth!
Go back to your breaker box and flip the breaker you turned off back to the “ON” position. Then, go to the light switch and flip it on.
Voila! Your beautiful new light fixture should now be illuminating your space. If it turns on and stays on steadily, congratulations! You’ve successfully tested and installed your new light fixture. If it doesn’t work, don’t panic. Double-check that the breaker is on, the light switch is on, and the bulb is screwed in correctly. If those are all okay, you may need to re-trace your wiring steps or consult the fixture’s troubleshooting guide or a professional.
Troubleshooting Common Light Fixture Issues
Sometimes, despite best efforts, things don’t go perfectly. Here are a few common issues and how to approach them.
Fixture Doesn’t Turn On
- Check the Bulb: Is it the correct type and wattage? Is it screwed in tightly? Try a known working bulb.
- Confirm Power: Is the breaker on? Is the light switch on? Use your voltage tester again at the ceiling box to be sure power is reaching it.
- Review Connections: Turn the power OFF at the breaker again. Carefully re-check your wire nut connections. Make sure they’re secure and that bare wire is inside the nut.
- Fixture Defect: If all else fails, there might be an internal issue with the fixture itself.
Light Flickers
- Loose Connection: This is the most common cause. Power off and re-check all wire connections (at the fixture and in the ceiling box).
- Bulb Issue: Some LED bulbs can be sensitive to dimmer switches or have compatibility issues.
- Faulty Switch or Dimmer: The problem might be with the switch itself.
- Voltage Fluctuations: Less common, but possible if the circuit is overloaded.
Fixture Humms
A slight hum can sometimes be normal for certain types of fixtures, especially those with transformers or fluorescent bulbs. However, a loud or unusual hum can indicate:
- Loose Wiring: Again, check your connections.
- Incompatible Dimmer: If using a dimmer, ensure it’s compatible with your fixture type (especially LEDs).
- Internal Component Issue: The fixture might have a faulty part.
When in doubt, always turn the power off before investigating further. If you’re uncomfortable or unsure, calling a qualified electrician is always the safest bet. You can find local electricians through resources like the Angi website, which lists and reviews local professionals.
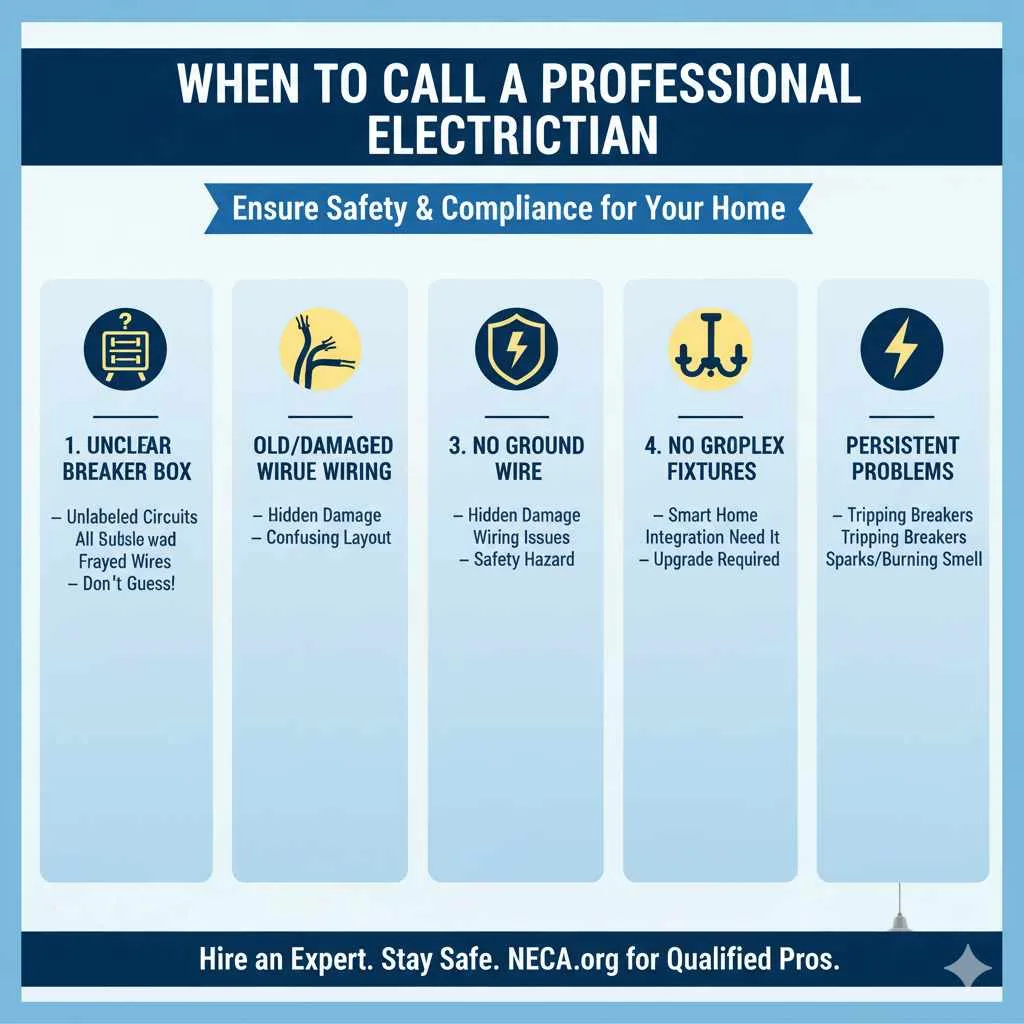
When to Call a Professional Electrician
While many lighting installations and tests are beginner-friendly, there are definitely times when it’s best to call in a pro. Here are a few indicators:
- Unlabeled or Confusing Breaker Box: If you can’t confidently identify the correct circuit, don’t guess.
- Old or Damaged Wiring: If the wires in your ceiling box look brittle, frayed, or have cracked insulation, it’s a safety hazard.
- No Ground Wire: If your ceiling box doesn’t have a ground wire (bare copper or green wire), installing certain modern fixtures might require professional upgrades.
- Complex Fixtures: Chandeliers with many lights, smart home integration, or features requiring more than simple wire-to-wire connections can be tricky.
- Persistent Problems: If you’ve tested everything you can and the light still doesn’t work, or you’re experiencing electrical issues like tripping breakers or sparks, it’s time for an expert.
- Personal Discomfort: Ultimately, if you feel unsafe or unsure at any point, that’s a clear sign to call a professional.
Hiring an electrician ensures the job is done safely and correctly, giving you peace of mind. The National Electrical Contractors Association (NECA) is a great resource for finding qualified professionals.
Frequently Asked Questions (FAQs)
Q1: How do I know which breaker to turn off for my light fixture?
Look for labels on your breaker box. If unknown, you can turn off breakers one by one and test the light fixture’s location with your non-contact voltage tester (make sure the light switch is on when testing, and off when you are about to proceed with installation). It’s best to have someone help you by calling out when the power is off for the correct circuit! Always confirm power is off with your voltage tester.
Q2: Can I test a light fixture in my hands before installing it?
Yes, for some fixtures! If a fixture has a plug, you can plug it into a working outlet. For hardwired fixtures, you can temporarily and carefully connect it to a suitable battery pack or an extension cord ending in a plug (with all safety precautions observed), but this is a more advanced step. Ensure you use the correct light bulb.
Q3: What if the new light fixture wiring doesn’t match the wires in the ceiling box?
Most modern fixtures have standard wire colors (black for hot, white for neutral, green/bare for ground). If yours are different, consult the fixture’s instruction manual. If the colors in your ceiling box are non-standard or confusing, it’s a good idea to consult a qualified electrician.
Q4: How tight should wire nuts be?
Wire nuts should be snug and secure enough that you can’t easily pull the wires out. They should twist on smoothly, and the plastic should be flush against the wire insulation. Give each connection a gentle tug to ensure it’s held firmly.
Q5: Is it safe to install a light fixture if the ceiling box doesn’t have a ground wire?
It’s less safe than having a ground wire, as the ground wire provides a path for electricity in case of a fault, preventing shock. Many modern fixtures rely on a ground connection for safe operation. If there’s no ground wire, consider having an electrician assess and upgrade your wiring, especially for fixtures with metal casings.
Q6: My new fixture has LED lights. Do I need to test them differently?
LED fixtures are generally tested the same way. Ensure you are using the correct type of bulb if it’s not integrated, and make sure any dimmer switch you are using is compatible with LED lights, as some older dimmers can cause flickering or buzzing with LEDs.
Conclusion
See? Testing a light fixture before installation doesn’t have to be scary! By taking a few simple, safety-conscious steps, you can ensure your new lighting is ready to shine. You’ve learned the importance of turning off power, verifying it’s off, inspecting the fixture’s wiring, and making those crucial connections. Remember, safety is always the top priority. If at any point you feel uncertain, don’t hesitate to call in a professional electrician.
With a little preparation and confidence, you can tackle this DIY task and enjoy the beautiful, updated look and feel of your newly lit space. Happy decorating, and may your new light fixture bring warmth and style to your home!


