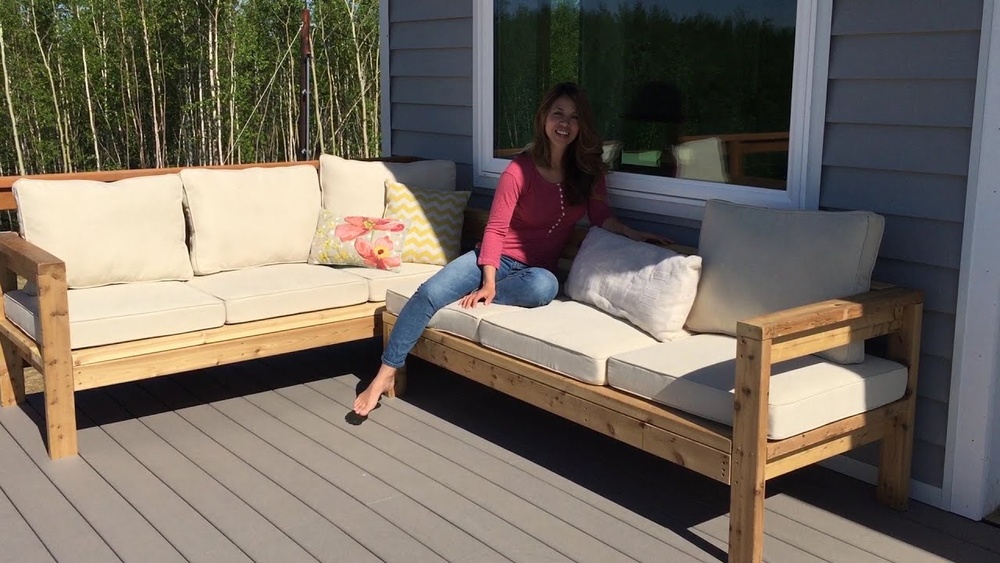
How to Build an Outdoor Sofa: Step-by-Step DIY Guide
Building an outdoor sofa is a satisfying project that can transform your patio, garden, or balcony into a cozy retreat. Many people buy outdoor furniture, but making your own gives you the chance to choose materials, customize the size, and save money.
You also get a piece that fits your space and style perfectly. If you’ve ever thought about adding a comfortable spot to relax outside, this guide will help you understand every step. You’ll learn how to plan, select materials, cut and assemble wood, and finish your sofa so it lasts for years, even through rain and sunshine.
Whether you’re handy with tools or a beginner, building an outdoor sofa is a project most people can do with basic woodworking skills and a weekend’s worth of effort.
Why Build Your Own Outdoor Sofa?
Making your own outdoor sofa is more than just a DIY challenge. It’s a way to get quality furniture that fits your needs and style. Store-bought outdoor sofas can be expensive and sometimes use materials that don’t last long in tough weather.
By building it yourself, you can use stronger wood, add extra support, and choose cushions that are truly comfortable.
Another advantage is customization. You can adjust the length, depth, and height to match your available space. Need a sofa to fit a narrow balcony or a large garden corner? You’re in control. Building your own also lets you pick colors, finishes, and cushion fabrics that work with your outdoor décor.
In my experience, hand-built furniture often becomes a favorite spot for family and friends, simply because you put your effort and creativity into it. The sense of accomplishment is real, and you get a functional piece that lasts.
Tools And Materials You’ll Need
Before you start, gather all necessary tools and materials. This will make the building process smoother. You don’t need advanced woodworking equipment, basic tools will do for most designs.
Essential Tools
- Measuring tape (at least 10 feet)
- Circular saw or miter saw (for cutting wood)
- Power drill with bits
- Screwdriver (manual or powered)
- Sander (electric or sanding block)
- Clamps (2, 4 strong clamps help hold pieces in place)
- Square (for straight edges)
- Pencil (for marking cuts)
- Safety gear (gloves, goggles, dust mask)
Materials
- Weather-resistant wood (such as cedar, teak, or pressure-treated pine)
- Outdoor screws or deck screws (2½ to 3 inches)
- Wood glue (exterior grade)
- Exterior wood finish (stain, paint, or sealant)
- Outdoor cushions (with UV-resistant, waterproof covers)
You’ll also need sandpaper (80, 120, and 220 grit) for smoothing the wood and a brush or roller for applying your finish.
Comparing Common Wood Types For Outdoor Sofas
Choosing the right wood is important. Here’s a quick comparison to help you decide:
| Wood Type | Durability | Cost | Maintenance |
|---|---|---|---|
| Cedar | High | Medium | Low |
| Teak | Very High | High | Very Low |
| Pine (Pressure-treated) | Medium | Low | Medium |
| Redwood | High | High | Low |
Pro Tip: If you live in a very wet or sunny climate, invest in teak or cedar for longer life and less maintenance.
Planning Your Outdoor Sofa Design
A successful sofa starts with a good plan. Think about your space, how many people you want to seat, and the style you prefer, modern, rustic, or classic.
Key Measurements
Standard outdoor sofas are usually 72 to 84 inches long, 32 to 36 inches deep, and about 30 to 34 inches high. Seat height is typically 16 to 18 inches, which works well with most outdoor cushions.
Measure your available space and decide:
- How long and deep should the sofa be?
- Will you add arms or keep it simple?
- Do you want a backrest, or prefer a bench style?
Sketch your design on paper or use simple online tools. Mark where each support, slat, and armrest will go. This saves time and errors later.
Example: Simple 3-seater Sofa Dimensions
| Part | Length (inches) | Width (inches) | Thickness (inches) |
|---|---|---|---|
| Seat Frame | 72 | 30 | 2 |
| Backrest | 72 | 18 | 2 |
| Legs | 16 | 4 | 4 |
| Armrests | 30 | 4 | 2 |
Pro Tip: Always double-check your measurements before buying wood. Small mistakes add up quickly.
Cutting The Wood
Once your plan is ready, it’s time to cut the wood. Use your measuring tape and square to mark precise lines. Cut slowly and check each piece for accuracy.
- Lay all pieces flat and make sure their lengths match.
- Sand each edge after cutting, this prevents splinters and makes assembly easier.
- Group pieces by part (legs, frame, slats) for quick access during assembly.
If you’re using reclaimed wood, inspect for old nails or cracks. Remove any hardware and cut away damaged parts.
Common Beginner Mistakes
- Rushing the cuts: Take your time. Accurate cuts make assembly much easier.
- Not labeling pieces: Mark each part (e.g., “leg,” “frame”) so you don’t mix them up.
- Forgetting to account for saw blade width: A saw blade removes about 1/8-inch of wood with each cut. Plan accordingly.
Assembling The Frame
The frame is the foundation of your sofa. A strong frame supports weight and keeps the sofa sturdy for years.
Step-by-step Frame Assembly
- Lay out the side panels: Position the legs and side rails on a flat surface.
- Attach the seat supports: Connect the front and back rails to the legs using outdoor screws. Check that everything is square.
- Add cross supports: These go between the side rails under the seat. Space them 16 to 20 inches apart for best support.
- Secure with glue and screws: Apply wood glue at joints, then use clamps to hold pieces tight while you drive in screws.
- Attach the backrest: Fix the backrest to the rear legs and seat frame. Tilt the backrest slightly (about 10, 15 degrees) for comfort.
Example Of Frame Assembly
| Step | Description | Tip |
|---|---|---|
| 1 | Position side rails and legs | Work on a level surface |
| 2 | Connect front and back rails | Check for right angles |
| 3 | Add cross supports | Space evenly for strength |
| 4 | Secure with glue and screws | Clamp while fastening |
| 5 | Attach backrest | Tilt for comfort |
Adding The Seat And Back Slats
Slats are the boards that support your cushions. They must be spaced correctly for comfort and airflow.
- Use slats that are 1×4 or 1×6 inches, depending on your design.
- Place slats 1 to 2 inches apart. This lets rainwater drain and keeps cushions dry.
- Attach each slat with two screws at each end.
If you want a solid seat, use plywood rated for exterior use. Drill small holes for water drainage.
Pro Tip: Sand the slats well before attaching. This step is much harder to do once they’re fixed in place.

Credit: www.woodshopdiaries.com
Building The Armrests (optional)
Armrests make the sofa more comfortable, but they’re not required. If you add them, make sure they’re strong enough to support weight.
- Attach armrests to the front and back legs using screws and glue.
- For extra support, add a diagonal brace under each armrest.
- Sand the tops and edges so they’re smooth to the touch.
If you prefer a minimalist look, skip the armrests or use wide, flat boards for a modern style.
Sanding And Preparing For Finish
Smooth wood feels better and looks more professional. Sand all surfaces with 80-grit paper first, then move to 120 and 220 grit for a silky finish.
- Wipe away dust with a damp cloth after each sanding step.
- Fill any screw holes or gaps with exterior wood filler.
- Let filler dry, then sand smooth.
This step takes time but is key to a great-looking sofa.
Choosing And Applying An Outdoor Finish
A good finish protects your sofa from sun, rain, and insects. You have a few options:
- Stain: Shows off wood grain and adds color.
- Paint: Covers wood completely, offers strong weather protection.
- Clear sealer: Keeps wood natural-looking, adds water resistance.
Apply finish with a brush or roller in thin coats. Let each coat dry fully before adding the next. Two or three coats give the best protection.
Warning: Always use products labeled for exterior use. Indoor finishes will not last outdoors.
Adding Cushions And Final Touches
Comfort is just as important as strength. Choose outdoor cushions that fit your sofa’s seat and back. Look for:
- UV-resistant fabric (won’t fade in sun)
- Waterproof or water-resistant covers
- Removable covers (for easy washing)
- Quick-drying foam (stays comfortable after rain)
Arrange the cushions neatly, and add a few throw pillows for extra style. You can also attach rubber feet or pads to the legs to prevent water damage from the ground.

Credit: www.noralukacs.com
Maintenance Tips For Long-lasting Use
Your outdoor sofa will face sun, rain, and changing temperatures. A little care keeps it looking good for years.
- Clean the wood every few months with mild soap and water.
- Reapply finish every 1, 2 years, or as soon as you see fading or wear.
- Store cushions indoors during storms or winter.
- Check screws and joints once a year, tightening as needed.
Pro Tip: Place your sofa in a spot with some shade or use a cover when not in use. This extends its life and keeps cushions looking fresh.
Cost And Time Estimate
How much will this project cost and how long will it take? Costs vary based on wood type, cushion quality, and finish.
- Wood: $80, $250 (cedar or pine; teak costs much more)
- Screws, glue, finish: $40, $80
- Cushions: $100, $300 (depending on size and quality)
- Total: $220, $630 (excluding tools)
Time needed: Most people complete the project in one weekend (10, 14 hours), not counting drying time for finishes.
What Beginners Often Miss
Many first-time builders focus on the look of their sofa but miss two important details:
- Drainage: If water can’t drain, wood rots and cushions get moldy. Always leave gaps between slats and use quick-drying foam.
- Fastener quality: Regular screws rust and weaken quickly outdoors. Always use outdoor or stainless-steel screws for longer life.
Another detail: measure your finished frame before buying cushions. Store-bought cushions sometimes don’t match advertised sizes exactly.
Troubleshooting Common Problems
Sometimes things don’t go as planned. Here’s how to fix common issues:
- Frame wobbles: Check for loose screws or joints. Add corner braces or more screws if needed.
- Wood splits: Drill pilot holes before screwing into ends of boards.
- Finish peels: Sand off old finish and reapply. Always let wood dry completely before painting or staining.
If your sofa feels uncomfortable, check that the seat depth and height are right for your cushions. Adjusting the cushion thickness can make a big difference.

Credit: www.youtube.com
Sustainable And Eco-friendly Choices
If you want to build green, choose FSC-certified wood, which comes from responsibly managed forests. You can also use reclaimed wood, but inspect it carefully for damage and pests. Water-based finishes have less odor and are safer for the environment.
For cushions, some brands use recycled plastics in their fabrics. These are both durable and eco-friendly.
Where To Find Plans And Inspiration
Many free and paid sofa plans are available online. Look for detailed diagrams with cut lists and assembly instructions. Pinterest and woodworking forums are great for design ideas. For more technical details and safety advice, check resources like Family Handyman.
Frequently Asked Questions
How Do I Keep My Outdoor Sofa From Rotting?
Use weather-resistant wood, seal all surfaces with a high-quality exterior finish, and make sure your sofa design allows water to drain through the seat slats. Raising the sofa slightly off the ground with rubber feet helps keep the legs dry.
Can I Use Indoor Cushions Outside If I Cover Them?
Indoor cushions are not designed for rain, humidity, or sun. Even with covers, they absorb moisture and can develop mold. Outdoor cushions use special foam and UV-resistant covers that last much longer.
How Heavy Will My Outdoor Sofa Be?
A Typical Three-se
Products related to this article
Sponsored / affiliate links. As an Amazon Associate I earn from qualifying purchases. I may earn additional commission from eligible campaigns.