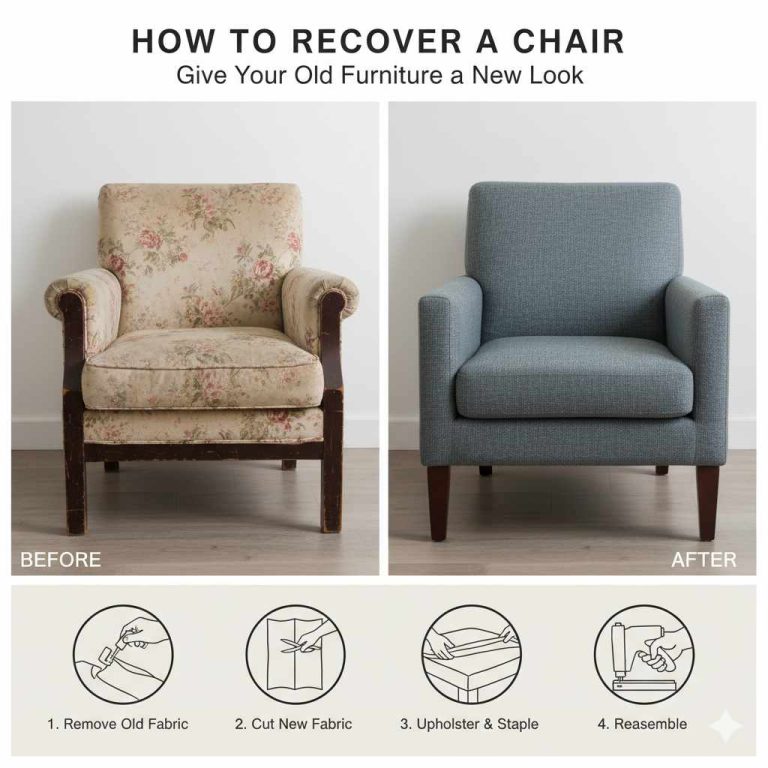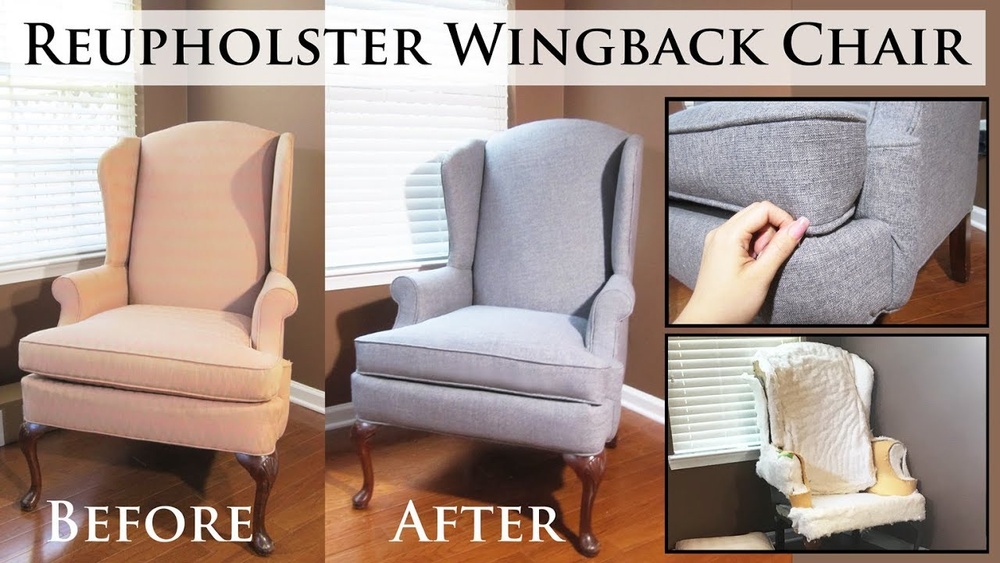
How to Recover a Wing Back Chair: Step-by-Step DIY Guide
Restoring an old wing back chair is more than a project, it’s a way to save history, add style to your home, and learn new skills. If you have a chair with worn fabric, faded colors, or sagging cushions, you might think it’s time to throw it away.
But with the right approach, you can recover a wing back chair and make it look new again. This process is not as hard as many people think, but it does require patience, care, and some basic tools.
You may want to recover a chair for different reasons. Maybe you found one at a thrift shop, inherited a family piece, or simply want to change your living room style. A recovered wing back chair can become a room’s centerpiece, showing off your taste and creativity.
The following guide will help you understand every step of recovering a wing back chair, from removing old fabric to putting in the last staple. Along the way, you’ll get practical tips, real examples, and warnings about mistakes to avoid.
Understanding Your Wing Back Chair
Before you start, spend time looking at your chair. Wing back chairs have a classic design with side “wings” that extend from the backrest down to the armrests. They are known for comfort and support. But not every chair is the same, some have simple lines, others have curves or extra padding.
Common Chair Features
- Wings: The side panels are the main feature.
- Arms: Can be rounded, flat, or rolled.
- Seat cushion: Some chairs have a loose cushion, others are fixed.
- Legs: Styles can be straight, cabriole, or even claw-foot.
Understanding these details helps you plan your work and buy the right materials.
Assessing Chair Condition
Check if the frame is solid. Sit in the chair and move it from side to side. If you hear creaks or feel wobbles, you may need to tighten screws or add wood glue. Examine the padding, if it’s lumpy or flat, you might need new foam or batting.
Recovering a chair with a weak frame or bad springs is not worth the effort unless you are ready for extra repairs.
Pro Tip: Take photos before you start. These will help you remember how the chair was put together, especially when reattaching fabric.
Tools And Materials Needed
Recovering a wing back chair does not require special skills, but you will need the right tools. Having everything ready saves time and reduces frustration.
Essential Tools
- Staple remover or flathead screwdriver: For pulling out old staples or tacks.
- Pliers: Remove stubborn staples or nails.
- Staple gun (manual or electric): For attaching new fabric.
- Sharp scissors: Cutting fabric cleanly.
- Measuring tape: For measuring fabric and foam.
- Hammer: For tapping in any nails or tacks.
- Sewing supplies: Needle, strong thread, pins (for sewing piping or seams).
- Safety gear: Gloves and safety glasses, especially if removing a lot of staples.
Materials
- Upholstery fabric: Durable and thick enough for furniture. You will usually need 6-8 yards, but measure your chair to be sure.
- Foam or batting: For replacing old or worn padding.
- Upholstery tacks or decorative trim (optional): For a finished look.
- Spray adhesive: To help attach new foam.
- Dust cover (cambric): For the underside of the chair.
Comparing Fabric Types
The right upholstery fabric will affect the look, feel, and durability of your chair. Here’s a simple comparison:
| Fabric Type | Pros | Cons | Best For |
|---|---|---|---|
| Cotton Blend | Soft, easy to clean, many colors | May fade, less durable | Low-traffic areas |
| Microfiber | Stain resistant, affordable | Can look synthetic, static issues | Homes with kids or pets |
| Leather | Classic look, easy to wipe | Costly, scratches easily | Formal living rooms |
| Velvet | Luxurious, rich colors | Shows marks, harder to clean | Accent chairs |
| Polyester | Durable, budget friendly | Can pill, less breathable | Everyday use |
Removing Old Fabric And Padding
This step takes time but is important for a neat result. Work slowly so you do not damage the chair frame.
- Start with the underside: Flip the chair over and remove the dust cover. This thin black or white fabric hides the bottom.
- Remove staples or tacks: Use your staple remover or flathead screwdriver to lift each staple. Pliers can help pull them out.
- Work in reverse order: As you remove each layer of fabric (arms, back, wings, seat), keep pieces as patterns for your new fabric.
- Check padding: If the padding is clean and firm, you may reuse it. If it’s dirty or crumbling, remove and replace it.
Pro Tip: Label each piece of fabric with a marker (like “left wing,” “seat front”). This avoids confusion during assembly.
Common Problems
Sometimes, old chairs have hundreds of staples. If you rush, you could scratch the wood or hurt yourself. Take breaks if your hands get tired.
Measuring And Cutting New Fabric
Getting accurate measurements is a must. Too little fabric means you can’t cover the chair fully. Too much leads to waste.
- Use old pieces as templates: Lay them on your new fabric, adding 2 inches around each side for stapling and adjustments.
- Mark with chalk or a fabric pen: Avoid ink, which can bleed through light fabrics.
- Cut smoothly: Sharp scissors make a big difference for clean edges.
When choosing pattern direction (like stripes or florals), check that they will look straight when attached. Many beginners forget to match patterns, which can make the finished chair look odd.
Fabric Quantity Guide
While every chair is different, this guide helps you estimate:
| Chair Size | Fabric Needed | Notes |
|---|---|---|
| Small Wing Back | 5-6 yards | Basic shape, little extra trim |
| Medium Wing Back | 6-8 yards | Standard size, includes arms |
| Large Wing Back | 8-10 yards | High back, deep seat |
If in doubt, buy extra fabric. It’s better to have leftovers for repairs.
Replacing Padding And Springs
If your chair feels saggy or uncomfortable, check the padding and springs.
Fixing The Padding
- Foam: Use high-density foam for seats. Cut it to size with a sharp knife or electric carving tool.
- Batting: Wrap foam in polyester batting for softness and to prevent fabric from rubbing on foam.
- Spray adhesive: Helps hold layers together during assembly.
Repairing Springs
Some wing back chairs use zig-zag or coil springs. If they are broken or loose, you might need professional help. But if springs are mostly fine, you can retie or adjust them with twine. When I restored a 1960s wing chair, I found one spring had popped loose.
A simple zip tie fixed it until I could get a replacement.
Pro Tip: Never reuse old, crumbling foam. It will break down quickly, making your hard work pointless.
Attaching New Fabric
Now comes the most rewarding part: adding new fabric and seeing your chair change before your eyes.
Step-by-step Process
- Start with the inside back: Center your fabric, pull it tight, and staple from the center outwards. Smooth out wrinkles as you go.
- Move to the arms and wings: Attach fabric over the padding, making sure curves and corners are neat. You may need to cut small slits to help the fabric bend.
- Seat and front: Lay fabric over the seat, pull tightly, and staple underneath or at the back.
- Outside panels: These pieces cover the sides and back. Tuck raw edges under for a clean look.
- Finishing details: Add trim or double welt cord to cover staple lines, using fabric glue or more staples. Attach a new dust cover underneath.
Tips For Neat Results
- Pull fabric tightly, but not so much that it warps the shape.
- For corners, fold fabric like wrapping a present and staple in place.
- Use more staples at stress points (where you sit or rest your arms).
Pro Tip: If you make a mistake, remove staples and try again. Small holes will not show once the fabric relaxes.

Credit: www.youtube.com
Creating Or Reattaching Piping And Trim
Many wing back chairs have decorative piping (also called welt cord) along the seams. This adds a professional finish and hides staple lines.
Making Piping
- Cut strips of fabric on the bias (diagonal to the weave).
- Wrap around cord and sew with a zipper foot.
- Staple or glue the piping in place, covering seams.
If your chair had nailhead trim, you can reuse it or buy new strips. Tap them in gently with a hammer and spacer.
Choosing The Right Trim
Trim can be simple or bold, depending on your taste. Some people use contrasting colors for a striking look, while others match the fabric for subtle style.
Reattaching The Seat Cushion
If your chair has a loose seat cushion, you may need to sew a simple cover.
- Measure the cushion and cut two pieces of fabric: One for the top, one for the bottom.
- Add a zipper or Velcro along the back edge for easy removal.
- Sew pieces together with the right sides facing, then turn inside out and insert the cushion.
If the cushion is attached, wrap and staple the fabric underneath, pulling tightly to remove wrinkles.
Final Assembly And Inspection
With all pieces in place, check your work. Sit in the chair, feel for comfort, and look for loose staples or puckered fabric.
- Trim any extra threads or fabric.
- Tighten all screws or bolts in the frame.
- Wipe down wood parts with a damp cloth or polish.
Walk around the chair to spot any mistakes or loose spots. Show your work to a friend or family member, fresh eyes often see things you missed.
Pro Tip: Wait a few days before moving the chair to heavy use, letting the fabric settle and foam expand.
Costs, Time, And Effort
Recovering a wing back chair takes effort, but the rewards are real. Here’s a quick comparison to help you decide if it’s worth doing yourself.
| Option | Average Cost | Time Needed | Skill Level |
|---|---|---|---|
| DIY Recover | $100-$250 (tools, fabric, foam) | 10-20 hours | Beginner to Intermediate |
| Professional Upholsterer | $500-$1200 | 1-2 weeks (waiting time) | None |
| Buy New Chair | $300-$1000+ | None | None |
In my experience, DIY projects save money and give a sense of pride. But they do require patience, especially for first-timers.
Common Mistakes And How To Avoid Them
Learning from other people’s mistakes can save you time and money.
- Choosing the wrong fabric: Thin or stretchy material may tear or wrinkle. Always pick upholstery-grade fabric.
- Not adding extra fabric: If you cut pieces too small, you cannot fix them. Always add at least 2 extra inches for stapling.
- Skipping padding replacement: Old foam breaks down quickly. Always check and replace if needed.
- Stapling too close to the edge: This can cause fabric to pull loose. Place staples at least 1/2 inch from the edge.
- Forgetting to match patterns: If using stripes or florals, make sure they line up across all chair parts.
Pro Tip: Practice on a hidden area first, like the bottom of the seat, before moving to visible parts.
Is Recovering A Wing Back Chair Right For You?
Recovering a wing back chair is not for everyone. It’s perfect for those who love DIY, want to save money, or have a piece with sentimental value. If you dislike hands-on work or want a quick result, hiring a professional may be better.
There’s also a feeling of satisfaction that comes from using a chair you restored yourself. Every time you look at it, you’ll remember the effort and creativity you put in. And if you make mistakes, you’ll learn valuable skills for your next project.
If you want more help, plenty of online guides and videos exist, like on Wikipedia’s upholstery page.
Frequently Asked Questions
How Do I Know If My Chair Frame Is Strong Enough To Recover?
You should check the joints and legs for movement or cracks. If the chair wobbles or creaks, tighten screws or use wood glue to fix loose parts before recovering. If the frame is badly damaged, it may need professional repair or replacement.
Can I Use Regular Fabric Instead Of Upholstery Fabric?
Regular fabric may not last long on a chair. Upholstery fabric is thicker, more durable, and less likely to tear or fade. If you use thin material, the seat or arms may wear out quickly, especially in high-use areas.
Is
Products related to this article
Sponsored / affiliate links. As an Amazon Associate I earn from qualifying purchases. I may earn additional commission from eligible campaigns.