How To Put Shelves In A Cabinet
Transforming your cabinet storage with custom shelves is one of the most effective ways to maximize organization and functionality in your kitchen, bathroom, or workspace. Whether you’re tackling a cluttered pantry or optimizing a wardrobe, the process of installing shelves inside a cabinet blends practical DIY skills with design insight.
With careful planning and the right approach, even novice homeowners can achieve professional-grade results without overspending. This guide offers a detailed, step-by-step blueprint for putting shelves in a cabinet, backed by real-world examples, actionable tips, and expert recommendations.
Many homeowners underestimate the impact of well-designed internal shelving. Not only can it double usable space, but it also makes everyday items easier to access, reduces clutter, and enhances resale value. From adjustable shelf hardware to fixed installations, choosing the right materials and method depends on your cabinet’s purpose and your own skill level.
Throughout this article, you’ll find comparison tables, practical illustrations, and advice on avoiding common mistakes, so you can confidently upgrade your cabinet interiors and enjoy lasting benefits.
Key Takeaways
- Cabinet shelving improves storage, accessibility, and organization across home spaces.
- Selecting the right shelf materials and installation method is crucial for durability and aesthetics.
- Precise measurement and planning prevent errors and ensure shelves fit perfectly.
- Adjustable shelving offers flexibility, while fixed shelves provide stability.
- Common mistakes include poor anchoring, overloading, and misalignments, learn how to avoid them.
- Real-world examples highlight how proper shelving transforms kitchens, pantries, and wardrobes.
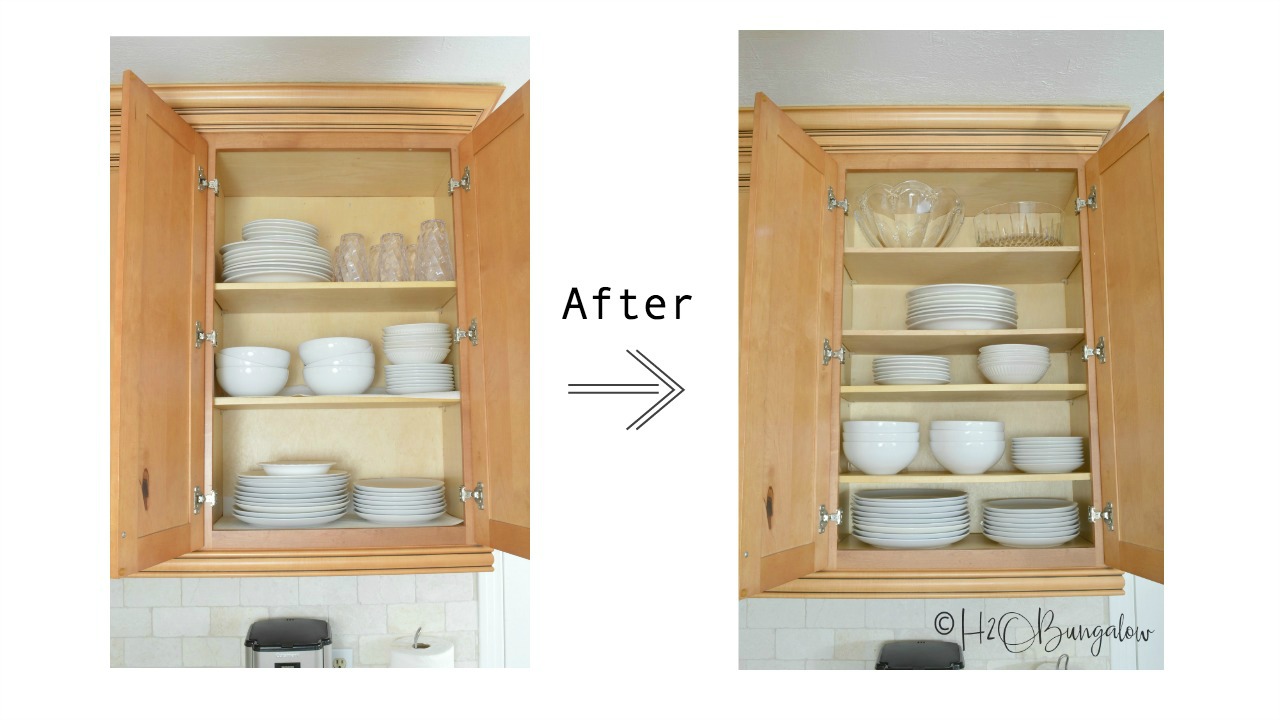
Credit: h2obungalow.com
Understanding Cabinet Shelving Options
Before diving into installation, it’s essential to understand the types of shelving available and how they suit different cabinet applications. The choice between adjustable shelves and fixed shelves, as well as material selection, can affect the long-term functionality and maintenance needs of your cabinet.
Types Of Cabinet Shelves
1. Adjustable Shelves
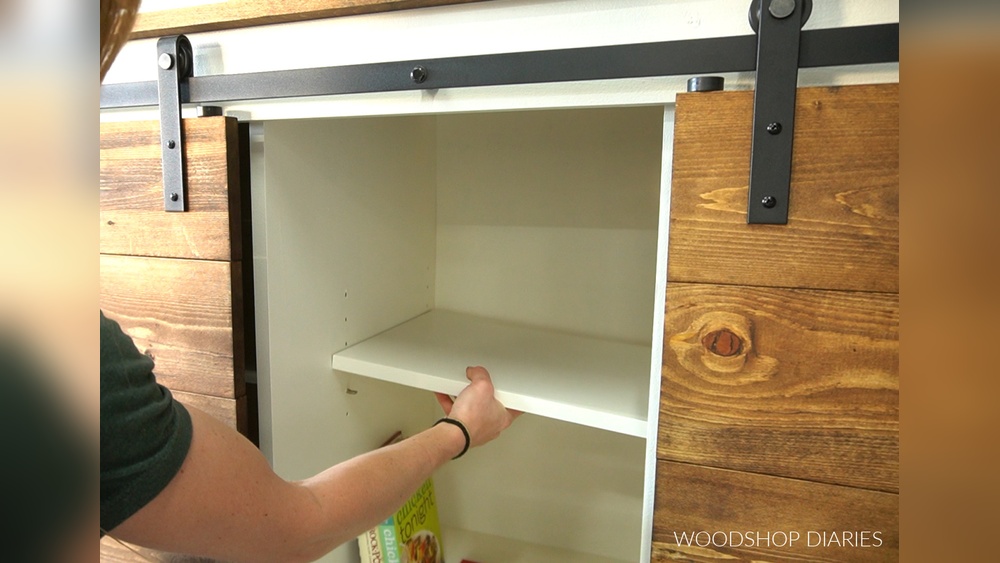
These shelves rest on shelf pins or brackets inserted into pre-drilled holes. They are ideal for cabinets where storage needs may change, such as kitchen pantries or office storage. Adjustable shelves allow you to shift shelf height without tools.
2. Fixed Shelves
Fixed shelves are attached directly to the cabinet walls using screws, cleats, or glue. They provide greater stability, making them suitable for heavy items (e. g. , cookware or books).
3. Pull-out Shelves
Mounted on drawer slides, pull-out shelves make it easier to access items at the back of deep cabinets. They require precise measurements and extra hardware, but significantly boost usability.
4. Corner Shelves
Designed for L-shaped or corner cabinets, these maximize awkward spaces and improve storage efficiency.
Shelf Materials Comparison
Choosing the right material is vital for both durability and aesthetics. Below is a comparison table of common materials:
| Material | Strength | Cost | Finish Options | Best Use |
|---|---|---|---|---|
| Plywood | High | Moderate | Paint, Stain | Kitchen, Pantry |
| Particleboard | Medium | Low | Laminated | Closets, Office |
| MDF | Medium | Moderate | Paint | Decorative Shelving |
| Solid Wood | Very High | High | Stain, Paint | Heavy Loads, Decorative |
| Wire | Medium | Low | Coated | Pantries, Utility Cabinets |
Hardware Options
- Shelf Pins: For adjustable shelving, these small metal or plastic supports are inserted into holes in the cabinet sides.
- Cleats: Wooden strips attached to the cabinet wall, providing support for fixed shelves.
- Brackets: Metal supports screwed into the cabinet for heavy-duty shelving.
- Drawer Slides: Required for pull-out shelves, available in ball-bearing or roller styles.
Example:
A homeowner seeking to upgrade a kitchen pantry opted for adjustable plywood shelves supported by shelf pins. The flexibility allowed them to easily accommodate tall cereal boxes and smaller spice jars, significantly improving pantry organization.
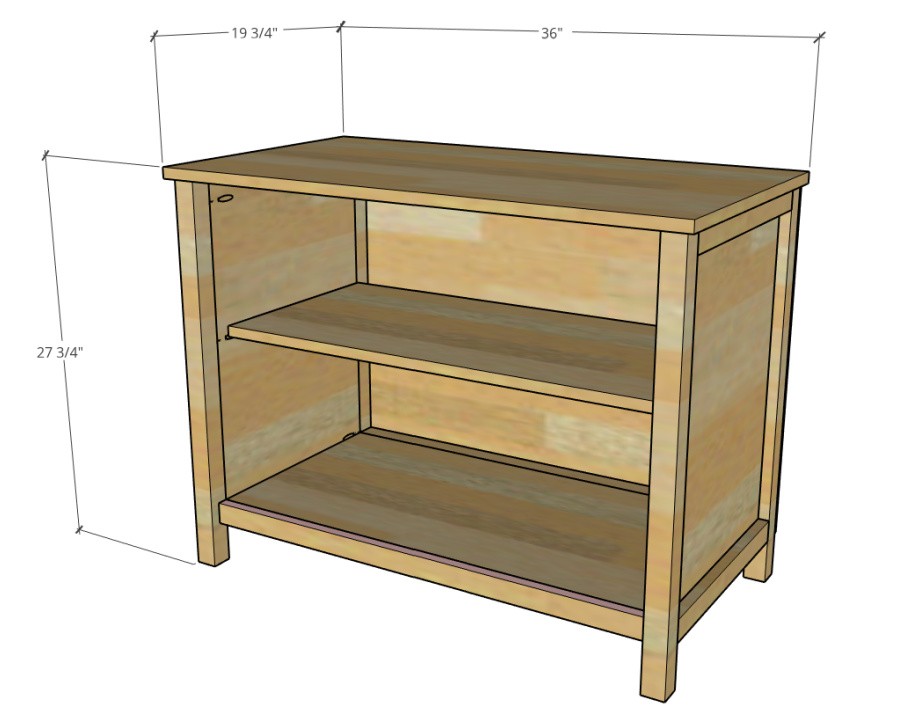
Credit: www.woodshopdiaries.com
Planning And Measuring For Shelves
Meticulous planning is the foundation of successful shelf installation. Accurate measurements, thoughtful layout, and careful consideration of item sizes ensure that shelves fit perfectly and function as intended.
Assessing Cabinet Dimensions
Begin by measuring the width, depth, and height of the cabinet interior. Use a steel tape measure for precision. Record measurements to the nearest 1/16 inch, accounting for any protrusions (hinges, hardware) that might affect shelf placement.
- Width: Measure between the inside faces of the cabinet sides.
- Depth: Measure from the cabinet back to the inside of the door frame.
- Height: Measure from the cabinet floor to the top.
Determining Shelf Quantity And Spacing
The number and spacing of shelves should reflect the items you plan to store:
- For pantries, space shelves 10, 14 inches apart for cans and boxes.
- For wardrobes, allow 15, 18 inches for folded clothes.
- For office cabinets, aim for 12, 15 inches for books and binders.
Pro Tip:
Lay out the proposed shelf locations using painter’s tape inside the cabinet. This visual aid helps identify potential conflicts and ensures ergonomic access.
Calculating Shelf Load Capacity
Shelves must support the weight of stored items without sagging. As a rule of thumb, a 3/4-inch plywood shelf spanning 36 inches can safely hold up to 90 pounds if properly supported. For heavier loads, use thicker materials or add center supports.
| Shelf Material & Thickness | Max Span (inches) | Max Load (pounds) |
|---|---|---|
| 3/4″ Plywood | 36 | 90 |
| 1″ Solid Wood | 40 | 120 |
| 5/8″ MDF | 30 | 60 |
| Wire Shelf | 36 | 50 |
Creating A Materials And Tools Checklist
Prepare a checklist before shopping or starting work:
- Shelf boards (cut to size)
- Shelf pins or cleats
- Brackets or slides (if needed)
- Screws, drill, level, measuring tape
- Sandpaper, paint or finish (optional)
Example:
In my experience, having a detailed materials list prevented multiple trips to the hardware store and kept the project on schedule.
Preparing Your Cabinet For Shelves
Preparation is key to achieving a polished, durable result. Cleaning, minor repairs, and marking shelf locations create a solid foundation for installation.
Cleaning And Inspecting The Cabinet
Empty the cabinet completely. Clean surfaces with mild detergent and inspect for damage, such as loose panels or water stains. Repair any issues before proceeding.
- Tighten loose hinges or hardware.
- Fill holes or cracks with wood filler; sand smooth once dry.
Marking Shelf Locations
Use a pencil and level to mark the intended shelf positions on the cabinet sides. For adjustable shelves, use a shelf pin jig (available at hardware stores) to drill evenly spaced holes.
- Mark both sides at the same height for level shelves.
- For fixed shelves, mark the top and bottom edges for clarity.
Preparing Hardware And Supports
- For fixed shelves, attach cleats or brackets to the cabinet walls at the marked locations using screws.
- For adjustable shelves, drill holes for shelf pins at consistent intervals (typically 1 inch apart).
Warning:
Always check for hidden wires or plumbing before drilling into cabinet walls, especially in bathroom or kitchen installations.
Cutting And Finishing Shelf Boards
Cut shelf boards to exact measurements using a circular saw or table saw. Sand edges smooth and apply finish as desired (paint, stain, or laminate).
- Test-fit shelves before final installation to ensure proper sizing.
- Apply finish in a well-ventilated area and allow to dry fully.
Example:
A DIYer preparing a bathroom cabinet replaced water-damaged particleboard with new plywood shelves, sealed with waterproof paint for longevity.
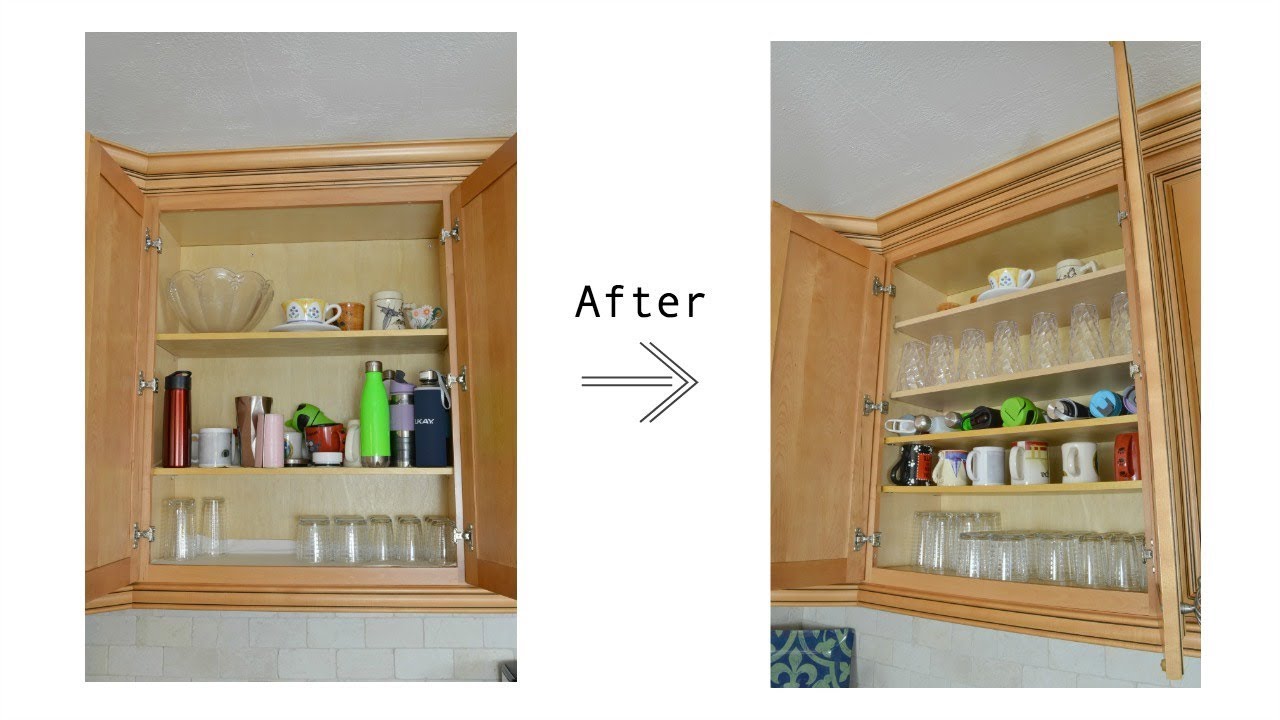
Credit: www.youtube.com
Installing Fixed And Adjustable Shelves
The installation process varies depending on whether you choose fixed or adjustable shelves. Each method has distinct advantages and requires careful execution.
Installing Fixed Shelves
- Position Cleats or Brackets
- Attach wood cleats or metal brackets to the cabinet sides at marked locations.
- Use a level to ensure supports are straight.
- Set the Shelf Board
- Place the shelf on top of the cleats or brackets.
- Secure with screws through the shelf into the supports for added stability.
- Check for Level
- Use a bubble level to verify the shelf is perfectly horizontal.
- Secure the Shelf
- For heavy-duty shelves, add corner brackets underneath for extra support.
Installing Adjustable Shelves
- Insert Shelf Pins
- Place shelf pins in the desired holes on both sides of the cabinet.
- Ensure pins are fully seated and level.
- Place Shelf Board
- Lower the shelf onto the pins, checking for stability.
- Adjust pin height as needed for different item sizes.
- Test Shelf Stability
- Press gently on the shelf to confirm it sits securely.
Pro Tip:
For deeper cabinets, add a center support to prevent sagging over time.
Installing Pull-out Shelves
- Install Drawer Slides
- Attach slides to the cabinet sides, following manufacturer instructions.
- Measure carefully for proper alignment.
- Attach Shelf to Slides
- Secure the shelf to the slide brackets.
- Test movement to ensure smooth operation.
Example:
A homeowner added pull-out wire shelves to a deep kitchen cabinet, improving access to pots and pans that were previously hard to reach.
Troubleshooting Common Installation Issues
- Shelf Not Level: Recheck support positions with a level; adjust as needed.
- Shelf Wobbles: Tighten hardware, add additional support if necessary.
- Shelf Doesn’t Fit: Trim edges with a saw or plane for a snug fit.
Real-world Examples And Case Studies
Practical examples illustrate how custom shelving transforms cabinet storage and solves real organizational challenges.
Kitchen Pantry Upgrade
A family with a small kitchen installed adjustable plywood shelves in their pantry. By customizing shelf heights, they accommodated tall cereal boxes, canned goods, and baskets for snacks. The result was a 50% increase in usable storage space and easier access to everyday items.
Bathroom Linen Cabinet
After a leak damaged the lower shelves, a homeowner replaced particleboard with waterproof plywood and added fixed shelves spaced 14 inches apart. The sturdy supports allowed for heavier items like towels and cleaning supplies.
Office Storage Solution
An entrepreneur outfitted a home office cabinet with fixed MDF shelves and one pull-out shelf for printer paper. By measuring carefully and reinforcing supports, the shelves held heavy binders without sagging and made the workspace more efficient.
| Cabinet Type | Shelf Type | Materials Used | Result |
|---|---|---|---|
| Kitchen Pantry | Adjustable | Plywood, Shelf Pins | Increased Storage, Improved Accessibility |
| Bathroom Linen | Fixed | Plywood, Cleats | Durable, Waterproof Storage |
| Office Cabinet | Fixed & Pull-Out | MDF, Drawer Slides | Efficient Organization, No Sagging |
Maintenance And Optimizing Shelf Performance
Proper maintenance ensures your shelves last and perform as intended. Optimizing shelf arrangement can further improve accessibility and storage efficiency.
Regular Inspection And Cleaning
- Inspect shelves periodically for signs of wear, sagging, or loose supports.
- Clean shelves with a damp cloth; avoid harsh chemicals on wood or laminate finishes.
- Tighten hardware annually to maintain stability.
Preventing Shelf Sagging
- Avoid overloading shelves beyond their rated capacity.
- For spans over 36 inches, add center supports or use thicker materials.
- Rotate heavy items to distribute weight evenly.
Reconfiguring Adjustable Shelves
- Change shelf heights to accommodate new items as storage needs evolve.
- Use bins or baskets to group smaller items and keep shelves tidy.
Example:
In a pantry, adjusting shelf heights seasonally allowed a homeowner to store bulk purchases during holidays and reorganize for everyday use the rest of the year.
Repairing And Upgrading
- Replace damaged shelf boards promptly to maintain safety.
- Upgrade shelf pins or brackets if they show signs of wear.
- Consider switching to pull-out or corner shelves for improved access.
Avoiding Common Mistakes And Ensuring Safety
Even well-intentioned DIY projects can run into pitfalls. Learning from common mistakes can help you achieve a safer, more durable installation.
Overlooking Measurements
Failing to measure accurately is the most frequent source of shelving problems. Double-check all measurements before cutting materials or drilling holes.
- Always measure twice, cut once.
- Account for cabinet hardware and door swing.
Using Inadequate Supports
Shelves installed without proper supports can sag, collapse, or damage the cabinet.
- Use cleats or brackets rated for the intended load.
- For heavy items, opt for fixed shelves over adjustable designs.
Ignoring Weight Limits
Exceeding shelf capacity leads to sagging and safety hazards.
- Refer to manufacturer guidelines for load ratings.
- Distribute weight evenly across the shelf span.
Warning:
Avoid storing hazardous items (e. g. , chemicals, heavy tools) on shelves not rated for such loads. Always prioritize safety by choosing materials and supports that match your storage needs.
Skipping Cabinet Preparation
Dirty or damaged cabinet interiors compromise shelf performance.
- Clean and repair cabinets before installation.
- Ensure surfaces are dry and free of debris.
Example:
A homeowner who neglected to repair a loose cabinet wall found that their new shelves soon pulled away, requiring a costly fix.
Advanced Tips For Custom Cabinet Shelving
For those seeking a truly tailored cabinet solution, advanced techniques can further enhance storage and aesthetics.
Integrating Lighting
LED strip lights installed under shelves illuminate contents, making it easier to find items in deep or dim cabinets.
- Use battery-powered or hardwired lighting kits.
- Conceal wires for a clean finish.
Decorative Shelf Edges
Adding routed or beveled edges gives shelves a custom look and prevents splinters.
- Use a router for decorative profiles.
- Sand thoroughly before finishing.
Multi-level And Tiered Shelving
Tiered shelves increase visibility and access, especially for pantries or spice cabinets.
- Build stepped shelves using stacked boards.
- Ideal for small jars or cans.
Incorporating Glass Or Acrylic Shelves
For display cabinets, glass or acrylic shelves add elegance and allow light to pass through.
- Use brackets designed for fragile materials.
- Avoid overloading with heavy items.
Example:
A collector installed glass shelves in a display cabinet, showcasing vintage jars while maintaining a sleek, modern appearance.
Integrating Cabinet Shelving With Other Storage Solutions
Maximizing cabinet utility often involves combining shelving with bins, baskets, or other organizers. Understanding these combinations can create a cohesive storage strategy throughout your home.
Using Bins And Baskets
- Store small or loose items in labeled bins to prevent clutter.
- Choose baskets sized to fit shelf depths and heights.
Drawer Inserts And Organizers
- Add drawer inserts for utensils, office supplies, or toiletries.
- Modular organizers adapt as storage needs change.
Combining With Other Cabinet Types
- Pair shelving with pull-out drawers or lazy Susans for full access.
- Use corner shelves to optimize hard-to-reach spaces.
Example:
A kitchen cabinet with adjustable shelves, pull-out drawers, and wire baskets accommodated both dry goods and cookware, streamlining meal prep.
For more tips on food storage and preserving, see Freeze-drying vs canning: Which is better for long-term food storage? and Choosing the right canning jar makes preserving food easier.
Frequently Asked Questions
What Tools Are Essential For Installing Cabinet Shelves?
To install shelves, you’ll need a measuring tape, level, drill, screwdriver, and saw for cutting shelf boards. For adjustable shelves, a shelf pin jig ensures evenly spaced holes. Sandpaper, paint or stain, and safety gear (gloves, goggles) are also recommended.
How Can I Make Shelves Adjustable After Installing Fixed Ones?
To convert fixed shelves to adjustable, remove the shelf and supports, patch holes, and drill evenly spaced holes for shelf pins using a jig. Install new shelf pins and ensure the shelf fits securely. This process may require repainting or refinishing the cabinet interior.
What Is The Best Way To Prevent Shelves From Sagging?
Prevent sagging by using thicker shelf material, limiting shelf span (ideally under 36 inches), and adding center supports. For heavy loads, choose solid wood or plywood and secure shelves with cleats or brackets. Regularly inspect shelves and redistribute weight as needed.
Are There Eco-friendly Options For Shelf Materials?
Yes. Bamboo plywood and reclaimed wood are sustainable alternatives. Choose low-VOC finishes and adhesives for improved indoor air quality. Wire shelves coated with recycled materials also offer a green solution.
How Do I Install Shelves In Cabinets With Uneven Walls?
For uneven cabinet walls, use shims to level supports and shelves. Flexible shelf brackets accommodate minor variations. Measure the shortest span to ensure shelves fit, and consider custom-cut boards for a precise finish.
For more information on distinguishing salt types for food preservation, check Canning salt and iodized salt differ in purity and use.
Expert Resources And Further Reading
For authoritative guidance and design inspiration, consult:
- Family Handyman: How to Build Cabinet Shelves
- Wikipedia: Cabinetry
Custom shelving turns ordinary cabinets into high-performance storage solutions, enhancing both practicality and property value. By planning carefully, choosing the right materials, and following proven installation methods, you can achieve a professional-quality result that lasts for years. With the detailed guidance in this article, even a first-time DIYer can confidently put shelves in a cabinet and enjoy the transformation.
Products related to this article
Sponsored / affiliate links. As an Amazon Associate I earn from qualifying purchases. I may earn additional commission from eligible campaigns.