
Sanding a dresser can feel like a big task. You want a smooth, beautiful finish. But picking the right sandpaper can be confusing.
Many numbers and types! It’s easy to feel lost. You might end up using the wrong grit.
This can lead to scratches or a rough surface. Don’t worry, we’ll break it down simply.
Choosing the right grit sandpaper for a dresser means starting with a coarser grit for shaping or removing old finishes, then moving to finer grits for smoothing. Aim for grits like 80-100 for heavy work, 120-150 for general smoothing, and 180-220 for final prep before painting or staining. Always sand with the wood grain.
Understanding Sandpaper Grits
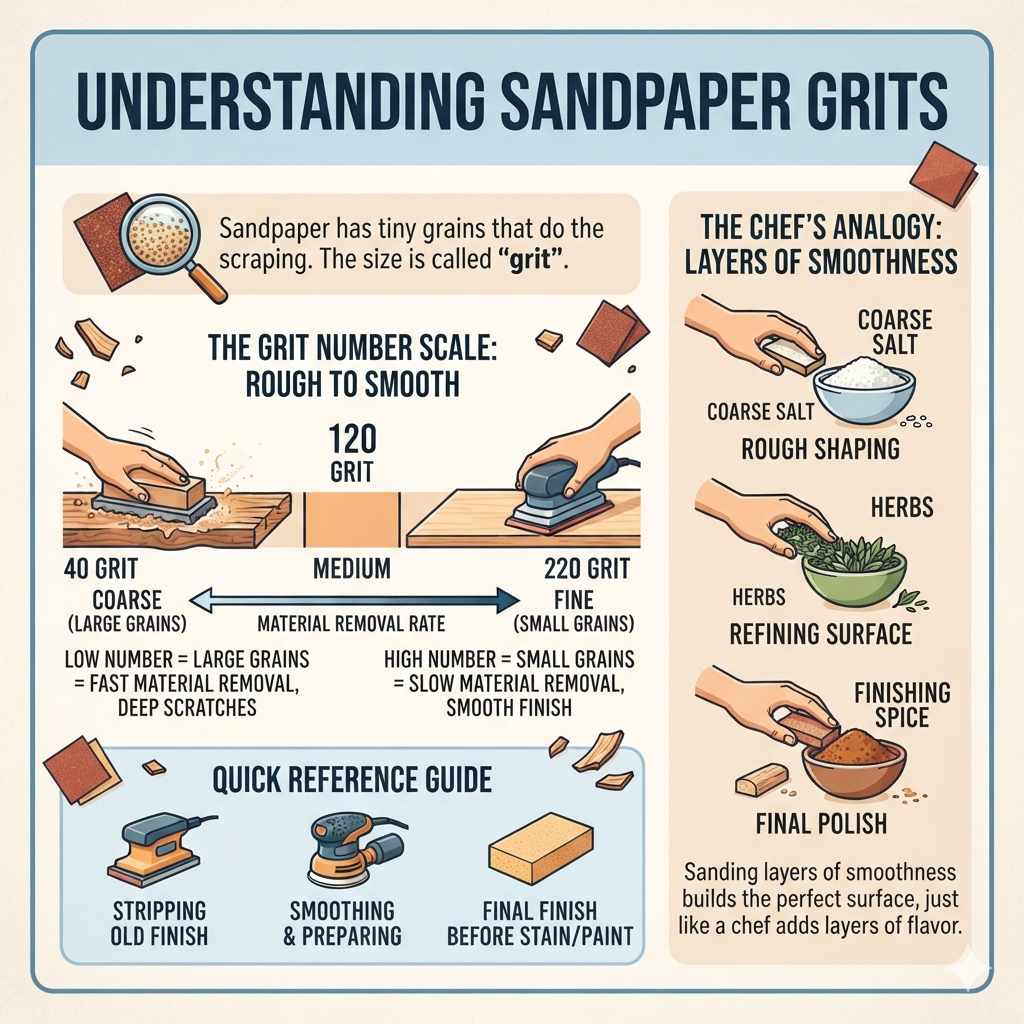
Sandpaper has tiny grains. These grains do the scraping. The size of these grains is called “grit.” A lower number means larger grains.
Larger grains scratch more. They remove material fast. A higher number means smaller grains.
Smaller grains make a smoother surface. They don’t remove much material.
Think of it like this: using a big rock to smooth a wall won’t work well. It would make huge gouges. Using fine dust would take forever.
Sandpaper is just right. It balances these two things. You pick the grit based on what you need to do.
For furniture, we often use a few different grits. We might start rough. Then we get smoother and smoother.
This is like a chef seasoning a dish. You add layers of flavor. Sanding layers of smoothness builds the perfect surface.
When to Use Different Sandpaper Grits for Dressers
The job you’re doing tells you which grit to use. Are you fixing big dents? Do you have old, peeling paint?
This needs a rougher grit. It cuts through the mess. Are you just making an already smooth surface even smoother?
Then you need a finer grit. It polishes the wood.
It’s like using tools. You wouldn’t use a hammer to screw in a screw. You need the right tool for the job.
Sandpaper is a tool. The grit number is its specific setting.
Most dresser projects involve a few steps. You don’t just grab one piece of sandpaper. You plan your approach.
This planning makes sure your work is great. It saves you time and effort later. A good plan prevents frustration.
Types of Sandpaper Grains
The material of the grit matters too. Some grains are harder than others. This affects how they cut.
It also affects how long they last.
Aluminum Oxide is very common. It’s good for wood. It lasts a long time.
It works well for most sanding jobs. It’s a good all-around choice for dressers.
Silicon Carbide is sharper. It cuts faster. It’s good for hard surfaces.
It can also work on wood. But it might wear out quicker. It’s often used for wet sanding.
Wet sanding reduces dust. It gives a super-smooth finish.
Garnet is a natural material. It’s softer. It breaks down slowly.
It’s great for final finishing. It gives a very fine, smooth look. It’s often used for bare wood.
It doesn’t remove wood aggressively.
Ceramic Alumina is very tough. It stays sharp for a long time. It’s good for tough jobs.
It can sand hard materials. It’s often used on metal. But it can work on very hard woods too.
For most dresser projects, aluminum oxide is your best friend. It’s reliable and effective. It does what you need it to do without fuss.
It’s what most people use for good results.
Personal Experience: That Time I Rushed Sanding
I remember working on an old oak dresser for my sister. She wanted it painted a sleek black. I was in a hurry.
I grabbed some sandpaper I had lying around. I think it was around 100 grit. I thought, “It’s just a quick once-over, right?” Wrong.
I started sanding the top. The old varnish was thick. The 100 grit was too coarse for this final step.
It left tiny, noticeable scratches. They looked like faint lines all over the wood. When I applied the primer, those scratches showed up even more.
I felt a wave of panic. My sister would be here tomorrow! I had to fix it.
I spent the next two hours going back. I started with 120 grit, then 150, then 180. Finally, the surface was smooth enough.
But I learned a big lesson that night. Rushing sanding makes more work. Taking the time for each grit is key.
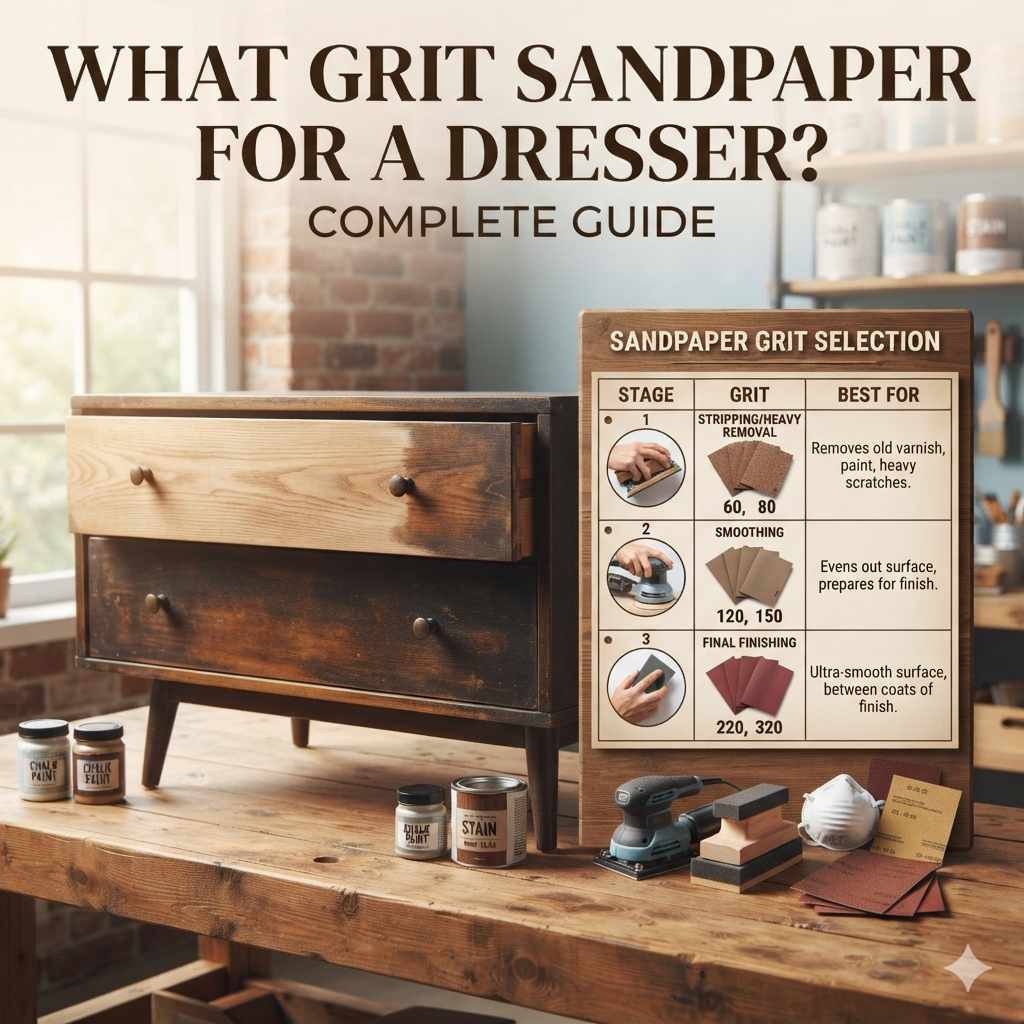
Sanding Steps for a Dresser Makeover
- Step 1: Rough Start (Optional) 80-100 grit. Use only if you need to remove old paint, heavy varnish, or level out big dents.
- Step 2: Initial Smoothing 120-150 grit. This is for general sanding. It removes the deeper scratches from the first step.
- Step 3: Fine Tuning 180-220 grit. This creates a smooth surface for paint or stain. It removes 120-150 grit scratches.
- Step 4: Pre-Finish Polish 220-320 grit. Use this for an ultra-smooth feel before applying finish. It’s great for oil-based stains or high-gloss paints.
What Does “Closed Coat” vs. “Open Coat” Mean?
You might see these terms. They describe how the grit is applied. It affects how the sandpaper works.
Closed Coat means the grit covers the whole surface. It’s like a solid layer of tiny rocks. This gives you maximum cutting power.
It’s good for hard materials. It can clog faster with soft woods. Think of it as a full brush of paint.
Open Coat means there are gaps between the grit. These gaps let dust and debris escape. This is very helpful when sanding softer woods.
Wood dust can clog sandpaper quickly. Open coat sandpaper resists this clogging. It lasts longer for wood projects.
It’s like a spaced-out brush of paint.
For sanding dressers, especially if you’re dealing with wood dust, open coat sandpaper is often a better choice. It will save you frustration. It keeps working longer.
Choosing the Right Grit: A Simple Breakdown
Here’s a quick guide. It helps you pick the right grit for your dresser project.
Grit Guide for Dresser Sanding
Grit Range | Purpose | When to Use
80-100 | Coarse | Removing thick old finishes, leveling deep gouges, shaping wood.
120-150 | Medium | General smoothing, removing scratches from coarse grit, preparing for primer.
180-220 | Fine | Creating a smooth surface for paint or stain, removing medium grit scratches.
240-320 | Very Fine | Final sanding before applying clear coats or oil finishes, achieving a silky feel.
400+ | Extra Fine | Buffing and polishing finishes, not typically for wood prep itself.
Remember, you usually work your way up. Start coarser. Get finer.
Never skip grits. Skipping can leave deep scratches. You’ll have to go back.
That wastes time. It’s better to be patient.
Sanding Techniques for a Flawless Finish
How you sand is as important as which grit you use. Doing it the right way makes a big difference. It ensures a professional look.
Always sand with the wood grain. This is the most crucial rule. Wood has tiny fibers that run in a direction. If you sand against the grain, you make tiny cuts.
These look like white scratches. They are hard to hide. You’ll see them especially when you stain or paint.
So, always follow the lines of the wood.
Use even pressure. Don’t push down too hard in one spot. This creates uneven surfaces. It can wear holes in the sandpaper faster.
A light, steady pressure works best. Let the sandpaper do the work.
Keep the surface clean. Dust is your enemy. It gets everywhere. It can clog your sandpaper.
It can end up in your finish. Wipe down the dresser often. Use a tack cloth.
This sticky cloth picks up fine dust. Do this between grits. Do it before you apply paint or stain.
Sand in sections. Don’t try to do the whole dresser at once. Work on one panel or drawer front at a time. This helps you stay focused.
It ensures you don’t miss spots. It keeps your work consistent.
Consider an orbital sander. For larger dresser surfaces, an electric orbital sander can save a lot of time. But be careful. They can remove wood quickly.
Use a light touch. Practice on scrap wood first. Always follow the grain.
Hand sanding is often best for edges and details.
Don’t rush the final grits. The last sanding step is very important. It sets the stage for your finish. Take your time with the 180 or 220 grit.
This is what makes the surface feel so nice. It’s the difference between an okay job and a great job.
Real-World Context: Why Dressers Need Different Grits
Dressers live a hard life. They hold clothes. They get bumped.
They might have spills. Over time, finishes wear down. Old varnish can yellow.
Paint can chip. Repairs are often needed.
If a dresser has thick, old varnish, you need coarse grit. Sandpaper like 80 or 100 grit can cut through that. It’s a powerful tool for removing layers.
This step is about removal. It prepares the wood for a new start.
Once the old finish is gone, you have bare wood. Bare wood is usually a bit rough. It has small imperfections.
This is where medium grit comes in. Sandpaper like 120 or 150 grit smooths it out. It removes the marks left by the coarse grit.
This is the smoothing phase.
For a nice paint finish, you need it really smooth. Paint highlights every tiny scratch. Fine grit sandpaper, like 180 or 220 grit, is perfect.
It makes the wood feel like silk. It ensures your paint goes on evenly. There are no fuzzy bits.
This is the preparation for perfection.
If you’re staining, the grit choice is also key. Stains soak into the wood. Coarser grits might create blotches.
Finer grits (180-220) often give a more even stain. Some people even use 320 grit before staining. This really seals the wood pores.
It leads to a very uniform color.
The type of wood also plays a role. Soft woods like pine can get damaged easily. You might need to use finer grits sooner.
Hard woods like oak or maple can handle coarser grits longer. They are more forgiving.
Infographic: Grit Selection for Common Dresser Issues
Problem | Recommended Starting Grit | Steps to Follow
Stripping Old Varnish/Paint | 80-100 Grit | Follow with 120, then 150, then 180-220.
Removing Deep Scratches/Dents | 80-120 Grit | Follow with 150, then 180-220.
General Surface Smoothing | 120-150 Grit | Follow with 180-220.
Preparing for Paint | 150-180 Grit | Follow with 220.
Preparing for Stain | 180-220 Grit | Some prefer 320 for very even stain application.
Smoothness Between Finish Coats | 320-400 Grit | Light sanding to de-nib and ensure adhesion.
What This Means for Your Dresser Project
Understanding sandpaper grits means you can plan better. You won’t buy the wrong supplies. You’ll know what to expect at each stage.
This saves you time and money.
When it’s normal: It’s normal to use multiple grits. It’s normal to feel a difference in smoothness after each grit. It’s normal to wipe away dust often.
It’s normal to sand with the wood grain.
When to worry: You should worry if you see deep scratches after using 180 or 220 grit. This means you might have skipped a grit. Or you used too much pressure.
You should worry if your sandpaper seems to stop cutting. It might be clogged. You might need a new sheet.
Worry if you’re sanding against the grain and can’t stop. You’ll have a lot of fixing to do.
Simple checks: Run your hand over the wood after sanding. Does it feel smooth? Or are there rough spots?
Look at the wood in good light. Do you see any deep scratches? These are signs.
They tell you if you need to do more work.
A well-sanded dresser is a joy to finish. It looks professional. It feels good to the touch.
It shows you paid attention to detail. This is where the magic happens. It’s not just about removing old stuff.
It’s about creating a perfect canvas.
Quick Fixes and Tips for Sanding
Sometimes, you need a little extra help. Here are some tips that make sanding easier.
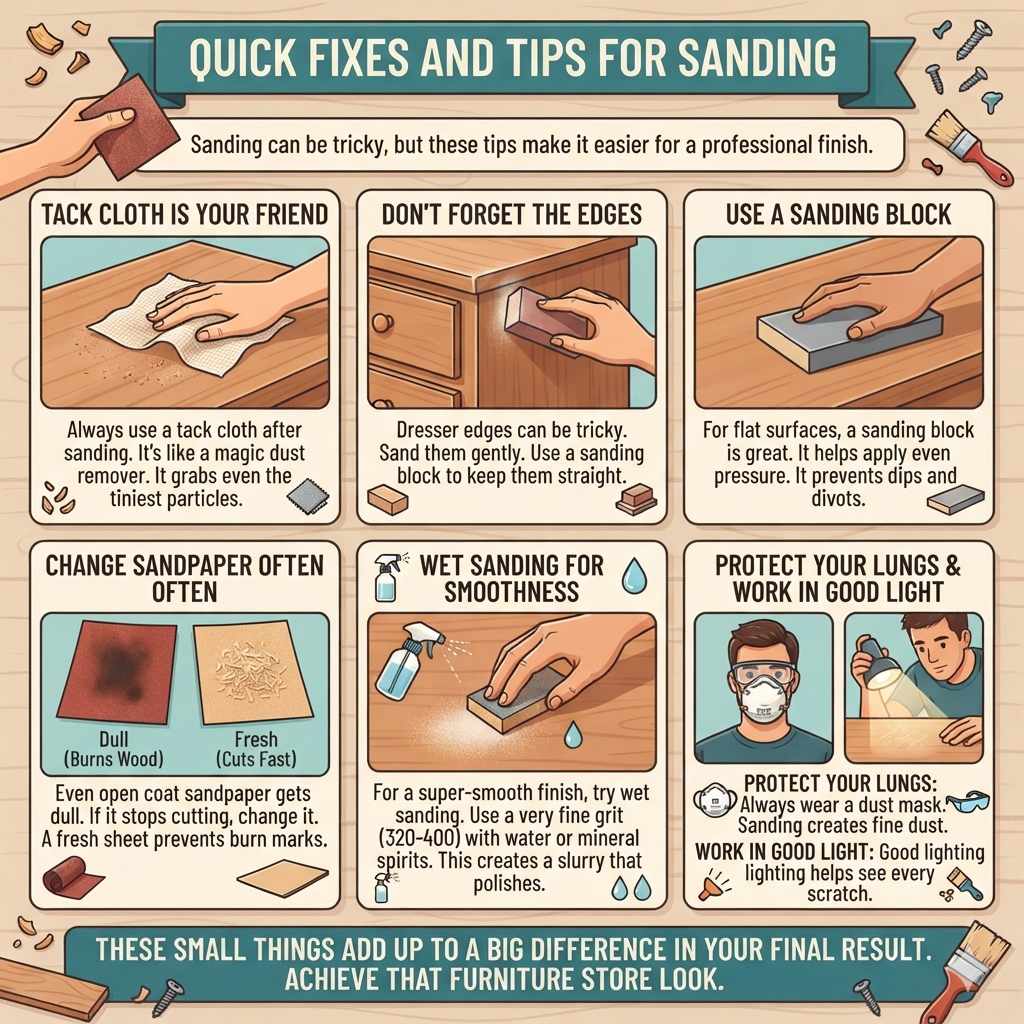
- Tack Cloth is Your Friend: Always use a tack cloth after sanding. It’s like a magic dust remover. It grabs even the tiniest particles.
- Don’t Forget the Edges: Dresser edges can be tricky. Sand them gently. Use a sanding block to keep them straight.
- Use a Sanding Block: For flat surfaces, a sanding block is great. It helps you apply even pressure. It prevents dips and divots.
- Change Sandpaper Often: Even open coat sandpaper gets dull. If it stops cutting, change it. A fresh sheet works faster. It prevents burn marks.
- Wet Sanding for Smoothness: For a super-smooth finish, especially before clear coats, try wet sanding. Use a very fine grit (320-400) with water or mineral spirits. This creates a slurry that polishes the surface.
- Protect Your Lungs: Always wear a dust mask. Sanding creates fine dust. It’s not good to breathe in.
- Work in Good Light: Good lighting helps you see every scratch. It ensures you don’t miss any spots.
These small things add up. They make a big difference in your final result. They help you get that furniture store look.
Frequently Asked Questions About Dresser Sandpaper Grit
What is the best sandpaper grit for old furniture?
For old furniture, you often need to start coarser. Begin with 80-100 grit if there’s thick old paint or varnish. Then move to 120-150, followed by 180-220 for a smooth finish.
Always sand with the wood grain.
Do I need to sand between coats of paint on a dresser?
Yes, it’s a good idea. After the first coat of paint, you might get small bumps or fuzzy bits. Lightly sand with very fine grit sandpaper, like 220-320.
This makes the next coat stick better and look smoother.
Can I use an orbital sander on a dresser?
Yes, an orbital sander can speed things up for large flat areas. Use it with a light touch and always follow the wood grain. Be careful around edges and details; hand sanding might be better for those.
What grit sandpaper should I use before staining a dresser?
For staining, you want a smooth surface that can absorb the stain evenly. Start with 120-150 grit, then move to 180-220 grit. Some people prefer 320 grit for an extra smooth surface before staining, especially for lighter or oil-based stains.
How do I fix scratches left by sandpaper?
If you see scratches, you likely skipped a grit or sanded too hard. You need to go back to a coarser grit to remove those scratches, then work your way back up to your desired fine grit. Always sand with the grain.
Is 220 grit sandpaper fine enough for a dresser?
Yes, 220 grit is a very good final grit for most dresser projects before painting or staining. It provides a smooth surface that paint and stain can adhere to well. For an ultra-smooth feel or before clear coats, you might go up to 320 grit.
Conclusion
Choosing the right sandpaper grit for your dresser is key. It’s about understanding the task. It’s about working from coarse to fine.
Patience and the right tools lead to beautiful results. You’ve got this!


