How To Take The Stand Off A Samsung Tv
Removing the stand from a Samsung TV involves carefully unscrewing it from the back panel. Most stands attach with several screws. You’ll need a compatible screwdriver, and sometimes a helper, to support the screen.

FADASTON
FADASTON Ultra Slim Aluminum Card Phone Stand,…
- "✅ 1. Extremely thin and portable, with a pocket-sized card design Only 2mm ultra-thin card-style design, lightweight and pocket-s…
- "✅ 2. Aluminum alloy is strong and durable Scratch-resistant, wear-proof and anti-oxidation. One-piece molding craft brings excell…
- "✅ 3. Multi-angle freely adjustable + Extremely strong and stable support Multi-angle adjustable design, easily tilt to your prefe…
As an Amazon Associate I earn from qualifying purchases.
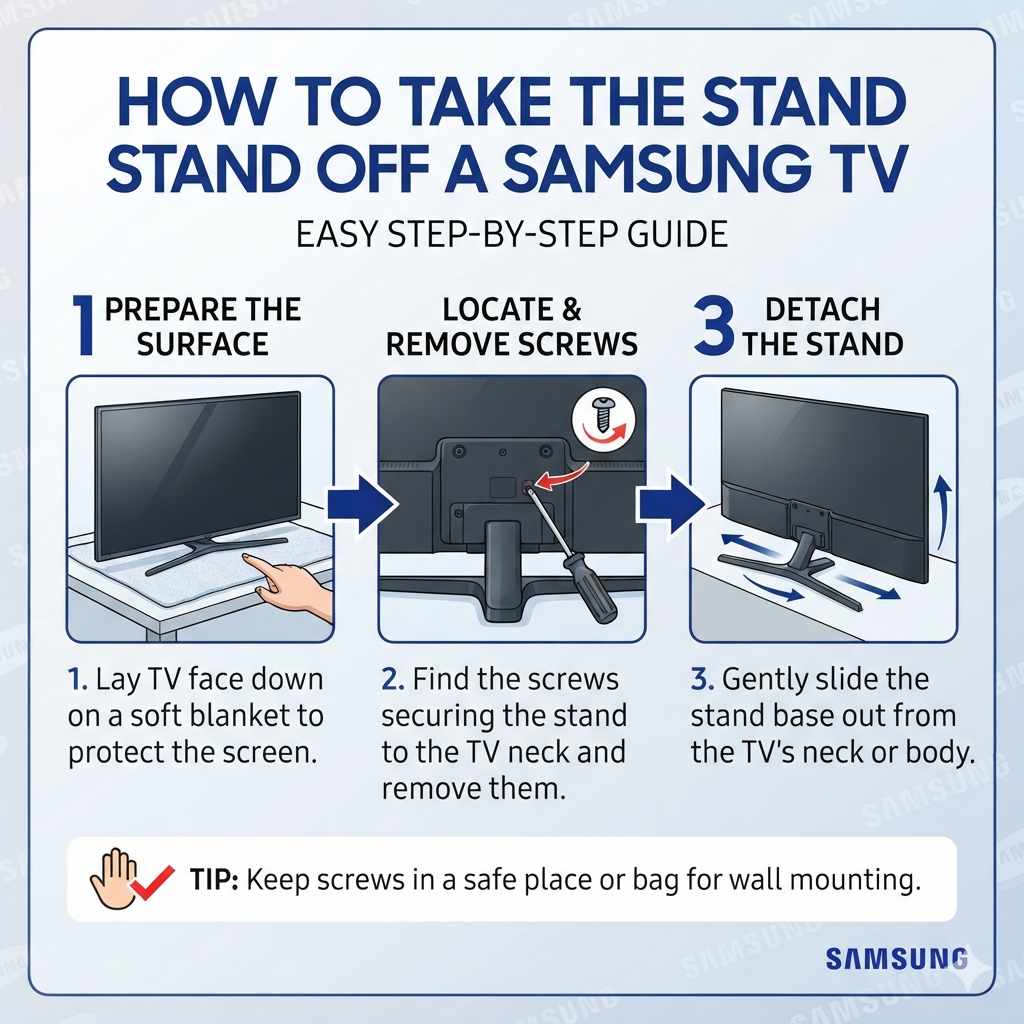
Always place the TV face down on a soft surface. Follow the specific screw locations for your model.

Understanding Your Samsung TV Stand
Samsung makes many different TV models. Each one can have a slightly different stand design. However, most of them work in a similar way.
The stand usually attaches to the back of the TV. It might be a single piece or two separate legs. These pieces are held in place by screws.
These screws are often located at the bottom or lower back of the TV. They go into pre-drilled holes.
Sometimes, the stand might have little clips or a locking mechanism. This is less common but good to know. You can usually find specific information about your TV model.
The user manual is the best place for this. If you don’t have it, you can often find it online. Just search for your TV’s model number.
This will show you diagrams and specific instructions.
Knowing your stand type helps a lot. Is it a single pedestal stand? Or is it two separate feet?
This can change how you need to support the TV. A single stand might make the TV top-heavy. Two feet might offer more stability when it’s lying down.

Why You Might Need to Remove the TV Stand
There are several common reasons people need to remove their TV stand. The most frequent one is wall mounting. Most people want their TV on the wall these days.
This looks cleaner and saves space. To wall mount, the stand has to go. It just gets in the way of the mount.
Moving is another big reason. When you pack a TV to move it, the stand can be awkward. It sticks out and makes the TV box harder to handle.
Taking it off makes the TV itself flatter. This means it can fit better into a box or a moving vehicle. It also protects the stand and the TV during transit.
Some people also remove the stand for aesthetic reasons. They might want a super slim profile. Or maybe they are building a custom entertainment center.
In these cases, the stand is just not needed. It’s extra bulk that they can live without.
Finally, sometimes a stand might be broken or loose. If it’s damaged, you’ll want to remove it. This prevents further damage.
Or it might just be wobbly. For safety, it’s better to remove a damaged stand. Then you can decide if you want to replace it or get a wall mount.
Gather Your Tools and Prepare Your Space
Before you start, make sure you have everything ready. This makes the whole process smoother. You will need a screwdriver.
Most Samsung TVs use Phillips head screws. You might need a medium-sized one. Sometimes, a small one is needed for very tiny screws.
It’s good to have a set of screwdrivers. This way you have options if one doesn’t fit right.
It’s also really helpful to have someone help you. TVs can be heavy and awkward. Having a second person helps you lift and support the TV.
This is especially true for larger screens. They can also help hold the stand steady as you remove the screws. This prevents the TV from tipping or falling.
You’ll need a safe place to work. Find a flat, stable surface. A table or the floor works well.
It’s crucial to put something soft down first. A blanket, a towel, or even the TV’s original foam packaging is perfect. This protects the TV screen from scratches.
You do not want to scratch that nice display. A scratch is permanent.
Make sure you have good lighting. You need to see the screws clearly. Also, keep pets and small children away from the area.
You don’t want any accidents. A clear, safe space is key to a successful stand removal.
Step-by-Step Guide to Removing the Stand
Now, let’s get to the actual removal. This is where you need to be careful and follow the steps. Remember, patience is your friend here.
Step 1: Power Down and Unplug. First, turn off your TV. Then, unplug it from the wall. Unplug all cables connected to the TV.
This includes HDMI cords, power cords, and any antenna cables. Safety first. You don’t want any power running through it.
Step 2: Position the TV. This is where the helper comes in handy. Gently lay the TV face down. Use the soft surface you prepared.
Make sure the screen is fully protected. The stand should be facing up. This gives you good access to the screws.
Step 3: Locate the Screws. Look at the base of the TV. You should see where the stand connects. There will be screws holding it.
They are usually in a line or a small cluster. Sometimes they are hidden under plastic covers. If so, you might need to gently pry those covers off with your fingernail or a plastic tool.
Step 4: Unscrew the Stand. Take your Phillips head screwdriver. Match it to the screw size. Slowly and carefully turn the screws counter-clockwise.
This is like opening a jar. As you loosen the screws, keep a steady hand. Don’t force them.
If a screw feels stuck, stop. You don’t want to strip the screw head.
Step 5: Remove the Stand. Once all screws are out, the stand should be loose. Your helper can now gently lift the stand away from the TV. Make sure you remove the entire stand.
Some stands have two parts. Remove both if that’s the case. Place the stand aside in a safe place.
Step 6: Check for Remaining Parts. Look at the back of the TV. Make sure no little brackets or screws are left attached. If there are, remove them too.
Some TVs might have small plastic pieces that need to be removed. They are often part of the stand assembly.
Step 7: Keep Screws Safe. Put all the screws you removed in a small bag or container. It’s easy to lose them. You’ll need them if you ever want to reattach the stand.
Dealing with Different Samsung TV Stand Types
Samsung has a few common stand designs. Knowing yours can help you. Let’s look at them:
Common Samsung Stand Styles
Style 1: Two-Legged Stand
This is very popular. Your TV has two feet, usually one on each side at the bottom. These are attached with screws.
You’ll likely remove two or three screws for each leg. They usually slide out or lift straight up after unscrewing.
Style 2: Center Pedestal Stand
This stand is one piece. It connects to the center of the TV’s back. It might look like a single neck with a wide base.
This often uses more screws to secure it. Sometimes, the neck part detaches from the base, but usually, the whole unit comes off the TV.
Style 3: Swivel or Articulating Stands
These are less common on newer TVs. They allow the TV to turn. They might have more complex attachment points.
Always check your manual for these. They could have extra latches or bolts.
The key is always to look at the connection point. See how it attaches. Then match that to the screws you see.
If you’re unsure, a quick online search for your exact TV model plus “remove stand” should give you visual guides.
My Own Stand Removal Fiasco (And How I Fixed It!)
I remember the first time I had to remove a TV stand. It was for a 55-inch Samsung. I was moving apartments and wanted to wall mount it at the new place.
I thought, “How hard can this be?” Famous last words, right?
I laid the TV down on my living room rug. I found the screws. Easy enough.
I started unscrewing them. But one screw was really tight. I kept turning, and turning.
I started to panic. Was I going to strip it? That would be a disaster.
I could feel the screw head start to get a little worn. My heart sank. I imagined calling Samsung support and being told I broke it.
That thought made my stomach do flips. I felt so frustrated and a bit silly.
Then, I remembered something. My dad always said, “Don’t force it, find the right tool.” I went to my toolbox. I found a slightly larger Phillips head screwdriver.
The tip was a bit more worn. I tried that one. It fit the screw head better.
I applied gentle pressure and turned. Click! It started to move.
It wasn’t stuck; the first screwdriver just wasn’t getting a good grip. Once that one was out, the rest were a breeze. I learned a valuable lesson that day: the right tool makes all the difference.
And don’t be afraid to stop and reassess.
What if a Screw is Stuck or Stripped?
Dealing with a stuck or stripped screw is frustrating. But don’t despair. There are a few things you can try.
First, ensure you have the correct screwdriver size. A screwdriver that’s too small or too big will strip the screw head faster. Make sure the screwdriver fits snugly.
If the screw is just tight, try applying a bit of penetrating oil. Let it sit for a few minutes. Then try unscrewing again.
Sometimes a rubber band can help. Place a wide rubber band over the screw head. Then insert your screwdriver.
The rubber can fill the gaps in a slightly stripped head. This can give the screwdriver more grip.
If the screw is truly stripped, you might need a screw extractor kit. These kits have special bits. They bite into the stripped screw head.
You then turn the extractor to remove the screw. You can find these at most hardware stores. Follow the kit’s instructions carefully.
This is often a last resort.
If all else fails, you might need to carefully drill out the screw. This is a delicate process. You need to drill just enough to remove the screw head.
Then you can pull the stand off. The remaining screw shaft can be removed with pliers. If you’re not comfortable with drilling, it’s best to seek professional help.
You don’t want to damage the TV’s casing.
Securing Your TV After Stand Removal
Once the stand is off, your TV is likely to be unstable if you try to stand it up. If you are immediately mounting it, that’s fine. But if you need to move it or set it down temporarily, do so carefully.
When you’re not using a stand, the safest way to place your TV is face down. Again, use a soft, protective surface. This prevents the screen from being damaged.
You can also use the original packaging if you still have it. Some people use TV stands that are designed for wall-mounted TVs. These are often minimal and keep the TV stable on a surface.
If you plan to use your TV without a stand for a while, consider a wall mount even if you don’t install it right away. You can place the TV on its back on a soft surface. Then you can attach the wall mount brackets to the TV.
This gives you a stable point of contact. Ensure the brackets are the correct VESA size for your TV.
When to Call a Professional
While removing a TV stand is often a DIY task, there are times when it’s better to call for help. If you have a very large or heavy TV, the risk of dropping it is higher. For TVs over 65 inches, it’s often worth the peace of mind to have two strong people handle it.
If you’ve tried to remove a screw and it’s not budging, or if you think you’ve damaged the screw head, stop. Continuing to force things can lead to more expensive damage. The cost of a professional to remove a stubborn stand is far less than replacing a cracked screen.
Also, if your TV model is particularly complex or has unusual attachment methods, consult your manual or a pro. Some older or specialized TVs might have unique designs that aren’t intuitive. Your TV’s warranty might also be affected if you cause damage while trying to remove the stand yourself.
It’s always wise to check your warranty terms.
Quick Checklist Before You Start
- Safety First: TV unplugged and powered off.
- Space: Large, flat, soft surface.
- Helper: A second person to assist.
- Tools: Correct size Phillips head screwdriver set.
- Manual: Your TV’s model number handy for online search.
- Patience: Don’t rush the process.
Reattaching the Stand (If You Change Your Mind)
If you decide you want to use the stand again, the process is just reversed. Make sure you have all the original screws. Clean the connection points on both the TV and the stand.
Place the stand in its correct position.
Align the screw holes. Gently insert the screws and start turning them clockwise. Hand-tighten them first.
This ensures they are properly seated. Then, use your screwdriver to tighten them fully. Don’t overtighten.
You don’t want to strip the threads or crack the plastic casing. Just make them snug and secure.
With the stand reattached, you can then carefully lift the TV upright. It’s a good idea to have your helper still there. This is especially true for larger TVs.
Ensure it sits evenly on its stand. Test it gently to make sure it’s stable.
Common Mistakes to Avoid
When removing a TV stand, a few common mistakes can cause trouble. One big one is not using a soft surface. This can lead to scratches on the screen.
Another is trying to do it alone. TVs are awkward, and dropping one can be disastrous.
Using the wrong screwdriver is also a frequent problem. It can strip screws, making them hard to remove. Forcing a stuck screw is another error.
This can damage the screw or the TV. Remember, they are usually not put on with glue. They just need the right force and tool.
Forgetting to unplug the TV is a major safety risk. Always ensure the power is completely cut off. Lastly, rushing the job.
Take your time. Look at what you’re doing. Rushing leads to mistakes.
Stand Removal vs. Wall Mounting
Stand Removal:
- Goal: Detach the TV from its base.
- Tools: Screwdrivers, soft surface, helper.
- Focus: Safely unscrewing the stand.
- Outcome: TV can be moved or mounted.
Wall Mounting:
- Goal: Secure TV to a wall.
- Tools: Drill, stud finder, level, wall mount kit, screwdrivers, helper.
- Focus: Finding wall studs, securing mount, attaching TV brackets.
- Outcome: TV hangs on the wall.
Stand removal is usually a prerequisite for wall mounting. It’s the first step. It allows you to get to the VESA mounting holes on the back of the TV.
These are what the wall mount bracket attaches to.
My Experience with Wall Mounts After Stand Removal
After removing the stand from my Samsung TV, I felt a sense of accomplishment. The next step was wall mounting. I had bought a VESA-compliant mount.
It came with its own set of screws and instructions. The TV itself had four threaded holes on the back. These were the VESA mounting points.
They were now exposed after the stand was gone.
The mount bracket itself attached to these holes. This part was relatively easy. The tricky part of wall mounting is finding studs in your wall.
You need to be sure the mount is secure. I used a stud finder. It took a few tries.
I marked the stud locations. Then I drilled pilot holes. Attaching the bracket to the wall felt solid.
Then, with my helper, we lifted the TV. We slid the mount arms onto the wall bracket. We secured it with safety screws.
It felt so good to see it hanging perfectly straight. It made the room feel so much bigger.
The whole process, from stand removal to final mounting, took about two hours. But that sense of having a clean, modern setup was worth it. It’s a project many people can do themselves with a little care.
Ensuring Screen Protection During the Process
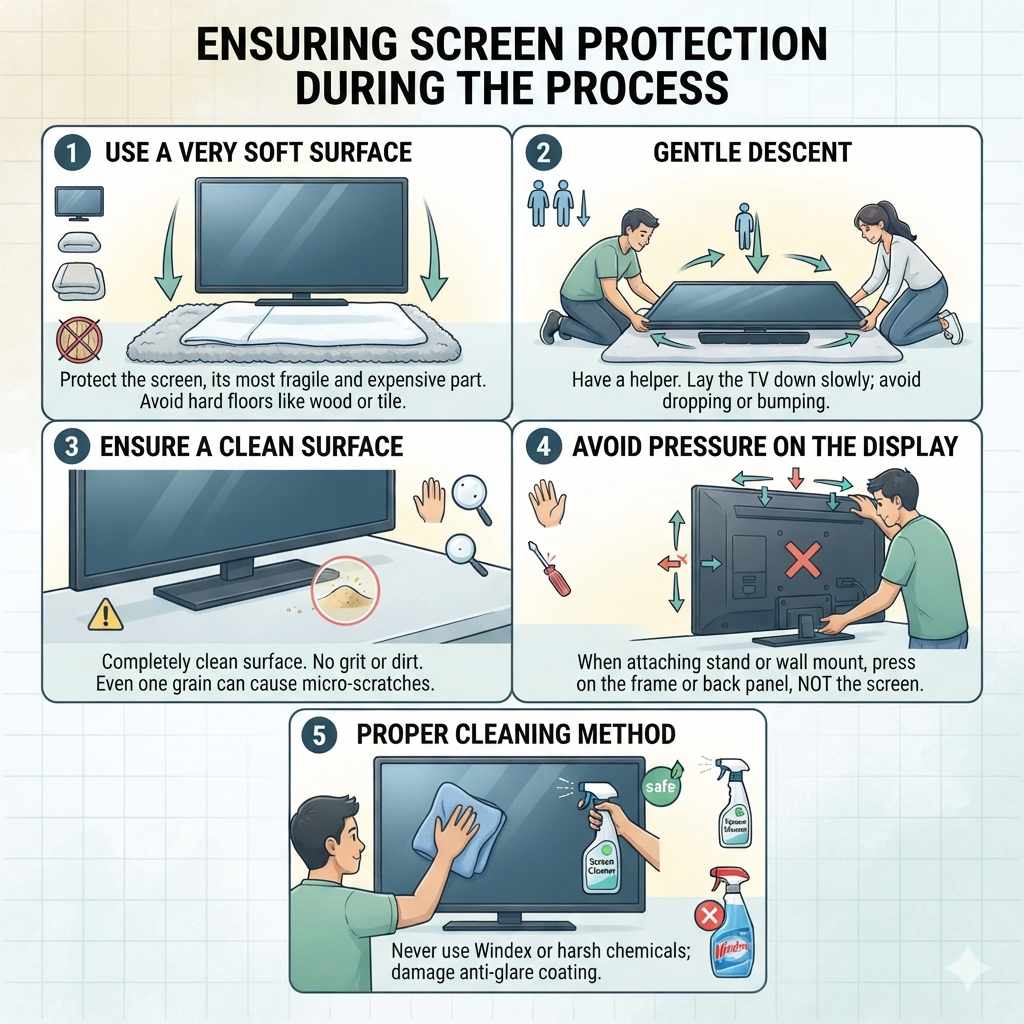
Protecting the screen is paramount. The screen is the most fragile part of your TV. It’s also the most expensive to fix.
Always use a very soft surface. Think thick blankets, large towels, or the original foam packaging. Avoid placing the TV directly on hard floors like wood or tile.
Even a slight bump can cause damage.
When laying the TV down, do it gently. Don’t just drop it. Have your helper control the descent.
When placing it face down, ensure the surface is completely clean. No dirt or grit. This can cause micro-scratches over time.
Even a single grain of sand can be an issue.
When reattaching the stand or a wall mount, be careful not to press too hard on the screen area. The pressure should be on the TV’s frame or the back panel, not the display itself. If you need to clean the screen, use a microfiber cloth and special screen cleaner.
Never use Windex or harsh chemicals. They can damage the anti-glare coating.
Frequently Asked Questions
How do I know which screwdriver to use for my Samsung TV stand?
Most Samsung TVs use standard Phillips head screws. You will likely need a medium-sized Phillips head screwdriver. It’s best to have a set handy. Try a few different sizes to find the one that fits the screw head snugly. A good fit prevents stripping the screw.
Can I remove the stand if I don’t have a helper?
It is strongly advised to have a helper, especially for larger TVs. TVs are heavy and awkward to handle alone. Trying to remove the stand by yourself increases the risk of dropping the TV. This can cause significant damage. If you must do it alone, use extreme caution and support the TV from all sides.
What if my Samsung TV has a different stand design than described?
Samsung offers many models with varying designs. If your stand looks different, your best bet is to find your TV’s specific model number. You can usually find this on a sticker on the back of the TV. Then, search online for ” remove stand” for specific instructions or videos. Your TV’s user manual is also a great resource.
How much force should I use when unscrewing the stand?
You should use just enough force to turn the screw. Screws for TV stands are usually not overtightened. If a screw feels very tight or won’t budge, do not force it. Try a different screwdriver or a bit of penetrating oil. Forcing it can strip the screw head or damage the TV’s casing.
Will removing the stand void my Samsung TV warranty?
Generally, removing the stand for purposes like wall mounting or moving does not void your warranty. However, if you damage the TV during the removal process due to mishandling or using incorrect tools, that damage may not be covered. Always check your specific warranty terms and conditions with Samsung.
Can I store the stand and screws somewhere safe?
Yes, it’s highly recommended. Place all screws and any small parts from the stand into a sealed plastic bag or a small container. Label the bag with your TV model number. Store this in a safe place, like a storage bin or a drawer, so you can easily find them if you ever need to reattach the stand.
Final Thoughts on Stand Removal
Taking the stand off your Samsung TV is a manageable task. It requires a bit of preparation and careful execution. By gathering the right tools and taking safety precautions, you can do it smoothly.
Remember to protect your TV’s screen. And don’t hesitate to ask for help. With a little patience, you’ll have your TV ready for its next move or mount in no time.
You’ve got this!
Related pick: Check today's price on Amazon
Products related to this article
Sponsored / affiliate links. As an Amazon Associate I earn from qualifying purchases. I may earn additional commission from eligible campaigns.