How To Change Dresser Knobs In 5 Easy Steps
Changing dresser knobs is a quick and easy DIY project that instantly refreshes the look of your furniture. This guide will show you how to swap out old knobs for new ones in just five simple steps, helping you update your decor without much effort or cost.
What Are Dresser Knobs and Why Change Them?
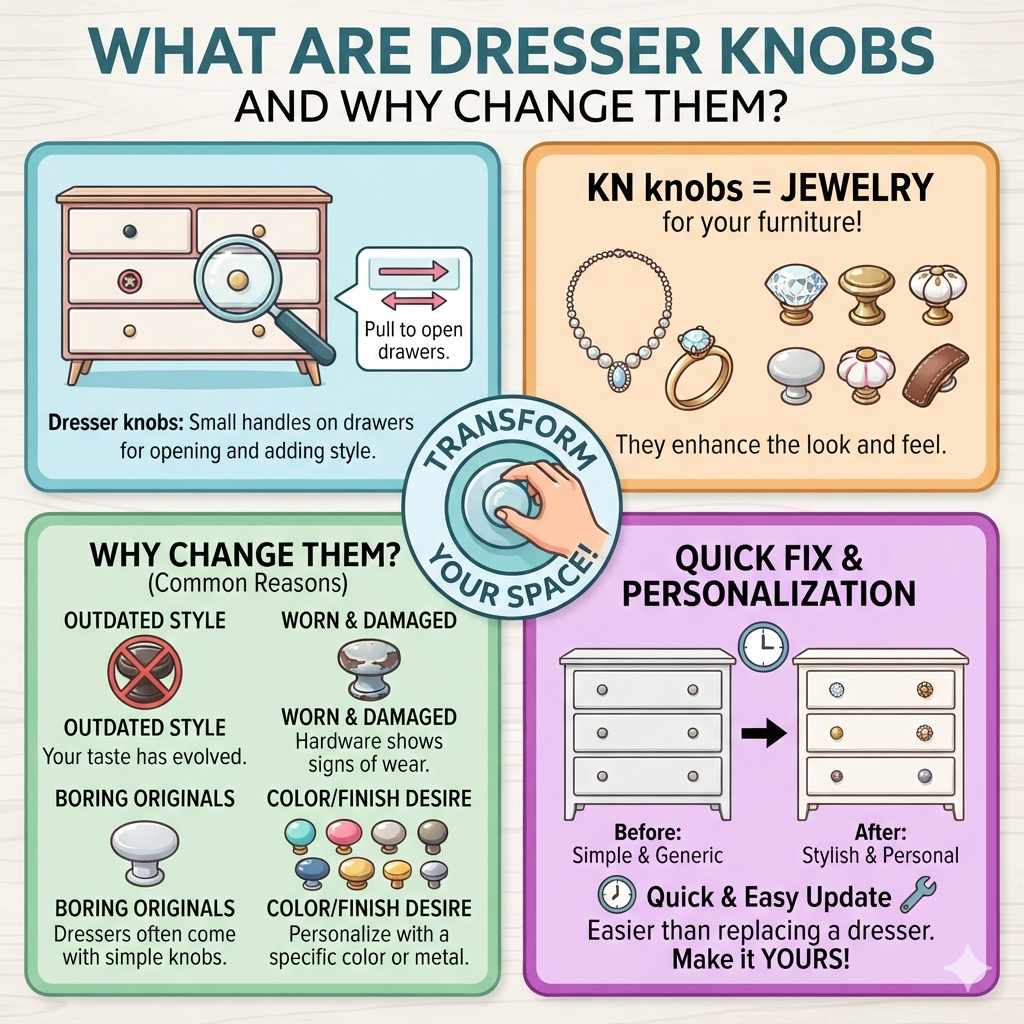
Dresser knobs are the little handles on drawers. They help you pull them open. They also add to the look of your dresser.
Think of them like jewelry for your furniture.
Why change them? Many reasons! Your style might have changed.
The old knobs might be worn out. Maybe the dresser came with boring knobs. You might want a certain color or finish.
Changing knobs is a quick fix. It’s much easier than buying a whole new dresser. It lets you personalize your space.
It feels good to make something yours.
My Dresser Knob Fiasco (and What I Learned)
I remember one time, I bought this really cute vintage dresser. It was perfect for my bedroom. But the knobs were this dark, almost black, metal.
They looked so heavy. My room had light colors. The knobs just felt out of place.
I really wanted something lighter, maybe with a brushed nickel finish. I saw some lovely ones online.
So, I decided to change them. I grabbed my screwdriver. I thought it would be simple.
I unscrewed the old knobs. Easy enough. Then I tried to screw in the new ones.
And they just wouldn’t tighten properly. They wiggled. I felt a little panic.
What was I doing wrong? Was the dresser broken? Was I just not good at this?
After a few frustrating minutes, I realized the screws for the new knobs were a tiny bit too long. They went all the way through the drawer front. They didn’t catch the nut on the inside.
I almost gave up. But then I dug through my junk drawer. I found some washers.
I put them on the screws. This made them shorter. And guess what?
They tightened up perfectly! It was such a relief. This taught me that sometimes, small details matter.
Having the right screw length is key. And sometimes, a simple washer is the hero.
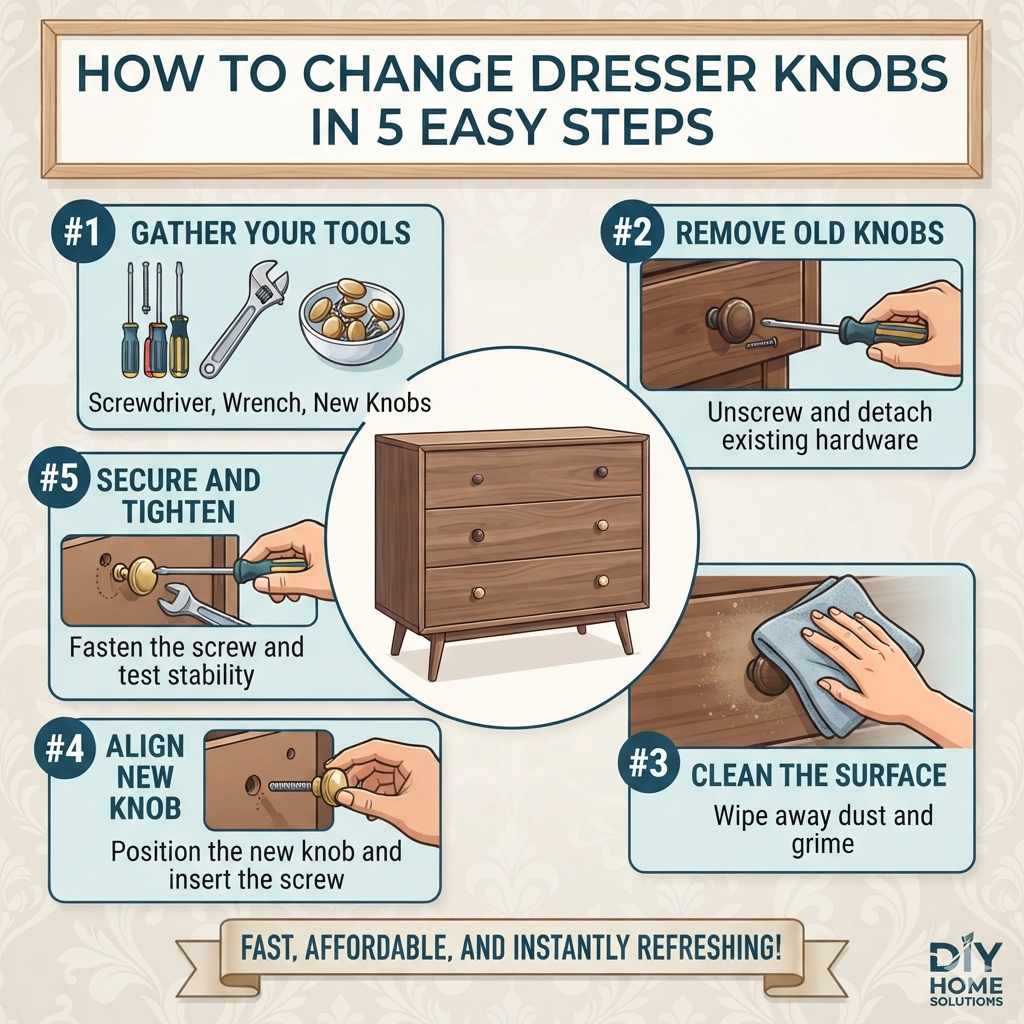
Step 1: Gather Your Tools and New Knobs
First things first, you need your supplies. This makes the job go smoothly. It’s like getting ready to bake.
You need all your ingredients out.
You will need your new dresser knobs. Make sure they are the right size. Most knobs screw into a standard hole.
But it’s good to check. You’ll also need a screwdriver. A Phillips head screwdriver is common.
Sometimes, a flathead works. It depends on the screw.
If your screws are too long or too short, you might need new screws. Or, like me, you might need washers. These are little metal rings.
They can help fill gaps. They make screws fit better. A tape measure can be handy too.
You might want to measure the distance between holes. This is important for some drawer pulls.
Choosing Your New Knobs
Think about style. Do you want modern, rustic, or vintage? Materials like metal, glass, or ceramic are popular.
Consider the finish. Brushed nickel, matte black, brass, or chrome all look different.
Check the size. Make sure the knob itself is a good size for the drawer. It should be easy to grip.
Measure the screw hole. Most are standard. But some might need specific screws.
Step 2: Remove the Old Knobs
This is the easiest part! Go to your dresser. Find the first knob you want to change.
Get your screwdriver. Look at the back of the drawer. You should see the screw that holds the knob.
Turn the screwdriver counter-clockwise. This is like unscrewing anything else. Keep turning until the screw comes all the way out.
Once the screw is out, the old knob should come right off. Sometimes, they can be a little stuck. If it’s stuck, try wiggling it gently.
If it still won’t budge, a little spray lubricant might help. Let it sit for a minute. Then try again.
Put the old knob and screw in a safe place. You might want to keep them. Or you can throw them away.
Don’t lose the screws! You might need them if your new knobs don’t come with screws.
Quick Tip for Stubborn Knobs
Test the screw direction. Most screws turn counter-clockwise to loosen. But very rarely, it might be the other way.
Gentle persuasion. If a knob is really stuck, don’t force it too hard. You could damage the drawer front. Wiggling is usually best.
Look for hidden fasteners. Most knobs have one screw. But some decorative pulls might have two.
Step 3: Prepare the New Knobs and Screws
Now you have your shiny new knobs. Look at the screws that came with them. Do they look like they’ll fit?
Are they the right length?
As I found out, screw length is super important. If the screw is too long, it won’t catch the nut on the inside. It might even poke through the other side.
If it’s too short, it won’t go in far enough to hold the knob securely.
Most dresser knobs use standard screws. They are about 1 inch long. But it’s always best to check.
Hold your new knob up to the drawer. See how the screw looks. If you’re unsure, it’s good to have a few different screw lengths on hand.
Or those handy washers!
Sometimes, new knobs come with screws that are too long. This is common. You can buy shorter screws at a hardware store.
Or you can use washers. Washers act like spacers. They can shorten the effective length of the screw.
This stops it from going too far.
Understanding Screw Length
Drawer Thickness: The screw needs to be long enough to go through the drawer front PLUS grip the nut or hole on the inside.
Too Short: Knob feels loose, might fall off. Not enough thread engagement.
Too Long: Screw pokes out the back. May not tighten properly. Could damage the inside of the drawer.
Washers: A simple fix for screws that are just a little too long. Add one or two washers to shorten the reach.
Step 4: Attach the New Knobs
This is where your dresser starts to transform! Take your new knob. Put the screw through the hole from the inside of the drawer.
This is the opposite of how you took the old one out.
Line up the screw with the hole on the knob on the outside. Start turning the screw. You can do this with your fingers at first.
Make sure it’s going in straight. This prevents cross-threading. That means the screw gets stuck and can’t be removed.
Once it’s started, use your screwdriver. Turn it clockwise. This tightens the screw.
Don’t overtighten it! This is important. You don’t want to strip the screw.
Or crack the drawer front. Just tighten it until the knob feels snug and secure. Give it a gentle wiggle to test.
Repeat this for all the drawers. Step back and admire your work! It’s amazing how much difference new hardware makes.
It’s like giving your dresser a facelift.
Attachment Styles
Single Screw Knobs: Most common. One screw from the back.
Two Screw Drawer Pulls: These are longer handles. They usually have two holes. You’ll need to align both screws carefully.
Specialty Hardware: Some unique pieces might have different mounting systems. Always check the product details.
Step 5: Final Checks and Enjoy!
You’ve done it! Your dresser has a fresh new look. But let’s do a quick final check.
It’s always a good idea to be sure.
Open and close each drawer. Do the knobs feel good? Are they all tight?
Do they scrape against anything? If a knob is loose, tighten the screw a little more. If it’s too tight, loosen it slightly.
Sometimes, you need that perfect sweet spot.
Look at the dresser from different angles. Do the knobs look straight? Do they match?
You’ve officially updated your furniture. This is a small project, but it’s very satisfying. You made your home look nicer with your own hands.
That’s a great feeling.
Enjoy Your New Look
Clean Up: Tidy your workspace. Put tools away.
Admire: Take a moment to appreciate the change. You earned it!
Share: Show off your updated dresser to friends or family.
Real-World Context: When Does This Apply?
Changing dresser knobs is super common in home decorating. It fits many situations. Think about moving into a new place.
The old dresser you inherited might not match. New knobs fix that fast. Or maybe you get tired of your room’s look.
A quick knob swap is an easy refresh.
Kids’ rooms are another great place for this. You can find fun, colorful knobs. They add personality to their furniture.
This is safer than painting. It’s also less work. It’s a way to involve kids in decorating too.
They can pick out their own knobs.
In older homes, original hardware can be hard to find. If a knob breaks, you might need to replace all of them. This keeps the look consistent.
It’s about making old furniture feel new again. It’s a budget-friendly way to update. It’s a project for almost anyone.
What This Means For You: Normal vs. Concerning
It’s normal for new knobs to feel a little different. They might be a different shape or size. This is okay.
The key is that they are secure.
When is it concerning? If a knob keeps coming loose after you tighten it. This could mean the screw hole is stripped.
Or the nut on the inside is damaged. In this case, you might need a bigger screw. Or wood filler to repair the hole.
Sometimes, you just have to accept that old furniture needs a little extra love.
If the new knobs rub against the drawer front when you open it, that’s not ideal. It could damage the finish. You might need to check the screw length again.
Or maybe the knob itself is too large for the drawer opening.
Normal & Concerning Signs
Normal: New knobs feel firm. Drawers open and close smoothly. The look is updated.
Concerning: Knobs wobble even after tightening. Screws won’t stay in. Drawers stick or scrape because of the new hardware.
When to Worry: If you notice cracks in the wood around the knob hole. This means you might be overtightening.
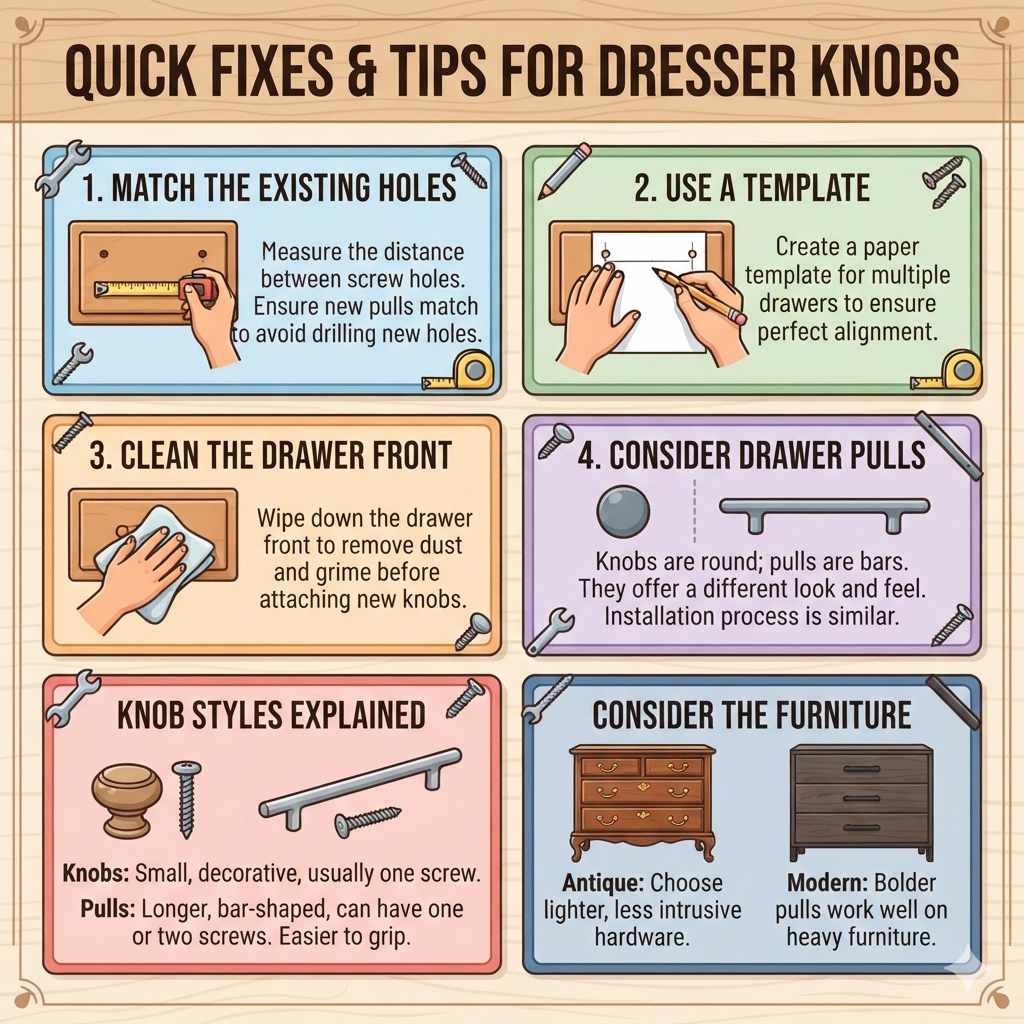
Quick Fixes & Tips for Dresser Knobs
Here are some extra tips to make your knob-changing experience even better.
Match the existing holes: If you’re replacing drawer pulls, measure the distance between the screw holes. Make sure your new ones match. This avoids drilling new holes.
Use a template: For multiple drawers, make a paper template. Mark the hole placement. This ensures all your knobs line up perfectly.
Clean the drawer front: Before you put on the new knobs, wipe down the drawer front. Remove any dust or grime. It’s a good chance to do a little cleaning.
Consider drawer pulls: Knobs are round. Drawer pulls are bars or levers. They offer a different look and feel.
The process is very similar for most pulls.
Knob Styles Explained
Knobs: Small, often round or decorative, usually one screw.
Pulls/Handles: Longer, often bar-shaped, can have one or two screws. They are easier to grip for larger drawers.
Consider the Furniture: For delicate antique pieces, choose lighter, less intrusive hardware. For heavy, modern furniture, bolder pulls can work well.
Frequently Asked Questions About Changing Dresser Knobs
What kind of screwdriver do I need for dresser knobs?
Most dresser knobs use standard screws. You will likely need a Phillips head screwdriver. Sometimes, a flathead screwdriver works.
Look at the screw head to see its shape. The most common is the cross shape, which needs a Phillips head.
How do I know if my new knobs will fit?
Check the screw hole size. Most dresser knobs use a standard 8-32 thread size. The main thing to check is the length of the screw.
It needs to go through your drawer front and catch the nut or hole on the inside without being too long or too short. If your new knobs don’t come with screws, you can buy them separately.
My new screws are too long. What can I do?
This is a common issue! You can try adding washers to the screw. Washers act as spacers.
They can shorten the effective length of the screw. This stops it from going too far into the drawer. You can also buy shorter screws at a hardware store.
Just bring one of the old screws with you to match the length and thread.
Can I change drawer pulls if they have two screws?
Yes, you can! Drawer pulls usually have two screws. You’ll need to measure the distance between the two screw holes on your drawer front.
This is called the “center-to-center” measurement. Then, buy new drawer pulls with the same center-to-center measurement. This way, you won’t need to drill new holes.
How do I keep my new knobs from loosening over time?
Make sure you tighten the screw firmly, but don’t overtighten. If a knob still loosens, you can use a tiny bit of thread locker on the screw. This is a special glue for screws.
A small drop is usually enough. Another trick is to ensure the screw is the right length so it engages well with the nut inside.
What if the hole for the knob is too big for the new screw?
If the hole is too big, the screw might not grip properly. You can try using a slightly larger screw. If that doesn’t work, you might need to repair the hole.
You can use wood filler to fill the hole, let it dry, and then drill a new pilot hole. Be patient with this process. Sometimes, a special threaded insert for wood can also work.
Conclusion: A Simple Update, A Big Change
Changing dresser knobs is one of those little home projects that pays off big. You can transform a piece of furniture easily. It’s a skill anyone can learn.
You don’t need to be a handyman. Just a few simple tools and some new knobs. Enjoy your refreshed furniture!
Products related to this article
Sponsored / affiliate links. As an Amazon Associate I earn from qualifying purchases. I may earn additional commission from eligible campaigns.