It’s that one drawer. You know the one. It sticks.
It wobbles. Sometimes it feels like it might just fall out completely. Dealing with broken drawer slides can be incredibly annoying.
It makes using your furniture a hassle. You might even avoid opening that particular drawer altogether. That’s a shame!
Your furniture should work for you. Thankfully, fixing them often isn’t as hard as you might think. We’ll walk through how to get those drawers sliding smoothly again.
A broken drawer slide means a drawer that won’t open or close right. This can be due to bent metal, loose screws, or worn-out parts. Fixing them usually involves tightening screws, straightening metal, or replacing small components.
Understanding Drawer Slides
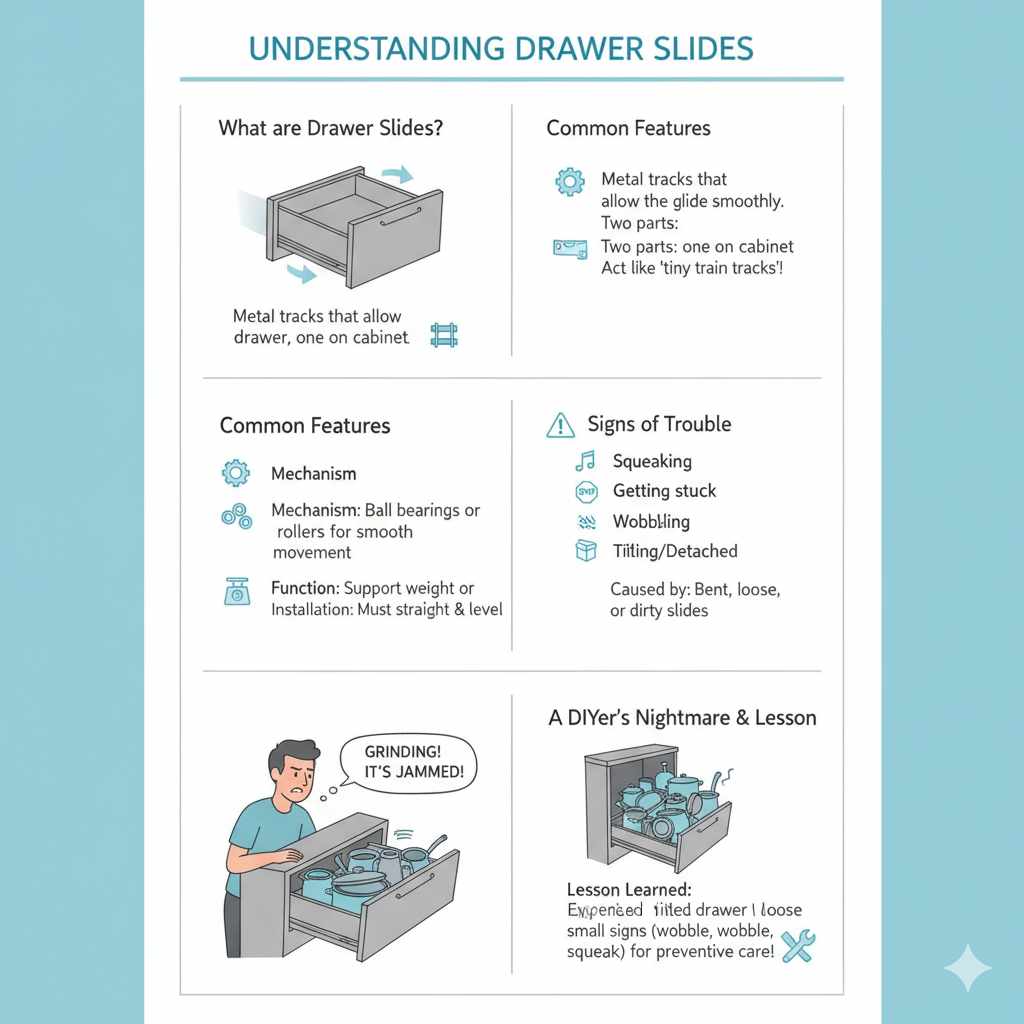
Drawer slides are the unsung heroes of your cabinets and dressers. They are the metal tracks that let drawers glide in and out. Think of them as tiny train tracks for your drawers.
Without them, drawers would just scrape against the wood. They would be hard to move. Different types of slides exist.
But most work on a similar idea. They have two parts. One part attaches to the drawer.
The other attaches to the cabinet. They then slide against each other.
Most common drawer slides are made of metal. They often have ball bearings or rollers. These help make the movement smooth.
They support the weight of the drawer and its contents. The way they are installed is key. They need to be straight and level.
If they get bent, loose, or dirty, trouble starts. This is when you might hear squeaking. Or the drawer might get stuck.
My Own Drawer Slide Nightmare
I remember one time, I was trying to organize my kitchen. I pulled open a deep drawer filled with pots and pans. Suddenly, it just stopped.
It felt jammed. I pulled harder, and then heard a terrible grinding sound. The drawer tilted forward.
One side of it was clearly detached from its slide. Panic set in. That drawer held so much!
I pictured all the pots falling out. It was a mess. I felt so frustrated.
I thought I’d need to buy a whole new cabinet. But I took a deep breath. I looked closely.
I saw that a few screws had just come loose. The metal slide itself was a bit bent. It was a wake-up call for me.
Even simple things can cause big problems.
After that, I paid more attention to other drawers. I noticed a slight wobble in my dresser. A faint squeak in my bathroom vanity.
These were small signs. They were telling me the slides needed attention. I learned that taking care of them early saves a lot of trouble.
It’s like preventive care for your furniture.
Common Drawer Slide Problems
Problem: Sticking Drawer
This happens when the slide is bent or dirty. Sometimes the drawer box itself is warped.
Problem: Wobbly Drawer
Loose screws are often the culprit here. The slide might not be secured tightly.
Problem: Drawer Falls Out
This means the slide is completely detached. Screws are missing or have pulled out of the wood.
Problem: Squeaking Noise
Lack of lubrication or dirt buildup causes this sound. A little cleaning and lube can help.
Types of Drawer Slides
To fix drawer slides, it helps to know what kind you have. Most home furniture uses a few main types. Knowing the type makes finding replacement parts easier.
It also helps you understand how they work.
There are roller bearing slides. These are common in many dressers and cabinets. They use plastic or metal rollers.
These rollers sit in tracks. They allow the drawer to slide. They are usually quite strong.
But they can get stuck if dirt builds up. The rollers can also break.
Next are ball bearing slides. These are often found in heavier-duty drawers. Think kitchen drawers with lots of dishes.
Or tool chests. They have two or three sections. These sections telescope out.
Tiny ball bearings are nestled between them. These bearings make movement very smooth. They can handle a lot of weight.
But they can be a bit more complex to repair.
Then there are epoxy coated slides. These are often less expensive. They are usually found in lighter furniture.
They have a metal channel. This channel is coated with epoxy. This coating helps them slide.
They are simpler. But they are not as durable. The coating can chip or wear off over time.
Finally, some older furniture might have wood slides. These are literally wooden strips. They fit into grooves.
They often require waxing to work well. They are simple but wear down faster. Most modern repairs focus on metal slides.
Slide Identification Quick Guide
Roller Slides: Look for plastic or metal wheels running in a track.
Ball Bearing Slides: See metal sections that extend outwards. Feel for small balls between sections.
Epoxy Coated Slides: Notice a painted metal track. It might have chips.
Wood Slides: Find wooden strips rubbing against wooden grooves.
Diagnosing the Problem
Before you grab a toolbox, let’s figure out what’s wrong. This makes fixing it much easier. You need to carefully examine the drawer and its slides.
Start by pulling the drawer out as far as it will go. Or at least far enough to see the slides clearly. Look for obvious damage.
Is a part bent? Are screws missing? Is the slide hanging loose?
Try to move the drawer slowly. Listen for noises. Feel for resistance.
Does it stick at one point? Does it feel loose or wobbly? Sometimes, the drawer box itself might be the issue.
It could be swollen from moisture. Or the wood might be warped. Check if the drawer box is square and not leaning.
Look at the cabinet opening. Are the slides attached firmly to the cabinet walls? Are they straight?
They should be parallel to each other. And they should be level. Any small angle can cause problems.
Check the drawer sides too. Are the slides attached there securely?
Often, the problem is simple. A few loose screws are very common. Or maybe some dirt and dust have accumulated.
This can cause sticking. Bent metal is also frequent. This happens from too much weight.
Or from forcing a stuck drawer.
Diagnostic Checklist
- Drawer sticks or feels rough?
- Drawer wobbles or feels loose?
- Drawer makes squeaking or grinding noises?
- Slide is bent or looks damaged?
- Screws are missing or loose?
- Drawer box seems warped or swollen?
- Slides are not level or parallel?
Tools You’ll Need
Most drawer slide repairs don’t require fancy tools. You can probably find most of what you need around the house. Having the right tools makes the job go much smoother.
It saves you time and frustration.
First, you’ll likely need a screwdriver. A Phillips head is most common for drawer slides. Sometimes a flathead is needed.
It’s good to have a set with different sizes. This helps you match the screw head perfectly. You want to avoid stripping screws.
A measuring tape can be useful. You might need to measure distances. Or check if slides are level.
This is especially true if you need to replace a slide. You’ll need the exact length.
A level is also a good tool. You can use it to make sure the cabinet slides are installed straight. This is very important for smooth operation.
A small torpedo level works well.
A pliers set is helpful. You might need them to grip a bent piece of metal. Or to hold a nut if there is one.
Needle-nose pliers are great for tight spots.
For cleaning, you’ll want some rags or paper towels. A small brush, like an old toothbrush, can get into tight areas. For lubrication, silicone spray or a dry lubricant is best.
Avoid greasy lubricants. They attract dust. For tougher bends, a rubber mallet can be useful.
If you need to replace screws, having a small box of assorted screws is wise. Make sure they are wood screws. And have a similar head type and length to the originals.
Essential Toolkit for Drawer Repairs
- Screwdriver set (Phillips and flathead)
- Measuring tape
- Level
- Pliers (needle-nose recommended)
- Cleaning rags or paper towels
- Small brush (e.g., toothbrush)
- Silicone spray or dry lubricant
- Assorted wood screws (if needed)
- Rubber mallet (optional, for stubborn bends)
Step-by-Step Repair Guide
Let’s get your drawers working again. We’ll cover the most common fixes. Remember to always work carefully.
And be patient. Sometimes things take a few tries.
1. Remove the Drawer
This is often the first step. You need access to the slides. Many drawers can be pulled out completely.
Some have a small clip or lever you need to press. Look for these on the sides of the slides. If yours doesn’t have them, you might need to unscrew the slides from the cabinet or drawer.
Be gentle. You don’t want to damage the wood.
If the drawer is stuck, don’t force it. Try to identify the sticking point. It might be a bent section of the slide.
Or something caught in the track. Gently work it back and forth. If it’s really stuck, you may need to carefully pry it open a bit.
Use a thin putty knife. Protect the wood with a cloth.
2. Inspect and Clean the Slides
Once the drawer is out, look closely at the slides. Are they dirty? Dust, hair, and grime build up over time.
This is a big cause of sticking. Use your brush and rags to clean them thoroughly. Get into all the nooks and crannies.
Pay attention to the ball bearings or rollers.
If they are very dirty, you can use a little bit of degreaser. But be sure to wipe it all off. You don’t want residue left behind.
After cleaning, make sure the slides are completely dry. Any moisture can lead to rust or other problems.
3. Tighten Loose Screws
This is the most common fix. Many drawer slide problems happen because screws loosen over time. This is especially true with heavy drawers or frequent use.
Check every screw. If a screw is loose, tighten it firmly. Don’t overtighten.
You could strip the screw hole. Or crack the wood.
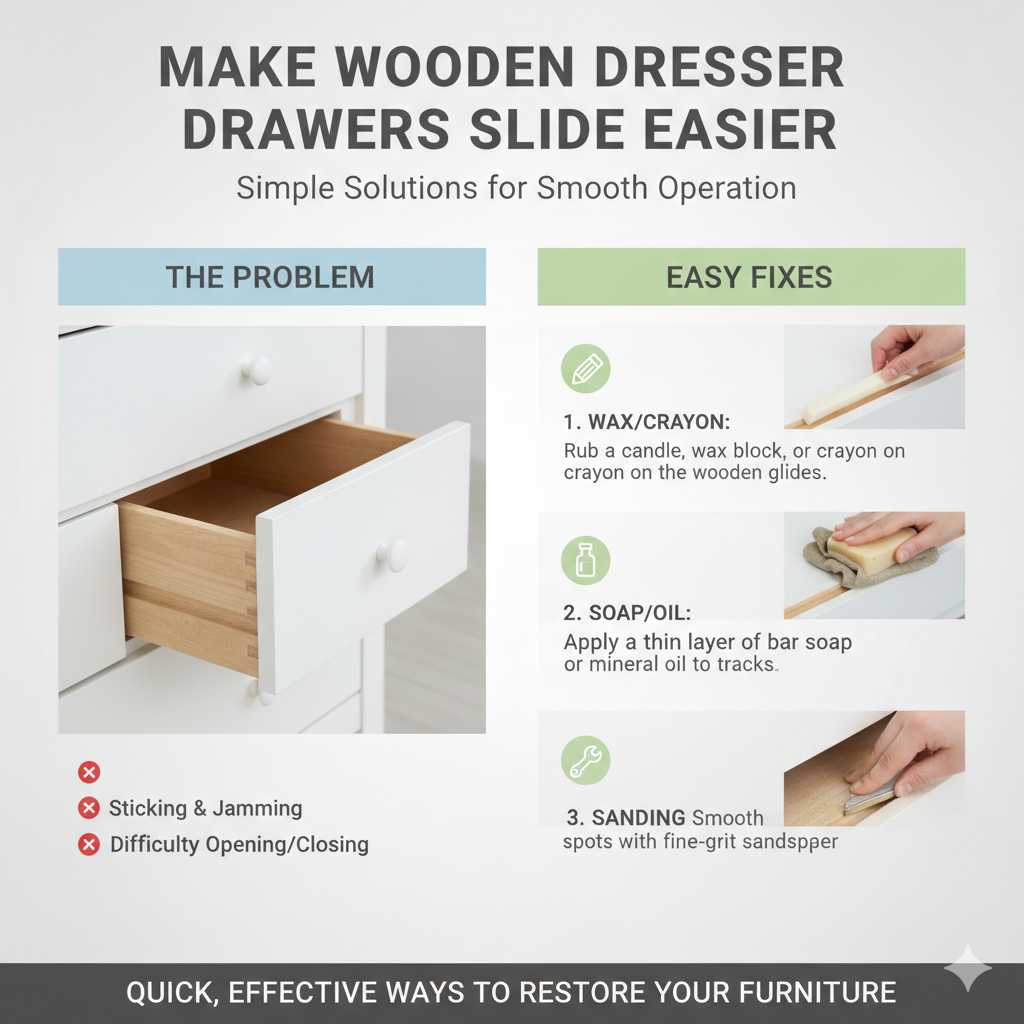
If a screw just spins and won’t tighten, the hole is stripped. You can fix this. Put a wooden toothpick or a small piece of wood in the hole.
Then screw it in again. The wood fills the gap. You can also use wood glue for a stronger repair.
Let the glue dry completely.
If screws are missing, replace them. Use screws that are the same size and type. Ideally, they are wood screws.
They should be long enough to grip the wood well. But not so long that they poke through the other side.
4. Straighten Bent Slides
Bent metal slides cause sticking and misalignment. Gently try to bend them back. Use pliers to grip the bent section.
Work slowly and carefully. Try to bend it back to its original shape. It doesn’t have to be perfect.
The goal is to make it straight enough for smooth movement.
For more stubborn bends, you can use a rubber mallet. Place a block of wood over the bent area. Then tap gently with the mallet.
Be careful not to dent or damage the metal further. If a slide is severely damaged, it might be best to replace it. We’ll cover that next.
Sometimes, the drawer box itself can be bent or warped. If this is the case, you might need to reinforce the drawer box. Or even rebuild it if it’s badly damaged.
5. Lubricate the Slides
Once everything is clean and tight, it’s time to lubricate. Use a silicone-based spray. Or a dry lubricant like graphite.
Spray it lightly onto the tracks and rollers. Don’t go overboard. Too much lube attracts dust.
It can make things worse in the long run.
Work the drawer in and out a few times. This helps spread the lubricant evenly. The drawer should now slide much more smoothly.
This lubrication step also helps prevent future sticking and squeaking.
6. Reinstall the Drawer
Carefully slide the drawer back into place. Align the slides. Make sure they engage properly.
If you had to remove the slides from the cabinet, reattach them now. Use your level to ensure they are straight. Screw them in securely.
Test the drawer. Open and close it several times. It should move smoothly and quietly.
If it still sticks, re-check your work. You might have missed a bent spot. Or maybe the other side needs adjustment.
Small adjustments can make a big difference.
Lubrication Tips
- Use silicone spray or dry lubricant.
- Avoid petroleum-based greases.
- Apply a light coat.
- Work the drawer to spread the lube.
- Reapply as needed, usually every 6-12 months.
When to Replace Drawer Slides
Sometimes, a repair just won’t cut it. If your drawer slides are severely damaged, it’s time for a replacement. This might happen if they are very rusty.
Or if the metal is torn. Or if key parts like ball bearings are missing or broken.
The first step is to identify the exact type of slide you have. Measure the length of the old slide. Note its width and height.
Look at the screw hole pattern. Take pictures if it helps. Many hardware stores sell replacement slides.
You can also find them online.
It’s best to buy a matching set. Sometimes you can buy individual slides. But it’s safer to replace both sides.
This ensures they work evenly. You might need to remove the old slide completely. This involves taking out all the screws.
Then install the new slide. Make sure it’s perfectly straight. Use your level!
Installing new slides requires accuracy. Measure carefully. Pilot holes can help prevent wood splitting.
Install the cabinet part first. Then attach the drawer part. Make sure they line up perfectly.
Test them as you go. This can be a bit tricky. But the reward is a drawer that slides like new.
Replacement Readiness Check
- Is the slide heavily rusted or corroded?
- Is the metal torn or significantly bent?
- Are ball bearings or rollers missing or broken?
- Does the drawer still stick after cleaning and tightening?
- Is the slide excessively wobbly even with tight screws?
Preventative Maintenance
Keeping your drawer slides in good shape is easy. A little bit of care goes a long way. You can prevent many problems before they start.
This saves you time and effort later.
The simplest thing is to avoid overloading your drawers. Know how much weight a drawer can handle. Distribute heavy items evenly.
Don’t put all the heavy pots in one drawer. This puts too much stress on the slides.
Keep the slides clean. Dust and debris are the enemies of smooth movement. Wipe them down every few months.
Use a dry cloth or a soft brush. If you notice a lot of dust buildup, give them a quick clean. This takes only a minute or two.
Lubricate them periodically. Once or twice a year is usually enough. A light spray of silicone lubricant will keep things running smoothly.
This also helps prevent rust. Pay attention to humidity. In damp areas, you might need to lubricate more often.
Don’t force stuck drawers. If a drawer is difficult to open, stop. Try to figure out why.
Forcing it can bend the slides or damage the drawer box. Take a moment to inspect it. A quick fix now can prevent a bigger repair later.
Simple Drawer Slide Care Tips
- Do not overload drawers.
- Clean slides regularly (dust, hair).
- Lubricate slides every 6-12 months.
- Avoid forcing stuck drawers.
- Keep drawers dry, especially in humid areas.
Real-World Scenarios
Let’s look at some real situations. How might these problems show up in your home?
Scenario 1: The Kitchen Cabinet Chaos. You open your silverware drawer. It feels rough.
It’s not smooth at all. You look closely. You see tiny bits of dried food stuck in the roller tracks.
The drawer box itself isn’t damaged. It’s just dirty. A good cleaning and a bit of lubrication should fix this right up.
This is a common issue for kitchen drawers due to food particles.
Scenario 2: The Heavy Bedroom Dresser Wobble. You pull out your sock drawer. It feels loose.
It wobbles side to side as you open it. When you look, you see the screws holding the slide to the side of the dresser are loose. Some look like they are almost out.
This is due to the weight of clothes. Tightening these screws is the primary fix. Maybe even using slightly longer screws for a better grip.
Scenario 3: The Office Desk Drawer Disaster. You try to open a file drawer. It won’t budge.
You tug harder. Then you hear a snap. The front of the drawer is now tilted.
The slide has completely detached from the drawer front. A screw has pulled out. The wood around the screw hole might be damaged.
You’ll need to re-secure the slide. You might need to repair the wood first.
Scenario 4: The Bathroom Vanity Squeak. Every time you open the cabinet under the sink, it makes a high-pitched squeak. This is often due to lack of lubrication.
The metal on metal is noisy. Or there might be some corrosion starting. A quick spray of silicone lubricant should stop the squeaking.
Make sure to get it into the tracks.
Common Home Scenarios
Kitchen Drawers: Often affected by food particles and grease. Need frequent cleaning.
Bedroom Dressers: Heavy use can lead to loose screws and wobbling.
Office Desks: File drawers can become overloaded, leading to damage.
Bathroom Vanities: Moisture can cause rust and noise. Lubrication is key.
What This Means for You
Understanding how to fix drawer slides means your furniture will last longer. It also means your home will feel more organized and functional. A drawer that sticks or falls out is a small annoyance.
But many small annoyances add up. They make your home feel less comfortable.
When it’s normal to have issues: Drawer slides are mechanical parts. They wear out over time. Especially with constant use.
It’s normal for screws to loosen. It’s normal for them to get a bit dirty. Occasional sticking or squeaking is not a disaster.
When to worry: You should worry if a drawer is completely unusable. If the slides are broken or bent beyond repair. If you’re constantly fighting with a drawer.
Or if the drawer box itself is falling apart. These are signs of bigger problems. Or damage that is too severe for a simple fix.
Simple checks: Regularly open and close your drawers. Pay attention to how they feel. Do they open easily?
Do they sound okay? A quick visual inspection every few months can spot problems early. Look for loose screws or obvious damage.
A quick clean is also a good idea.
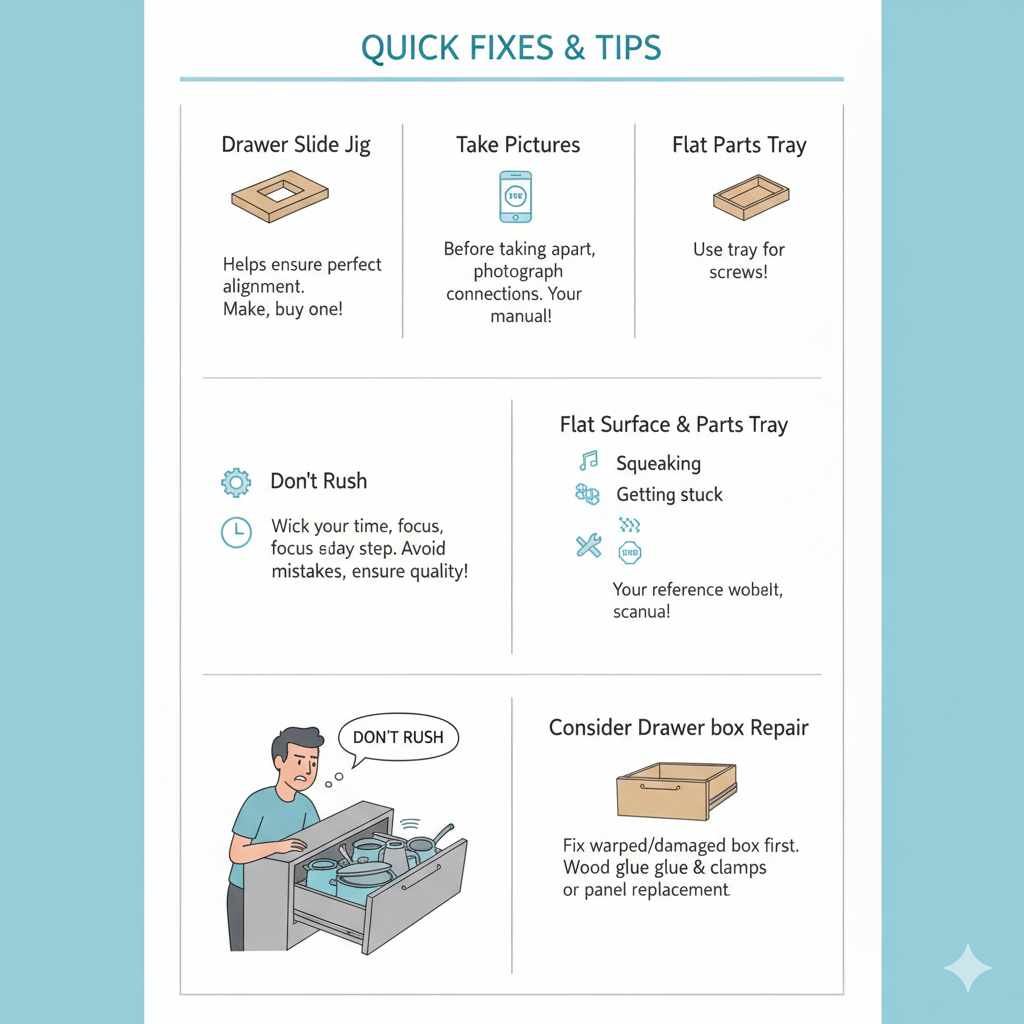
Quick Fixes & Tips
Here are some quick tips to make drawer slide repairs even easier.
Use a Drawer Slide Jig: For installing new slides, a jig can be a lifesaver. It helps ensure perfect alignment. You can often make one yourself from scrap wood.
Or buy an inexpensive one.
Take Pictures: Before you take anything apart, take pictures. This is especially helpful for complex slides. It shows you how things were connected.
It’s like having a reference manual.
Work on a Flat Surface: If you remove the drawer slides completely, work on a clean, flat surface. This helps you keep track of parts. And it makes reassembly easier.
Keep a Small Parts Tray: Use a small tray or container for screws and small parts. This stops them from rolling away. It keeps your workspace tidy.
Don’t Rush: Drawer slide repair might seem simple. But rushing can lead to mistakes. Take your time.
Focus on each step. The result will be worth it.
Consider Drawer Box Repair: If the drawer box itself is warped or damaged, that needs fixing too. Sometimes wood glue and clamps can reshape it. Or you might need to replace a panel.
Pro Tips for Drawer Slide Work
- Jigs: Use or make a jig for installing new slides.
- Photos: Document disassembly with pictures.
- Flat Surface: Work on a stable, level area.
- Part Tray: Keep small parts organized.
- Patience: Avoid rushing to prevent errors.
- Box Repair: Address drawer box issues alongside slides.
Frequent Questions
How often should I clean my drawer slides?
It’s a good idea to give your drawer slides a quick clean every 3-6 months. If you have very dusty conditions or pets, you might want to do it more often. Just a quick wipe down with a dry cloth or brush can make a big difference.
What kind of lubricant is best for drawer slides?
Silicone spray or a dry lubricant like graphite is best. These products don’t attract dust like oil-based lubricants. Avoid using petroleum jelly or WD-40 as they can gum up the works over time and attract more dirt.
Can I fix a drawer slide that is completely bent?
Sometimes, yes. You can try to gently bend it back into shape using pliers. If it’s severely bent or cracked, it’s usually better to replace the entire slide.
Replacing it ensures smooth operation and prevents further damage.
My screws keep falling out of my drawer slides. What can I do?
This usually means the screw holes are stripped. You can try filling the hole with a wooden toothpick or a small piece of dowel and some wood glue. Let it dry, then re-screw.
For a stronger fix, use slightly longer or thicker screws, or even some wood filler.
How do I know if I need to replace my drawer slides or just repair them?
If the slides are just dirty, loose, or slightly bent, repair is usually possible. If they are heavily rusted, torn, cracked, or missing essential parts like ball bearings, replacement is the better option for long-term function.
What’s the difference between ball bearing and roller bearing slides?
Ball bearing slides use small metal balls enclosed between telescoping metal sections to allow smooth movement and support heavy loads. Roller bearing slides use plastic or metal wheels that roll in a track, which are common in lighter-duty drawers and can be simpler to repair.
Conclusion
Fixing broken drawer slides might seem like a small task. But it has a big impact on your home. By understanding how they work, diagnosing problems, and using the right tools, you can bring drawers back to life.
Simple maintenance keeps them working smoothly. Don’t let a sticking drawer frustrate you. With these tips, you can repair them like a pro.