How to Remove Office Chair Cylinder: Easy Step-by-Step Guide
Every office chair has a part that works behind the scenes to give you that smooth up-and-down movement: the chair cylinder. This gas lift cylinder is often the first part to wear out. If your chair keeps sinking or won’t adjust heights, the cylinder is usually the culprit. You might think replacing it is a complicated job, but with the right guidance and tools, almost anyone can do it at home.
Learning how to remove an office chair cylinder not only saves you money but also extends the life of your favorite chair. Many people throw away a perfectly good chair just because the cylinder failed. This guide will help you understand each step, from preparation to removal, and highlight small details that most beginners miss.
Whether you want to swap for a new cylinder or just take it out for cleaning, you’ll find everything you need here.
Understanding The Office Chair Cylinder
The office chair cylinder is a metal tube filled with compressed gas. It connects the seat to the wheeled base and controls height adjustment. When you pull the lever, the gas inside moves, lifting or lowering the chair.
Most cylinders are universal fit, but there are different sizes and designs. Some chairs have unique mechanisms or covers that make removal trickier. Cheaper chairs tend to have welded parts or glued components, while higher-end models use snap rings or screws for easier repair.
Why Cylinders Fail
Over time, seals inside the cylinder wear out. This lets gas escape, causing the chair to slowly sink. Rough use, sudden impacts, or exposure to extreme temperatures can speed up this process. About 60% of chair repairs relate to cylinder failure, according to office furniture repair experts.
Tools And Materials You Will Need
Before you start, gather the following tools:
- Adjustable wrench or pipe wrench (for gripping the cylinder)
- Rubber mallet (to loosen stuck parts)
- Flathead screwdriver (to help pry off covers or clips)
- WD-40 or penetrating oil (for rusted or stubborn joints)
- Thick work gloves (protect your hands from sharp edges)
- Old towel or mat (to protect your floor)
- Replacement gas cylinder (if you plan to install a new one)
Having these ready prevents frustration and speeds up the process.
Pro Tip: Use a pipe wrench with serrated jaws for better grip on smooth cylinders. Regular wrenches often slip.

Credit: www.youtube.com
Safety Precautions Before You Begin
Removing a chair cylinder can release sudden force or cause parts to drop. Take these safety steps:
- Work on a flat, stable surface.
- Remove any items from the chair (like pillows or covers).
- Wear gloves to avoid pinched fingers or cuts.
- If spraying lubricant, do so in a ventilated area.
Check that your chair is not under warranty. Attempting repairs may void some warranties, so look for a sticker or contact the manufacturer if you’re unsure.
Step-by-step Guide To Removing An Office Chair Cylinder
1. Prepare The Chair
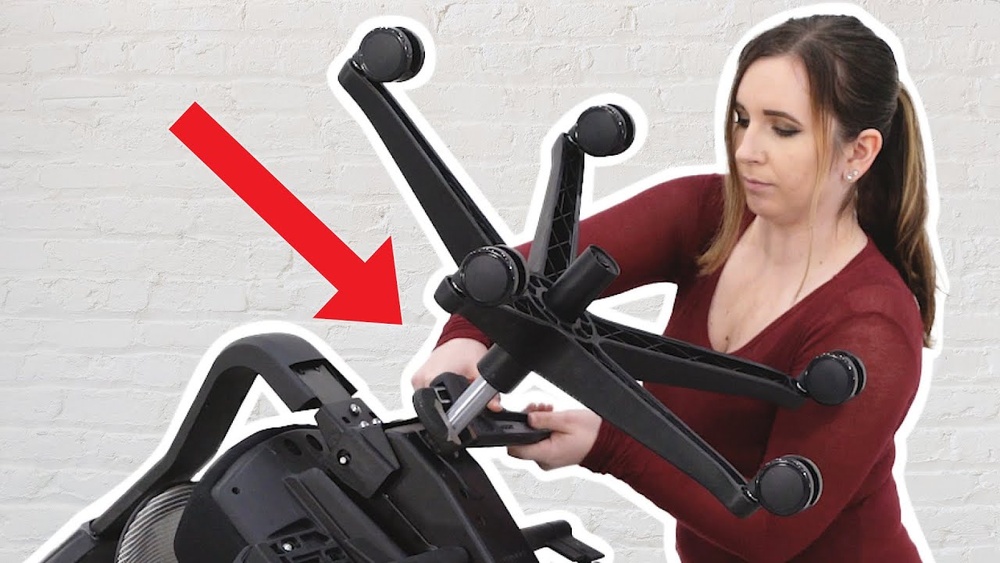
Turn the chair upside-down or lay it on its side on a mat or towel. This gives you clear access to the base and cylinder. Remove the five-star base by gently pulling the wheels out if possible. Some bases are attached with a clip or screw, use a screwdriver if needed.
2. Loosen The Base
The cylinder is often press-fit into the base. Grip the base with one hand and gently tap around the area where the cylinder meets the base with a rubber mallet. Rotate the base and repeat. If it doesn’t budge, spray a little WD-40 where the two parts meet and let it sit for 10 minutes.
After waiting, try again. If it’s still stuck, use an adjustable wrench to grip the cylinder and twist while pulling. Most will loosen with steady pressure.
3. Separate The Cylinder From The Base
Once loosened, pull the base off the cylinder. This exposes the lower part of the gas lift. Set the base aside.
Warning: Never hit the cylinder directly with a metal hammer. Gas cylinders can be pressurized and may become dangerous if damaged.
4. Remove The Cylinder From The Chair Seat
Now, look under the seat. Some chairs have a retaining clip, screw, or plastic cover over the top of the cylinder. Use a flathead screwdriver to gently pry off any covers. If there’s a clip, remove it carefully.
Grip the exposed top of the cylinder with your wrench. Hold the seat steady and twist the cylinder out. You may need to tap the seat gently with a mallet if it’s stuck. Most cylinders are only press-fit, so they usually come out with a little patience.
5. Clean And Inspect The Chair
With the cylinder out, check for rust, wear, or broken parts inside the base and seat mechanism. Wipe away old grease or dirt before installing a new cylinder. This step helps prevent future problems and gives smoother operation.
Table: Common Office Chair Cylinder Sizes
Here’s a quick comparison of standard cylinder sizes you may encounter:
| Cylinder Size (inches) | Chair Height Range (inches) | Typical Use |
|---|---|---|
| 4 | 15, 19 | Standard office chairs |
| 5 | 16, 21 | Taller users, drafting chairs |
| 6+ | 18, 24 | High stools, special needs |
Pro Tip: Always measure your original cylinder before buying a replacement. Not all chairs use the same size, even if they look similar.
Troubleshooting Common Problems
Cylinder Stuck In The Base
If the cylinder will not come out after following the steps above, try these:
- Apply more penetrating oil and let it sit overnight.
- Use a pipe wrench for extra grip.
- Rock the base gently back and forth while pulling.
If it’s still stuck, the parts may be corroded or welded. In rare cases, you may need to cut the cylinder with a hacksaw. Always wear safety glasses and proceed with caution.
Cylinder Stuck In The Seat
Some chairs have a very tight fit at the top. Insert a flathead screwdriver between the cylinder and seat socket, twisting gently. If you see a retaining ring, remove it first.
Avoid prying too hard, as this could bend the seat mechanism.
Chair Base Won’t Separate
In my experience, the base can sometimes fuse to the cylinder, especially in humid areas. Try leaving the chair outside for a few hours, as metal contracts in cooler temperatures, which may help loosen stuck parts.
Table: Signs Your Cylinder Needs Replacement
Below is a summary of symptoms and what they mean:
| Symptom | Possible Cause | Repair Needed? |
|---|---|---|
| Chair sinks slowly | Gas leak in cylinder | Replace cylinder |
| Chair won’t go up | Broken piston or jammed lever | Replace or adjust |
| Wobbling at base | Loose or worn cylinder | Check fit, maybe replace |
| Noisy when adjusting | Dry or dirty parts | Clean and lubricate |
Installing A New Cylinder (optional)
If you plan to install a new cylinder, follow these steps:
- Clean the seat socket and base thoroughly.
- Insert the new cylinder into the seat socket first (top end up).
- Slide the base back onto the cylinder.
- Set the chair upright. Sit down gently to press the parts together.
Test the height adjustment lever to ensure smooth operation. If the chair doesn’t adjust, double-check that all parts are seated correctly.

Credit: www.diocesisdesalamanca.com
When To Seek Professional Help
Some office chairs, especially high-end or antique models, have unique or complex mechanisms. If you encounter:
- Welded or riveted parts
- Unusual shapes or covers you can’t remove
- Electronic height adjustment systems
It’s safer to consult a professional repair service. For expensive chairs, it’s worth asking the manufacturer about repair options.
Table: Diy Vs. Professional Cylinder Removal
Here’s a quick comparison to help you decide:
| Aspect | DIY | Professional |
|---|---|---|
| Cost | Low (just parts) | Higher (labor + parts) |
| Time | 30, 60 minutes | 1, 3 days (if shop visit needed) |
| Risk | Possible damage, warranty void | Low risk, warranty kept |
| Tools needed | Wrench, mallet, oil | Professionally equipped |

Credit: www.youtube.com
How To Avoid Common Mistakes
Beginners often make these errors:
- Using the wrong tools: Standard pliers slip on smooth metal. Use a pipe wrench.
- Forcing parts: If something won’t budge, stop and lubricate. Forcing can break the seat mechanism.
- Skipping measurements: Not all cylinders are the same size. Measure both the length and diameter of your old one.
- Ignoring safety: Pressurized cylinders can be dangerous if punctured. Don’t hammer directly on the cylinder.
- Losing small parts: Clips, rings, and screws can disappear easily. Keep a small tray nearby for all parts.
Environmental Impact And Disposal
Old chair cylinders contain compressed gas and oil. Do not throw them in regular trash. Many local recycling centers accept metal parts, but check their rules for pressurized containers. Some require you to vent the gas first, this is best left to professionals to avoid injury.
If you’re not sure, contact your local waste authority. Proper disposal keeps harmful materials out of landfills.
Where To Buy Replacement Cylinders
Replacement office chair cylinders are available at hardware stores, office supply stores, and online. Popular brands include Office Oasis, Steelcase, and Herman Miller. Always compare specifications before buying.
Check if the seller provides clear measurements and return policies. Some manufacturers offer direct replacements if your chair is under warranty.
For more about how gas lift cylinders work, see the Wikipedia article on gas lift chairs.
Long-term Maintenance Tips
To keep your new cylinder working well:
- Lubricate moving parts once every six months with silicone spray.
- Avoid dropping into the chair; sudden impact stresses the cylinder.
- Clean wheels and base so debris doesn’t jam the mechanism.
- Check for rust if you live in a humid climate. Wipe down metal surfaces occasionally.
A little care goes a long way in extending the life of your chair.
Pro Tip: If your chair will not be used for several months, store it upright in a dry place to prevent parts from sticking.
Frequently Asked Questions
What If The Cylinder Is Welded Or Won’t Come Out?
Some low-cost chairs use welded or glued cylinders to cut costs. If oil, wrenches, and gentle tapping don’t work, the only solution may be to cut the cylinder out with a hacksaw. This is risky and can damage the chair.
In many cases, it’s cheaper to replace the whole chair.
Can I Repair A Leaking Gas Cylinder Instead Of Replacing It?
A leaking cylinder cannot be safely repaired at home. The gas inside is under pressure, and tampering with the seals can be dangerous. Always replace with a new cylinder designed for your chair model.
Is It Possible To Upgrade To A Taller Or Shorter Cylinder?
Yes, you can upgrade to a different size, but you must ensure the new cylinder fits both the seat and base. Also, check that the new height suits your desk and comfort. Some chairs become unstable if raised too high.
How Do I Know If My Chair Uses A Standard Cylinder?
Measure the diameter at both ends of your old cylinder. Most office chairs use a 2-inch (50mm) standard size at the base. However, executive chairs or imported models may use different sizes. Check the manufacturer’s website for details.
What Should I Do With The Old Cylinder After Removal?
Never puncture or burn the old cylinder. Take it to a recycling center that accepts pressurized metal parts. If none is available in your area, ask your local hardware store for safe disposal advice.
Removing an office chair cylinder is not as difficult as it seems. With the right tools, a bit of patience, and attention to detail, you can save money and keep your workspace comfortable. Remember, safety comes first, never rush or force parts, and always check your replacement cylinder matches the old one.
Over time, these DIY skills can help you fix not just chairs, but many other pieces of furniture, making your office or home more sustainable and budget-friendly.
Products related to this article
Sponsored / affiliate links. As an Amazon Associate I earn from qualifying purchases. I may earn additional commission from eligible campaigns.