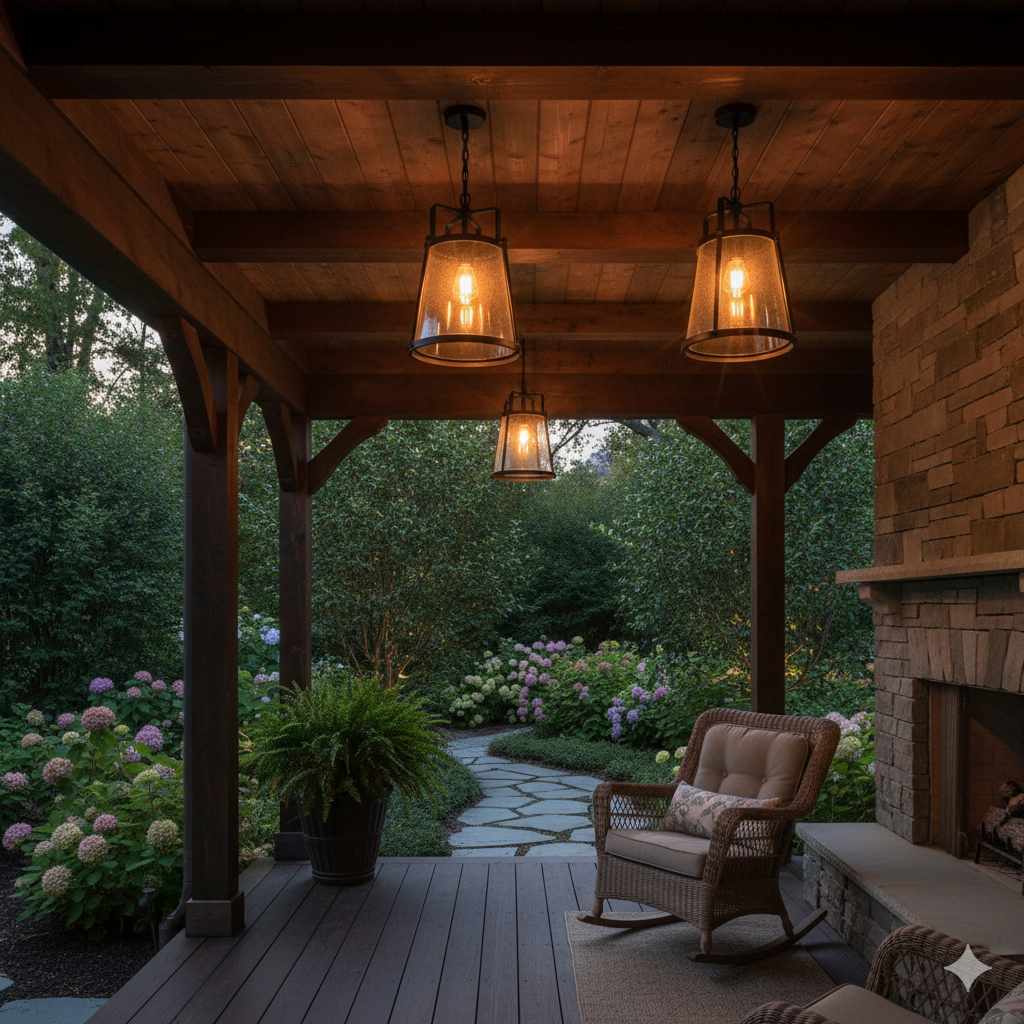
Outdoor pendant lights for porch are easy-to-install fixtures that boost curb appeal and safety. This guide simplifies choosing the right size, material, and height, ensuring you pick durable, wet-rated fixtures that perfectly light up your entryway without needing an electrician.
Choosing the right outdoor lighting can feel tricky. You want your front door to look welcoming, not like an airport runway. Many folks worry about weather damage or picking a light that’s just too big or too small for their porch. It is completely normal to feel unsure! But trust me, hanging outdoor pendant lights for your porch is a simple weekend project that boosts your home’s look and keeps everyone safe. We will break down every step in a way that makes perfect sense, even if you’ve never touched a screwdriver before. Let’s look at making your porch shine safely and beautifully, starting with picking the perfect fixture.
Why Choose Pendants Over Other Porch Lights?
Pendants aren’t just pretty; they offer functional benefits that other outdoor fixtures sometimes miss. Let’s see why they are a popular choice for porches.
- Aesthetic Appeal: Pendants offer height variation and style, drawing the eye upward and making ceilings look taller.
- Better Light Spread: Because they hang lower, they can cast light further down the steps or landing area compared to fixtures mounted flush against the ceiling.
- Variety: You can find everything from modern glass lanterns to rustic barn styles that fit any home design.

Essential Safety Check: Understanding Wet Ratings
Before we look at style, we must talk about weatherproofing. Your porch light lives outside, meaning it faces sun, rain, snow, and humidity. Using the wrong type of fixture is a safety risk and guarantees it will fail quickly.
The Importance of IP Ratings (Ingress Protection)
Lighting fixtures meant for outdoor use must have a specific rating to show they can handle the elements. The standard used worldwide is the IP (Ingress Protection) rating.
For a porch setting, you are generally looking for fixtures rated for damp or wet locations. Since a porch often has an overhang, a “Damp” rating might be acceptable, but “Wet” is always the safest bet for maximum protection.
Wet-Rated vs Damp-Rated:
- Damp-Rated: Suitable for areas protected from direct rain and moisture, like a covered porch ceiling that stays relatively dry. It protects against splashes.
- Wet-Rated: Must withstand direct moisture exposure, including heavy rain and spraying. This is the best choice if your porch is fully exposed or if you live in a very rainy climate.
Always look for the UL (Underwriters Laboratories) listing, which confirms the product meets specific safety standards in the United States. You can often find reliable information about these ratings on reputable hardware store sites or manufacturer documentation.
Sizing It Right: How Big Should My Porch Pendant Be?
A common mistake beginners make is choosing a light that is either too small (looking lost) or too large (overwhelming the space). Sizing correctly ensures your outdoor pendant lights for porch look balanced.
The Porch Light Formula (Width Rule)
To find the ideal width for your pendant, use this simple trick based on the width of your door or porch area.
- Measure the total width of your front door (frame included).
- Add the height of the door and the width of the door together.
- The total number you get (in inches) is the recommended maximum diameter for your light fixture.
Example: If your door is 36 inches wide and 80 inches tall, 36 + 80 = 116 inches. You would look for a fixture with a width near 11 to 12 inches maximum.
Hanging Height – The Golden Rule
The height at which the pendant hangs is crucial for both aesthetics and safety (so people don’t bump their heads!).
The bottom of the pendant fixture should hang:
- At least 6.5 feet (about 78 inches) from the floor or landing.
- No more than 8 feet from the floor.
If you have very high ceilings (over 10 feet), you can adjust slightly higher, but remember that the lower it hangs, the more imposing it becomes.
Choosing the Best Material for Durability
Your porch light needs to look good for years, resisting rust and fading. Material choice directly impacts maintenance and longevity.
| Material | Pros | Cons | Best For |
|---|---|---|---|
| Aluminum | Lightweight, resists rust, easy to finish/paint. | Can dent easier than steel. | Coastal or mild climates; great low-maintenance option. |
| Brass/Bronze | Very durable, develops a beautiful patina over time. | Can be more expensive; needs care if living near saltwater. | Traditional or high-end looks; excellent longevity. |
| Steel (Stainless or Powder-Coated) | Very strong, modern look available. | Can rust if the protective coating scratches off (especially standard steel). | Modern homes; areas needing high impact resistance. |
| Copper | Ages beautifully, highly resistant to corrosion. | Most expensive option; turns green (patina) over time. | Historic homes; homeowners who love natural aging processes. |
When shopping, look for powder-coated finishes, as this process adds a tough layer of protection over the metal, making it much more resistant to chipping and weather damage than simple paint.
Style Guide: Matching Pendants to Your Home’s Look
The light fixture is a major piece of exterior décor. It should complement your home’s architectural style. Think of it like choosing the right hubcaps for your favorite truck—it finishes the look!
Architectural Style Match-Ups
Here are quick ways to pair your home style with outdoor pendant lights for porch:
- Traditional/Colonial: Look for lantern-style fixtures, often featuring clear glass panels, decorative metal scrollwork, and oil-rubbed bronze or brass finishes.
- Modern Farmhouse/Rustic: Wire cages, simple metal shades (like barn lights), weathered black, or galvanized finishes work best. These fixtures often have an industrial feel.
- Contemporary/Modern: Prioritize clean lines, geometric shapes, and materials like brushed nickel or matte black. Glass should often be frosted or clear, with minimal ornamentation.
- Tuscan/Mediterranean: Look for fixtures with darker, aged metals, perhaps with seeded or amber glass details, mimicking older lantern designs.
Glass Considerations
The type of glass you choose impacts both the look and the quality of the light output:
- Clear Glass: Provides the brightest, most direct light. Best if you want maximum visibility.
- Seeded Glass: Has small bubbles trapped in the glass, giving a vintage, watery appearance. It scatters light just a little bit and hides dust easily.
- Frosted/Etched Glass: Diffuses the light softly, reducing glare. Great for main entrances where you don’t want harsh light hitting guests’ eyes.
Planning for Power: What You Need to Know Before Installation
If you have an existing porch light, the wiring is usually straightforward. If you are installing a new light where there was no previous fixture, you will need an electrician. Safety first—dealing with 120V wiring is serious business!
Essential Tools for a DIY Swap-Out
If you are replacing an existing fixture, you will likely need these basic items:
- Non-contact voltage tester (Crucial for safety!)
- Screwdrivers (Phillips and flathead)
- Adjustable wrench or pliers
- Wire strippers/cutters
- Ladder (sturdy and rated for your weight)
- Silicone weatherproofing sealant
- Wire connectors (wire nuts)
The Step-by-Step Light Replacement Process
This process assumes professional wiring is already in place in the junction box above your porch. Always verify connection standards with resources like the Electrical Safety Foundation International (ESFI) before starting any electrical work.
- CUT THE POWER: Go to your main breaker box and turn off the breaker controlling the light circuit. Do not skip this step.
- TEST FOR POWER: Use your non-contact voltage tester right on the existing fixture’s wires to confirm that the power is completely off.
- Remove the Old Fixture: Unscrew the decorative nuts holding the old fixture to the mounting bracket. Carefully lower the fixture—it might be heavier than you think!
- Disconnect Wires: Unscrew the wire nuts connecting the house wires to the old light’s wires. Set the old light aside.
- Inspect the Box: Check the junction box. If the mounting bracket is old or damaged, replace it with a new, sturdy exterior-rated bracket.
- Mount the New Bracket: Secure the mounting bracket that came with your new pendant light according to the manufacturer’s instructions.
- Connect the Pendant: This generally involves matching colors: black (hot) to black, white (neutral) to white, and bare copper or green (ground) to the ground screw on the bracket. Twist the ends together snugly, cap with a wire nut, and give a gentle tug to test the connection.
- Tuck and Secure: Carefully tuck all the wired connections up into the junction box. Line up the new pendant fixture base with the mounting bracket screws.
- Seal for Weather: Apply a thin bead of silicone sealant around the edge where the base of the new light meets the ceiling. This prevents water from seeping into the box.
- Test: Turn the power back on at the breaker box and test your new light switch!
Lighting Efficiency: Choosing the Right Bulb
The best outdoor pendant lights for porch aren’t complete without the right light bulb. Bulb choice affects energy use, light quality, and how often you have to climb that ladder.
Bulb Types for Outdoor Use
| Bulb Type | Energy Use | Lifespan | Light Quality Notes |
| :— | :— | :— | :— |
| LED (Recommended) | Very Low | Very Long (15,000+ hrs) | Excellent efficiency; choose “Warm White” (2700K–3000K) for a cozy look. |
| Incandescent | High | Short | Produces nice warm light but wastes a lot of energy as heat. |
| CFL (Compact Fluorescent) | Medium | Medium | Can take a moment to brighten fully; some people dislike the light color. |
Pro Tip: Always check the maximum wattage listed on your new light fixture. Never exceed that wattage, regardless of the bulb type!
The Importance of Color Temperature (Kelvin)
Color temperature is measured in Kelvins (K) and dictates how warm or cool the light appears.
- 2700K – 3000K (Warm White): This is the sweet spot for porches. It looks inviting, cozy, and mimics traditional incandescent light. It’s great for welcoming guests.
- 3500K – 4000K (Cool White/Natural): Brighter and more bluish. This is better for task lighting or security, but can make a front door feel less welcoming.
Advanced Tips for Maximum Curb Appeal
Once you master the basics, these small details can elevate your porch lighting from functional to fantastic.
Layering Light for Depth
If your porch is large, one single pendant might leave dark corners. Consider layering:
- Task Light: The main pendant over the door provides the primary downlight.
- Accent Light: Add small, low-voltage path lights along the walkway leading up to the porch.
- Sconce Pairing (Optional): If your porch is wide enough (more than 6 feet deep), you can flank the door with matching exterior wall sconces, using pendants in the very center for maximum effect.
Using Smart Bulbs Outdoors
Modern technology makes outdoor lighting easier than ever. Switching to outdoor-rated smart LED bulbs allows you to control the light from your phone.
You can set schedules for dusk-to-dawn lighting, or even change the brightness or color temperature remotely. This is great for energy savings and security, as you don’t need to mess with timers. Just ensure the smart bulb itself is rated for “Damp” or “Wet” locations, depending on your fixture’s shielding.
For more information on outdoor electrical standards and safe wiring practices, always consult resources from organizations governed by electrical codes, such as those referenced by state or local building department guidelines.
Troubleshooting Common Issues
Even simple swaps can sometimes lead to minor hiccups. Here’s how to quickly fix the most common problems with new outdoor pendant lights for porch.
Quick Fixes
- The Light is Too Dim: Your bulb might be rated too low, or you chose a highly frosted glass. Switch to a clear bulb in the 3000K range, ensuring you do not exceed the fixture’s maximum wattage.
- The Light Flickers: This almost always means a loose wire connection. Turn off the power, remove the fixture, and re-verify the wire nuts are tight on all connections (black, white, and ground).
- The Fixture Sits Crooked: Check the mounting bracket screwed into the ceiling box. If it’s slightly tilted, the fixture won’t hang straight. You may need to loosen the small screws holding the bracket, adjust it until the pendant hangs level, and then retighten firmly.

Frequently Asked Questions (FAQ) About Porch Pendants
Q1: Can I use a regular indoor pendant on my porch?
A: No, never. Indoor lights lack the necessary seals to protect their internal wiring and sockets from moisture, leading to corrosion, short circuits, and potential fire hazards. Always use a fixture explicitly listed as “Damp” or “Wet” rated for outdoor use.
Q2: How much should I spend on exterior pendant lights?
A: Price varies widely. For a reliable, durable aluminum or basic steel pendant, expect to spend between $50 and $150. High-end materials like solid brass or statement-making designer pieces can cost $250 or more per fixture.
Q3: Do outdoor pendants connect to a dimmer switch?
A: Yes, but both the light fixture AND the bulb must be dimmable. Ensure your fixture is rated for use with a dimmer switch, and use only dimmable LED or incandescent bulbs. Always check the compatibility chart provided by the bulb manufacturer.
Q4: What if my porch ceiling is slanted?
A: If your porch ceiling is angled (vaulted), you need a pendant that comes with a “swivel canopy” or “sloped ceiling adapter.” This mechanism allows the fixture chain or rod to hang straight down, keeping the light plumb, even if the ceiling is not level.
Q5: Is it hard to clean outdoor pendant lights?
A: Cleaning is usually easy! Start by turning off the power and letting the fixture cool. For metal parts, a mild soap and water solution usually works. For glass, use a glass cleaner. If your fixture has many small intricate parts (like cage pendants), use a soft toothbrush for tight spots.
Q6: Should I use a chain or a rod for hanging?
A: Chains are traditional and allow for easier height adjustments mid-install. Rods offer a cleaner, more contemporary look, but require you to know the exact length needed beforehand, as adding or removing segments can be fiddly.
Conclusion: Lighting Your Way with Confidence
Upgrading to stylish and functional outdoor pendant lights for porch does not require hiring a professional crew or diving deep into complex electrical manuals. By focusing on weather resistance (wet rating), choosing the correct size based on simple rules of thumb, and matching the material to your home’s style, you can confidently select and install a fixture that enhances your home’s look dramatically. Remember, safety comes first—always verify the power is off before touching wires. With these steps, you are now equipped to handle this simple yet rewarding DIY project, ensuring your entryway is welcoming, well-lit, and beautifully finished for years to come.