To learn how to tie restraints to a bed frame securely, you need the right gear (like strong webbing or rope) and a strong anchor point. This guide shows you simple, reliable knotting techniques, focusing on safe attachment points like bedposts or frame rails using secure hitches, ensuring stability without damaging your equipment.
Are you facing a situation where you need to temporarily secure items to your bed frame? Maybe you’re transporting furniture, need a stable anchor point for temporary safety measures, or perhaps you’re simply trying to keep things neat and tidy while moving. Whatever the reason, knowing how to safely connect ropes or straps to a bed frame can feel tricky. It seems like you need a special sailor’s knot just for your bedroom furniture! Don’t worry; it’s easier than it looks. We’re going to break down the process into simple, safe steps using basic, reliable techniques that anyone can master quickly. Let’s get that gear secured with confidence!
Understanding Bed Frame Anatomy: Where to Tie
Before we touch a single rope or strap, we need to look closely at your bed frame. Not all parts of a bed frame are created equal when it comes to handling tension. You want to anchor to the strongest, most rigid parts. Think of it like choosing the best spot to jack up your car—you use the frame rail, not the plastic trim!
Strongest Anchor Points
The success of how to tie restraints to bed frame depends heavily on where you attach them. Look for solid materials capable of bearing weight and resisting movement. Here are the top spots:
- Four-Poster Bedposts (Wood or Metal): These are usually the strongest vertical members of the frame, designed to hold the sheer weight of the headboard and footboard. Always aim for the thickest part, close to the floor if possible.
- Frame Rails (The Long Sides): If you have a traditional metal or sturdy wooden platform bed, the main rails connecting the headboard to the footboard are excellent anchor points, especially if they are thick, structural beams.
- Heavy-Duty Corner Brackets: Where the side rail meets the head/footboard, there is often a heavy metal bracket assembly. If accessible, these dense joints offer extremely secure fastening points.
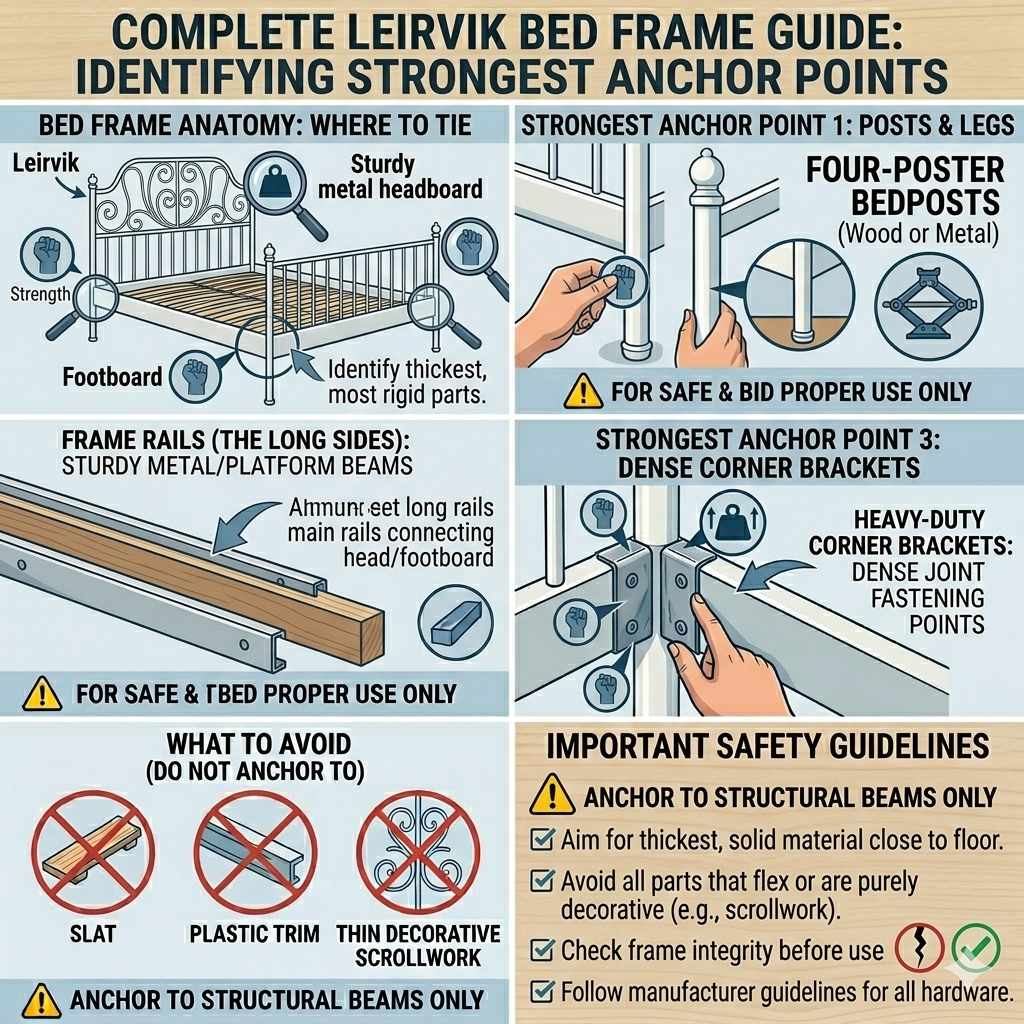
Anchor Points to Avoid
Safety first! Some parts look convenient but are weak links that can break or bend under stress:
- Headboard or Footboard Slats: These decorative pieces are only designed to keep your mattress centered, not to hold heavy loads. They can snap easily.
- Decorative Finials or Caps: The little knobs or decorative tops on metal posts should never bear load. They often pull right off.
- Box Spring Support Bars (Thin Metal): Older or cheaper frames sometimes use thin metal bars for box spring support. These bend under tension.
Essential Tools and Materials for Secure Tying
You don’t need a full marine supply store to tie things down properly. A few reliable items make all the difference. Since we are focusing on basic, reliable securing methods, here’s what should be in your toolkit.
Recommended Restraint Materials
The material you use determines how much tension you can safely apply. For securing items to a bed frame, you generally want non-stretching, high-tensile strength material.
| Material Type | Pros (Why It’s Good) | Cons (When to Avoid) |
|---|---|---|
| Ratchet Straps (Best for Cargo) | Provides huge tension, easy to release. Excellent holding power. | Can overtighten and damage soft wood or plastic parts if you aren’t careful. |
| Nylon or Polyester Webbing (Tie-Down Straps) | Strong, durable, less likely to fray than rope. | Requires a secure buckle or tying knot (like a tensionless hitch). |
| Utility Rope (Minimum 3/8″ Diameter) | Versatile, good for looping around irregular shapes. | Can stretch; requires proper knot-tying knowledge to maintain tension. |
For beginners learning how to tie restraints to bed frame anchor points, quality, flat nylon webbing straps with a simple buckle system are my top recommendation. They offer control without the high risk of slippage found in basic rope.
Required Tools
- Protective Padding: Pieces of an old towel, bubble wrap, or carpet scraps. This protects both the bed frame finish (paint or wood) and your straps/rope.
- Gloves: Protects your hands from rope burn or sharp metal edges on the frame.
- Measuring Tape (Optional): Useful if you need the restraints to be exactly the same length on opposite sides for balance.
Step-by-Step: How to Tie Restraints to Bed Frame Safely
We will cover two primary methods: using a dedicated strap (the easier route) and using rope (the classic method). Both aim for a secure hold that doesn’t damage the bed structure.
Method 1: Using Ratchet Straps or Webbing with Buckles (Recommended for Beginners)
Ratchet straps give you mechanical advantage, making tightening simple. If you are securing something like a mattress being moved or needing to hold a temporary barrier steady, this is fast and reliable.
Step 1: Prepare the Anchor Point
Take your protective padding (towel or cloth) and wrap it completely around the bedpost or frame rail where you plan to fasten the strap. This prevents your strap from rubbing the finish raw when tension is applied.
Step 2: Loop the Non-Ratchet End
Feed the end of the strap (the one without the large ratchet mechanism) around the anchor point (post or rail). You want this end to secure first, usually with a simple knot or by threading it through a permanent O-ring if your strap has one.
For simple webbing straps: Make a quick overhand knot, but leave a slightly longer tail. Ensure this knot is snug against the padded post.
Step 3: Position the Ratchet
Bring the main body of the strap, which holds the ratchet mechanism, to the load you are securing. The goal is to pull the load toward the frame structure.
Step 4: Tensioning the Load
Thread the loose end of the webbing through the ratchet mechanism as per the manufacturer’s instructions. This usually involves threading it through the bottom slot and ratcheting upwards until the strap is tight. You should see the load firm up against the frame.
Pro Tip: Use just enough tension to prevent movement. Overtightening metal frames can cause squeaks or even warp loose joints. A good rule of thumb is to pull until the slack is gone and the strap is firm, but you can still depress the webbing very slightly with one strong finger push. For more reliable guidance on load security, always check standards from transportation bodies, like those often referenced by the Federal Motor Carrier Safety Administration (.gov resource regarding safe securement).
Step 5: Securing the Excess Strap
Never let loose tails or the excess strap from the ratchet flap around. This is a safety hazard and can cause the strap to loosen over time due to vibration. Tidy the excess strap by wrapping it tightly around the main length of the strap or securing it with a small piece of Velcro or elastic band.
Method 2: Using Utility Rope and Secure Knots
If you only have rope, you need the right knot to prevent slippage under load. For wrapping around a post, the best choice is often a variation of the Clove Hitch or a specialized friction knot. For holding a constant pull, we use the Taut-Line Hitch or the Trucker’s Hitch.
Step 1: Prepare the Anchor
Just like with straps, wrap the contact area on the bedpost with padding. You must protect the frame finish.
Step 2: Tying the Anchor Knot (The Clove Hitch)
The Clove Hitch is fast and works great for securing the initial end of the rope to a post, provided that the tension will be applied in a direction that pulls against the hitch (i.e., pulling straight down or across the post).
- Pass the working end of the rope completely around the bedpost.
- Cross the working end over the standing part (the rest of the rope).
- Loop the working end around the post again, crossing under the previous wrap.
- Tuck the working end under the second loop you just made.
- Pull both ends tight. This should lock firmly against the post.
Step 3: Creating the Tension System (The Trucker’s Hitch)
If you need strong, adjustable tension using only rope, the Trucker’s Hitch is the professional answer. It creates a simple pulley system that multiplies your pulling force, similar to a ratchet strap.
- Anchor: Tie the first end of the rope securely to one side of the anchor point using a strong knot (like a secure Figure-Eight or an Anchor Hitch).
- Run the Line: Run the rope toward the load or the second anchor point.
- Create the Pulley: About 3–4 feet before the second anchor point, create a loop in the rope line. Do this by forming a bight (a U-shape) and twisting it twice to create two full wraps. This forms your “pulley.”
- Pass Through: Pass the working end of the rope under the standing line that is running to the second anchor point, and then up through the loop you just made (the pulley).
- Tighten Down: Pull down hard on the working end. You are basically creating friction against the standing line, leveraging the force significantly.
- Lock It Off: Once you have maximum tension, tie off the remaining working end securely to the second anchor point using a couple of half hitches or a Square Knot.
This method saves your arms and provides incredible grip. Remember, the stability of the setup relies on the strength of the anchor knot (Step 1) and the securing knot (Step 5).
Maintenance and Safety Checks After Securing
Getting the restraints tied is only half the battle. To ensure reliability, especially if the bed frame is staying put for a long time or if you are securing something that might shift (like a rolled rug), regular checks are crucial.
The “Shake Test”
After you tie everything down, give the object/load a firm shake or push. If it moves more than an inch or you hear creaking unrelated to the actual straps, you need to re-tension immediately.
Checking For Wear
If you used rope or straps that rubbed against sharp corners during tightening, stop and inspect them. Frayed rope fibers or cuts in webbing are signs the material integrity has been compromised. Replace the material immediately rather than relying on a weakened strand.
Periodic Retightening
If the setup is only temporary (e.g., for moving day), it’s wise to check the tension every 30–45 minutes. Fabrics and ropes can settle, especially under varying temperature or humidity, leading to slight loosening. A quick half-turn on a ratchet or tightening the lead on a rope knot can prevent issues.
When to Use This Skill: Practical Applications
While mastering how to tie restraints to bed frame anchors might sound niche, this skill set applies widely in DIY and transportation scenarios. Knowing safe tying methods builds confidence for many tasks around the house and garage.
Securing Furniture During a Move
If disassembly isn’t an option, sometimes a disassembled mattress or a lightweight dresser needs to be secured to the frame temporarily while you move other heavy items around the room or stage things in a moving truck before final loading.
Temporary Child Safety Barriers (With Caution)
In an emergency or temporary scenario, if you need to create a barrier across an open doorway or to block a staircase landing temporarily, a strong rope system tied between sturdy bedposts (if the bed is accessible) can provide a perimeter, provided you use appropriate, visible materials like bright nylon webbing.
Crucial Safety Note: Never use restraints tied to a bed frame as primary supports for structures or as restraint devices meant to hold people unless they are specifically rated safety harnesses used in conjunction with professional fall protection gear. Always prioritize approved, manufactured safety equipment over improvised solutions for life-threatening situations. For guidance on general home safety equipment, consult resources like the Consumer Product Safety Commission (CPSC).
DIY Workshop Organization
If you have a large frame bed in a small apartment, you might use the frame as a temporary anchor point to hang long items vertically out of the way—like lengths of lumber or rolled-up carpets—using a strong strap wrapped around a bedpost and then looped over the item.
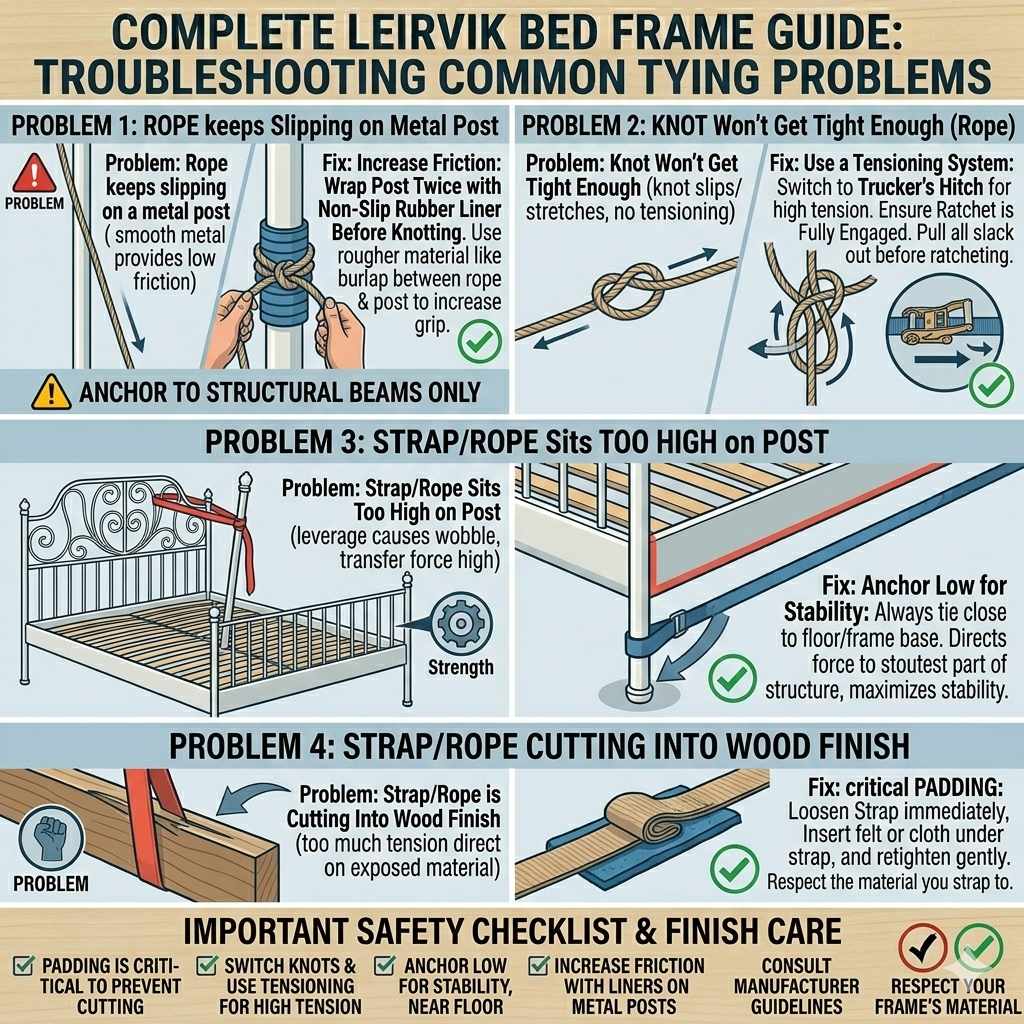
Troubleshooting Common Tying Problems
Even experts run into snagging issues. Here are the most common hurdles when you are trying to figure out how to tie restraints to bed frame components and how to fix them easily.
Problem 1: The Rope Keeps Slipping on a Metal Post
The Cause: Smooth metal offers very little friction for rope to grip, even with standard knots.
The Fix: Use more friction material. Wrap the post twice with thick, non-slip material like rubber shelf liner before you apply the Clove Hitch. If using rope, consider using a wrap or two of a rougher material (like burlap) between the rope and the metal post to artificially increase grip.
Problem 2: The Knot Won’t Get Tight Enough (Rope)
The Cause: You are using a knot that slips or stretches too much (like a simple overhand knot under tension) or you aren’t using a tensioning system.
The Fix: Switch to the Trucker’s Hitch described above. It mechanically assists you in creating high tension. If using webbing, ensure the ratchet mechanism is fully engaged and you are pulling the slack out efficiently before ratcheting up.
Problem 3: Strap/Rope Sits Too High on a Post
The Cause: Attaching too high on a tall, thin post means leverage is working against you, making the base of the post wobble.
The Fix: Always tie as close to the floor or the main frame base as possible. Anchoring low down ensures that any force applied is transferred directly into the stoutest part of the frame structure, maximizing stability.
Problem 4: Strap/Rope is Cutting Into the Wood Finish
The Cause: Too much tension applied directly onto exposed wood or paint.
The Fix: This is why padding is critical. If you’ve already tightened it and notice scoring, immediately loosen the strap, insert a thicker layer of felt or cloth directly under the strap path, and retighten gently. Always respect the material you are strapping to.
Frequently Asked Questions (FAQ) for Beginner Securing
Q1: Can I use bungee cords to tie things to my bed frame?
A: It is generally not recommended for securing items that must stay put even if slight movement occurs. Bungee cords stretch too much and are designed for bundling, not load restraint where constant tension is required.
Q2: What is the best knot to use if I don’t have a ratchet strap?
A: For anchoring to a post, use a Clove Hitch. For creating the necessary tension (the pulling force), the Trucker’s Hitch is the superior knot choice when working only with rope.
Q3: How tight should my restraints be when tied to the bed frame?
A: They should be firm enough that the item cannot shift or slide, but not so tight that you hear groaning or see the frame material warp. For webbing, aim for firm resistance when pushing down on the strap.
Q4: Is it safe to anchor straps to the metal cross bars under a mattress foundation?
A: Only if those cross bars are solid, structural metal beams (like on an industrial frame). If they are thin, stamped metal tracks, tying to them risks bending them and potentially damaging the foundation over time. Stick to the main frame rails or posts.
Q5: Do I need to use special protective padding?
A: Yes, padding is highly recommended. Use thick towels, old blankets, or moving blankets placed between the strap/rope and the bed frame’s finish (especially wood or painted metal) to prevent scratching, rubbing, and heat scoring.
Q6: What length strap or rope should I buy?
A: For bed frames, having straps between 8 to 12 feet long is usually ideal. This gives you enough slack to wrap around a standard post, run to the load, and still have enough tail left over to complete your tension knot or secure the ratchet end.
Conclusion: Confidence in Securing Your Items
When it comes to tying restraints to a bed frame, success isn’t about complicated knots or heavy-duty equipment — it’s about using smart, reliable techniques. By focusing on strong anchor points, choosing durable low-stretch materials, applying balanced tension, and protecting your frame with proper padding, you create a setup that is both stable and safe.
The difference between a secure hold and a frustrating failure often comes down to small details: where you tie, how you tighten, and whether you take a moment to test your work. A careful approach prevents unnecessary damage, keeps your materials in good condition, and ensures everything stays exactly where it should.
Whether you’re preparing for a move, organizing your space, or setting up a temporary solution, these practical methods give you confidence and control. With the right preparation and a little attention to detail, securing items to your bed frame becomes a straightforward task — not a stressful one.
Take your time, secure it properly, and move forward knowing your setup is stable, protected, and built to hold.