To recover a leather bed frame, start by removing the old fabric or vinyl, preparing the frame underneath, measuring carefully, cutting new upholstery material slightly oversized, and securing the new fabric using a staple gun. This approach saves money and revives your frame’s look efficiently.
Is your beautiful leather bed frame starting to look tired? Maybe the leather is cracked, peeling, or stained beyond repair. It’s frustrating when a central piece of furniture loses its shine. You might think replacing the entire frame is the only choice, or that hiring a professional upholsterer will drain your wallet. Don’t worry! You absolutely can bring that frame back to life yourself. Learning how to recover a leather bed frame is a rewarding DIY project. We are going to walk through every easy step, ensuring you get a professional finish without needing special tools. Let’s get your bedroom looking great again!
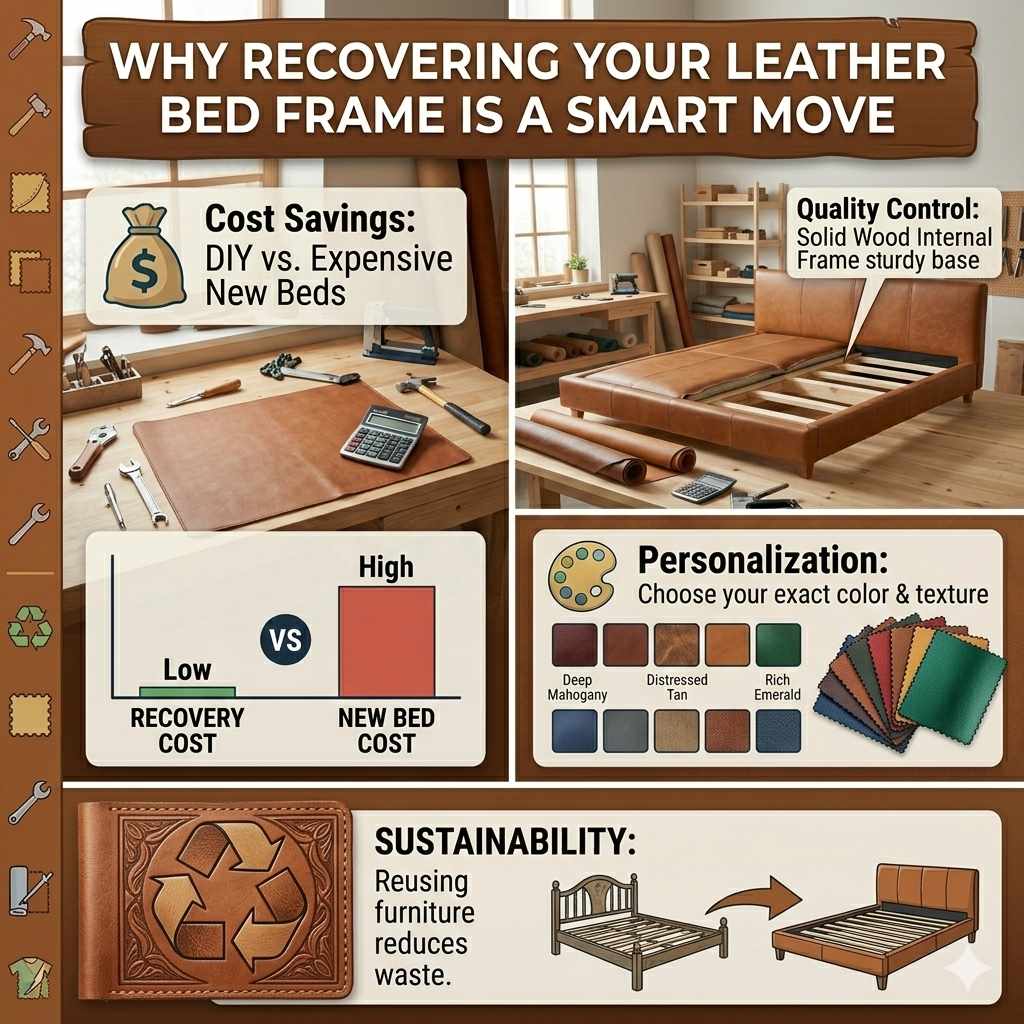
Why Recovering Your Leather Bed Frame is a Smart Move
Before diving into the “how-to,” let’s quickly look at why this repair beats replacing the whole unit. When you decide how to recover a leather bed frame, you are choosing value and customization.
- Cost Savings: New, high-quality upholstered beds are expensive. Recovering costs just the price of fabric and a few supplies.
- Quality Control: Often, the internal frame of an older bed is solid wood. You are keeping a sturdy, well-built base.
- Personalization: You get to choose the exact color and texture—maybe you switch from dark brown leather to light gray velvet.
- Sustainability: Reusing furniture reduces waste, which is always a win for the planet.
Gathering Your Essential Tools and Materials
Preparation is key to success. Having the right gear makes the job quick and safe. Think of this as setting up your pit stop before the big race. You don’t need a full professional shop, just a few reliable items.
Required Materials List
This is what you’ll purchase or gather for the actual covering process:
- New Upholstery Fabric: Choose high-quality faux leather, vinyl, or even performance fabric if you prefer an upgrade. Make sure it has good durability ratings.
- Heavy-Duty Staples: Get staples specifically made for upholstery or wood (usually 1/4-inch or 3/8-inch).
- Fabric Glue or Spray Adhesive: Used for securing tricky corners or seams neatly.
- Batting (Optional but Recommended): Thin layer of polyester batting adds a softer look and cushions beneath the leather.
Essential Tools Checklist
These are the tools that do the heavy lifting during disassembly and reassembly:
- Staple Remover Tool (Pry Bar): Essential for safely pulling out all the old staples without damaging the wood underneath.
- Electric Staple Gun: This is highly recommended over a manual gun. It saves your hands a lot of strain, especially when pulling the fabric tight on thick sections.
- Measuring Tape: Accuracy matters here!
- Sharp Fabric Scissors or Rotary Cutter: You need clean cuts. Dull blades will fray your new material.
- Screwdriver Set: To disassemble any bolt-on headboards or side rails.
- Utility Knife: For trimming excess fabric once stapled.
- Protective Gear: Gloves and safety glasses are always smart when using power tools or pulling old staples.
Step-by-Step Guide: How to Recover a Leather Bed Frame
Follow these instructions closely. We will start by taking the frame apart and end with the beautiful finished product. Remember to work in a clean, well-lit area.
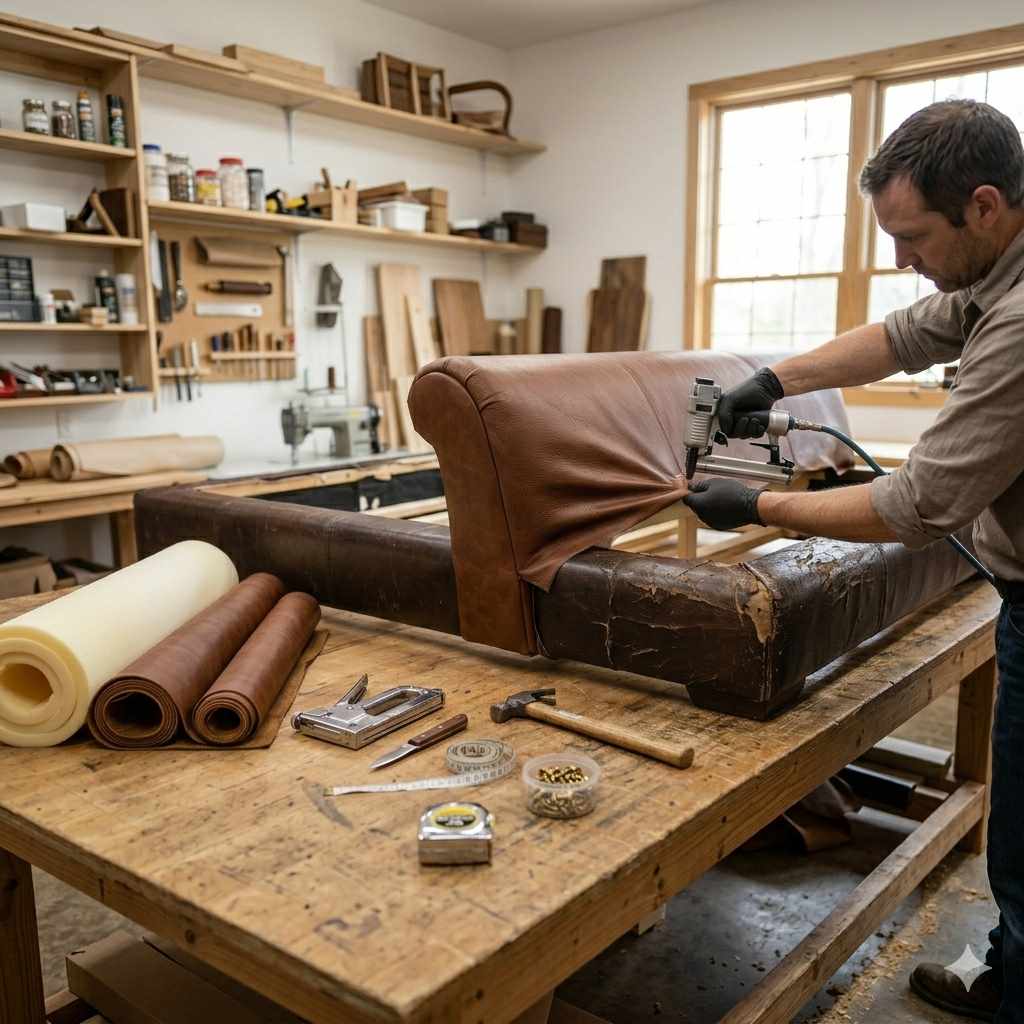
Phase 1: Disassembly and Old Material Removal
This might seem tedious, but removing the old covering correctly gives you the perfect template for the new one.
1. Disassemble the Frame Components
If your bed frame is large (like a king or queen headboard), it often comes in separate pieces. Carefully detach the headboard, footboard, and side rails. Place all bolts and screws in a labeled bag so you don’t lose them.
2. Remove Existing Upholstery
This is where your staple remover shines. Start in the center of a panel and work your way outward.
- Use your staple remover or pry bar to gently lift the edges of the old material where it is stapled.
- Once you have a staple loose, pull up slowly. If the fabric is tearing, use the tool to remove the staple completely before pulling the material away. Don’t just yank!
- Keep the old fabric pieces together. They are now crucial templates for cutting the new material.
3. Inspect the Frame and Padding
Once the old leather is off, you might find the underlying foam or padding is compressed or damaged. This is the perfect time to upgrade.
If the foam is flat, you can replace it with new upholstery foam, commonly available at craft or home improvement stores. For a softer look, lay down a thin layer of polyester quilt batting over the foam and staples the edges down first. For more information on mattress support and materials, consult resources from organizations like the UK Government on Furniture Flammability Regulations (understanding material standards helps in choosing replacements).
Phase 2: Measuring and Cutting the New Material
Accuracy here prevents wrinkles and gaps later on.
1. Create Your Templates
Lay the old, removed leather panels flat onto your new fabric. If the old fabric is too damaged or if you need a slightly tighter fit, measure from the wooden frame edge.
2. Understand the Required Overhang
When upholstering, you must cut the material larger than the area you are covering. This overhang is what allows you to pull the material tight over the frame and staple it securely on the back side.
Rule of Thumb: Add 3 to 4 inches to every dimension (width and height) of the wood panel you are covering. This ensures you have plenty of material to wrap around corners and staple onto the back supports.
3. Cutting the Pieces
Using your sharp scissors or rotary cutter, carefully cut out the new sections based on your measurements. Try to cut on the back (wrong) side of the fabric to prevent snags showing on the front. If you are using batting, cut that piece slightly larger than the fabric.
| Panel Section | Key Consideration | Recommended Overhang (Min.) |
|---|---|---|
| Headboard Center Panel | Must be smooth; center alignment is crucial. | 4 Inches on all sides |
| Side Rails | Needs to stretch around corners tightly. | 3 Inches on all sides |
| Footboard | Often has complex curves or piping requirements. | 4-5 Inches, especially around curves |
Phase 3: Upholstering the Panels
This is the most satisfying part—seeing the transformation happen! We recommend working on the headboard first, as it is usually the largest and most visible piece.
1. Secure the Batting (If Used)
If you are using new foam or batting, lay it over the panel and lightly tack it down with a few staples around the edges. Don’t pull too hard yet.
2. Positioning the New Fabric
Lay your new material face-down on a clean floor. Place the wooden panel (face-down) directly onto the center of the fabric. Take a moment to center the fabric perfectly over the component.
3. The Critical Stapling Technique (Start at the Center)
This technique ensures even tension, preventing puckers and ripples.
- First Staple: Pull the fabric very taut over the center of one edge (e.g., the top edge). Place one staple right in the middle of the edge.
- Opposite Edge: Go directly to the opposite edge (the bottom edge). Pull the fabric firmly—but not so hard that it distorts the material on the front—and place one staple in the center there.
- Side Edges: Repeat this process for the left and right sides, placing one staple in the center of each. You now have four central staples balancing the tension.
- Work Outward: Continue stapling outward from the center staple towards the corner. Place staples about 1 to 2 inches apart. Keep testing the front side to ensure there are no wrinkles forming.
4. Mastering the Corners
Corners are where most beginners struggle. A neat, hospital corner is the goal.
- As you approach a corner, stop stapling about 3 inches away from it.
- Fold the excess material neatly on one side, creating a crisp pleat or fold right at the corner edge.
- Pull the second adjacent side fabric very tight over that fold, and secure it with a staple.
- Fold the remaining flap neatly over the first one and smooth it down. Secure this final edge with staples. A little spot of fabric glue can help hold these complex folds if needed.
Phase 4: Finishing Touches and Reassembly
Once all panels are covered, it’s time to make it look factory-fresh.
1. Trimming Excess Material
Flip the panel over. Using your utility knife, carefully trim away all the excess, bunched-up fabric from the back, leaving about a half-inch margin past the final staple line. This prevents bulkiness.
2. Reattaching Components
If your original frame had protective backing fabric (the thin black cloth often stapled to the back), now is the time to put it back on. This hides the staples and the rough edges of your new material. Use small upholstery tacks or staples to secure this backing.
3. Final Assembly
With all sections finished, reassemble the headboard, rails, and footboard using the original hardware. Take a moment to admire your work—you just saved hundreds of dollars!
Troubleshooting Common Beginner Issues
Every DIY project has small hiccups. Knowing how to handle them prevents frustration. As a trusted guide, I want you to succeed on the first try.
Issue 1: Wrinkles or Ripples on the Front Surface
Cause: Uneven tension or not pulling tight enough across the center staples.
Fix: Carefully use your staple remover to pull out the staples in the wrinkled area. Pull the fabric tighter from the opposite side, smoothing out the wrinkle by hand, then re-staple, ensuring you pull evenly from all four directions.
Issue 2: The Fabric Won’t Stay Put on Curved Edges
Cause: The material naturally wants to bunch up on tight curves.
Fix: You need more compression. Use a smaller staple (like 1/4-inch) directly into the curve. If the stretch is extreme, you might need to snip the material slightly (a small vertical relief cut) on the backside of the curve, which allows the material to lay flatter before you staple it down.
Issue 3: Staples Are Coming Through the Wood
Cause: Using staples that are too long for the frame thickness, or hitting soft, spongy wood.
Fix: If staples are poking through, pull them out immediately. For soft spots, use shorter staples or apply a dab of strong wood glue before inserting the staple to help it grip.
Pros and Cons of DIY Frame Recovery vs. Professional Upholstery
Understanding the trade-offs helps you decide if this project fits your schedule and skill level. Here is a quick comparison chart based on experience and budget.
| Factor | DIY Recovery (You Do It) | Professional Upholstery Service |
|---|---|---|
| Cost | Low (Material cost only) | High (Labor and materials) |
| Skill Required | Beginner to Intermediate | Expert |
| Time Investment | 1 Full Weekend | 2–4 Weeks |
| Customization | Total control over fabric choice and tightness | Relies on the shop’s supplier options |
| Warranty/Guarantee | None (Your guarantee is your satisfaction) | Usually includes a limited service warranty |
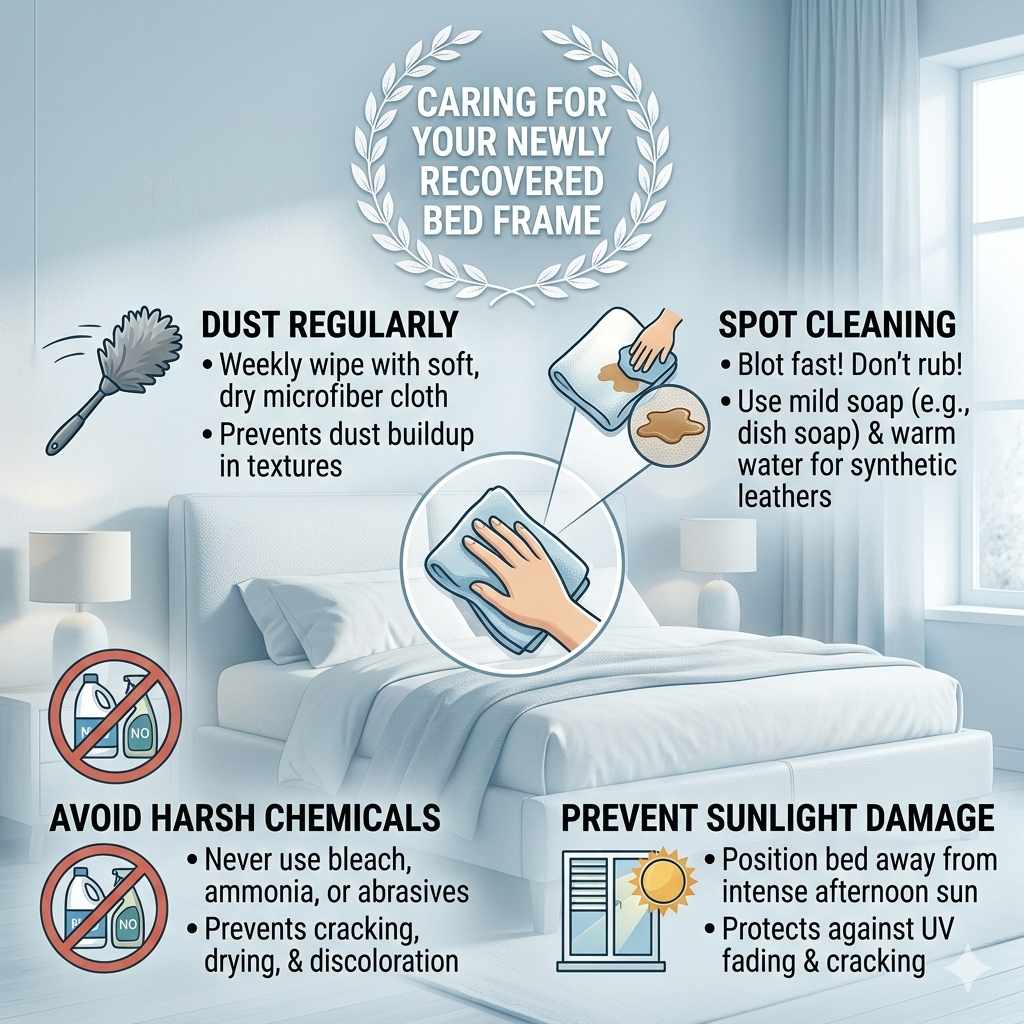
Caring for Your Newly Recovered Bed Frame
You’ve done a fantastic job reviving your furniture! To make sure that new look lasts, a simple cleaning routine is essential. Whether you chose faux leather or a fabric finish, consistent, gentle care pays off.
Cleaning Guidelines
- Dust Regularly: Use a soft, dry microfiber cloth to gently wipe down the surface weekly. This stops dust from settling deep into the weave or texture.
- Spot Cleaning: For spills, act fast. Blot, never rub. For most durable synthetic leathers, a mild soap (like diluted dish soap) and warm water solution works well. Always test the cleaner on a hidden spot first.
- Avoid Harsh Chemicals: Never use abrasive cleaners, ammonia, or bleach, as these can dry out or discolor synthetic materials. For real leather, check recommendations from organizations like the Leather Research Laboratory regarding mild cleaners appropriate for treated hides.
- Prevent Sunlight Damage: Position your bed frame away from windows that receive direct, intense afternoon sunlight. UV rays are the enemy of all upholstery materials, causing fading and cracking over time.
Frequently Asked Questions (FAQ) About Recovering Bed Frames
Q1: How much fabric should I buy to cover a queen-size headboard?
A queen headboard typically requires between 6 and 10 yards of material, depending on its height and width, and whether it has complex curves. Always measure the finished piece and add the 3-4 inch overhang margin all around before purchasing your final yardage.
Q2: Can I use my old staples if they look okay?
It is strongly recommended that you do not reuse old staples. They are often bent or rusty from removal, and they won’t hold the new, tightly stretched material as securely as fresh, new staples will.
Q3: Is it necessary to replace the foam inside the headboard?
No, it is not strictly necessary if the existing foam is still supportive and soft. However, if the original foam is stiff, cracked, or has flattened out, replacing it with new upholstery foam or adding a layer of polyester batting will significantly improve the final look and comfort.
Q4: What is the easiest material for a beginner to work with?
Faux leather or vinyl is often easier for beginners than genuine leather, as vinyl is less prone to stretching unevenly. Look for materials labeled as “upholstery weight” and avoid very thin or lightweight fabrics.
Q5: How do I get piping or welting installed neatly on a newly recovered frame?
Piping is installed before attaching the final side panel. You secure the piping into the corner folds first, often using fabric glue to hold it in place while you staple the main panel. Then, the final piece of fabric that wraps underneath is used to cover the raw edges of the piping installation.
Q6: If my frame has button tufting, should I try to do it myself?
Button tufting adds a high level of complexity because you must drill holes through the frame, secure the tufts before stapling the final back panel, and ensure the fabric depth is correct. For a first-time project, it is safer to recover around the tufted sections or consider a professional for that specific element.
Q7: Do I need an air compressor for the staple gun?
While many professionals use pneumatic (air-powered) guns, a quality electric staple gun is perfect for this project. It uses wall power instead of an air compressor, making it much easier and cheaper for a beginner tackling a single bed frame.
Conclusion: Confidence in Your New Look
We’ve broken down the process of how to recover a leather bed frame into manageable, understandable steps. You now have the knowledge to assess your frame, select your materials, and execute the reupholstering process with confidence. This project is a fantastic way to update your bedroom style, reinforce your DIY skills, and save a significant amount of money compared to buying new furniture. Remember that perfection comes with practice; if your first corner isn’t museum-quality, that’s okay! Look at the entire piece—the smooth panels and the fresh upholstery speak volumes about your effort. Dive in, enjoy the process of transformation, and rest easy knowing your beautifully revived leather bed frame is built to last.