
To prepare the best chocolate fondue, you need quality chocolate (like semi-sweet chips or chopped bars), heavy cream for silky texture, and a gentle heating method, often a double boiler or low heat setting, to melt everything slowly without scorching. This simple process ensures a smooth, luxurious dip every time.
Making chocolate fondue at home seems fancy, but it’s surprisingly easy. If you’ve ever tried to melt chocolate only to end up with a grainy, stiff mess, you know how frustrating that can be. That thick, seized chocolate is a common beginner pitfall, much like over-tightening a drain plug on your car, it causes problems!
Don’t worry. Getting that velvety, perfect chocolate dip is totally achievable. We are going to walk through this step-by-step, using common kitchen tools. By the end of this guide, you’ll feel confident mixing up a batch of luxurious chocolate fondue that will impress everyone. Let’s dive into the secrets for the proven best chocolate fondue!
Why Homemade Chocolate Fondue Beats Store-Bought Every Time
You can buy pre-made fondue kits, but when you make it yourself, you control the quality. Think of it like changing your own oil; you know exactly what went into the engine. With homemade fondue, you get richer flavor and the perfect consistency.
The Flavor Advantage
When you buy chocolate bars or quality chips, you get true cocoa flavor. Commercial fondue sauces often rely on stabilizers, extra sugars, or lower-grade cocoa butter, cutting down on that deep chocolate taste.
Texture Control
The biggest win is texture. If your fondue is too thick, it won’t coat the marshmallows or fruit right. If it’s too thin, it slips right off. By controlling the fat (cream or milk) and the heat, you guarantee that signature velvety mouthfeel. It’s all about balance.

Gathering Your Best Tools and Ingredients
Before we start cooking, let’s make sure the “garage” is stocked. For great fondue, you don’t need specialized equipment, just a few core items. Consistency in your parts equals consistency in your results—whether it’s the right torque wrench or the right saucepan.
Essential Equipment
You need some way to heat the chocolate gently. High heat is the enemy of smooth chocolate; it causes it to burn or seize up.
- Heat Source: A stovetop or a dedicated fondue pot with a low-setting burner.
- Mixing Bowl: A heat-safe bowl, preferably glass or stainless steel, for melting.
- Whisk or Spatula: A flexible rubber spatula is great for scraping the sides clean.
- Pot for Water: If using a double boiler method (highly recommended).
The Star Ingredients (The “Oil” and “Filter” of Your Recipe)
The ingredients you choose directly impact the final taste and texture. Resist the urge to grab the cheapest chocolate!
| Ingredient | Recommended Type | Why It Matters |
|---|---|---|
| Chocolate Base | High-quality semi-sweet or dark chocolate (60–70% cocoa). Chips or roughly chopped bars work well. | Provides intense flavor and the right amount of cocoa solids. |
| The Liquid (The Smoother) | Heavy whipping cream (35% fat content or higher). | The fat content prevents the chocolate from seizing and keeps the final product ultra-smooth. |
| Flavor Boosters (Optional) | A splash of vanilla extract, a pinch of salt, or a teaspoon of liqueur (like Grand Marnier). | Salt enhances the sweetness; extracts add depth. |
Step-by-Step Guide: How to Prepare Chocolate Fondue Perfectly
We are going to use the double boiler method (or a makeshift one). This is the safest way to heat chocolate, preventing direct contact with the bottom of the pan, which causes scorching. Think of this as checking your tire pressure before a long trip—it prevents failure.
Step 1: Prep Your Chocolate
If you are using a large chocolate bar, chop it into small, uniform pieces. This allows the chocolate to melt evenly and at the same speed. If you are using good quality chips, you can skip this, but even chips benefit from being slightly broken up.
Step 2: Prepare the Gentle Heat Source (The Double Boiler)
A double boiler uses the steam from hot water to gently heat the bowl above it. It’s foolproof for delicate melting.
- Fill a saucepan with about two inches of water—just enough so that the base of your mixing bowl sits above the water, but the water cannot splash in.
- Place the saucepan on the stove over medium-low heat. You want a gentle simmer, not a rolling boil.
- Place your heat-safe mixing bowl on top of the saucepan. Ensure the bottom of the bowl does not touch the simmering water.
Step 3: Introduce the Cream
Do not put just the chocolate in the bowl first! You need the liquid to help the process along. Add the heavy cream to the bowl (over the double boiler). Let the cream heat up until it just begins to steam slightly and tiny bubbles form around the edges. This usually takes about 3–5 minutes.
Quick Tip: For every 8 ounces of chocolate, use about 1/2 cup of cream. Adjust slightly depending on the chocolate’s fat content.
Step 4: Melt the Chocolate Slowly
Remove the bowl from the heat source temporarily, or reduce the heat to the absolute lowest setting while stirring the warm cream.
- Add about half of your prepared chocolate pieces to the warm cream.
- Let it sit undisturbed for about 60 seconds. This allows the latent heat to penetrate the solid chocolate.
- Begin stirring gently, starting from the center and moving outward. Do not whisk vigorously—gentle folding is key.
- Once that batch is mostly melted and glossy, add the remaining chocolate. Continue stirring until the mixture is completely smooth and uniform.
If you notice any lumps, place the bowl back over the very low steam for just 30 seconds, stir, and repeat until smooth. Patience here saves rework later!
Step 5: Final Flavor Adjustments and Transfer
Once absolutely smooth, take the bowl off the heat entirely. Now is the time to add your flavor boosters (vanilla, liqueur, or a small pinch of sea salt). Stir them in well.
Transfer the finished, liquid chocolate carefully into your fondue pot. If you are using an electric fondue pot or a small ceramic pot with a tea light underneath, set it to its lowest warming setting to maintain the luxurious flow while dipping.
Troubleshooting Common Fondue Issues (The Mechanics of Melting)
Just like when diagnosing a slight engine miss, sometimes the recipe needs a slight adjustment. Don’t panic if your fondue doesn’t look perfect immediately. These simple fixes correct 99% of common fondue problems.
Problem 1: The Chocolate Seized Up (It looks gritty or like grainy paste)
This happens when the chocolate gets too hot, or if a tiny drop of water or steam splashes into the bowl. The sugar and cocoa solids separate from the fat.
The Fix: Add one clean tablespoon of hot water or more heavy cream, one teaspoon at a time, stirring constantly on low heat. This extra liquid often re-emulsifies the mixture, smoothing it out. If that fails, start over, ensuring you control the water/steam level very carefully.
Problem 2: The Fondue Is Too Thick
This is common if you use a higher percentage dark chocolate or if the cream content was a bit low.
The Fix: While still warm, slowly whisk in another tablespoon or two of hot heavy cream until the desired dipping consistency is reached. Remember, you might need more liquid as it cools down.
Problem 3: The Fondue Is Sitting Out and Getting Stiff
Chocolate naturally hardens as it cools. This isn’t a failure, it’s physics!
The Fix: If using a tea light warmer, ensure the flame is low enough that it warms the bottom of the pot without scorching the chocolate. If using an electric warmer, use the lowest setting. If it stiffens too much, carefully stir in a teaspoon of warm cream to loosen it up.
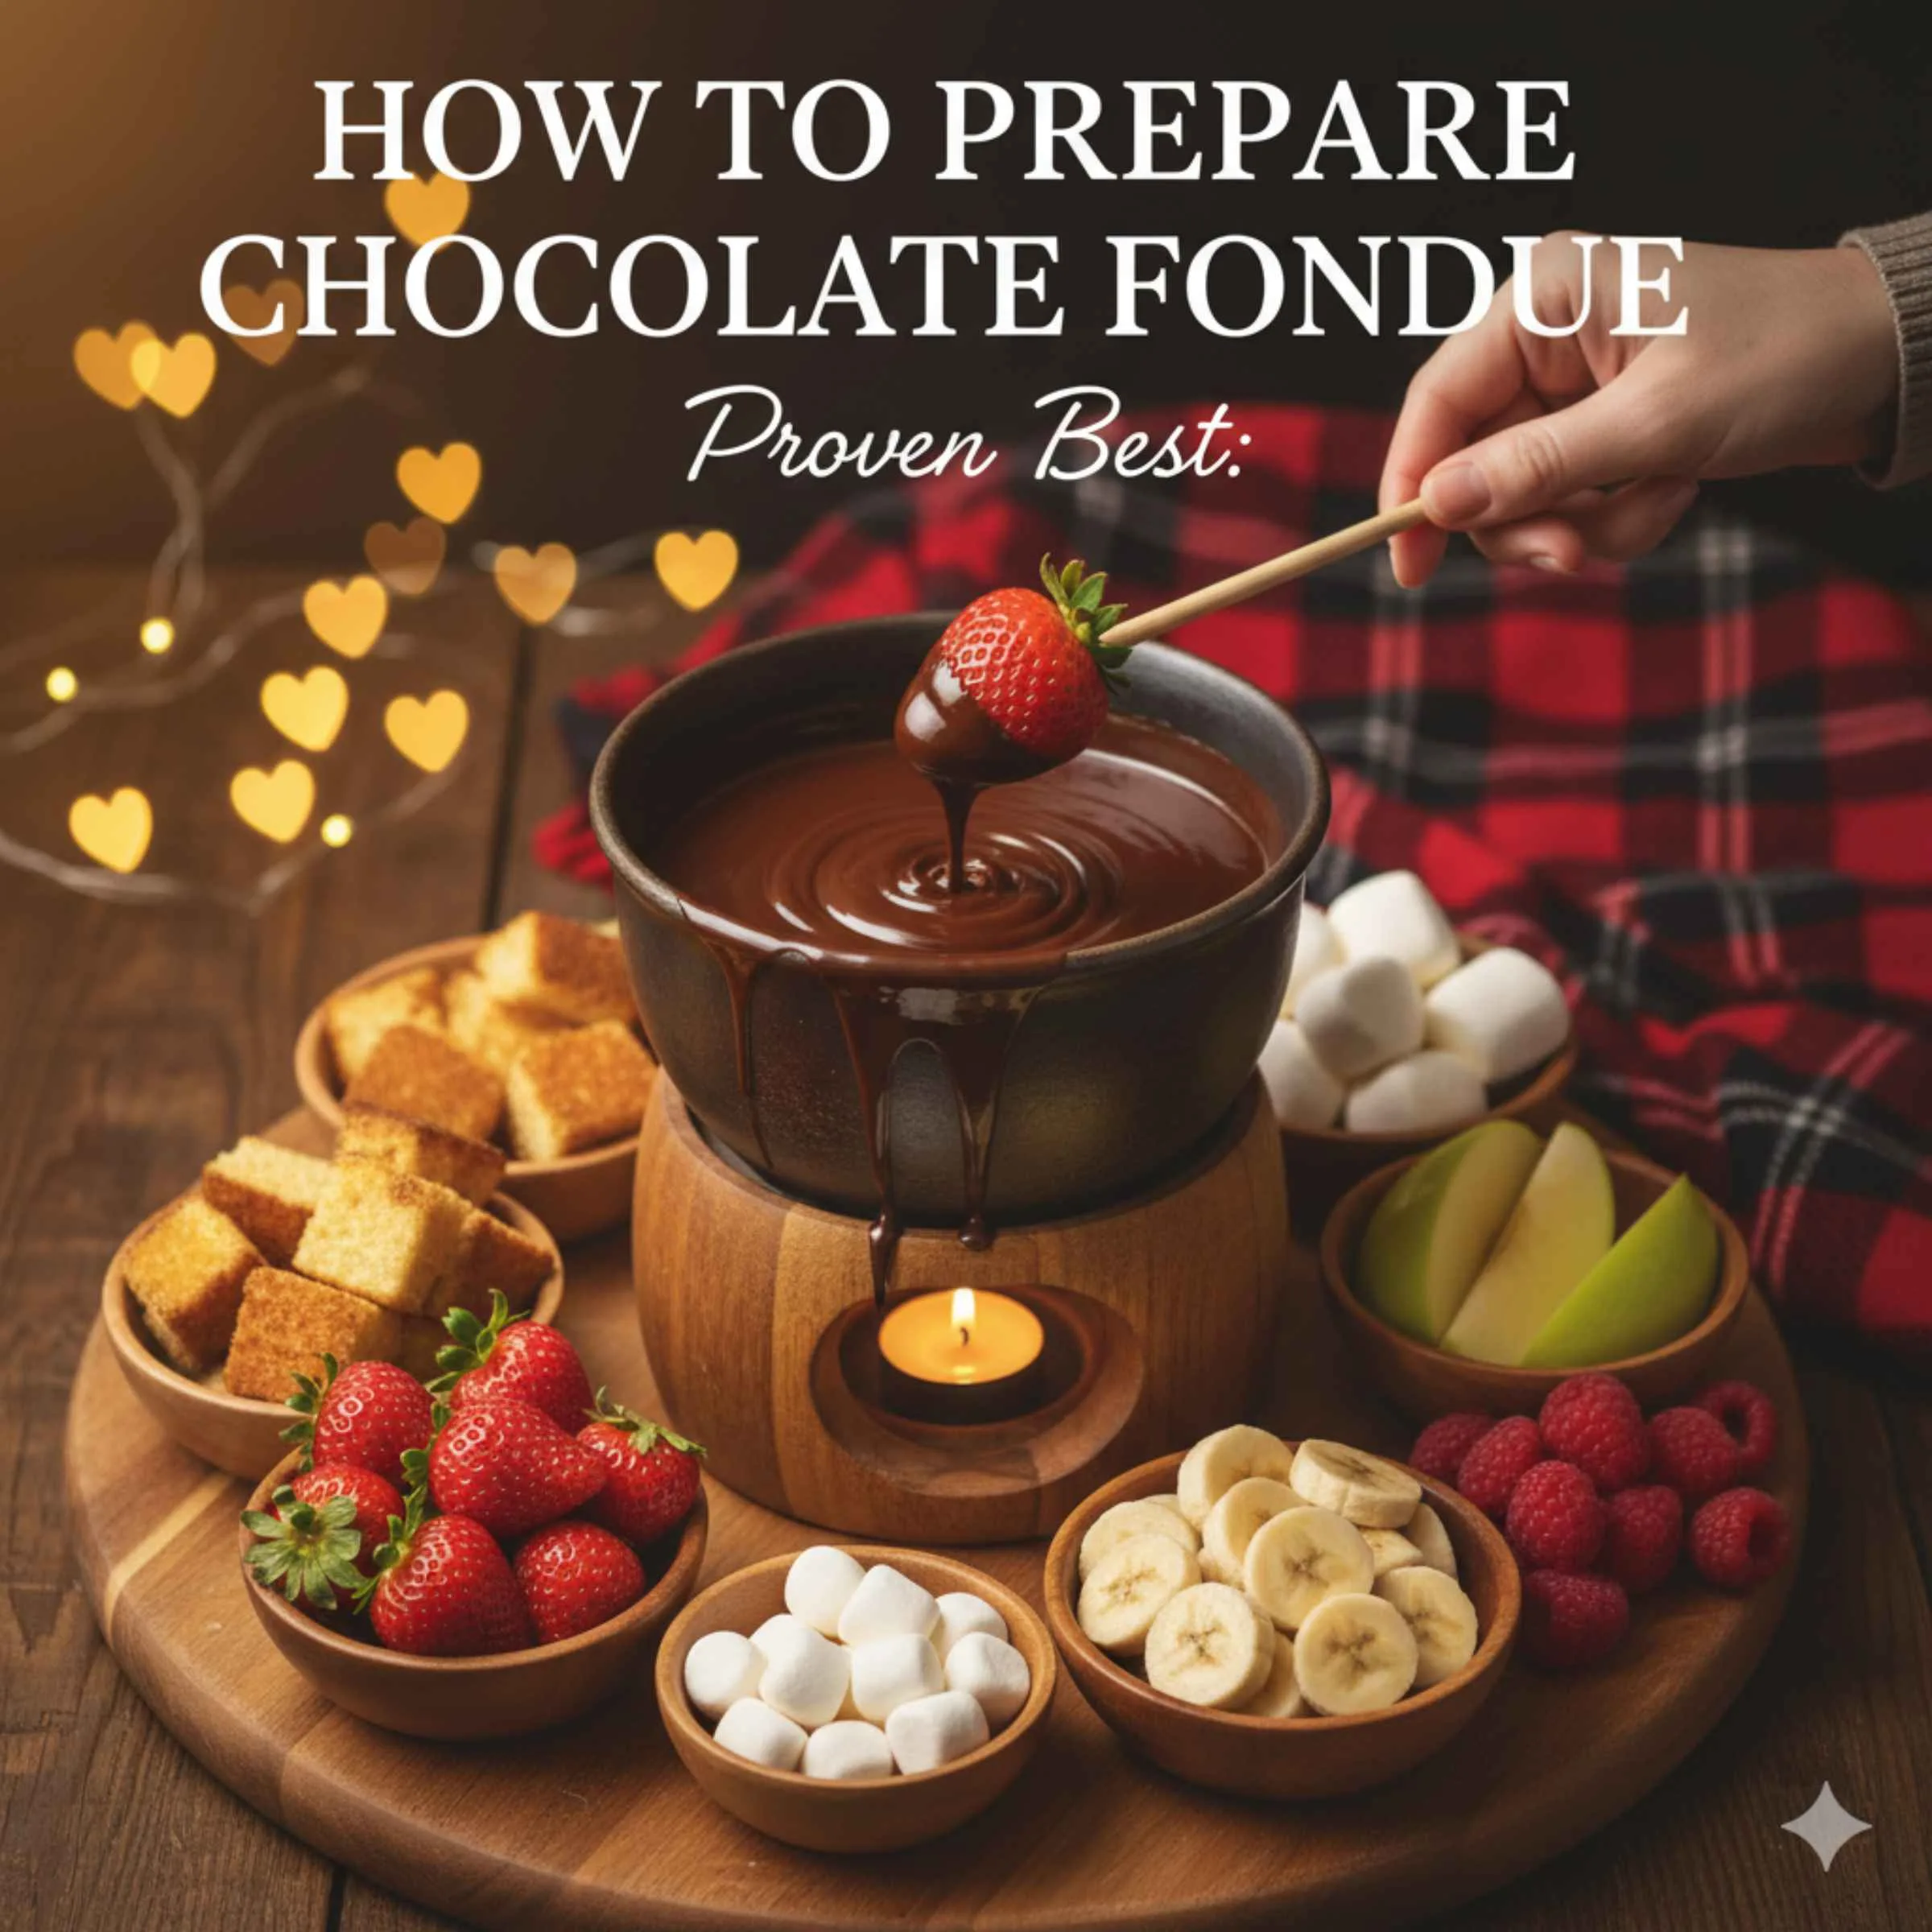
Choosing the Perfect Dippers: What Goes Best with Your Chocolate?
The best fondue needs the best things to dip in it! Think about texture and flavor contrast. You want things that hold up well to the warm chocolate but offer something interesting (like crunch or tartness).
Fruit Dippers (Fresh and Bright)
Fruits provide a wonderful counterpoint of acidity to cut through the richness of the dark chocolate.
- Strawberries (essential!)
- Banana slices (dip them right before eating to prevent browning)
- Pineapple chunks (the acidity is fantastic)
- Green apple slices (tart Granny Smith works best)
- Clementine or orange segments
Baked Goods (Sweet and Soft)
These soak up just a little of the warm chocolate.
- Cubed pound cake or sponge cake
- Marshmallows (large or mini)
- Pretzels (for the sweet/salty contrast—highly recommended)
- Lightly toasted shortbread cookies
Crunchy and Unexpected
For those who like layers of texture, add a little crunch.
- Roasted, salted nuts (pecans or almonds).
- Crispy wafer cookies (like Pirouettes).
- Rice Krispie treats cut into cubes.
Expert Tip from Dustin: When preparing fruit, remember that moisture is the enemy of smooth sauces. Pat cut fruit completely dry with a paper towel before serving near the fondue pot. Excessive water can cause the chocolate to seize upon contact.
Alternative Melting Methods (For the Non-Stovetop Cook)
If you don’t want to mess with a saucepan and water, there are two other reliable methods. These are often even easier for beginners, similar to using a jump starter instead of trying to manually crank a dead battery.
Method 1: Microwave Magic (The Quickest Route)
The microwave is fast, but it requires very small bursts of power, as overheating is instant.
- Place your chopped chocolate and half of the cream into a microwave-safe bowl.
- Microwave on 50% power (or medium setting) for 30 seconds.
- Remove and stir well, even if the chocolate doesn’t look melted yet. The residual heat will keep working.
- Repeat in 15-second intervals, stirring vigorously between each interval, until only a few small lumps remain.
- Stir until smooth. The final residual heat should melt the last bits.
Method 2: Using a Dedicated Electric Fondue Pot
If you have the right appliance, use it! Most modern electric fondue pots have built-in low-temperature warming elements designed specifically for this.
- Melt the chocolate and cream together gently on the stovetop first (using the double boiler method above) to ensure perfection.
- Pour the pre-melted fondue into the warmed electric pot set immediately to its lowest or “Keep Warm” setting.
- If you skip the stovetop and try to melt raw chocolate directly in an electric pot, it often scorches the bottom layer before the top melts evenly.
Making Your Chocolate Fondue Vegan or Dairy-Free
Many people want a delicious fondue but need to skip the dairy. This is entirely possible by replacing the heavy cream with a high-fat, dairy-free alternative. This adjustment requires careful heat management, similar to bleeding the brakes on a vehicle—it needs precision.
The key is using high-fat liquids that contain stable emulsifiers.
Best Dairy-Free Substitutes:
- Full-Fat Coconut Cream (The Best Option): Use the solid cream scooped off the top of a refrigerated can of coconut milk. This mimics the fat content of heavy cream very closely.
- Cashew Cream: Soaked and blended raw cashews create a rich, neutral cream base.
- Soy or Oat Creamers: Ensure they are the “barista blend” or “full-fat” versions, as regular thin creamers will cause the chocolate to separate.
When using dairy substitutes, consider adding a tiny bit more chopped cocoa butter or a teaspoon of neutral oil (like refined avocado oil) if the resulting mix seems too thin after melting, as some vegan liquids have less natural stabilizing fat than heavy cream.

Maintaining Chocolate Fondue Temperature: Keeping it Fluid
If your fondue sits for 30 minutes, it will inevitably thicken. Keeping it at the perfect dipping consistency is crucial for a successful party.
The best practice relies on two rules: keep the heat extremely low, and stir often.
| Heating Tool | Ideal Temperature Range (Approximate) | Maintenance Note |
|---|---|---|
| Tea Light Warmer | 100°F – 110°F (38°C – 43°C) | Use an unscented tea light; replace it every 45 minutes to maintain consistent, low heat. |
| Electric Fondue Pot | “Low” or “Warm” setting (Avoid the “High” setting entirely). | Stir every 5-10 minutes to equalize temperature throughout the pot. |
If you’re hosting guests, it’s often better to serve the fondue in smaller batches. Melt two cups, serve until half is gone, then quickly melt a fresh batch. This guarantees every dip is as perfectly smooth as the first. Think of it like topping off your fuel tank instead of running the engine dry!
Frequently Asked Questions (FAQ) for Chocolate Fondue Beginners
Q1: Can I use milk instead of heavy cream for my chocolate fondue?
A: You can, but it is not recommended for the best results. Regular milk has much less fat than heavy cream. Using milk significantly increases the risk of the chocolate seizing, becoming grainy, or separating because there isn’t enough fat to suspend the cocoa solids correctly.
Q2: What is the best type of chocolate to use if I want a deeply rich flavor?
A: Use dark or semi-sweet chocolate with a cocoa content between 60% and 72%. This range provides deep chocolate notes without being overwhelmingly bitter. High-quality chocolate bars that you chop yourself usually melt better than standard bagged chips.
Q3: How do I keep my fondue smooth if my heating element is too hot?
A: Immediately turn the heat down, or move the pot slightly off the heat source. Whisk in one small teaspoon of room-temperature heavy cream or milk. The extra liquid helps cool down the mixture and can help stabilize the emulsion again. Stir until smooth before returning to low heat.
Q4: How far in advance can I prepare the chocolate mixture?
A: You can prepare the fondue mixture entirely and store it in an airtight container in the refrigerator for up to three days. When ready to serve, gently rewarm it over low heat or in the microwave (in short bursts), adding a splash of extra cream to restore the silky consistency.
Q5: Should I add sugar to my chocolate fondue?
A: Usually, no. Most semi-sweet and dark chocolates (60–70% cocoa) already contain enough sugar for proper balance. Adding extra sugar can make the fondue overly sweet and may affect the texture unless additional liquid is added. Only consider adding sugar if you are using very high-percentage dark chocolate (85% or higher), and even then, add it sparingly and dissolve it fully in the warm cream first.
Q6: Can I make chocolate fondue ahead of time?
A: Yes. You can prepare chocolate fondue up to 24 hours in advance. Let it cool completely, then store it in an airtight container in the refrigerator. When ready to serve, reheat gently using a double boiler or microwave on low power in short intervals, stirring frequently. Add a small splash of warm cream if needed to restore the silky consistency. Never reheat on high heat, as this can scorch or seize the chocolate.
Final Conclusion: How To Prepare Chocolate Fondue
Preparing perfect chocolate fondue isn’t about fancy tools—it’s about quality ingredients, gentle heat, and patience. By using high-quality chocolate, rich cream, and controlled low temperatures, you create a smooth, luxurious fondue that coats beautifully and tastes indulgent without being heavy.
Whether you use a double boiler, microwave, or electric fondue pot, the same principles apply: go slow, stir gently, and keep moisture away. With the troubleshooting tips and dairy-free options covered, you’re equipped to handle any situation confidently.
Once you master this method, chocolate fondue becomes less of a “special occasion” dessert and more of a reliable, impressive treat you can make anytime. Smooth, glossy, and endlessly dippable—that’s the proven best way to prepare chocolate fondue.


