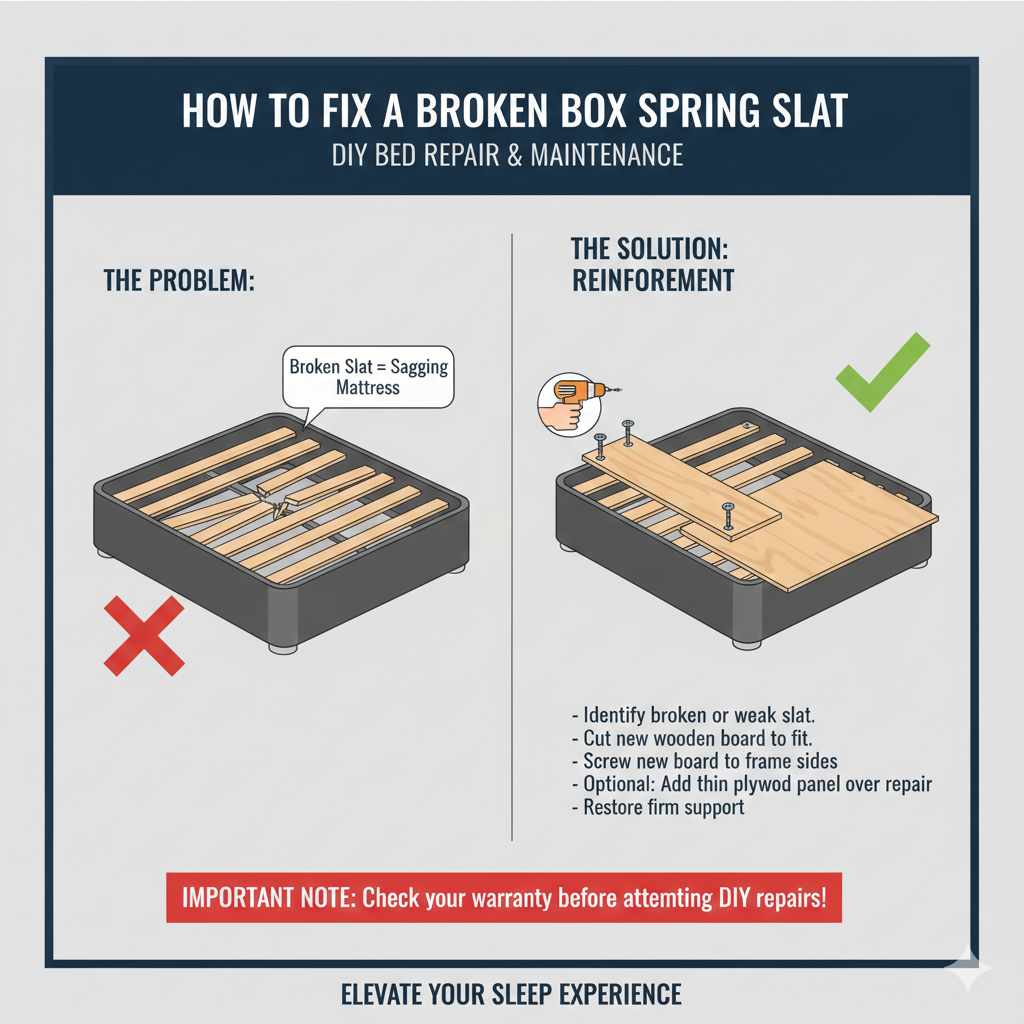
To fix a broken box spring slat, you first need to secure the frame, remove the damaged wood, and replace it with a new slat of the exact same length and thickness, securing it firmly with screws. This simple repair keeps your mattress supported and saves you the cost of buying a new box spring.
Is your bed suddenly sagging in the middle? That annoying dip usually means one of the wooden slats inside your box spring has given up the ghost. It’s frustrating when your comfortable bed starts feeling like a hammock! Finding a broken slat can feel like a big, specialized job, but I promise you, it is not. Think of this like changing a flat tire; it’s a basic roadside repair for your furniture. With a few common tools and clear steps, you can handle this repair quickly and safely. We will walk through every step to get your box spring solid again, restoring that perfect, level support your mattress needs.
Why Box Spring Slats Break (And Why You Should Fix Them Now)
Box springs are simple structures, relying on those horizontal wooden slats to hold up the mattress evenly. When one breaks, it creates a weak spot. This isn’t just uncomfortable; it’s actively bad for your mattress.
Modern mattresses, especially memory foam and hybrid models, need consistent, flat support. If a slat breaks, the weight shifts unevenly onto the surrounding frame and the remaining slats. Over time, this causes premature wear, leading to lumps, indentations, and potentially voiding your expensive mattress warranty. Fixing the slat right away is preventative maintenance for your whole sleep system.
Common Causes of Slat Failure
- Age and Wear: Wood dries out over time, making it brittle and prone to snapping under pressure.
- Excessive Weight: Regularly having more weight on one area than the manufacturer intended (like jumping on the bed).
- Moisture Damage: Infrequent exposure to spills or high humidity can weaken the wood fibers.
- Manufacturing Defect: Sometimes, the original wood piece was weak, knotty, or too thin for the job.

Tools and Materials You Need for the Repair
Don’t worry, you don’t need a full workshop or specialized carpentry tools. Most of what you need is probably already in your desk drawer or garage. Having the right gear makes this job faster and much less frustrating.
Here is a simple checklist of what to prepare before you start taking things apart:
Essential Tool Checklist
- Safety Glasses: Always protect your eyes, especially when prying or if splinters fly.
- Work Gloves: Box springs often have staples and rough wood edges.
- Drill/Screwdriver: A cordless drill makes this much easier than using a hand screwdriver.
- Measuring Tape: Accuracy is key for the replacement part.
- Pry Bar or Sturdy Flathead Screwdriver: For carefully removing the old staples or screws.
- Pencil or Marker: For marking cuts if you buy lumber.
- Saw (Optional): If you need to cut a new piece of wood to size.
Material Checklist
The most important material is the replacement slat. You need to match the existing wood perfectly.
- Replacement Wood Slat: Must match the exact length, width, and thickness of the original slats.
- Wood Screws or Nails: Appropriate length to go through the fabric covering and securely into the frame rails—usually 1.5-inch wood screws.
Step-by-Step Guide: How to Fix a Broken Box Spring Slat
This process is structured to be safe and effective. We’ll start with preparation and end with a rock-solid repair. Remember, take your time; rushing this leads to mistakes.
Step 1: Prepare the Area and Access the Damage
First things first: safety and access. You cannot fix what you cannot see.
- Remove Bedding: Take off all sheets, blankets, mattress protectors, and the top mattress. Set them aside somewhere clean.
- Move the Box Spring: If possible, move the box spring frame to an open, well-lit area, like a garage or driveway. Even if you work on it in place, you need room to maneuver.
- Locate the Damage: Lift the fabric covering on the top side of the box spring. Box springs usually have a thin, non-woven dust cover stapled to the top side (the bottom of the box spring frame as you look at it). Carefully locate the area where the slat is broken, usually indicated by the mattress sagging.
Step 2: Carefully Open the Box Spring Covering
The structural slats are often encased beneath the top layer of upholstery fabric attached to the wooden frame rails. You need to peel this fabric back just enough to expose the broken slat and its mounting points.
- Using a flathead screwdriver or a staple remover, gently work underneath the staples holding the top covering fabric to the outer wooden rails.
- If the slats are mounted on the inside of the frame, you might have to carefully remove staples around the entire perimeter where the broken slat resides. Work slowly to avoid tearing the fabric unnecessarily.
- Once you expose the broken slat, note how the ends are attached. Are they resting on a ledge, or are they screwed directly into the side rails?
Step 3: Remove the Debris (The Broken Piece)
You need a clean slate to install the new wood. This is where you remove the broken piece entirely.
- If the broken slat is held in place by screws, use your drill to remove them carefully.
- If it was held by nails or staples punched through the mounting bracket or the slat itself, slowly pry those out using your pry bar or screwdriver. Be mindful of the screws/nails holding the other, intact parts of the structure together—you only want to remove what holds the broken slat.
- Remove all pieces of the broken slat. Check the area for loose nails, staples, or wood chips before proceeding.
Step 4: Measure for the Perfect Replacement
This is the most critical step for the success of your repair. A slat that is too long won’t fit; one that is too short won’t offer support.
- Measure the precise distance between the inside edges of the horizontal frame rails where the old slat sat.
- Measure the thickness and width of the remaining good slats. For example, if you have 1×3 inch wood for your slats, you need to buy the same dimensions (even if true measurements are slightly different, stick to what’s already there).
- If you are at a hardware store buying replacement lumber, take a piece of the old slat with you, or write down the exact dimensions. For DIY projects, lumber yards often sell common dimensional lumber like 1″x3″ or 2″x4″, but remember that a “2×4” isn’t actually 2 inches by 4 inches when milled. Match the existing piece closely. If you want professional advice on wood types, reputable lumber suppliers often have detailed guides on their websites, explaining wood sizing standards.
Step 5: Install the New Slat
Now we put the new piece in. Remember, these slats bear a surprising amount of weight, so secure them well.
- Slide the new, correctly sized slat into position between the frame rails.
- Center the slat if it needs placement relative to the mattress support structure above (some slats are meant to sit exactly under center seams).
- Secure the slat. If the original used screws, use screws again (about 1.5 inches long should suffice, ensuring they don’t poke too far through the side rails). Place screws near the ends of the slat, driving them firmly through the side rails and into the end-grain of your new slat.
- If you notice the frame rails themselves seem thin or weak where you are screwing in, you can add a thin piece of scrap wood (a small mounting block) along the inside of the rail for better purchase before screwing the slat to that block.
Step 6: Reattaching the Fabric Cover
The final step is making it look professional and keeping everything secure.
- Carefully fold the dust cover fabric back over the top edge of the frame rails, ensuring it is snug but not overly tight.
- Use a staple gun or carefully tap the original staples back into place using a hammer. If the old staples ripped the fabric, you may need to use a few extra staples spaced slightly apart to secure the fabric firmly to the wood frame again.
- Once the fabric is secure, you have successfully completed the repair!
When Replacing the Slat Isn’t Enough: Frame Issues
Sometimes, the slat breaks because the entire box spring frame underneath is failing. If you notice these signs along with the broken slat, you might need a bigger fix, or perhaps it’s time to consider replacing the box spring itself.
Signs the Frame Needs More Than a Slat Swap
| Symptom | What It Means | Recommended Action |
|---|---|---|
| Warped or Bowed Rails | The main perimeter wood structure is bent due to long-term stress. | Replace the entire box spring or add significant bracing reinforcement. |
| Loose Corner Joints | The glued or screwed corners connecting the rails are separating. | Disassemble and re-glue/re-screw the corners with wood glue and long bolts. |
| Multiple Failed Slats | If two or more slats broke around the same time, the load distribution is failing. | Consider a new box spring, especially one with metal reinforcement, as the wood quality is suspect. |
Alternative: Adding Support Without Replacing the Slat
If you can’t easily access the broken slat, or if the wood is cracked but hasn’t fully snapped, you can sometimes bridge the gap temporarily or permanently using very sturdy reinforcement, similar to how you might reinforce a weak beam on a car chassis temporarily.
Bridging a Cracked or Partially Broken Slat
If the slat is only cracked down the middle, you can secure it with external reinforcement. This works best if the slat is still relatively flat.
- Get a Sturdy Support Piece: Find a piece of wood (like a 1×2 or even a flat metal strip) that is longer than the broken slat by at least 6 inches on either side.
- Position the Splint: Place this reinforcement piece directly underneath the broken slat. You want it spanning across the frame rails, sitting tight against the good wood on both ends of the broken slat.
- Screw Everything Together: Drive screws through both the reinforcement piece and the original slat, anchoring them firmly into the side rails of the box spring frame at both ends. This essentially creates a structural bridge over the weak point.
When to Say Goodbye to Your Box Spring
DIY repairs are fantastic for saving money, but sometimes a repair isn’t worth the effort or risk. Box springs typically last 7 to 10 years. If yours is significantly older or if the damage is widespread, saving money now might cost you a new mattress later.
Warning Signs It’s Time for a New Box Spring
- The box spring is visibly leaning or distorted when empty.
- You see visible mildew, mold, or insect activity inside the frame.
- The entire structure creaks loudly, even when only a light weight is applied.
- The manufacturer’s warranty has expired, and the wear is extensive.
While many people are switching to platform beds, many modern mattresses still strongly recommend a foundation with at least 75% surface coverage (meaning slats shouldn’t have gaps wider than 2-3 inches). Always check your mattress warranty documentation before completely ditching the box spring structure for simple slat support.

Frequently Asked Questions (FAQ) About Box Spring Repair
Q1: Can I just use stronger wood, like oak, instead of repairing the broken pine slat?
A: Using wood that is too hard or too thick can actually cause problems. The wood needs to flex slightly with the mattress. If the replacement piece is drastically different (like oak vs. soft pine), it might transfer stress to neighboring slats, causing them to break sooner. Stick to the original dimensions and wood type if possible.
Q2: How wide should the gap between slats be for good mattress support?
A: For most modern mattresses, especially foam or hybrid types, the gap between supporting slats should generally be no more than 3 inches wide. Check your specific mattress warranty guidelines, as some high-end models require closer spacing or even a solid foundation.
Q3: Do I have to remove the mattress to fix a slat?
A: Yes, absolutely. Working under several hundred pounds of mattress is unsafe and makes accessing the frame impossible. Always remove the mattress first. For very heavy mattresses, it helps to have a second person assist you in moving the mattress safely.
Q4: What is the typical material box spring slats are made of?
A: Most standard box springs use inexpensive, readily available dimensional lumber, most commonly pine, spruce, or a composite wood, usually sized as 1×3 or 1×4 boards.
Q5: I can’t find lumber the exact length needed. Can I join two pieces together?
A: Avoid joining two shorter pieces end-to-end if you can. A joint in the middle of the slat creates a massive weak point right where the mattress weight concentrates. If you must join wood, attach the two pieces side-by-side (laminating them) with heavy-duty wood glue and screws for added strength, and ensure the joint is supported by the frame rails underneath.
Q6: Is it safer to screw the slat in or nail it?
A: Screws provide superior holding power and are much easier to remove non-destructively later if needed. Nails can loosen over time, especially with the constant vibration of a bed. Always use wood screws for the replacement slat installation.
Conclusion: Confidence in Your Bed Foundation
There you have it—fixing a broken box spring slat is a straightforward DIY task you can tackle confidently in an afternoon. We covered everything from recognizing the problem to safely measuring and installing a solid replacement. By taking the time to secure that one weak point, you protect your entire mattress investment and ensure you get comfortable, even support night after night. Remember, handling simple repairs like this is the first step in becoming a DIY master of your home. Don’t let a little broken wood keep you from a good night’s sleep; you have the knowledge now to get it fixed right and enjoy a sturdy bed foundation once again.