

Bed springs and frames creak because moving parts rub together, often due to loosened screws, worn-out hardware, or dry wood/metal. The fix usually involves tightening bolts, adding lubrication (like wax or tennis balls), or replacing worn components. We’ll show you simple ways to silence that noise today.
Does the slightest shift in bed cause a loud, embarrassing squeak? You are certainly not alone! That annoying creaking sound is one of the most common household noises. It happens when parts of your bed frame, mattress support, or even the box spring rub against each other. It’s frustrating when you just want a peaceful night’s sleep without sounding like an old rocking chair. The good news is that fixing a creaky bed is usually straightforward and rarely requires calling a professional repair person. We can tackle this together using simple tools you likely already have. Let’s dive into the reasons behind that noise and get your sleep quiet again with easy, step-by-step solutions.
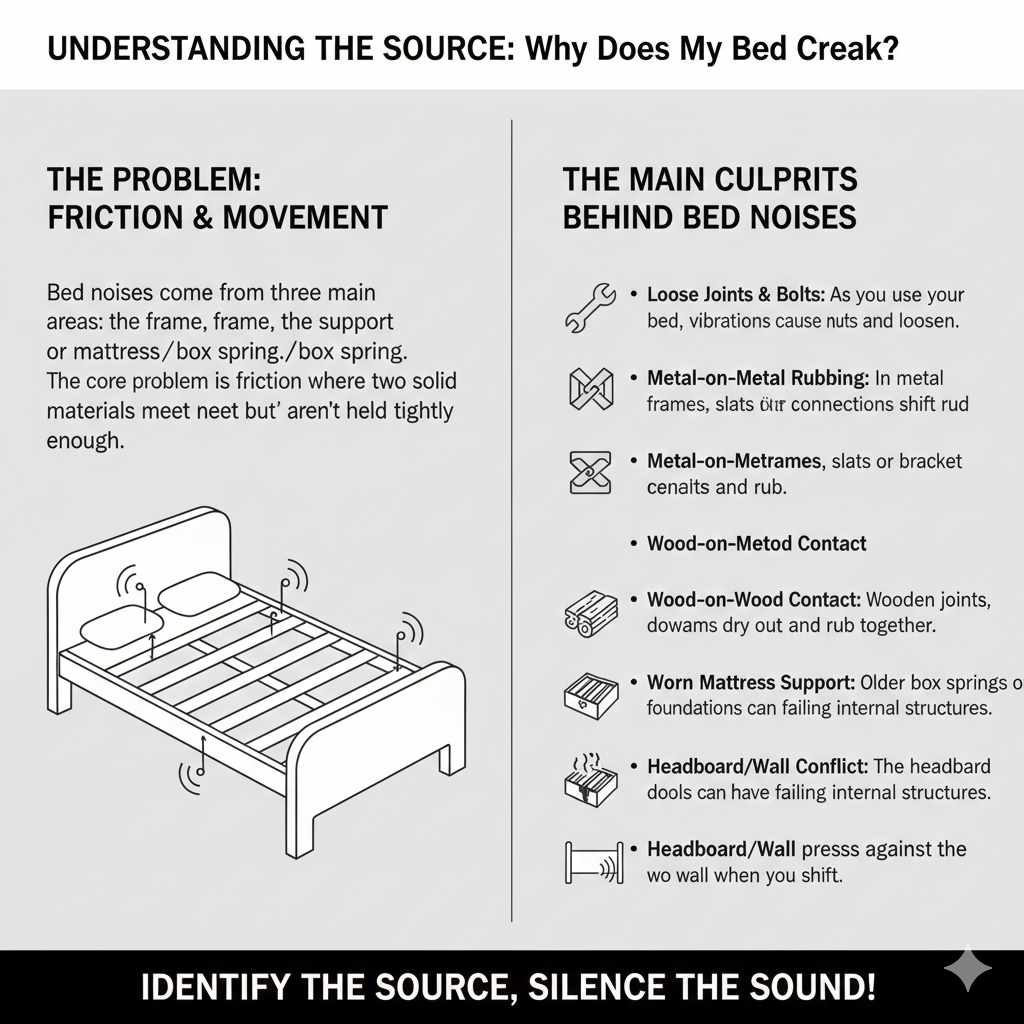
Understanding the Source: Why Does My Bed Creak?
Before we grab the tools, it helps to know what is actually making the noise inside your bedroom. Bed noises generally come from three main areas: the frame itself, the support system underneath the mattress, or sometimes, the mattress or box spring directly. The core problem is almost always friction where two solid materials (wood or metal) meet but aren’t held tightly enough.
The Main Culprits Behind Bed Noises
When trying to figure out why does my bed creak, look for movement in these specific spots:
- Loose Joints and Bolts: This is the number one cause. As you use your bed over time, vibrations cause nuts and bolts holding the headboard, footboard, and siderails together to loosen slightly.
- Metal-on-Metal Rubbing: In metal frames, the metal slats or the bracket connections can shift and rub during movement.
- Wood-on-Wood Contact: In wooden frames, the wood dries out, causing the joints, dowels, or support beams to rub together, creating a friction sound.
- Worn Mattress Support: If you have an older box spring or foundation, the internal structure might be failing, causing slates or coils to shift and squeak when weight is applied.
- The Headboard/Wall Conflict: Sometimes the noise isn’t the frame, but the headboard pressing directly against the wall every time you shift position.
Step 1: The Investigative Search – Finding the Noise
You can’t fix what you can’t locate! The first crucial step is becoming a detective to pinpoint the exact location of the squeak. This takes patience, but it saves time later.
How to Isolate the Creak Effectively
Working with a helper makes this much easier. Have one person slowly move around on the bed (sitting, shifting weight, getting up and down) while the other person listens closely around the frame.
- Start at the Extremities: Gently press down on the four corners of the mattress. Does the noise happen when you push down on the area near the headboard or footboard?
- Check the Middle: Have your helper lie down. Press down firmly along the center line of the bed where the main support beams run.
- Test the Slat Movement: If you have a slatted frame, carefully lift and press on the individual wooden or metal slats. A hollow, dry sound often points to a loose slat.
- Examine the Headboard: Have someone lean against the headboard while you listen where it bolts into the side rails. Sometimes, the noise is just the headboard wobbling against the wall.
Step 2: The Easiest Fixes – Tightening and Securing
Once you know which area is squeaking, the first line of defense is always tightening. Just like a loose wheel nut on a car, a loose screw causes movement, and movement causes noise.
Tools You Will Need for Tightening
Keep your toolbox minimal for these quick fixes:
- Screwdriver set (Phillips and Flathead)
- Wrench set or Adjustable Wrench
- Socket set (if your bolts require sockets)
- Flashlight
Tightening Metal Frames and Hardware
Most modern beds, especially platform or metal frames, rely on bolts connecting the side rails to the headboard/footboard, and hardware securing the center support beam or castor wheels.
Action Plan for Metal Frames:
- Inspect All Visible Bolts: Use your wrench or socket set to give every major assembly bolt a gentle turn clockwise. Don’t overtighten to the point of stripping the threads, but ensure there is no play or wiggle room left.
- Check Center Support Legs: If your frame has a stabilizing leg running down the middle, ensure the screw attaching it to the frame is tight. Sometimes this leg is what’s touching the floor unevenly.
- Examine Caster Wheels: If your bed rolls, check the wheels (casters) where they fit into the frame sockets. If they are loose in their housing, they can rattle. You may need a small dab of construction adhesive (once confirmed tight) to secure the socket housing.
Quick Tip for Hard-to-Reach Bolts: If you cannot physically reach a bolt, sometimes gently rocking the frame while applying pressure to the opposite side can jar the mechanism enough to tighten itself, or at least reveal exactly where the movement is happening.
Securing Wooden Frames and Slats
Wooden frames require slightly different finesse. We are looking for loose screws holding brackets or dowels that have slipped out of their slots.
Action Plan for Wood Frames:
- Check Slat Screws: If your slats are screwed directly into the side rails, gently check each screw. Tighten any that feel loose.
- Examine Corner Blocks: Many quality wooden frames use corner blocks for structural integrity. Ensure the screws holding these blocks to the main side rails are snug.
Step 3: The Crucial Step – Lubrication and Padding
If tightening everything doesn’t stop the noise, the problem is friction between two surfaces that cannot be tightened further. This is where lubrication comes in. We need to place something soft or slick between the rubbing parts.
Silencing Wood-on-Wood Squeaks
Dry wood is a major squeak contributor. Think of it like rubbing two pieces of sandpaper together—it makes noise! We need to buffer that contact.
Effective Wood Lubricants:
- Paraffin Wax: This is the gold standard for wood friction points. Take a simple candle (unscented works best) or a block of paraffin wax and rub it vigorously along the joints, dowels, and any spot where two pieces of wood meet. The heat and friction deposit a slick layer of wax.
- Bar Soap: An old bar of dry soap can work just as well as wax. Rub the soap over the contact areas.
- Furniture Polish/Oil (Use with Caution): While effective, oil can eventually degrade some wood finishes or glue. Reserve this for bare, structural wood connections only, and use sparingly.
Quieting Metal-on-Metal Noises
Metal frames and springs need something slicker than wax to prevent squealing.
- Graphite Lubricant: For highly mechanical parts (like adjustable frames or very tight connections), dry graphite spray is excellent because it won’t attract dust like oil might.
- Silicone Spray: A silicone-based lubricant spray is safe for many materials and excellent for spraying into joints where you can’t reach with a rag.
- Petroleum Jelly (Vaseline): For areas you can easily reach, a thin layer of petroleum jelly applied to hinge points or bracket interfaces offers effective, long-lasting cushioning.
The Tennis Ball Trick: Quieting Slats and Box Springs
This is a famous, easy trick, especially popular for platform beds or box springs that sit on a frame. It specifically targets the contact point between the support structure and the mattress/box spring foundation.
How to Apply the Tennis Ball Fix:
- Lift the mattress or box spring slightly in the noisy area.
- Cut a small “X” slit into a clean, dry tennis ball.
- Squeeze the tennis ball onto the wooden cross-beam or metal support that seems to be rubbing the bottom of the box spring.
- Let the tennis ball act as a cushion between the two surfaces.
Step 4: Addressing the Mattress and Box Spring Foundation
Sometimes, the frame is solid, but the noise is coming from inside the sleeping surface itself. This is common with older innerspring mattresses or deteriorating box springs.
Diagnosing a Noisy Box Spring
A box spring is essentially a wooden frame wrapped in fabric, filled with small springs or metal grids. If the internal springs loosen or the fabric covering stretches, the structure squeaks.
If you suspect the box spring, try removing the mattress and pressing directly on the box springs. If it still squeaks, the noise is definitely internal.
Best Fix for Box Springs:
- The Plywood Layer: If you have a slatted platform bed, the gap between the slats and the box spring can cause movement. Place a solid sheet of plywood cut to the exact dimensions of your bed base (found at most hardware stores) directly on top of the slats. This creates a perfectly solid, non-moving surface for the box spring to rest on, immediately silencing movement noise.
- Replace the Box Spring: If the noise is internal and widespread, the internal hardware has likely worn out. Unfortunately, outside of specialized repair (which costs more than replacement), the best fix is often just buying a new box spring or foundation.
Dealing with Mattress Sounds
Modern memory foam or hybrid mattresses rarely creak. However, older innerspring mattresses can make noise when the internal coils shift pressure points.
If you trace the sound to the mattress itself, try rotating it 180 degrees. Sometimes this redistributes the internal tension enough to silence the squeak temporarily. If the noise persists, it means the coils are failing and the mattress needs replacement.
Troubleshooting the Headboard and Wall
This is a surprisingly loud culprit because the headboard shakes against the wall every time you move.
Techniques to Silence Headboard Rubbing:
- Gapping: Pull the bed frame slightly away from the wall (about an inch or two). This prevents the headboard panels or brackets from making contact.
- Padding the Wall: If you prefer the bed flush against the wall, place felt furniture pads—the kind used to protect hardwood floors—on the back of the headboard where it touches the wall. You can also use small rubber shims.
- Check Headboard Bolts: Re-examine the bolts connecting the headboard to the side rails. These often loosen because the entire assembly slightly shifts when you lean back to read. Tighten these securely.
Preventative Maintenance: Keeping Your Bed Quiet Long-Term
Preventing squeaks is easier than fixing them! Think of this like preventative maintenance on your car—a little attention now saves big headaches later. Staying ahead of dryness and looseness is key.
A Simple Annual Inspection Checklist
Set a reminder once a year (perhaps when changing your clocks for daylight savings) to quickly inspect your frame.
| Component | Action | Frequency |
|---|---|---|
| Frame Bolts & Joints | Tighten all major connection points using a wrench. | Annually |
| Wooden Contact Points | Apply paraffin wax or soap to visible joints/dowels. | Every 1-2 Years |
| Center Support Legs | Ensure legs are firmly screwed into the frame and touching the floor securely. | Annually |
| Headboard Connection | Check bolts connecting the headboard to the side rails. | Annually |
The Role of Humidity and Wood
Wood naturally expands and contracts with changes in humidity. In very dry winters, wooden frames contract, causing small gaps to open up—gaps that eventually lead to squeaking.
If you live in a climate with high seasonal humidity swings, running a humidifier in your bedroom during dry months can help keep the wood structure stable and less prone to splitting or shrinking away from its joints. For more information on how home humidity affects structures, resources like those from the U.S. Environmental Protection Agency (EPA) regarding indoor air quality and moisture can provide context on how environmental factors affect materials.
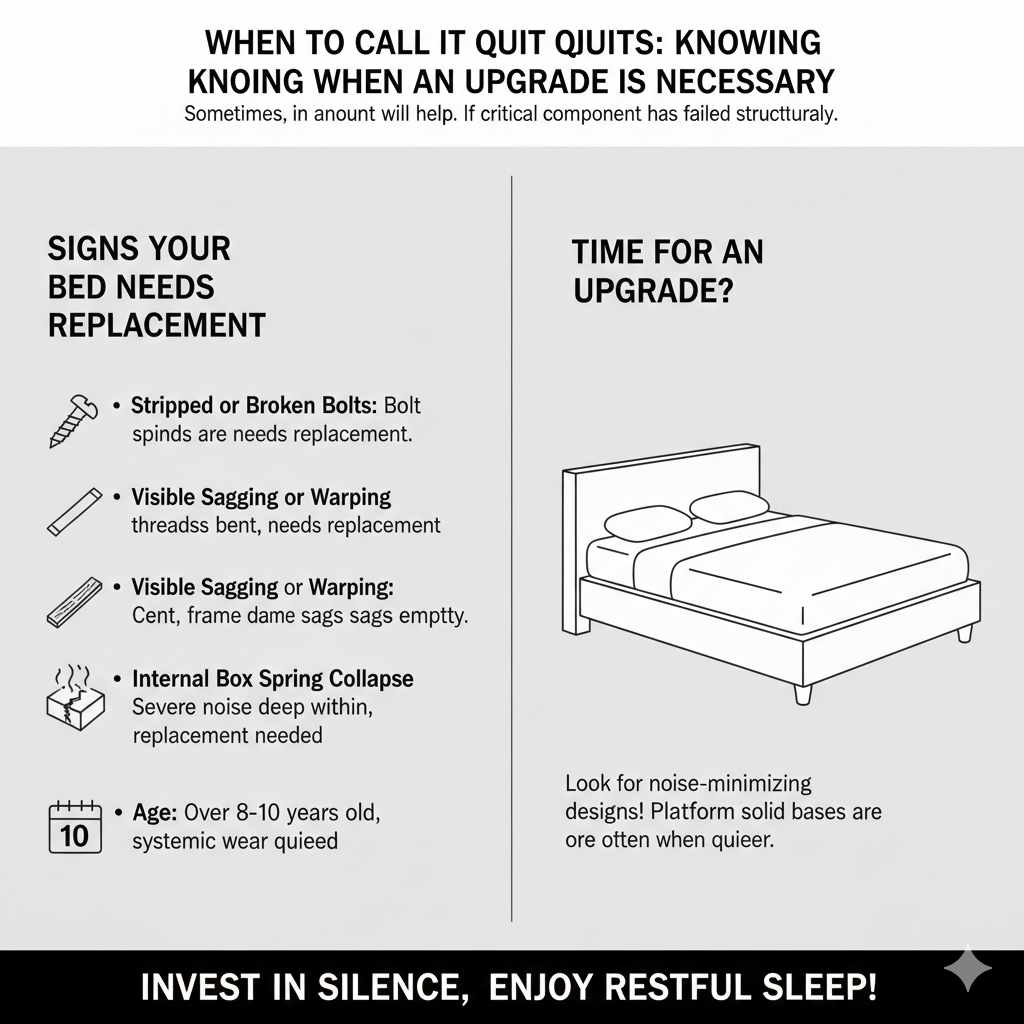
When to Call It Quits: Knowing When an Upgrade is Necessary
Sometimes, no amount of tightening or waxing will help. If you’ve tried every step above and the noise remains, it means a critical component has failed structurally.
Signs Your Bed Needs Replacement
If you notice these issues alongside persistent noise, it’s time for new hardware or a new bed altogether:
- Stripped or Broken Bolts: If you try to tighten a bolt and it just spins endlessly, the threads are stripped, and the bolt or frame receiver needs professional replacement.
- Visible Sagging or Warping: If the center supports are visibly bent or the frame sags significantly even when empty, the metal or wood structure has failed under load.
- Internal Box Spring Collapse: If the noise is severe and located deep within the box spring, replacement is usually the most cost-effective route.
- Age: If the bed frame or mattress is over 8–10 years old, wear-and-tear has likely caused systemic failure in numerous small parts.
If you decide to replace the frame, look for models designed explicitly to minimize noise. Platform beds with solid bases that don’t rely on many separate moving pieces often remain quieter for longer periods.
Beginner DIY Bed Noise FAQ
Frequently Asked Questions About Creaky Beds
Q: Can I use WD-40 to fix a squeaky bed?
A: While WD-40 stops noise immediately, it is not ideal for long-term bedding fixes. It’s a solvent that can attract dust and grime over time, potentially gumming up the mechanism later. Silicone spray or wax/paraffin is a better choice.
Q: My noises only happen when my partner moves. Does that change the fix?
A: Not really, but it helps pinpoint the severity. The noise is likely caused by very slight loosening in the bolts nearest the center or the side rail connecting to the headboard, as these points bear the most shifting load. Focus your tightening efforts there.
Q: Why does my metal frame squeak only in one specific spot?
A: In metal frames, this is almost always where two L-shaped brackets meet, or where the caster socket fits into the frame rail. Check these connection points rigorously and apply silicone lubricant or graphite.
Q: Should I lift the mattress before applying wax?
A: Yes. For waxing wood joints, you usually need to remove the mattress and box spring to access the structural wood beams (like slats or side rails) directly. For minor surface squeaks, you might be able to slip the wax in, but full access is better.
Q: Is it safe for me to try tightening these bolts myself?
A: Absolutely! Tightening bolts is one of the safest and easiest DIY tasks. Just make sure the bed is stable before you start, and turn bolts clockwise slowly until they feel snug. You do not need specialized auto knowledge for this—just a basic wrench!
Conclusion: Reclaiming Your Quiet Nights
That relentless nighttime symphony of squeaks and groans doesn’t have to be your reality. As we’ve walked through, most bed noises stem from simple physical principles: loose connections or dry friction. By systematically checking, tightening hardware, and applying smart, simple lubrication—like wax for wood or silicone for metal—you gain back control over your sleep environment. You now possess the knowledge to diagnose the source, apply the right non-jargony fix, and even set up a simple plan to prevent future complaints. Take an afternoon, grab that wrench, and enjoy the incredibly rewarding silence that follows a job well done. Sweet dreams await!


