
When your favorite leather sofa starts showing its age, it can feel like a real bummer. You might see a scratch here, a little tear there, or maybe the color looks a bit faded. It’s totally normal for leather to get a few marks over time.
After all, it’s a material that lives with you, sees spills, and gets cuddled on. But the good news is, you don’t always need to call in the expensive professionals. Many common leather sofa problems can be fixed right at home with a little know-how and a few simple tools.
This guide will walk you through easy ways to bring your sofa back to its former glory.
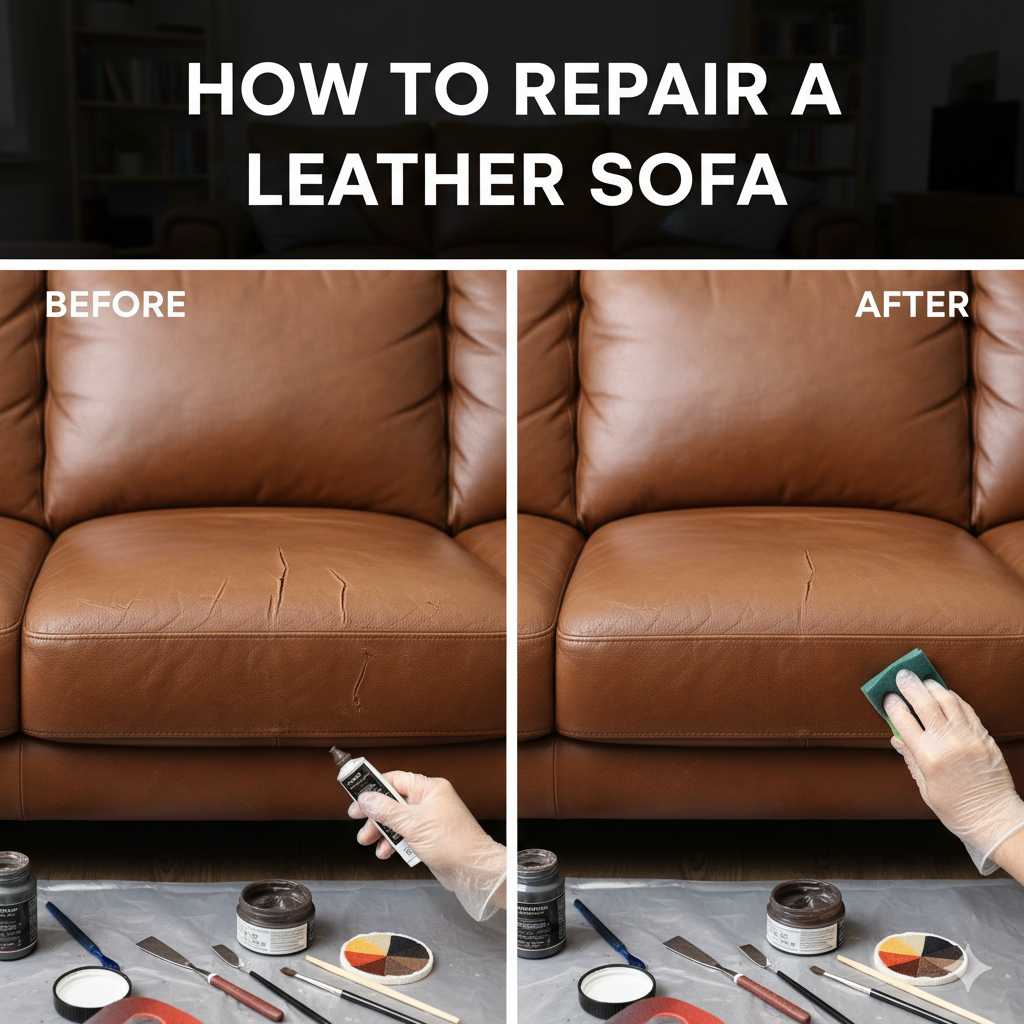
Fixing a leather sofa often involves simple, straightforward steps for common issues like scratches, small tears, or fading. Many household items and readily available kits can help restore its look and feel without needing professional repair services.
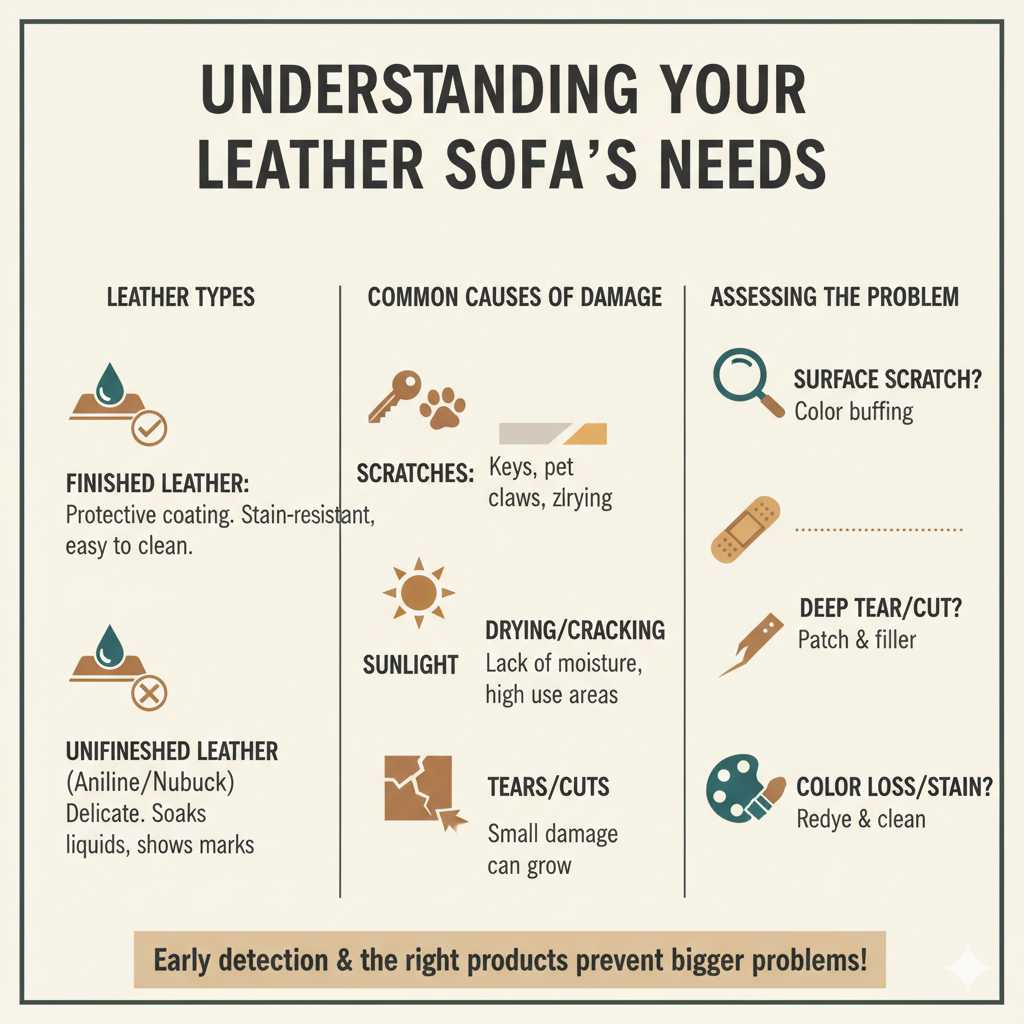
Understanding Your Leather Sofa’s Needs
Leather is a natural material. It breathes and can change over time. Think of it like skin.
It needs a bit of care to stay looking good. Different types of leather react to repairs in different ways. Knowing what kind of leather you have is the first step.
This helps you pick the right products and methods. Most sofas use finished leather. This is leather that has a protective coating.
It’s more resistant to stains and easier to clean. Unfinished leather, like aniline or nubuck, is more delicate. It soaks up liquids easily and shows marks more.
But even these can be cared for.
Why does leather get damaged? It’s usually from everyday life. Little things add up.
Sharp objects like keys or pet claws can cause scratches. Bags with zippers can rub against the leather. Sunlight can make the color fade over time.
If the leather gets too dry, it can crack. This happens especially on parts that bend a lot, like seat cushions. Sometimes, a small tear can start small.
If left alone, it can grow bigger. Knowing these common causes helps you prevent future damage too.
When you look at your sofa, try to spot the problem. Is it a surface scratch? Is it a cut that goes deeper?
Is the color worn off in spots? Or is it a stain from something spilled? Each issue needs a slightly different approach.
For example, a light scratch might just need a bit of buffing. A deeper tear will need a patch and filler. Treating the problem early is always best.
It stops small issues from becoming big, hard-to-fix problems. Taking a moment to assess the damage guides you to the right repair steps.
My First Leather Sofa Mishap
I remember my first “nice” leather sofa. It was a deep brown, soft to the touch, and felt so luxurious. I was so proud of it.
Then came the fateful day. My cat, a creature of pure mischief, decided my new sofa was the perfect place to sharpen her claws. I heard the shredding sound and my heart dropped.
I rushed into the room to find long, ugly scratches marring the armrest. Panic set in. I imagined expensive repair bills.
I felt so guilty for not protecting it better. The visual of those deep gouges made me feel sick. I thought it was ruined forever, a costly mistake.
For days, I avoided looking at that armrest. I’d sigh every time I saw it. Then, I decided to do some research.
I was amazed to find out how many people fixed their own leather furniture. I found articles and videos showing simple fixes. I learned about leather repair kits.
It felt a little scary at first, using products on my prized sofa. But the thought of living with those scratches was worse. I ordered a basic leather repair kit online.
It came with a filler, some colors, and a small spatula. The instructions seemed straightforward. I took a deep breath and decided to try it.
The process was slow. I cleaned the area first, then carefully applied the filler to the scratches. It took a few layers to fill them in completely.
Then, I matched the color as best I could and dabbed it on. It wasn’t perfect. You could still see a slight difference if you looked closely.
But from a normal viewing distance, those awful scratches were gone. The armrest looked so much better. I felt a huge wave of relief and pride.
I had saved my sofa, and my wallet. It taught me that many furniture problems aren’t the end of the world. Often, a little effort can make a big difference.
Leather Sofa Repair Basics: What You’ll Need
Cleaning Supplies: A soft cloth, mild soap (like saddle soap or a specialized leather cleaner), and distilled water. Always test cleaners in an inconspicuous spot first.
Repair Kit: Look for a kit designed for your leather type. It usually includes a leather filler, colorants, an applicator, and sometimes a sealant.
Tools: Small spatulas or palette knives for applying filler, fine-grit sandpaper (if needed for smoothing), and a clean cloth for buffing.
Patience: Repairing leather takes time. Don’t rush the process. Let each layer dry properly.
Dealing with Scratches on Your Leather Sofa
Scratches are probably the most common issue. They can range from light surface marks to deeper gouges. For light scratches, often a bit of gentle buffing is all you need.
Sometimes, just rubbing the area with your finger can help redistribute the leather’s natural oils. This can make the scratch less visible. For slightly deeper scratches, you might need a leather conditioner or balm.
Apply a small amount to a soft cloth. Gently rub it into the scratch. The oils in the conditioner can help blend the scratch into the surrounding leather.
If the scratch is more noticeable, especially on finished leather, you can try a leather repair crayon or balm. These come in various colors. Choose a color that matches your sofa as closely as possible.
Apply the crayon to the scratch. Then, buff it gently with a soft cloth. This fills in the scratch and adds color.
It’s a quick fix for minor damage. It won’t make the scratch disappear completely, but it will make it much less obvious. Always test the color on a hidden spot first to make sure it matches.
For deeper scratches or gouges that have broken the leather’s surface, you’ll need a leather filler. This usually comes in a paste form. Clean the scratched area well first.
Then, using a small spatula, carefully apply the filler into the scratch. You want to fill the groove evenly. You might need several thin layers.
Let each layer dry completely before applying the next. Once the filler is dry and level with the surface, you can gently sand it smooth. Then, you’ll need to color it to match your sofa.
This often involves mixing colorants to get the exact shade. Apply the color in thin coats.
Quick Scan: Scratch Repair Levels
- Level 1: Light Surface Scuff – Try buffing with a finger or soft cloth.
- Level 2: Noticeable Scratch – Use leather conditioner or a color-matched repair crayon.
- Level 3: Deeper Gouge (Surface Broken) – Requires leather filler, sanding, and color matching.
Repairing Tears and Holes in Your Leather Sofa
Tears and holes can seem intimidating. But with the right approach, they are manageable. For small nicks or tears, a leather repair kit with a backing fabric and filler is your friend.
First, clean the area around the tear. Then, carefully insert a piece of backing fabric underneath the tear. This fabric acts as a support.
You can often use a piece of an old cotton shirt or a special patch from a kit. Make sure the fabric is a little larger than the tear itself.
Next, use a spatula to apply leather filler over the tear and onto the backing fabric. You want to press the filler into the tear. Smooth it out so it is level with the surrounding leather.
Again, this might take several thin applications. Let each layer dry completely. Once it’s dry and smooth, you can sand it lightly if needed.
The final step is coloring. You’ll need to match the color of the filler to your sofa. Apply the color in thin coats until the repair blends in.
A sealant can be applied over the top to protect the repair.
For larger holes, the process is similar but requires more care. You might need a larger piece of backing fabric. Ensure it’s securely in place.
Building up the filler might take longer. Patience is key here. Sometimes, a piece of leather from an inconspicuous area (like under a cushion) can be used as a patch.
You would cut this patch to fit the hole, then glue it in place and fill/color over the edges. This is a more advanced repair but can yield great results for bigger damages. Always follow the instructions that come with your specific leather repair kit.
Contrast: Tear Repair Myths vs Reality
Myth: A tear means the sofa is ruined and needs reupholstering.
Reality: Small to medium tears can often be successfully repaired with DIY kits, especially on finished leather.
Myth: DIY repairs will always look obvious and messy.
Reality: With patience and the right color matching, repairs can be very discreet, almost invisible from a normal distance.
Reviving Faded Leather Sofa Colors
Over time, sunlight and general use can make your leather sofa look dull. The color can fade unevenly, especially in spots that get direct sun. This is a common issue, but it has solutions.
For minor fading, a good quality leather conditioner can sometimes help. The oils in the conditioner can restore some of the leather’s natural luster and richness. Apply it evenly with a soft cloth.
Let it soak in, then buff off any excess. This can make the color look deeper and more uniform.
If the fading is more significant, you’ll need to use a leather colorant or dye. These products are designed to restore or change the color of leather. You can buy them in many shades.
It’s crucial to get the color as close as possible to your sofa’s original shade. Many products come with mixing guides. Always test the colorant on a hidden area first.
You want to be sure it matches before applying it to the main parts of the sofa.
The application process for colorants usually involves a sponge or a soft cloth. You apply the colorant in thin, even coats. Work in small sections.
For faded areas, you might need several coats to build up the color. Allow each coat to dry completely before applying the next. The goal is to create a uniform color across the entire piece of furniture, or at least the affected panels.
Once you’ve achieved the desired color, you’ll typically apply a leather sealant or topcoat. This protects the new color and adds a protective finish. This step is vital for durability.
Stacked Micro-Sections: Fading Prevention
Sunlight: Avoid placing your leather sofa in direct sunlight for extended periods. Use curtains or blinds.
Heat: Keep the sofa away from heat sources like radiators or fireplaces, which can dry out the leather.
Cleaning: Use mild, pH-neutral cleaners. Harsh chemicals can strip color.
Conditioning: Regular conditioning keeps the leather supple and its color vibrant.
Tackling Stains on Your Leather Sofa
Stains are another common sofa woe. The key to stain removal is acting fast. The longer a stain sits, the harder it is to get out.
For most common spills like water-based liquids (juice, soda), blot the area immediately with a clean, dry cloth. Don’t rub. Rubbing can spread the stain and push it deeper into the leather.
Once you’ve absorbed as much liquid as possible, you might need to use a slightly damp cloth. Use distilled water and a tiny bit of mild soap, like saddle soap.
Gently wipe the stained area. Then, use another clean, damp cloth (water only) to wipe away any soap residue. Finally, dry the area with a soft, clean cloth.
For grease or oil stains, the approach is a bit different. Blot up any excess oil first. Then, you can try applying an absorbent powder, like cornstarch or baking soda.
Sprinkle it liberally over the stain. Let it sit for several hours, or even overnight. The powder will absorb the oil.
Gently brush away the powder. You might need to repeat this process a few times for stubborn grease stains.
Ink stains can be tricky. For fresh ink marks, try rubbing alcohol on a cotton swab. Gently dab the stain, working from the outside in.
Be very careful, as alcohol can remove color from the leather. Test in an inconspicuous spot first. If the stain is old or stubborn, you might need a specialized ink remover for leather.
For dye transfer stains (like from dark jeans), these are tough. A leather cleaner might help. Sometimes, a color restorer kit is needed if the dye has actually lifted from the leather.
Quick-Scan Table: Stain Treatments
| Stain Type | Initial Action | Secondary Treatment |
|---|---|---|
| Water-based (Juice, Soda) | Blot immediately with dry cloth. | Mild soap and water, then rinse and dry. |
| Grease/Oil | Blot excess oil. | Cornstarch or baking soda (leave overnight), brush off. Repeat. |
| Ink (Fresh) | Dab with rubbing alcohol on cotton swab (test first!). | Specialized ink remover if needed. |
| Dye Transfer (Dark Jeans) | Leather cleaner. | Color restorer kit if necessary. |
Understanding Leather Types for Repair
The type of leather your sofa is made from matters a lot. It affects how it wears and how you should repair it. Most modern sofas use finished leather.
This is also called pigmented or protected leather. It has a uniform color and a protective coating. This makes it durable and easier to clean.
Most scratches and minor tears on finished leather can be fixed with DIY kits. The color is usually stable. Fading is less of an issue.
Then there’s aniline leather. This is very natural and soft. It has minimal or no protective coating.
It shows natural markings like scars and variations in color. Aniline leather is beautiful but very sensitive. Water spills can leave dark spots.
Scratches are very visible. Repairs can be tricky because it soaks up products easily. You need specialized cleaners and conditioners for aniline.
DIY color matching can be harder.
Nubuck and Suede are types of leather with a soft, napped surface. They are not smooth like finished or aniline leather. They are very absorbent and stain easily.
Special brushes and erasers are used for cleaning. Repairing tears or deep scratches on nubuck or suede usually requires professional help. DIY filler and color methods can flatten the nap and change the texture, making the repair obvious.
For most typical sofa repairs, you’re likely dealing with finished leather.
Observational Flow: Repairing Different Leathers
Finished Leather: Easiest to repair. Scratches, tears, fading are manageable with kits.
Aniline Leather: More delicate. Needs gentle, specialized products. Repairs require careful application to avoid changing texture or color.
Nubuck/Suede: Very sensitive. Best for professional cleaning and repair due to unique texture.
When to Call a Professional Leather Repair Specialist
While DIY repairs are great for many issues, sometimes you need an expert. If your sofa has very large tears or holes, it might be beyond simple filler and patches. Professionals have specialized tools and techniques for complex structural repairs.
They can often
Deep cuts that go through multiple layers of leather can be hard to fix properly yourself. A professional can ensure the underlying structure is sound. If your sofa has extensive damage, like widespread cracking or very deep, widespread stains, it might be more cost-effective to hire someone.
They can assess the overall condition and recommend the best course of action. Sometimes, a professional can recolor or refinish the entire sofa, making it look almost new.
Consider the value of your sofa. If it’s a high-end piece, investing in professional repair for significant damage might be worthwhile. Also, if you’ve tried DIY repairs and they haven’t worked, or you’re unhappy with the results, a professional can often correct the issue.
Don’t be afraid to get a quote from a few different specialists. They can often provide before-and-after photos of their work, giving you confidence in their abilities. Trust your gut; if a repair feels too complex or risky for you, a pro is likely the best choice.
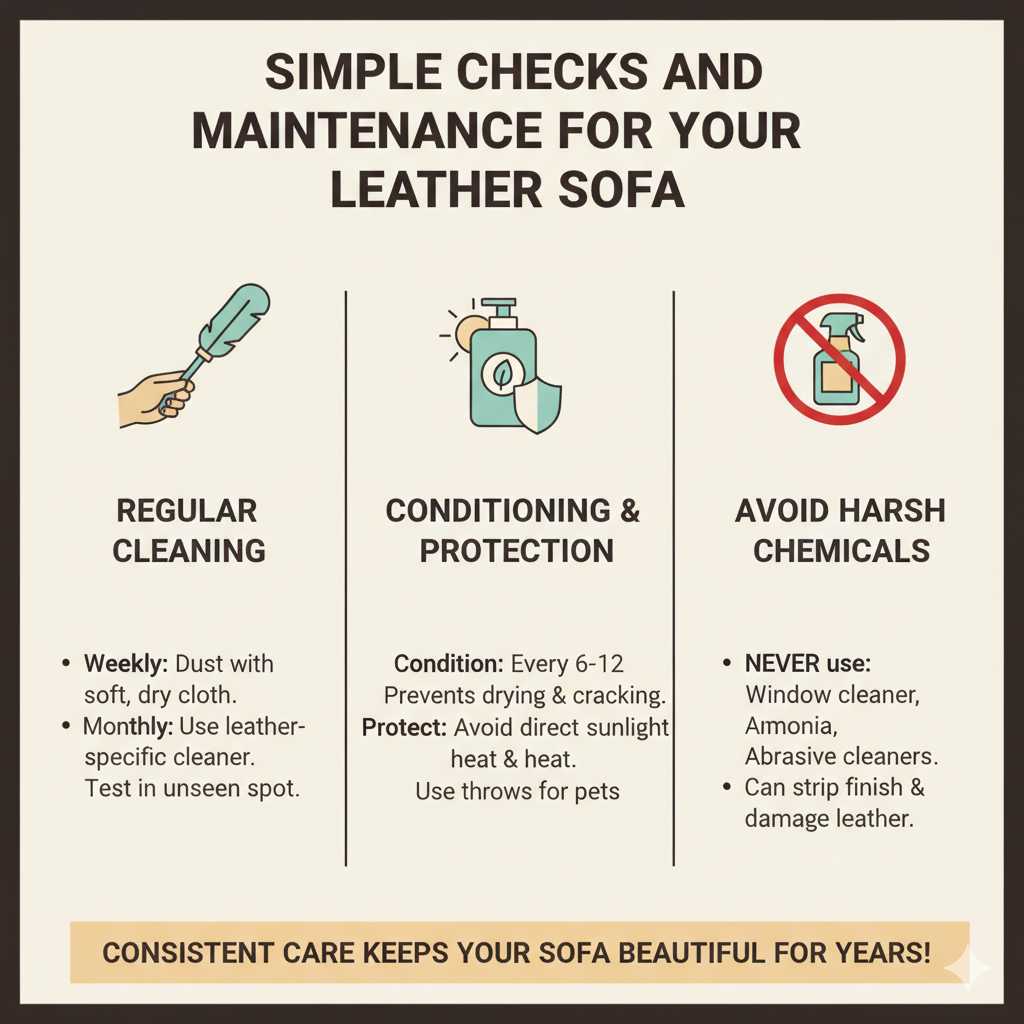
Simple Checks and Maintenance for Your Leather Sofa
Keeping your leather sofa in good shape involves regular care. This prevents many problems from happening in the first place. The most important thing is regular cleaning.
Use a soft, dry cloth to dust your sofa weekly. This removes surface dirt that can become abrasive over time. About every 3-6 months, give it a more thorough cleaning.
Use a cleaner specifically made for your type of leather. Apply it sparingly with a soft cloth. Wipe gently, following the grain of the leather.
Always test any cleaner in an unseen spot.
Conditioning is also vital. Leather can dry out, especially in arid climates or heated homes. This makes it prone to cracking.
Use a good leather conditioner every 6-12 months. Apply it with a soft cloth in a thin, even layer. Let it soak in for the time recommended by the product.
Then, buff off any excess. This keeps the leather supple and prevents it from becoming stiff or brittle. Think of it like moisturizing your skin.
Protect your sofa from direct sunlight and heat sources. As mentioned before, sunlight fades color and dries out leather. Heat can also cause drying and cracking.
Be mindful of pets. Keep their nails trimmed. Use throws or covers on areas where they like to lounge if they tend to scratch or shed heavily.
Avoid harsh chemicals. Never use window cleaner, ammonia, or abrasive cleaners on your leather. They can strip the finish and damage the material.
Simple, consistent maintenance is the best way to keep your leather sofa looking beautiful for years.
Your Sofa’s Health Check: Easy Steps
Weekly: Dust with a soft, dry cloth.
Monthly: Check for any new marks or stains. Address them immediately.
Every 3-6 Months: Clean with a specialized leather cleaner.
Every 6-12 Months: Condition with a leather conditioner.
Always: Protect from direct sun and heat. Test all products first.
Frequently Asked Questions About Leather Sofa Repair
Can I repair a cigarette burn on my leather sofa?
Yes, small cigarette burns can often be repaired. For a minor burn, you might be able to gently sand away the charred material, then use a leather filler and colorant to blend it in. For deeper burns, a professional repair is usually recommended.
It’s a delicate process.
How do I know if my sofa is real leather?
Real leather often has a slightly uneven texture, a unique smell, and markings like pores or small scars. If you look at the back or underside, real leather has a fibrous backing. Faux leather (or pleather) often has a perfectly uniform pattern, a plastic-like smell, and a fabric backing that looks very consistent.
Will leather repair kits work on all types of leather?
No, most DIY leather repair kits are designed for finished or pigmented leather. They may not work well or could even damage delicate leathers like aniline, nubuck, or suede. Always check the product description to ensure it’s suitable for your leather type.
How long does a leather sofa repair last?
The longevity of a repair depends on the type of damage, the quality of the products used, and how well the repair is done. Minor scratch repairs with balm or conditioner can last a long time with good maintenance. Filler and color repairs can also last for years if done correctly and the area is cared for.
Major structural repairs by professionals tend to be very durable.
Is it cheaper to repair or replace a leather sofa?
For minor to moderate damage like scratches, small tears, or fading, repairing is almost always much cheaper than replacing. A full professional restoration or repair for severe damage might approach the cost of a very basic new sofa, but for most issues, repair is the more economical choice. Replacing a high-quality leather sofa can be very expensive.
Can I change the color of my leather sofa with a repair kit?
Yes, many leather colorant kits allow you to change the color of your sofa, or at least refresh and deepen the existing color. However, changing to a significantly lighter color from a darker one is very difficult and often requires professional refinishing. It’s easiest to go darker or maintain the current shade.
Final Thoughts on Leather Sofa Restoration
Seeing your leather sofa get damaged can be upsetting. But remember, leather is a durable material. Most common issues have practical solutions.
With a little care and the right approach, you can often fix scratches, tears, fading, and stains yourself. Understanding your leather type is key. For the most severe damage, don’t hesitate to seek professional help.
Regular cleaning and conditioning will keep your sofa looking its best for many years to come. Enjoy your refreshed and revitalized sofa!


