How To Put An Ikea Dresser Together: Complete Guide
Putting an IKEA dresser together involves careful attention to the instructions, organizing parts, and using the right tools. While it requires patience, following a clear process helps ensure a successful build, resulting in a functional and attractive piece of furniture for your home.
Understanding the IKEA Dresser Assembly Process
IKEA dressers are known for their clever design. They also come flat-packed. This means you get all the parts in a big box.
You have to build it yourself. This process is designed to be straightforward. It uses simple connectors and pre-drilled holes.
The goal is to give you a quality dresser at a lower cost. This is because you’re doing some of the labor.
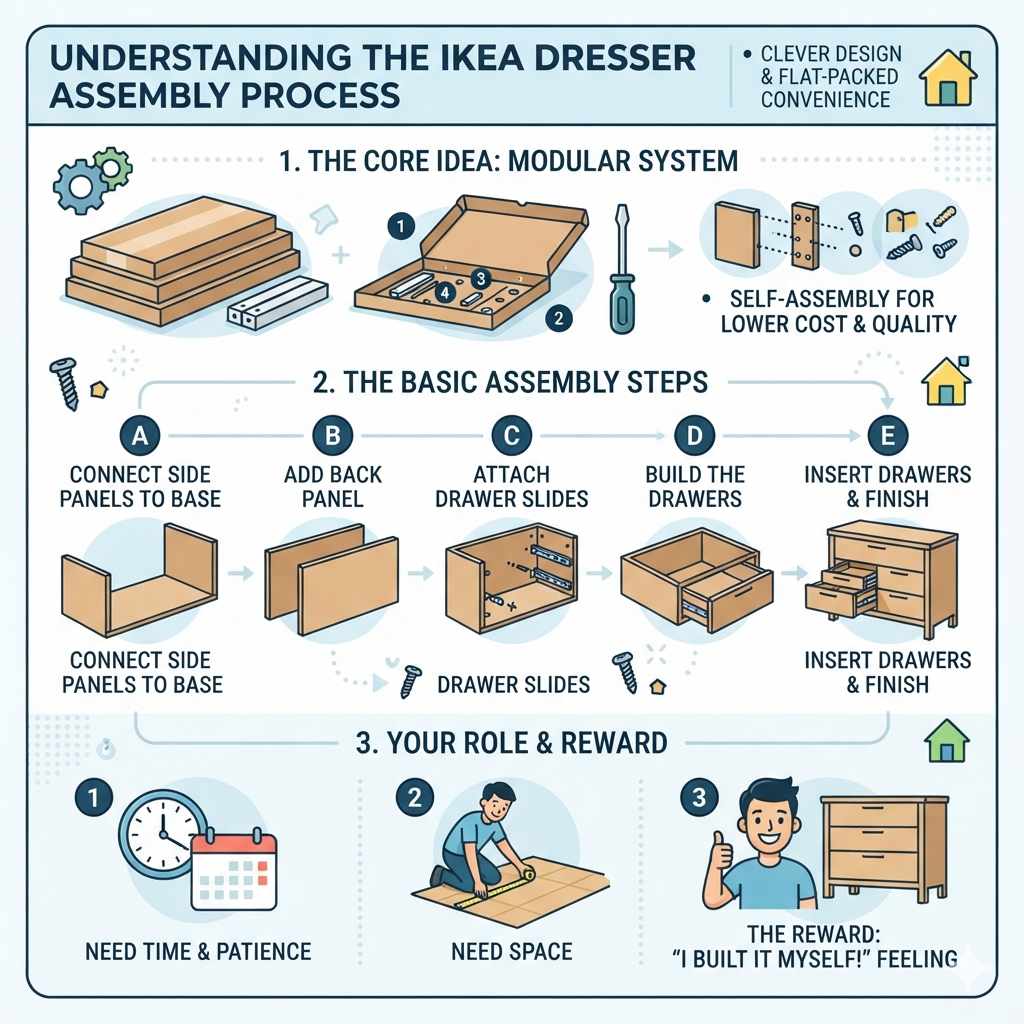
The core idea is a modular system. You connect side panels to a base. Then you add a back panel.
Drawer slides are attached. Finally, you build the drawers. This approach makes the dresser strong.
It also makes it look neat and tidy.
Each IKEA dresser model is a little different. But the basic steps are usually the same. You’ll find clear pictures in the manual.
These show you exactly what to do. It’s like a visual story. It guides you from a pile of parts to a finished dresser.
Understanding this process means you can prepare. You know what to expect. You’ll need space.
You’ll need time. And you’ll need a bit of patience. But the reward is a dresser you built yourself.
That feels pretty good.
My First IKEA Dresser: A Tale of Tape and Triumph
I remember the first time I bought an IKEA dresser. It was for my very first apartment. I was so excited to have my own space.
I picked out a simple, white, three-drawer dresser. It looked great in the showroom. Then it arrived.
The box was huge. It was heavier than I expected. I dragged it into my living room.
I stared at it for a moment. Then I opened it up. Parts spilled out everywhere.
I saw little bags of screws. I saw wooden dowels. And then I saw the manual.
It was all pictures. No words. My heart sank a little.
I thought, “How can I do this?”
I started by laying everything out. I tried to match each piece to the drawing. Some looked very similar.
I started to get confused. I picked up a panel. I looked at the tiny holes.
Then I looked at the picture. It seemed simple enough. But then I tried to put a dowel in.
It wouldn’t go all the way. I grabbed a hammer. I tapped it gently.
It went in a bit crooked. Panic started to set in. I imagined the whole dresser falling apart.
I felt a wave of frustration. I wanted to just shove it all back in the box. But I took a deep breath.
I remembered my friend telling me to just take it slow. So I did. I looked at the picture again.
I saw that the dowel was supposed to go in a specific way. I noticed a small arrow. I realized I was holding the piece the wrong way.
I tried again. This time, the dowel slid in perfectly. That small win felt huge.
It gave me the confidence to keep going. Slowly, piece by piece, it started to look like something. There were moments I had to backtrack.
I put a piece on backward once. That was annoying. But each mistake taught me something.
By the end of the day, it was done. It wasn’t perfect. One of the drawer fronts was slightly off.
But it was standing. It was a dresser. And I had built it.
The feeling of accomplishment was amazing. It made all the tape, confusion, and slight frustration worth it.
Quick Assembly Prep Checklist
Before you even open the box, think about this:
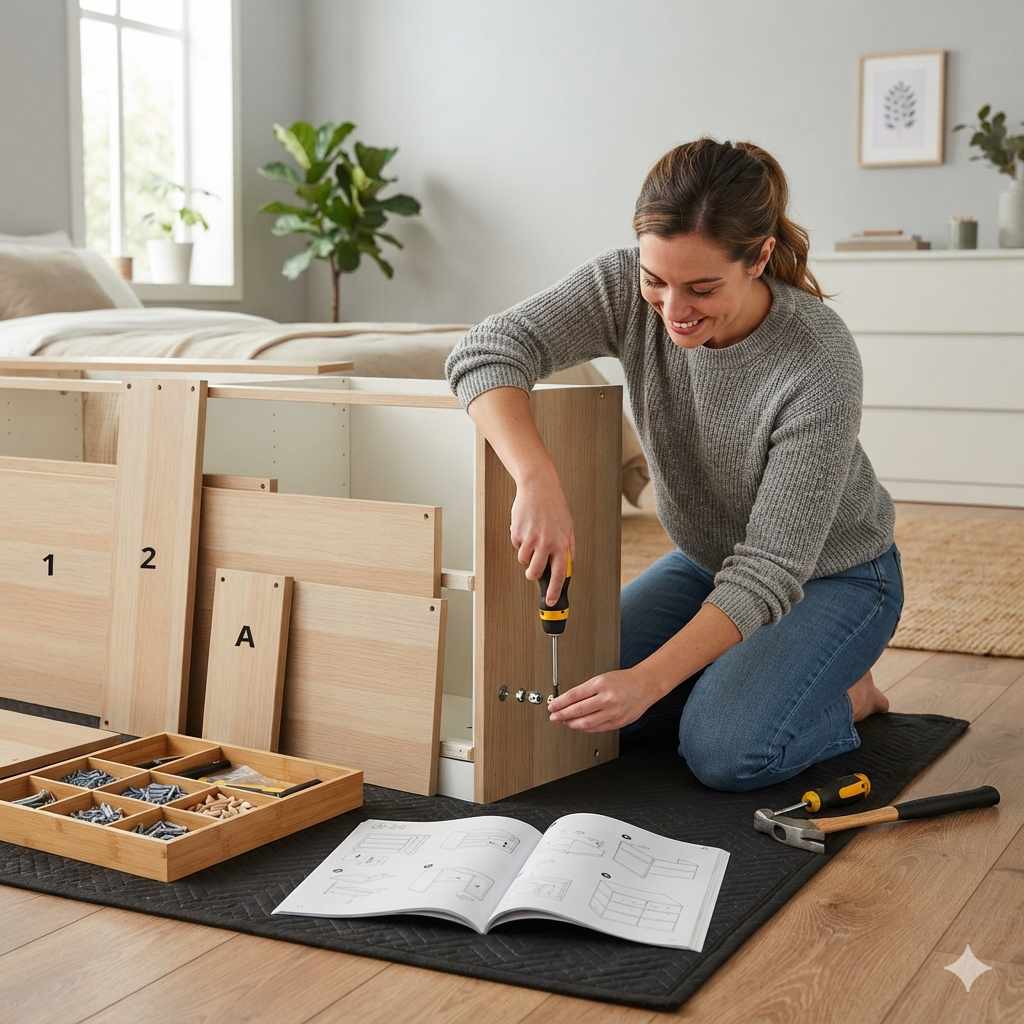
- Clear Space: You need a large, flat area. A rug can protect your floor and the dresser pieces.
- Gather Tools: Most IKEA furniture needs a Phillips head screwdriver and sometimes a hammer. A rubber mallet is even better.
- Check Parts: Open the box carefully. Lay out all the pieces. Compare them to the parts list in the manual.
- Sort Hardware: Open the small bags of screws, dowels, and cams. Put them in small bowls or containers. This stops them from rolling away.
- Read Ahead: Quickly look through the whole manual. This gives you an idea of the steps involved.
Gathering Your Tools: The Right Stuff for the Job
You might look at the IKEA box and think, “I don’t have the right tools.” But usually, you do! Most IKEA furniture assembly doesn’t require fancy power tools. This is by design.
They want most people to be able to build their items.
The most important tool is a good Phillips head screwdriver. Make sure it fits the screws well. A wobbly screwdriver can strip the screw heads.
This makes them hard to tighten or remove later. You might also need a flathead screwdriver for some cam locks.
A hammer is often needed. You use it to tap in wooden dowels. However, a rubber mallet is a much better choice.
It’s gentler. It won’t damage the particleboard or the finish. If you don’t have one, you can put a thin cloth over the part you’re tapping.
This protects the surface.
Some IKEA kits include a small L-shaped hex key, often called an Allen wrench. If yours doesn’t, or if you need a more comfortable grip, having a set of Allen wrenches is helpful. Some dressers use these for certain bolts.
You’ll also need a measuring tape. This helps confirm you have the right size space. It also helps if you need to attach wall anchors later for safety.
Finally, a utility knife or a sturdy pair of scissors is useful for opening the box and the hardware bags. Just be careful not to cut the contents inside.
Having these basic tools ready makes the process smoother. You won’t have to stop and run to the store mid-assembly. It shows you’re prepared and ready to tackle the task.
Essential Tools for IKEA Dresser Assembly
- Phillips Head Screwdriver (Medium Size)
- Flathead Screwdriver (Small to Medium)
- Rubber Mallet (or Hammer with Protective Cloth)
- Allen Wrench Set (if your kit doesn’t include one)
- Measuring Tape
- Utility Knife or Scissors
Decoding the IKEA Manual: A Picture-Perfect Guide
Ah, the IKEA manual. For some, it’s a source of dread. For others, it’s a puzzle to be solved.
The key to the IKEA manual is understanding its language. It’s a language of pictures. There are no words to translate.
This can be both a blessing and a curse.
The first thing to notice is the overview page. This shows you all the parts. It gives each one a number or letter.
It also shows all the hardware. This is your reference sheet. When the manual shows a specific screw, you’ll know which bag to grab.
Look for the little symbols. A crossed-out picture means “don’t do this.” An exclamation mark in a triangle often means “pay attention here.” A magnifying glass symbol means “look closely at this detail.” These symbols are like traffic signs for assembly.
Each step is a small box. It shows what you need to do. It shows the pieces involved.
It shows how they fit together. Pay close attention to the orientation of the pieces. This is where many mistakes happen.
Does the finished edge face forward? Are the holes on the inside or outside? The diagrams usually make this clear if you look carefully.
Cam locks and dowels are common. The manual will show how to insert the cam lock bolt into one piece. Then it shows how to insert the dowel into another.
When you join them, the cam lock will grab the bolt. You then turn the cam lock to tighten. This is a very secure way to join pieces without visible screws on the outside.
Don’t rush through the steps. Take your time. If a step looks confusing, look at the next step.
Sometimes, seeing how the next piece fits can clarify the current step.
If you get stuck, take a break. Step away. Come back with fresh eyes.
You’ll often see the problem immediately. The manual is your best friend here. It’s designed to be followed precisely.
There’s usually a good reason for every step.
Manual Reading Tips:
- Check Part Numbers: Always verify you’re using the correct piece.
- Note the Direction: Look for finished edges, pre-drilled holes, and grooves.
- Understand Cam Locks: See how the bolt and cam work together.
- Don’t Force It: If a piece doesn’t fit, you’re likely doing it wrong.
- Small Steps: Focus on one step at a time.
Step-by-Step Assembly: Building Your IKEA Dresser
Now, let’s get down to building. Remember, every IKEA dresser is slightly different. Always follow YOUR specific manual.
This is a general guide for common steps.
1. Prepare Your Workspace and Parts
As we talked about, clear your space. Lay out all the wooden panels. Identify the side panels, top, bottom, and back panels.
Group the hardware. Separate screws, dowels, cam locks, and any other small bits. Make sure you have the correct screwdriver and mallet ready.
2. Attach Cam Lock Bolts and Dowels to Side Panels
Look at your side panels. You’ll see many small holes. Some are for cam lock bolts.
Some are for wooden dowels. Screw the cam lock bolts into the designated holes. They should go in until they are snug.
Then, gently tap the wooden dowels into their holes using your rubber mallet. Make sure they are flush or just slightly sticking out, as the manual shows.
3. Connect Bottom and Top Panels to One Side Panel
Take one side panel. Align the bottom panel with the corresponding holes and dowels. Push them together firmly.
You should see the cam lock bolts poke through the larger holes on the bottom panel. Now, insert the cam locks into these larger holes. Use your screwdriver to turn the cam locks clockwise.
Usually, a half-turn is enough. They will pull the two pieces together tightly. Repeat this process for the top panel.
You should now have an ‘L’ or ‘C’ shape.
4. Attach the Second Side Panel
Carefully lift the second side panel. Align its holes with the dowels and cam lock bolts sticking out of the top and bottom panels. Gently push it into place.
Insert the cam locks and turn them to secure. You’ve now formed the main box structure of your dresser.
5. Slide in the Back Panel
Most IKEA dressers have a thin back panel. This panel is crucial for stability. It often slides into grooves on the side, top, and bottom panels.
Gently slide the back panel into these grooves. Make sure it sits flat. Sometimes, there are small plastic clips or nails to secure the back panel further.
If so, attach them now as per the manual.
6. Assemble the Drawers
Now for the drawers. Each drawer usually has four sides and a bottom. Attach the sides to the front and back pieces, again using dowels and cam locks.
The drawer bottom often slides into a groove. Ensure it’s fully seated. Then, attach the drawer slides to the outside of the drawers.
The manual will show you exactly where these go.
7. Attach Drawer Slides to the Dresser Body
Inside the dresser frame, you’ll find pre-drilled holes for the drawer slides. Attach these using the provided screws. Make sure they are level and parallel.
This is critical for smooth drawer operation. If the slides are crooked, the drawers will stick or not close properly.
8. Insert the Drawers
Carefully slide the assembled drawers into the dresser. They should glide smoothly on the rails. If they are stiff, check that the slides on both the drawer and the dresser body are aligned correctly.
Sometimes, you might need to gently push or wiggle them to get them started.
9. Attach Drawer Pulls/Handles
Finally, attach the drawer pulls or handles. These usually screw in from the inside of the drawer front. It’s often easier to do this before the drawers are fully inserted, but the manual will guide you.
You might need to switch to a smaller screwdriver for this.
Drawer Slide Alignment Check
- Level: Are the slides perfectly horizontal?
- Parallel: Are the slides on each side of the drawer opening perfectly lined up?
- Secure: Are all screws tight?
- Smooth Movement: Test by sliding the drawer in and out.
Common IKEA Dresser Assembly Hiccups and How to Solve Them
Even with the best intentions, sometimes things don’t go perfectly. It’s a common experience. Here are a few issues people often run into and how to fix them.
The “It Doesn’t Fit” Problem
This is the most common one. You’re trying to connect two pieces, and they just won’t line up. First, stop.
Don’t force it. Double-check the manual. Are you using the right pieces?
Are they oriented correctly? Sometimes, a piece can look identical but have slight differences. Also, check if there’s something blocking the connection, like a stray piece of packaging or a misplaced dowel.
Experience Tip: I once spent 20 minutes trying to force a side panel. It turned out I had a cam lock bolt screwed in too far. It was sticking out and preventing the next panel from seating properly.
Backing it out just a tiny bit solved it.
Stripped Screw Heads
This happens when the screwdriver slips. Or if you use the wrong size screwdriver. If the head is stripped, you can’t get a good grip to turn it.
Sometimes, placing a rubber band between the screwdriver tip and the screw head can give enough grip. You can also try pliers if there’s enough of the screw head sticking out.
Prevention is Key: Use the correct size screwdriver. Apply firm, steady pressure. Don’t overtighten screws, especially into particleboard, as this can strip the wood around the screw hole too.
Wobbly Dresser
If your dresser feels wobbly, it’s usually down to a few things. Firstly, the back panel. This is a major stabilizer.
Make sure it’s fully seated in its grooves and securely attached. If it’s just nailed on, ensure all nails are in place.
Secondly, check all cam locks and screws. Go back over them. Are they all tightened?
Sometimes, vibrations during assembly can loosen them. Finally, ensure the dresser is on a level surface. If your floor is uneven, the dresser might rock.
You can use shims under the feet to level it.
Drawers Not Sliding Smoothly
This is often caused by misaligned drawer slides. As mentioned earlier, check that the slides on the dresser body and the drawers are parallel and level. Make sure there’s no debris caught in the slides.
Sometimes, the slides themselves might be slightly bent during shipping or assembly. Inspect them for damage.
Troubleshooting Quick Guide:
- Piece Won’t Fit: Recheck manual, orientation, and for blockages.
- Stripped Screw: Try rubber band trick or pliers. Use correct screwdriver next time.
- Wobbly: Ensure back panel is secure and all fasteners are tight. Check for level floor.
- Sticky Drawer: Inspect slide alignment and check for obstructions.
Real-World Context: Where and Why Dressers Go Wrong
It’s not just about the nuts and bolts. The environment where you build and use your dresser matters. Think about the space itself.
The Building Environment
Building on a soft carpet is great for protecting pieces. But sometimes, it can make it hard to get things square. A hard floor with a protective mat is often ideal.
Also, consider the lighting. Trying to assemble a dresser in a dimly lit corner is a recipe for mistakes. Ensure you have good, bright light.
Temperature and Humidity can play a small role too. Extreme heat or cold can make particleboard slightly more brittle. High humidity can make it swell a tiny bit.
While usually not a major issue in a typical home, it’s something to be aware of if you’re building in a garage or shed.
Habits of Use That Affect Dressers
How you use your dresser impacts its lifespan. Overloading drawers is a big one. IKEA dressers are designed for specific weight limits. See how much a dresser weighs by type to get a sense of what’s reasonable.
Piling in heavy items can stress the drawer slides and the dresser frame. This leads to sagging and sticking drawers.
Kids and Dressers: This is a serious safety concern. Unsecured dressers can tip over. This is why IKEA strongly recommends using the anti-tip hardware.
It anchors the dresser to the wall. It’s crucial, especially if you have children or pets. They might climb on it.
Moving a Dresser: Always empty it first! Then, lift it from the bottom, not by pulling the drawers or the top. Dragging it can loosen joints and damage the feet.
Design and Materials
IKEA uses materials like particleboard, MDF, and laminate. These are cost-effective and look good. However, they are not as strong as solid wood.
Particleboard can be susceptible to moisture damage. It can swell and lose its integrity if it gets wet. The laminate surface can chip or scratch if not cared for.
The drawer slides are often made of metal. They are designed for many open-and-close cycles. But they can wear out or get clogged with dust and debris over time.
Regular cleaning can help.
User Behavior and Expectations
Sometimes, the issue isn’t the dresser, but our expectations. IKEA furniture is generally great value. It’s designed for everyday use.
It’s not heirloom furniture. Understanding this helps manage frustration. If a screw hole seems a little loose, it’s likely not a defect, but a characteristic of the material.
Rushing the build is a behavior that leads to errors. Taking your time, reading each step carefully, and double-checking your work will prevent most problems. It’s a practical skill, and like any skill, it improves with practice.
Dresser Longevity Factors:
- Build Environment: Good light, level surface, protected floor.
- Usage Habits: Avoid overloading drawers, use anti-tip hardware.
- Material Care: Protect from moisture and sharp impacts.
- Assembly Patience: Follow instructions carefully, don’t rush.
What This Means for You: When to Be Concerned
Most of the time, assembling an IKEA dresser is a straightforward task. You follow the steps, and you get a functional piece of furniture. But there are times when you might need to pay closer attention.
When It’s Normal (and Totally Fine)
It’s normal to feel a bit confused by the diagrams at first. It’s normal to have a few tight spots where you need to tap things gently. It’s normal to have a small gap that closes up once the next piece is attached.
These are all part of the process.
It’s also normal for your dresser to have a slight, almost unnoticeable, wobble on an average floor. As long as it’s not severe, and the dresser feels stable, it’s usually okay. Small cosmetic imperfections, like a tiny scratch on an unseen side, are also common with mass-produced items.
When to Worry (and What to Check)
Significant Wobbling: If the dresser feels like it could tip over easily, even before you put anything in it, that’s a problem. Check that the back panel is perfectly secured. Then, re-tighten all cam locks and screws.
Make sure it’s on a level surface.
Drawers That Won’t Open or Close: If a drawer is completely stuck, or if it scrapes badly, something is wrong with the slide alignment. This is a common issue that needs fixing. The manual will show how to adjust or reattach the slides.
If a drawer falls out, that’s a definite sign something is loose.
Visible Cracks or Large Gaps: If you see significant cracks in the wood panels, or large, permanent gaps between joined pieces, that’s not normal. This could mean a piece was damaged in transit, or it was assembled incorrectly with too much force applied somewhere.
The Dresser Tilts Forward or Backward: This is a structural issue. It could be that the base is not properly attached or the back panel isn’t providing enough support. This is dangerous and needs immediate attention, especially if you have children.
Simple Checks to Do
The “Shake Test”: Once assembled, give the dresser a gentle shake from the sides and front. Does it feel solid? Or does it move excessively?
Drawer Glide Test: Open and close each drawer several times. Do they move smoothly? Do they stop at the same point?
Visual Inspection: Look at all the joints. Are they tight? Are there any strange gaps or cracks?
Tip-Over Test (Gentle!): Try to gently push the dresser forward. Does it feel stable? If you have the anti-tip kit, install it immediately.
This is not just for when you’re worried; it’s a safety feature for all dressers.
When to Be Concerned:
- Severe Wobble: Dresser feels unstable.
- Stuck Drawers: Drawers won’t open/close smoothly.
- Large Gaps/Cracks: Visible structural damage.
- Tilting: Dresser leans forward or backward.
- ALWAYS: Install the anti-tip hardware.
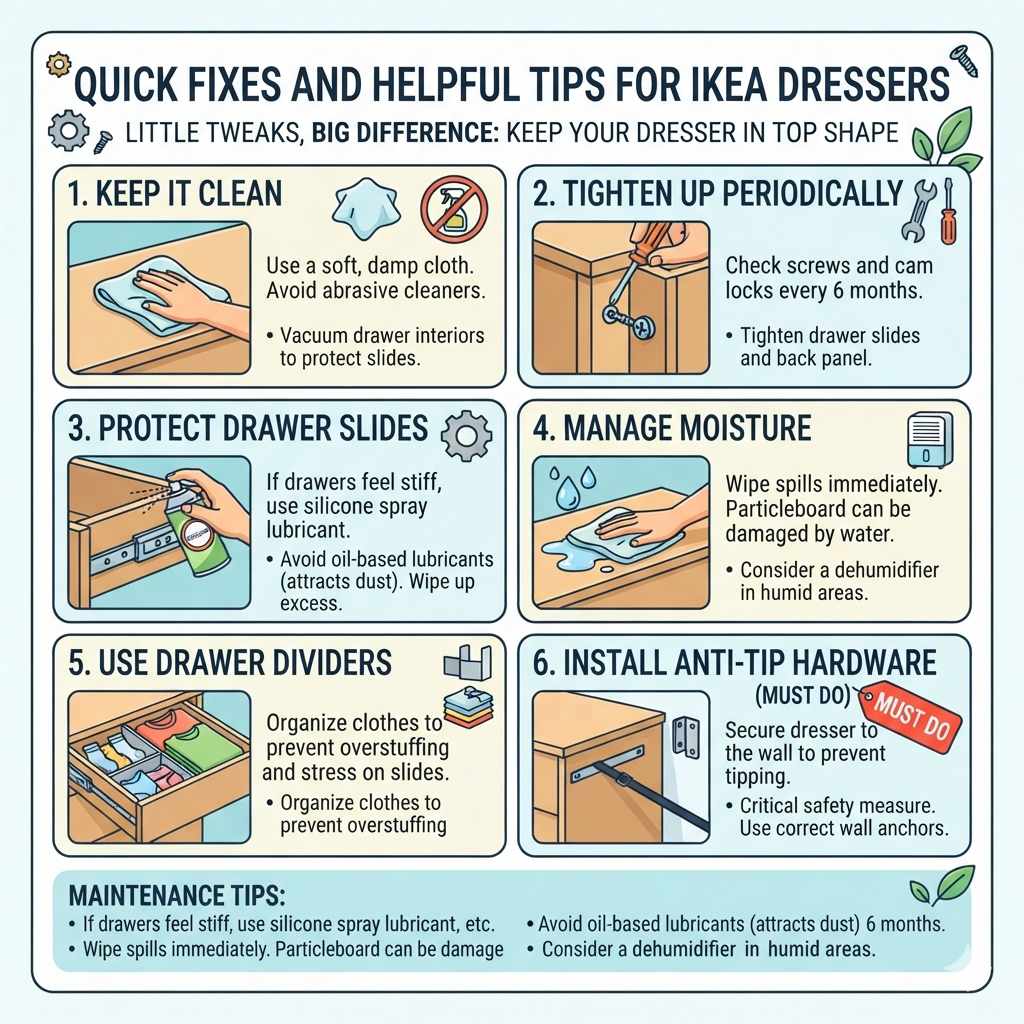
Quick Fixes and Helpful Tips for IKEA Dressers
Even after assembly, little tweaks can make a big difference. Here are some tips to keep your IKEA dresser in top shape.
Keep it Clean
Use a soft, damp cloth to wipe down surfaces. Avoid harsh chemicals or abrasive cleaners. They can damage the laminate.
For drawer interiors, a quick vacuum or wipe-down keeps dust from building up. This helps drawer slides run more smoothly.
Tighten Up Periodically
Over time, screws and cam locks can loosen slightly. It’s a good idea to give your dresser a quick check-up every six months or so. Tighten any screws that feel loose.
This is especially important for the drawer slides and the back panel.
Protect Drawer Slides
If your drawer slides start to feel a bit stiff, try a bit of silicone spray lubricant. Avoid oil-based lubricants, as they can attract dust and make things gummy. A light spray directly on the metal rails usually does the trick.
Make sure to wipe up any excess.
Manage Moisture
Particleboard and MDF can be damaged by water. Wipe up spills immediately. Don’t place damp items directly on the surface for extended periods.
If you live in a very humid area, consider using a dehumidifier.
Use Drawer Dividers
Drawer dividers can help organize your clothes and prevent overstuffing. This reduces stress on the drawer slides and keeps things neat. Small items won’t get lost at the back.
Anti-Tip Hardware is Your Friend
I can’t stress this enough. Install the anti-tip kit that comes with your dresser. It secures the dresser to the wall, preventing it from falling forward.
This is a critical safety measure. Even if you think your kids won’t climb on it, accidents happen.
To install it, you’ll typically attach a bracket to the back of the dresser and another to your wall. Then, a strap or cable connects them. Make sure to use the correct wall anchors for your wall type (drywall, plaster, stud).
Maintenance Tips:
- Clean Regularly: Gentle wiping.
- Periodic Tightening: Check screws and cams every few months.
- Lubricate Slides: Use silicone spray if drawers are stiff.
- Prevent Moisture: Wipe spills quickly.
- Organize Drawers: Use dividers.
- MUST DO: Install anti-tip hardware.
Frequently Asked Questions About IKEA Dresser Assembly
Is it really possible for one person to assemble an IKEA dresser?
Yes, absolutely. Most IKEA dressers are designed to be assembled by one person. However, some larger or heavier dressers might be easier with a second set of hands, especially when lifting and maneuvering larger panels.
The instructions are always written with a single builder in mind.
How long does it usually take to assemble an IKEA dresser?
This can vary a lot. For a basic three-drawer dresser, it might take 1-2 hours. For a larger dresser with more drawers, it could take 3-4 hours or even longer if you’re new to this kind of assembly.
Taking breaks and not rushing is key to a good outcome.
What if I lose a piece or a screw? Can I get replacements?
Yes, IKEA usually has
Do I need to use a drill for an IKEA dresser?
Generally, no. Most IKEA furniture is designed to be assembled with hand tools like screwdrivers and a mallet. Using a drill can sometimes be too powerful and strip screws or damage the particleboard.
However, for attaching the anti-tip hardware to the wall, a drill might be necessary depending on your wall type.
What’s the difference between cam locks and screws in IKEA furniture?
Screws are traditional fasteners that twist directly into the material. Cam locks are a two-part system. A cam lock bolt screws into one piece of wood.
A cam lock (a round disk with a slot) fits into a larger hole in the adjoining piece. When the cam lock is turned, it grips the bolt and pulls the two pieces together tightly. They provide a very strong, hidden joint.
Is it okay to use wood glue with IKEA furniture?
While you can use wood glue, it’s generally not necessary. IKEA furniture is designed to be assembled securely with the provided hardware. Adding glue can make it very difficult to disassemble or adjust if you make a mistake.
Stick to the manual’s instructions unless you encounter a specific problem the glue might solve, and even then, use it sparingly.
What should I do if a drawer keeps falling off its slides?
This usually means the drawer slides are not aligned correctly, or a screw has come loose. First, empty the drawer. Then, carefully inspect the slides on both the drawer and the dresser body.
Ensure they are parallel and level. Re-tighten any loose screws. If the slides are damaged, you may need to contact IKEA for replacements.
Final Thoughts on Building Your IKEA Dresser
Putting together an IKEA dresser is a rite of passage for many. It’s a practical skill that saves money and builds confidence. Remember to approach it with patience.
Follow the manual closely. Use the right tools. And don’t be afraid to take a break if you feel frustrated.
The feeling of accomplishment when you’re done is fantastic. You’ve not only built a piece of furniture but also learned a little bit about how things are put together. Enjoy your new, sturdy dresser!
Products related to this article
Sponsored / affiliate links. As an Amazon Associate I earn from qualifying purchases. I may earn additional commission from eligible campaigns.