

Reinforcing an old porch or balcony involves a thorough inspection, identifying weak spots like rotted wood or corroded metal, and then physically strengthening these areas using structural hardware, proper support posts, and modern fasteners. Safety first!
Do you have an old porch or balcony that feels a little shaky? Maybe those wooden steps creak more than they used to, or the railing sways when you lean on it. It’s totally normal for outdoor structures to wear down over time due to weather and age. That sinking feeling you get when using your deck shouldn’t be ignored! The good news is that reinforcing these areas doesn’t always require an expensive contractor. With a few simple steps and a little hands-on effort, you can restore stability and enjoy your outdoor space safely again. We’re going to walk through exactly what you need to check and how to fix it, step by step.
When tackling an old porch or balcony, think of it like tuning up an old engine—you need to find what’s loose or worn out and secure it properly. Structural integrity is key here. We are focusing on making sure the load-bearing components—posts, beams, and joists—can safely handle the weight.
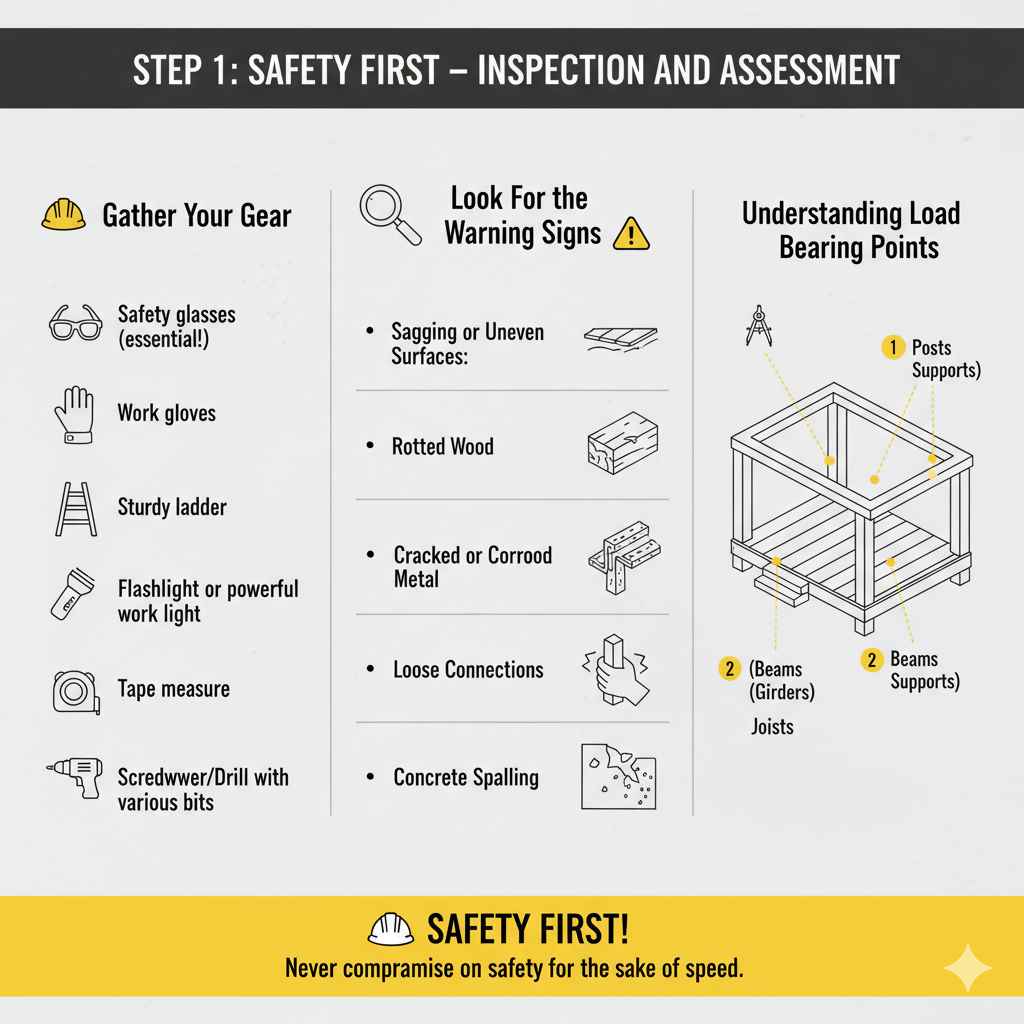
Step 1: Safety First – Inspection and Assessment
Before you grab a single tool, you must know what you are dealing with. An unsafe structure can cause serious injury. Never compromise on safety for the sake of speed.
Gather Your Gear
You don’t need a full contractor setup, but having the right safety items makes everything easier and safer.
- Safety glasses (essential!)
- Work gloves
- Sturdy ladder (check its rating first)
- Flashlight or powerful work light
- Tape measure
- Screwdriver/Drill with various bits
- Hammer and pry bar
Look For the Warning Signs
The first vital step is a thorough visual inspection. Go slow and check everything, especially where wood meets the ground or where main supports connect. Look for these common red flags:
- Sagging or Uneven Surfaces: Does the deck floor noticeably dip or slope in the middle? This usually points to undersized or failing support beams or joists.
- Rotted Wood: Tap on any wooden element—posts, joists, deck boards—with the back of a hammer. A solid thud means it’s fine. A dull, hollow sound suggests water damage and rot. Pay close attention to the bottom of posts where they meet concrete.
- Cracked or Corroded Metal: If your porch or balcony relies on metal brackets or lag screws, look for rust scaling off or visible cracks in the metal.
- Loose Connections: Gently push on railings and posts. If they wiggle significantly, the fasteners (nails or screws) have likely pulled out or loosened over time.
- Concrete Spalling: If the foundation piers are concrete, check for crumbling or chipping surfaces (spalling), which suggests water intrusion weakening the material.
Understanding Load Bearing Points
You need to know what holds up the structure. For most porches and balconies, the weight rests on these three components:
- Posts (Vertical Supports): These carry the dead load (the weight of the structure itself) and the live load (people, furniture).
- Beams (Girders): These sit horizontally on top of the posts and support the joists.
- Joists: These run perpendicular to the beams and directly support the deck flooring.
Step 2: Addressing Immediate Structural Weakness (The Heavy Lifting)
If you found that a post is rotten or a beam is sagging, you need temporary support before permanent repairs. Think of this as putting a temporary spare tire on a flat—it gets you going safely while you fix the real problem.
Safely Supporting the Load
For this step, you will need a hydraulic jack, several sturdy wooden blocks, and perhaps some temporary lumber (like 4x4s).
- Place Temporary Support: Position the hydraulic jack directly under the weakened beam, close to the failing post. Place sturdy wooden cribbing (stacked blocks) on top of the jack’s base for stability.
- Lift Slowly: Crank the jack very gradually. You are only lifting enough to take the weight off the failing post, maybe an eighth of an inch. You should see the sagging beam slightly reposition itself.
- Check Stability: Once the load is off, gently tap or push the area. If it feels much firmer, you can proceed with repair or replacement of the support element.
Replacing Rotted Posts
Replacing a wooden post that sits on a concrete footing often involves a specific process, especially if the original wood was directly touching the concrete—a major cause of rot.
If the post is rotted only at the bottom:
- Keep the temporary jack in place supporting the beam.
- Cut off the rotted section of the post. Make the cut level and flat.
- Install a post base connector (like the Simpson Strong-Tie ABA or similar metal connector). These lift the new wood off the concrete. You can get these at any hardware store. Ensure the connector is securely bolted or anchored to the existing concrete pier according to the manufacturer’s instructions.
- Measure and cut a new pressure-treated lumber post to fit perfectly into the connector.
- Secure the new post to the connector and reattach the beam/ledger board using structural screws or through-bolts where the beam rests on top.
- Slowly lower the jack until the weight transfers fully to the new support system. Remove the jack cautiously.
Step 3: Reinforcing Beams and Joists (The Framework)
Once the vertical supports are sound, we look at the horizontal structure that carries the deck surface.
Strengthening Sagging Beams
If the main beam is bowing between the posts, you can often add structural support beneath it rather than replacing the entire large beam. This is often called “sistering” or adding an intermediate support.
Before we proceed, remember that for any wood reconstruction, using Lumber rated as Pressure Treated (PT) is crucial for exterior elements exposed to moisture, as it resists rot and insects.
For strengthening a beam, you should ideally double its size. If you have 2×8 beams, you will add another 2×8 alongside it. This dramatically increases strength.
- Take your temporary jack support and reposition it directly under the sagging area of the beam.
- Cut a new piece of lumber (e.g., a 2×8) to the exact length needed between the two posts.
- Lift the beam slightly with the jack, just enough to relieve pressure.
- Place the new 2×8 directly against the old beam, ensuring the top edges line up perfectly.
- Secure the two beams together using heavy-duty structural screws (like 3″ or larger) or lag screws. Space these fasteners every 16 to 24 inches along the entire length, staggering them so half are high and half are low (like brickwork). This ties the load-bearing capacity of both pieces together.
- Slowly lower the jack. The newly doubled beam should now be much straighter and stronger.
Fixing Weak Joists
Joists are the ribs of your porch. If you feel “bounce” when walking, or if the deck boards are uneven, the joists might need help.
A common fix for a slightly undersized or weak joist is installing a joist reinforcement strap or, for more severe cases, “sistering” the joist, similar to the beam fix.
Using Metal Reinforcement Hardware
Structural hardware is your best friend here because it’s engineered for strength. A well-known supplier for this kind of hardware is Simpson Strong-Tie. Always check local building codes, as they often specify the required hardware for structural repairs; you can find general guidelines from resources like the International Residential Code (IRC) regarding deck construction standards.
For a bouncing joist that needs connection reinforcement:
Sistering a Rotted Joist
If a joist is partially rotted in the middle or near an end, you cut out the bad section and install a new piece of comparable lumber alongside the remaining good section:
- Support the deck floor above this area with temporary jacks or sturdy supports.
- Carefully cut out the rotted section, leaving at least 12 inches of solid wood on either side of the cut (if possible).
- Fit a new piece of pressure-treated lumber into the gap.
- Use metal straps or hurricane ties to connect the new piece firmly to the remaining sound portions of the original joist. The goal is to create a continuous structural path. Bolt or screw these connections securely.
Step 4: Securing Railings and Stairs (The Connections)
A wobbly railing is both annoying and dangerous. Balconies and porches carry strict safety requirements for railing height and stability.
Rethinking Railing Posts
Railing posts (the vertical pieces that hold the top rail) must be extremely secure. They should be able to withstand a lateral (sideways) force of 200 pounds applied anywhere on the rail. Often, older railings are simply nailed or bolted only into the face of the deck framing, not through it.
To ensure maximum strength, the railing post should ideally be bolted directly through the structural framing members (joists or beams) below the deck surface.
| Connection Type | Strength Level | DIY Difficulty | Best Use |
|---|---|---|---|
| Face Nailing (Old Style) | Low | Very Easy | Repairs only; not for new structural support. |
| Through-Bolting (Recommended) | High | Medium | Securing new or existing railing posts directly to framing members. |
| Post Base Connectors | Medium/High | Medium | Connecting new posts to concrete piers or reinforcing existing wood posts. |
If your current railing post wiggles:
- Remove the railing top cap and any visible trim covering the base of the post.
- If the post is not bolted through the framing, you must add through-bolts. Drill a hole entirely through the post and the underlying framing member (joist or beam).
- Insert a heavy-duty galvanized or stainless steel carriage bolt (at least 1/2 inch thick).
- Secure it on the other side underneath the deck with a large washer and locknut. Tighten firmly.
Stair Stringer Reinforcement
Stairs take a beating. If the stairs are bouncing or pulling away from the porch structure, the stringers (the notched supports holding the treads) are often the issue.
- At the Top Connection: Check where the stringer meets the ledger board attached to the house or porch frame. Old nails often pull out. Remove the old fasteners and use heavy-duty metal angle brackets (L-brackets) to span the connection, attaching them with lag screws into both the stringer and the ledger.
- At the Ground Connection: If the stringers just rest on the ground, they encourage rot. They should rest on a concrete pad or solid pavers. If they are sinking, reset the pavers or pour small concrete footings and then use metal anchors to tie the stringer ends securely to these footings.
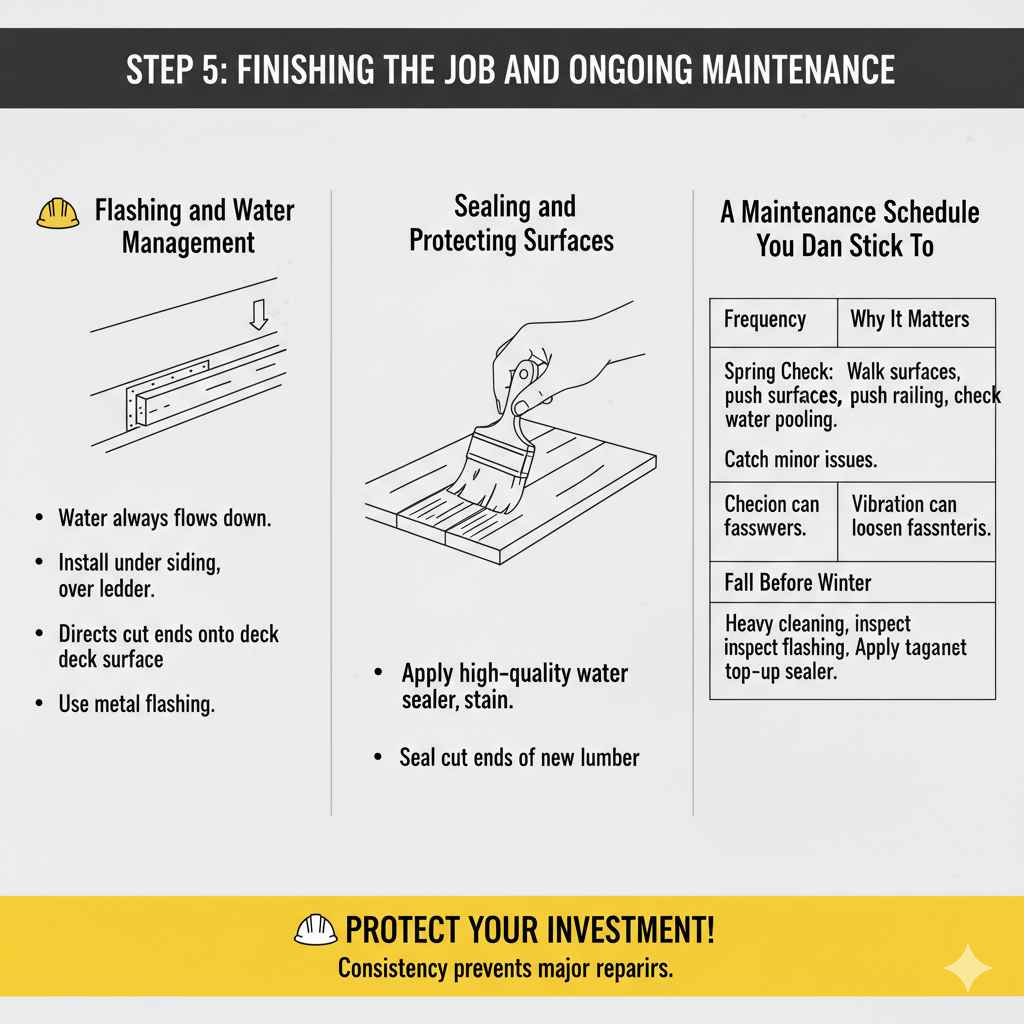
Step 5: Finishing the Job and Ongoing Maintenance
Once you have reinforced the structure, you need to protect your investment from the elements that caused the damage in the first place.
Flashing and Water Management
Water is the number one enemy of wood structures. Preventing water intrusion around crucial connection points is key to long-term stability.
A ledger board (the beam attached directly to your home) is a high-risk area. If water gets trapped between the ledger and the house siding, it rots the house framing and the ledger itself.
If you exposed the ledger board during repairs, you must install metal flashing:
- Water always flows down. Flashing must be installed under siding or roofing but over the ledger board.
- The flashing bends outward, directing water onto the top of the deck surface, allowing it to drain harmlessly away from the house wall.
- Use specialized metal flashing designed for decks or wide strips of aluminum/galvanized steel. Secure it properly before installing new deck boards or attaching the post hardware above it.
Sealing and Protecting Surfaces
Applying a high-quality water sealer or stain once all repairs are complete will create a barrier against rain and UV rays.
Remember to seal the cut ends of any new pressure-treated lumber, even though it’s treated, especially if it’s near the ground. End-cut preservatives are inexpensive and offer a necessary last line of defense.
A Maintenance Schedule You Can Stick To
Consistency prevents major repairs later. Think of this as your porch’s oil change schedule:
| Frequency | Task | Why It Matters |
|---|---|---|
| Spring (Early Season) | Visual Check: Walk every surface, push railings, check for pooling water. | Catch minor issues before summer use begins. |
| Mid-Summer | Check accessible fasteners (bolts/screws) beneath the structure for tightness. Lightly clean moss or debris from wood. | Vibration can loosen fasteners throughout the season. |
| Fall (Before Winter) | Heavy cleaning and inspection of flashing. Apply top-up waterproofing sealer if needed. | Protect against winter moisture, freeze/thaw cycles, and snow load. |
Frequently Asked Questions (FAQ) About Porch and Balcony Reinforcement
Q1: How do I know if my balcony needs professional help versus DIY repair?
If the sagging is minor (less than an inch over ten feet) and the rot is limited to the surface boards, DIY fixes using basic hardware might work. However, if you find major rot in the main beams, the ledger board attached to the house is compromised, or the structure is more than one story high, call a licensed structural engineer or contractor immediately. Safety is non-negotiable.
Q2: Is it better to use screws or bolts for reinforcing wood?
For structural reinforcement where serious load transfer is involved—like connecting beams, posts, or railings—heavy-duty galvanized or stainless steel through-bolts (fasteners that go completely through both pieces of wood) are superior to screws. Screws grip well, but bolts provide clamped strength, which resists shaking and movement much better.
Q3: Do I need special ‘deck screws’ if I am only screwing boards down?
Yes, absolutely. Do not use standard drywall screws or indoor screws! You must use exterior-grade fasteners like hot-dipped galvanized or stainless steel screws. Standard screws rust quickly outdoors, leading to the exact loosening and swaying you are trying to prevent. Always use screws rated for exterior and pressure-treated lumber contact.
Q4: Can I just pour concrete around a rotten post footing?
No, this is a common mistake that actually traps moisture. If the post base has rotted, you must lift the structure, cut off the rot using a technique like installing a metal post base connector (as detailed above), and ensure the new wood is lifted slightly above the ground or concrete. Never bury new wood.
Q5: My balcony is too high to safely access underneath—what now?
If accessing the underside of a second-story balcony is dangerous or requires specialized scaffolding, stop. Structural repairs need clear access to the connections. In this case, hiring a professional with the right safety gear and scaffolding is the smart, safe choice. Attempting repairs blind or from an unsafe height is too risky.
Q6: What is ledger flashing, and why is it so important for porches attached to the house?
Ledger flashing is a thin strip of metal installed between the ledger board (the main beam attached to your house) and the house siding. It’s critical because it prevents rainwater from running down the house wall and settling directly between the deck structure and the home’s wood structure, which causes rot in both components over time.
Q7: How much weight can a safely reinforced porch hold?
Modern residential building standards generally require porches, balconies, and decks to support at least 40 pounds per square foot (PSF) of live load, which includes people, furniture, and normal daily use, in addition to the structure’s own weight (dead load). When an older porch is properly reinforced—with solid posts, doubled beams, secure joists, and strong connections—it can often meet or come close to these modern expectations.
Conclusion
Reinforcing an old porch or balcony is about restoring confidence in the structure by strengthening the parts that carry weight and stabilizing the connections that hold everything together. A careful inspection helps you spot early warning signs like rot, sagging beams, loose railings, and weakened joists. From there, practical fixes such as replacing damaged posts, sistering beams, installing proper hardware, and securing railings can dramatically improve safety and stability.
The most important takeaway is that structural strength comes from solid support points and strong connections, not just surface repairs. Using pressure-treated wood, galvanized fasteners, proper flashing, and regular maintenance will help prevent the same problems from returning.
Small issues can often be handled with thoughtful DIY work, but major structural damage, severe sagging, or high second-story balconies should always be evaluated by a professional. With the right approach, an aging porch or balcony can be made sturdy, secure, and reliable again—giving you peace of mind and a safe outdoor space to enjoy for years to come.


