

Learn how to safely tie down a bicycle for transport by securing it firmly to fixed anchor points using strong straps or ropes. Proper technique prevents damage to your bike and vehicle. Always check strap tightness before driving.
Hi there! I’m Dustin Hall, and I know how frustrating it feels when you want to take your bike on a trip but worry sick about it rattling around in your truck or van. That beautiful ride deserves better than rattling against the tailgate! Many people think securing a bike is complicated, full of knots and confusing mechanics. It is not! We’re going to walk through the whole process in simple, easy steps. You’ll learn exactly which gear you need and the best methods for keeping your bike safe, whether it’s going into a truck bed or onto a trailer. Ready to secure your bike like a pro? Let’s get started!
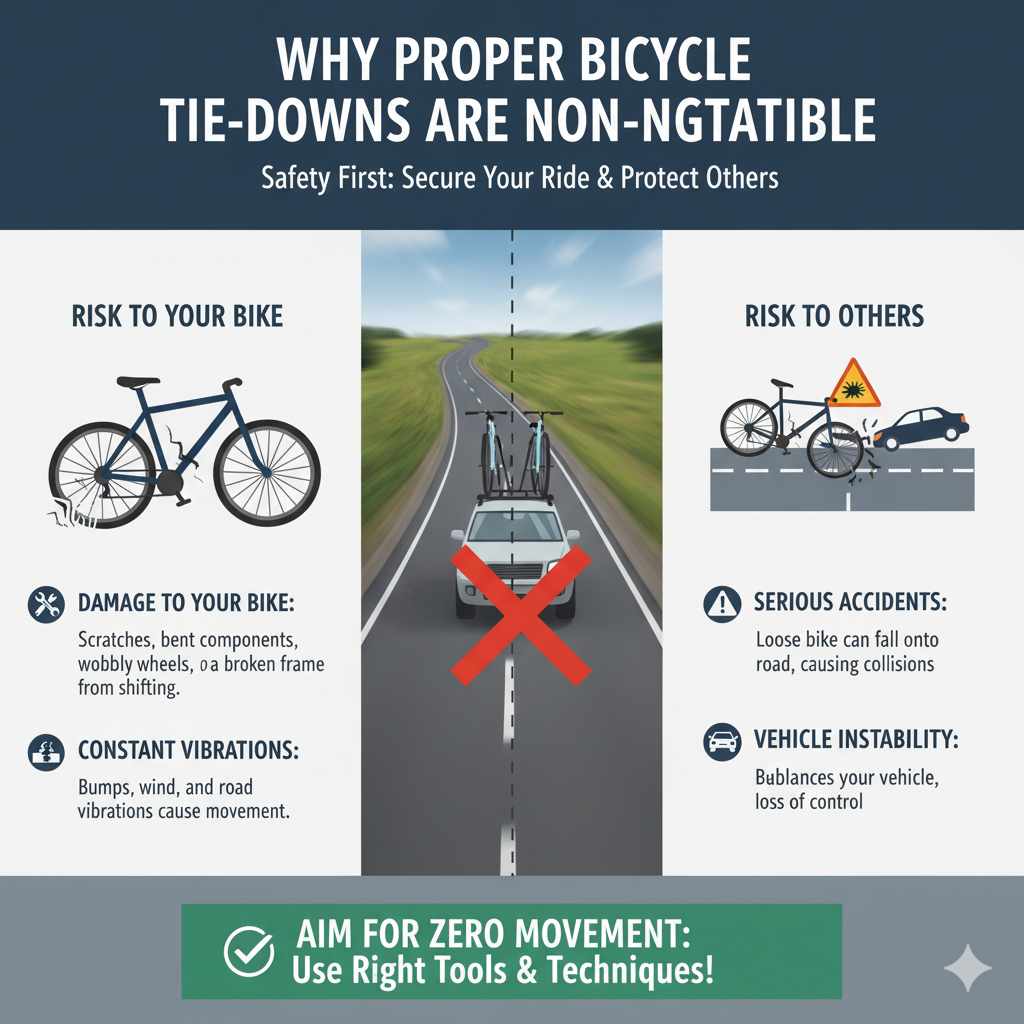
Why Proper Bicycle Tie-Downs Are Non-Negotiable
Think of tying down your bike like buckling up in your car. It’s all about safety first. When you’re driving down the highway, your truck or SUV experiences bumps, wind, and constant vibrations. Without a good tie-down job, two bad things can happen:
- Damage to Your Bike: Scratches, bent components, wobbly wheels, or even a broken frame can happen when the bike shifts even an inch.
- Risk to Others: A loose bike can unbalance your vehicle, or worse, fall completely out onto the road, causing a serious accident for other drivers. No one wants that responsibility.
By using the right tools and techniques, you ensure your bike arrives in the same condition it left. We are aiming for zero movement—that’s the sweet spot.
Essential Tools: Get Your Gear Ready
Before you start loading up, make sure you have the right equipment. You don’t need heavy-duty industrial straps, but you do need gear designed to handle movement and tension. Skip the flimsy bungee cords if you can; they stretch too much.
The Best Tie-Down Tools for Bikes
- Ratchet Straps (Recommended): These are the gold standard. They use a ratcheting mechanism to apply serious, consistent tension without over-tightening the load. Look for straps rated around 500 lbs working load limit (WLL).
- Cam Buckle Straps: Simpler and faster than ratchets, these are great for lighter loads or quick securing. You pull the strap tight through a buckle, and it locks mechanically.
- Heavy-Duty Rope/Nylon Cord: If you must use rope, use thick nylon rope and know a couple of secure knots, like the taut-line hitch. However, straps offer more reliable, consistent tension.
- Moving Blankets or Towels: These are your padding superheroes. They go between the bike frame, handlebars, and the truck bed walls or rails.
- Gloves: Protect your hands from grime and tight strap edges.
Pro Tip on Bungee Cords: While great for securing a tarp over luggage, bungee cords are too elastic for securing a valuable, rigid item like a bicycle. They allow for too much bounce and movement during transit.
Step-by-Step: How To Tie Down A Bicycle In A Truck Bed
The truck bed configuration is the most common way people transport multiple bikes. The goal here is to anchor the bike’s rigid parts (frame and fork) to the truck’s fixed anchor points (tie-down loops or rails).
Step 1: Prepare the Truck Bed
A clean truck bed means clean bikes. Sweep out any gravel, tools, or debris that could scratch your frame while bouncing around.
- Place moving blankets or thick towels strategically where the bike’s frame, wheels, or handlebars will make contact with the truck walls or headache rack. This cushioning is crucial for paint protection.
Step 2: Bike Orientation and Placement
How you position the bike affects stability. Generally, you want the bike facing forward, aligned with the direction of travel.
- For One Bike: Place it near the cabin, facing forward.
- For Multiple Bikes: Load bikes facing opposite directions (one forward, one backward) or stand them handle-bar-to-handle-bar to maximize space and prevent twisting.
If possible, remove helmets, water bottles, and panniers (saddlebags) and store them securely inside the cab. These accessories can fly off or get damaged easily.
Step 3: Identifying Anchor Points
A pickup truck has built-in anchor points—these are metal loops or hooks usually found in the corners of the truck bed where the side rails meet the floor.
If you have a utility liner or specific cargo track system (like the Toyota Cargo Management Systems often use these tracks), utilize those. These are designed to handle the load.
Step 4: Attaching the Straps (The Crucial Part)
We need at least two straps, one near the front and one near the back, to prevent rotational movement.
- Anchor an End: Thread one end of your ratchet strap through the anchor point in the truck bed corner that is nearest and diagonally opposite your bike location.
- Loop Over the Frame: Carefully drape the strap over the bicycle’s frame. The best place to route the strap is over the sturdiest part: usually the main triangle formed by the top tube and seat tube, or directly over the chainstays (rear triangle), avoiding brake lines or shifter cables.
- Pad it! Ensure you place a blanket or rag where the strap touches the frame paint.
- Secure the Second End: Feed the loose end of the strap through the ratchet mechanism and pull through as much slack as possible by hand.
- Tighten Slowly: Begin ratcheting. Apply firm tension, but stop before you feel the need to compress the bike frame itself. You are securing the bike to the truck floor, not crushing the frame.
Step 5: Managing Handlebars and Wheels
For added stability, especially with multiple bikes, you need secondary tie-downs for the handlebars and wheels.
- Handlebar Strap: Use a second, lighter strap (or a strong rope) to lightly secure the handlebars to the truck bed wall or frame loop to prevent them from turning constantly.
- Wheel Stabilization: If the wheels seem wobbly, use small loops of cord to tether the wheel rims to a fixed point near the spokes, ensuring they cannot swing side-to-side outside the line of the frame.
Securing Bikes in an SUV or Van (The Enclosed Space Method)
If you are transporting your bike inside an enclosed vehicle, the anchor points will be slightly different, but the principles of tension and padding remain the same.
Tools for Enclosed Transport
In an SUV, you often rely on built-in cargo loops or secure points around the floor seats.
- Cargo Loops: Many modern SUVs have small D-rings or fabric loops under the rear cargo floor cover. Use these diligently.
- Seat Anchors (LATCH Points): While often used for car seats, the LATCH lower anchors (located where the seat back meets the bottom cushion) can sometimes be cleverly used as sturdy anchor points if they are accessible.
The Process for an SUV/Van
- Remove Front Wheel (Optional but Recommended): Removing the front wheel flattens the bike profile significantly, making it easier to fit and drastically reducing handlebar swing. Store the wheel flat on the floor.
- Secure the Rear Wheel: Place the bike standing up (if the roof allows) or lying down, leaning against the back seats. Attach one strap from the frame anchor point down to the left cargo loop.
- Anchor the Front: Attach a second strap from the fork dropouts (the base of the front wheel where the axle sits) down to the right cargo loop. This prevents the bike from tipping forward or backward.
- Cross-Strap for Security: If you have two bikes, consider crossing the straps like an ‘X’ over the bikes and securing them to opposite corners of the cargo area. This counter-tension keeps everything centered.
Remember to check the NHTSA guidance on securing external and internal cargo; safety standards apply even inside your own vehicle.
Common Tie-Down Mistakes and How to Fix Them
It’s all about avoiding the common pitfalls that lead to a damaged bike. Here is a quick guide to what not to do.
| Mistake | Why It’s a Problem | The Dustin Hall Fix |
|---|---|---|
| Relying only on the kickstand. | Kickstands are not designed for highway speeds or road vibrations; they will collapse or break. | Remove the kickstand or fold it up. Use at least two anchor points for stability. |
| Over-tightening the straps. | You can bend thin aluminum or carbon fiber tubes, causing structural failure later. | Use padding. Tighten until the strap is taut, then stop. The bike should not move, but the frame shouldn’t feel compressed. |
| Tying only to the wheels or handlebars. | Wheels can spin freely, and the handlebars can turn, causing the bike to pivot wildly. | Always anchor to the most rigid part: the frame or fork dropouts. |
| Forgetting the ‘shake test.’ | You secure everything, but a quick vibration loosens the ratchet mechanism. | After tightening, vigorously shake the bike side-to-side and top-to-bottom. If it moves more than a millimeter, tighten again. |
The Final Check and The Drive
We’ve secured the tie-downs, padded the frame, and checked the tension. Now comes the most important part of the entire process: the final safety confirmation and monitoring during the trip.
The 5-Minute Shake Down
- Visual Inspection: Walk around the bike. Do all straps look straight? Are they centered over the padding?
- The Push Test: Push down hard on the seat. Does the bike spring back firmly? It should not sink significantly under pressure.
- Handlebar Check: Wiggle the handlebars. If they turn more than half a rotation without resistance, add a light securing strap.
- Wheel Stability: Grab the tires and rock them laterally (side-to-side). They should move only as much as the entire bike assembly moves against the anchor points.
- The Drive: Drive slowly for the first mile. Pull over safely and check the straps again. It is common for the initial tension to settle slightly after the first few bumps. Re-tighten as necessary.
For longer drives, make it a habit to stop every 50 to 100 miles to perform a quick, visual check on the straps. Weather changes, temperature fluctuations, and road vibrations can all subtly affect the tightness.
When to Use Specific Tie-Down Techniques
The basic method works well, but sometimes you need a specialized strategy. Here are a couple of common scenarios where a slight adjustment helps significantly.
Scenario 1: Transporting a Full-Suspension Mountain Bike
Full-suspension bikes have complex rear triangles and many moving parts. You want to avoid stressing the shocks.
- Frame Anchor: Place the main strap high on the front triangle, near the top tube/head tube junction.
- Rear Anchor: Instead of strapping the rear swingarm (which attaches the rear wheel), secure the strap near the seat post/seat tube junction, pulling diagonally down toward the truck floor hook. This keeps tension centralized without compressing the suspension linkages.
Scenario 2: Using a Hitch-Mounted Rack with Extra Straps
Even if you use a platform hitch rack, extra straps are often required by manufacturers for highway travel to stabilize the bike from side-to-side sway. This is where the ‘X’ technique really shines.
Run one strap from the front tire/fork area, angling across the bike frame, hooking to the opposite side anchor point. Run the second strap from the rear wheel/frame, angling across the frame to the other side anchor point. This crisscross acts like a stabilizing brace.
Why Strap Material Matters More Than Knot Knowledge
As an auto guide, I lean towards security through mechanical advantage over complicated knots. While a good knot, like a Bowline, is fantastic for securing a static tent pole, it can slowly slip or require constant retightening when dealing with the vibrations of a vehicle in motion.
Ratchet straps provide constant mechanical leverage. Once they are set to the right tension, they hold that tension remarkably well. This consistency removes human error from the equation—you set it tight, and it stays tight.

Table: Strap Type Comparison for Bike Transport
| Strap Type | Tension Control | Ease of Use | Best Application |
|---|---|---|---|
| Ratchet Strap | Excellent (Adjustable & High Tension) | Moderate (Takes time to secure) | Long hauls, heavy bikes, multiple bikes. |
| Cam Buckle Strap | Good (Finger Tightening) | Easy (Very fast) | Short trips, securing secondary handlebars/wheels. |
| Nylon Rope | Poor to Fair (Manual Tension) | Difficult (Requires knot knowledge) | Emergency backup only. |
Handling Different Bike Types
Not all bikes are built the same. A road bike is lighter and more delicate than a heavy e-bike or downhill mountain bike. Adjust your tension accordingly.
- Road Bikes / Carbon Frames: Be extremely cautious. Carbon fiber frames can crack under excessive clamping pressure. Use minimal ratcheting tension, focusing more on preventing side-to-side movement than downward pressure. Pad every single contact point well.
- E-Bikes / Heavy Duty Bikes: These require robust straps and often need more anchor points (usually three instead of two) because of their extra weight. Ensure your anchor points (truck loops) are rated for heavy loads—most OEM loops are fine, but aftermarket plastic tie-downs might fail.
- Kids’ Bikes: Often more awkward due to small wheels and high crossbars. It’s usually best to secure them lying flat and strap the main frame triangle securely to the floor to prevent them from tipping over due to their high center of gravity.
Frequently Asked Questions (FAQ)
Q1: Can I just use bungee cords to tie down my bicycle?
A: It is strongly recommended that you do not rely solely on bungee cords. Bungees stretch too much during highway vibration, allowing your bike to shift, bounce, and potentially get damaged or fall off.
Q2: Should I remove my bike wheels before securing it in the truck bed?
A: For a single bike, removing the front wheel is often helpful; it makes the bike profile smaller and prevents the handlebars from twisting into the truck walls. For multiple bikes, removing wheels is almost always necessary for efficient packing.
Q3: How tight should the straps be?
A: They should be tight enough that the bike does not move at all when you shake it hard, but not so tight that you physically see the frame tubes deforming or compressing under the strap. Always use padding between the strap and the frame.
Q4: What is the best place to attach the strap on the bike frame?
A: Aim for the stiffest, most solid part of the frame, typically the main triangle (where the top tube, down tube, and seat tube meet). Avoid wrapping straps tightly around thin accessories like seat posts or brake lines.
Q5: Do I need to tie down the wheels separately in the truck?
A: If the main frame straps are secure, the wheels often stay put. However, if the wheels are sticking out, use small ropes or auxiliary straps to tether the wheel rims lightly to the truck floor hooks to stop excessive side-to-side flapping.
Q6: Is it safe to transport a bike upside down?
A: Generally, it is safe, provided you protect the seat and handlebars with padding. Securing the frame upside down can actually offer better stability as the weight settles lower, but ensure no components (like shifters or derailleurs) are resting directly on the truck floor.
Conclusion: Drive With Confidence
In conclusion, knowing how to properly tie down a bicycle for transport is an essential skill for any rider who wants to travel with confidence. Using strong straps, reliable anchor points, and protective padding ensures that your bike stays secure and free from damage during the trip. Taking a few extra minutes to position the bike correctly and tighten the straps can prevent costly repairs and dangerous situations on the road.
Whether you are transporting your bike in a truck bed, SUV, or trailer, the key is stability and tension—your bike should not shift or bounce while driving. Always perform a quick shake test and recheck the straps after the first few miles to make sure everything remains tight. These small safety checks make a big difference, especially during long drives.
By following the right tie-down techniques and using quality gear, you can protect both your bike and your vehicle. With practice, securing your bicycle becomes quick, simple, and reliable every time you travel.


