
To secure your TV to a stand safely and easily, first check if your TV stand is compatible. Then, use the correct VESA mounting holes and hardware (bolts and washers) provided with your TV or mount kit to firmly attach the brackets to the TV and then the TV to the base. Always tighten securely, but never overtighten.
Are you tired of that big TV wobbling just a little too much on its little feet? Maybe you’ve just moved, or perhaps you’ve upgraded to a huge, beautiful new screen, and you worry about bumps or curious pets knocking it over. It’s a common worry! A fallen TV is a costly disaster. The good news is that making your TV rock-solid steady on its dedicated stand is easier than you think. You don’t need to be a master technician. We’ll walk through every simple step to get your television safe and sound. By the end of this guide, you’ll have the confidence to secure your setup perfectly. Let’s dive into making your entertainment area safe and stable!
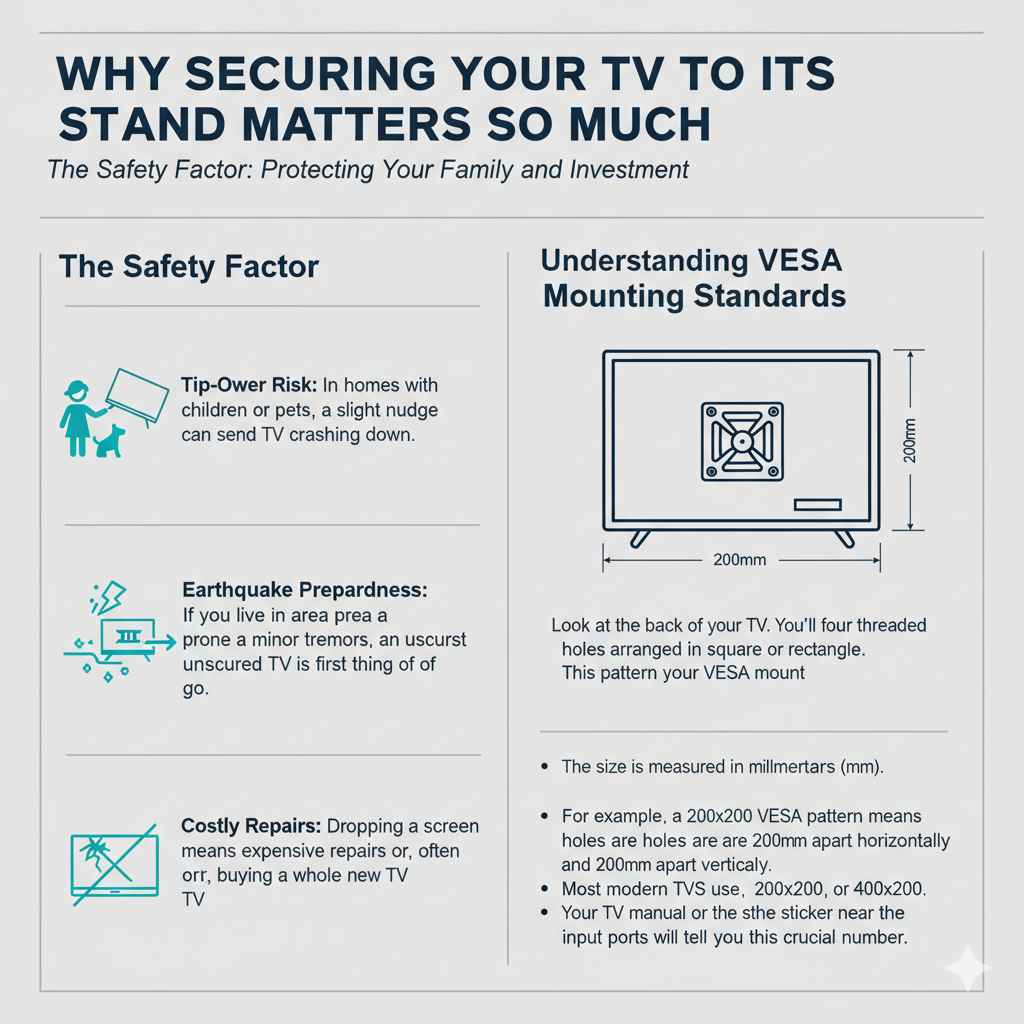
Why Securing Your TV to Its Stand Matters So Much
It might seem like overkill, but securing your television, especially modern, large, flat-screen models, is critical for safety and peace of mind.
The Safety Factor: Protecting Your Family and Investment
Modern TVs are surprisingly light, but they are also tall. This height creates a higher center of gravity, making them susceptible to tipping.
- Tip-Over Risk: In homes with children or pets, a slight nudge can send a TV crashing down. According to safety guidelines, securing large electronics prevents serious injury.
- Earthquake Preparedness: If you live in an area prone to minor tremors, an unsecured TV is the first thing to go. A simple attachment can keep it grounded.
- Costly Repairs: Dropping a screen means expensive repairs or, more often, buying a whole new TV. Taking five minutes to secure it saves headaches later.
Understanding VESA Mounting Standards
Before you can secure anything, you need to know what connects the TV to the stand. This connection relies on the VESA standard. VESA (Video Electronics Standards Association) sets the rules for where the screw holes should be on the back of your TV.
Look at the back of your TV. You’ll see four threaded holes arranged in a square or rectangle. This pattern is your VESA mount.
The size is measured in millimeters (mm). For example, a 200×200 VESA pattern means the holes are 200mm apart horizontally and 200mm apart vertically. Most modern TVs use patterns like 200×200, 300×300, or 400×400. Your TV manual or the sticker near the input ports will tell you this crucial number.
Gathering Your Tools and Parts: The Preparation Checklist
The beauty of securing a TV to its matching stand is that often, all the necessary hardware is included! If you bought the TV used or tossed the original parts, a universal mounting kit will have what you need.
Essential Tools You Will Need
You do not need a massive toolbox for this job. Keep it simple and safe.
- Screwdriver Set: Usually Phillips head (the cross shape). A power drill with a clutch setting can speed things up, but manual tightening gives you better control against overtightening.
- Measuring Tape: Handy for checking spacing if you are unsure about your VESA pattern.
- Soft Blanket or Towel: Crucial for protecting your screen when placing the TV face-down on a table during installation.
- A Helper (Recommended): For larger TVs (over 40 inches), having a second pair of hands makes lifting and aligning much safer.
Understanding the TV Stand Hardware
The stand kit comes with several key components you need to identify:
| Component | Purpose | Why It Matters |
|---|---|---|
| Mounting Plate/Brackets | These attach directly to the back of the TV. | They bridge the gap between the TV holes and the stand pillar. |
| Connecting Bolts (Screws) | These go through the brackets and into the TV’s VESA holes. | They must be the correct length and thread size for your TV model. |
| Spacers/Washers | Small plastic or metal rings used to create space behind the bracket. | They ensure the bolt doesn’t press too hard on the back casing of the TV. |
| Stand Base/Pillar | The main structure that rests on the furniture. | This is what the TV brackets will ultimately lock onto. |
Pro Tip on Bolts: If you are using a universal kit, there are often many different bolts. Do not guess! The manual will usually list the correct M-size (e.g., M6 or M8) and length for your specific TV brand.
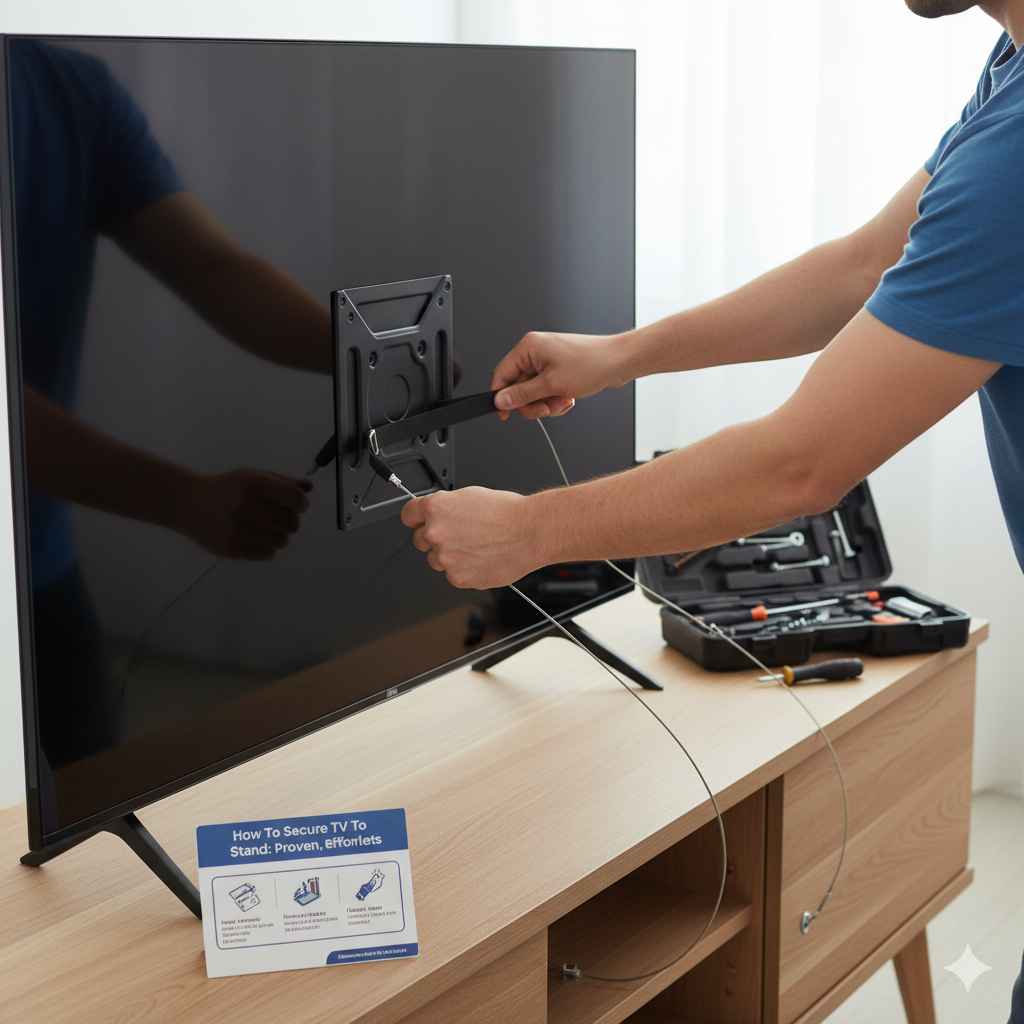
Step-by-Step Guide: Attaching the Brackets to Your Television
This is where we connect the pieces that will hold your TV up. Take your time here; this connection must be perfect.
Step 1: Prepare a Safe Work Area
Never work with the screen facing up on a hard surface.
- Place a thick, soft blanket or the original foam packaging on a large table or the floor.
- Gently lay the TV screen-down onto the soft surface. You only need to see the back panel clearly.
- If your TV has a removable plastic panel covering the VESA holes, unscrew and set it aside.
Step 2: Match the VESA Pattern and Choose Hardware
Look at the four holes on the back of the TV.
- Hold one of the mounting brackets (often an ‘L’ shaped piece) against the back of the TV, aligning it over the holes.
- If the holes don’t line up perfectly, you might need to try the other bracket or use the provided spacers. Spacers are essential if the back of the TV is curved or has plastic bumps around the holes.
- Select the correct connecting bolts from your hardware kit. Most manufacturers recommend using bolts that are long enough to go through the bracket, any necessary spacer, and into the TV by about 5–8mm (or 3-5 full turns).
Step 3: Secure the Brackets to the TV
This step requires careful tightening.
- Place the bracket (with any required spacers) over the holes.
- Insert the first bolt and hand-tighten it just enough to hold the bracket in place. Do not tighten fully yet!
- Repeat for the remaining three bolts. This ensures the bracket sits flat and square.
- Once all four are in place, use your screwdriver (or drill on the lowest setting) to tighten them in a diagonal pattern (like changing a tire). Tighten the top-left, then the bottom-right, then the top-right, and finally the bottom-left.
- Crucial Caution: Tighten until firm. Do not over-tighten! You should feel resistance, but forcing it can strip the threads inside the TV or crack the plastic housing. You are securing it, not fusing it permanently.
Assembling the Stand Base and Pillar
Now that the TV has its feet (the brackets), we need to build the base structure that sits on your furniture.
Step 4: Building the Base Structure
The stand base usually comes in two parts: the bottom plate (which rests on the stand) and the pillar or neck (which rises up to meet the TV).
- Consult the stand’s assembly instructions. Usually, you attach the upright pillar to the wide base plate using large, heavy-duty screws from underneath.
- Ensure these base screws are tightened extremely well, as this section bears the entire weight of the TV. This assembly needs to be rock-solid before adding the heavy TV.
Step 5: Connecting the TV to the Stand Pillar
This is the moment of truth. If you have a large TV, grab your helper now!
- Carefully lift the TV (still screen-down on the blanket, if possible) and align the brackets attached to the back of the TV with the receiving slots or plate on the top of the stand pillar.
- Slide the brackets down into their mounting points on the pillar. You might hear a slight click, or you may need to gently push down until they seat fully.
- Check Alignment: Once seated, give the TV a gentle wiggle. It should feel securely connected to the pillar assembly.
The Final Security Step: Locking It Down
Many stand kits include a final locking mechanism designed to prevent the TV from being accidentally lifted off the stand or vibrating loose. This is often the most overlooked but most important step for long-term stability.
Step 6: Installing Safety Locks or Screws
Examine the connection point where the brackets meet the stand pillar.
- Set Screws: Many stands use small set screws (often Allen-head or thumbscrews) that go through the bottom of the mounting bracket and screw directly into the stand pillar. These prevent vertical slippage.
- Locking Pins: Some designs use metal pins or clips that snap into place once the bracket is seated.
If your stand uses set screws, use the provided Allen wrench to tighten them. Just like attaching the brackets to the TV, tighten these firmly—they are the ultimate fail-safe against accidental removal or shaking.
Step 7: The Final Placement and Safety Check
With the TV securely attached to the base, it is time to stand it up.
- With your helper, carefully lift the entire assembly and place it gently onto your desired piece of furniture (a sturdy TV console or media cabinet).
- Check the stability. Does it sit flat? Can you gently push the top corner without it wobbling excessively?
- Weight Distribution Check: Make sure the bulk of the TV’s weight is centered over the stand base. If the stand base is too narrow for your large TV, you might need to reinforce the stand itself or consider a wall mount instead (see resource note below).
When everything is set, ensure the stand is not too close to the edge of the cabinet, leaving room for cables and general safety buffer. For added security, especially with very tall units, consider securing the stand itself to the wall using an anti-tip strap, even though the TV is secured to the stand. The Consumer Product Safety Commission (CPSC) strongly recommends this dual approach for all tall furniture and TVs.
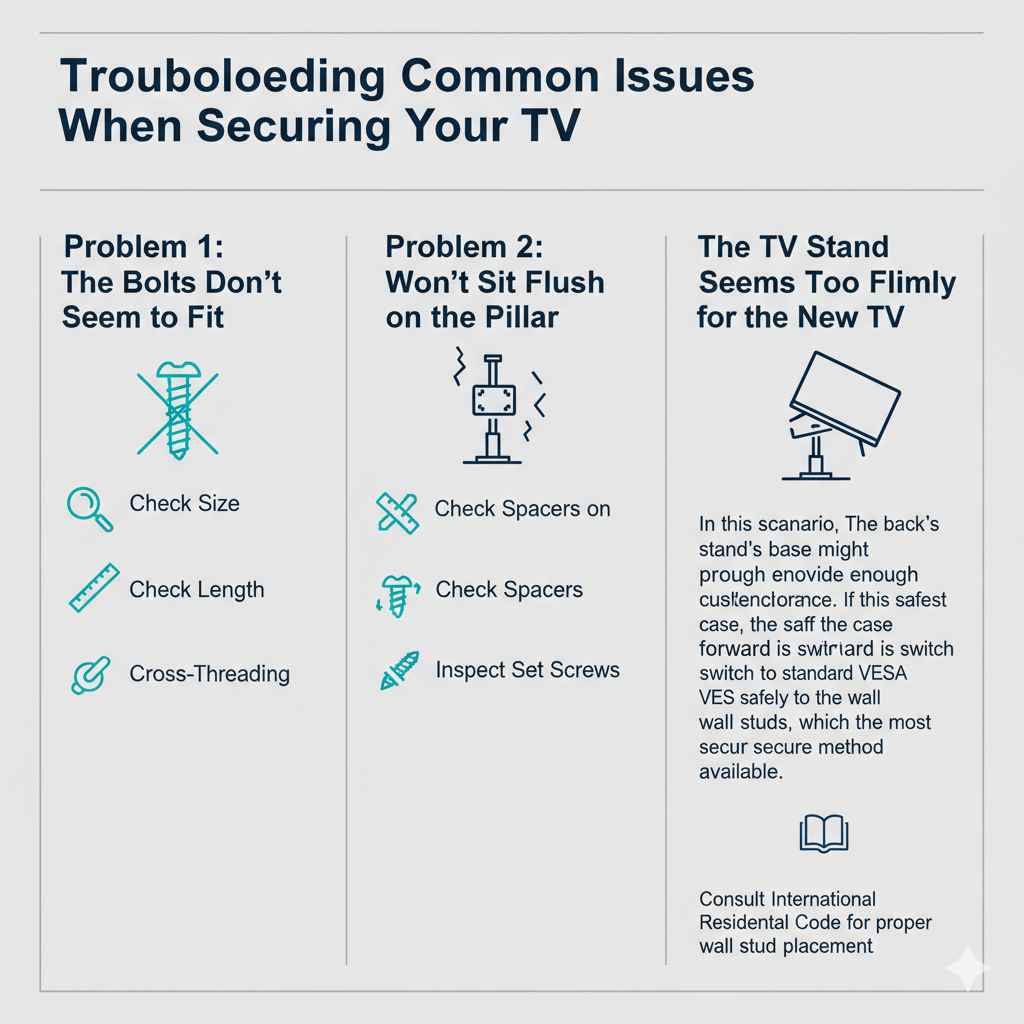
Troubleshooting Common Issues When Securing Your TV
Even with the best intentions, things don’t always line up perfectly. Here are solutions for common snags.
Problem 1: The Bolts Don’t Seem to Fit
If the bolts provided don’t screw in easily, stop immediately.
- Check Size: You might be using the wrong diameter bolt (M6 vs. M8). Compare the new bolt head to the old, unused bolts.
- Check Length: If the bolt goes too deep and hits something inside the TV, you need a shorter bolt or you need to use a spacer. Never force a bolt that feels too long.
- Cross-Threading: If you started twisting crookedly, you might have cross-threaded it. Unscrew it slowly and try again, ensuring the bolt goes in straight. If the threads are damaged, you may need replacement hardware.
Problem 2: The TV Won’t Sit Flush on the Pillar
If the brackets feel wobbly once seated on the stand pillar:
- Check Spacers on the Back: Sometimes, the spacers used between the bracket and the TV prevent the bracket from sliding fully into the pillar slot. Try removing one or more spacers.
- Inspect the Set Screws: Ensure the locking set screws underneath the bracket haven’t been partially tightened before the bracket was fully seated. Loosen them, seat the bracket fully, and then retighten the set screws.
Problem 3: The Stand Seems Too Flimsy for the New TV
If your TV is significantly larger or heavier than the stand was designed for (e.g., putting a 75-inch TV on a stand rated for 55 inches), securing it won’t solve the structural weakness.
In this scenario, the stand’s base might not provide enough counterbalance. If this is the case, the safest path forward is to switch to a standard VESA wall mount. Wall mounting transfers the entire load directly and safely to the wall studs, which is the most secure method available. You can find excellent resources on proper wall stud placement from organizations like the International Residential Code guides, ensuring you anchor into structural support.
When to Choose a Wall Mount Over a Stand
While securing a TV to its stand is great, sometimes the stand itself isn’t the best solution for your room layout or viewing needs.
| Scenario | Stand Security vs. Wall Mount |
|---|---|
| Very Large TVs (75″+) | Wall Mount is superior; provides better stability and viewing angle control. |
| Small or Narrow Furniture | Wall Mount is safer; prevents the TV from hanging over the edge. |
| High Traffic Areas (Kids/Pets) | Wall Mount is the safest option, eliminating all ground-level tipping risk. |
| Desire for Swivel/Tilt | Specialized Articulating Wall Mounts offer the best movement. |
| Renting/No Drilling Allowed | Securing to the original stand is the only non-permanent option. |
Frequently Asked Questions (FAQ) About Securing TVs
Q1: Do I need to use the washers or spacers that came with the mount kit?
A: Yes, if your TV manufacturer provided them or if the included bolts are too long. Spacers prevent the mounting screws from pressing too hard on the back casing of the TV, which can damage internal components. Always use them if the bracket doesn’t sit perfectly flat against the back of the TV.
Q2: What happens if I tighten the screws too much?
A: Overtightening can strip the metal threads inside the TV casing, meaning the screws won’t hold securely anymore. In severe cases, excessive pressure can crack the plastic housing around the VESA mounts. Always stop tightening once you feel firm resistance.
Q3: My TV stand is from a different manufacturer than my TV. Will it fit?
A: Only if both pieces adhere to the VESA standard and the stand’s receiving plate matches your TV’s VESA hole pattern (e.g., both are 400×400). If the patterns do not match, you must use the mounting brackets provided with the stand, or buy a universal mount kit that adapts between the two standards.
Q4: Should I secure the TV to the stand even if I have a small TV (under 32 inches)?
A: Absolutely! While smaller TVs are less likely to cause major injury, they are often easier for toddlers to pull down. Safety practices should apply to all electronics. It takes mere minutes to secure a small TV, and it’s worth the effort.
Q5: How tight should the final locking screws be that attach the bracket to the pillar?
A: These screws are critical for preventing vertical movement. They should be tightened until they are very firm, ensuring there is no gap between the bracket and the pillar. However, treat them like the TV bolts—snug, but do not strip the threads, as these are often smaller than the main connection bolts.
Q6: Can I use wood screws instead of the provided mounting bolts?
A: No, never substitute hardware. The provided bolts are precisely engineered for the specific depth and thread pitch required for your TV’s casing. Using the wrong screws can cause internal damage or lead to the TV falling off the stand later.
Conclusion: Enjoying Your Newly Stabilized Setup
You did it! You’ve successfully moved past the worry of an unstable television. By taking the time to identify your VESA pattern, choose the right hardware, and follow the step-by-step process of securing the brackets to the TV and then the TV firmly onto the stand pillar, you’ve made your entertainment center significantly safer. Remember, DIY confidence comes from preparation and following instructions carefully. Now, you can enjoy your favorite shows, knowing that your big-screen investment is solid, stable, and ready for years of worry-free viewing. If you ever decide to upgrade or move again, you’ll know exactly how to handle the mounting process like a seasoned pro!


