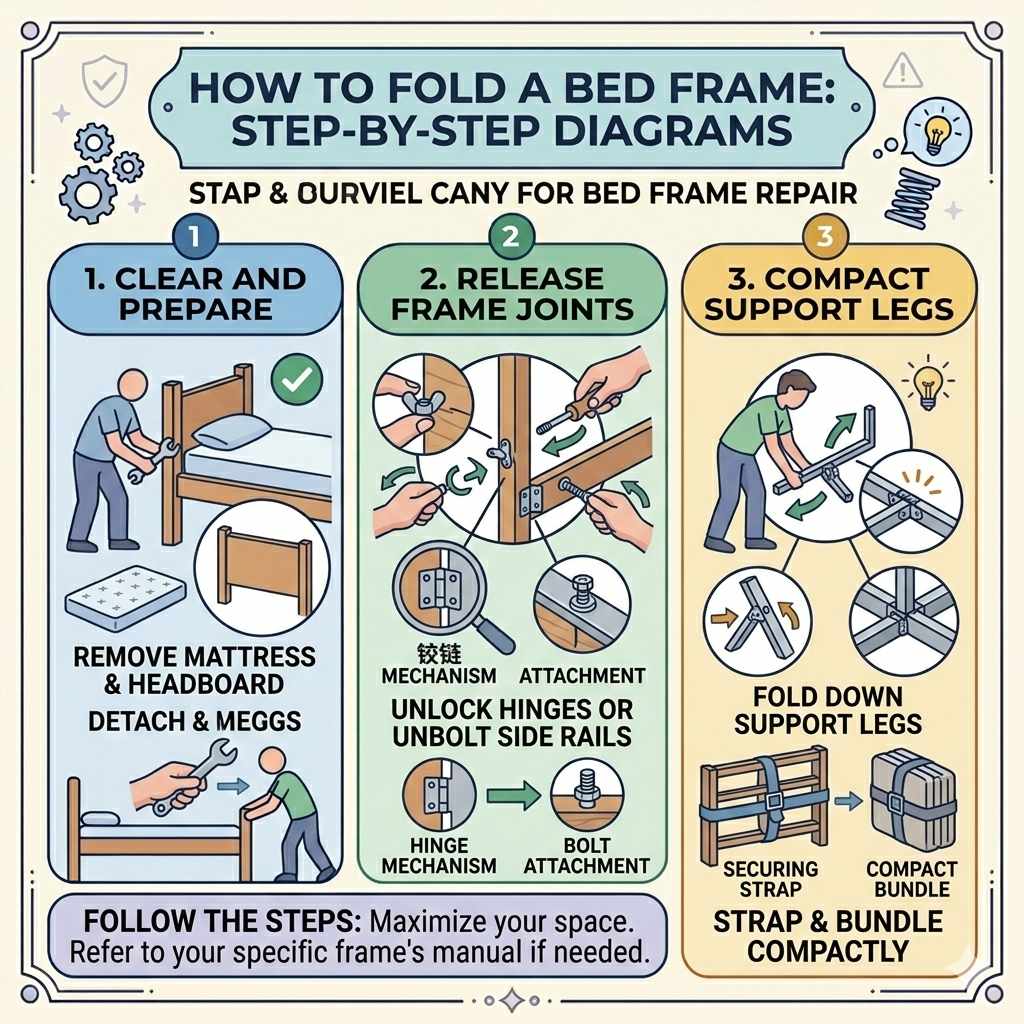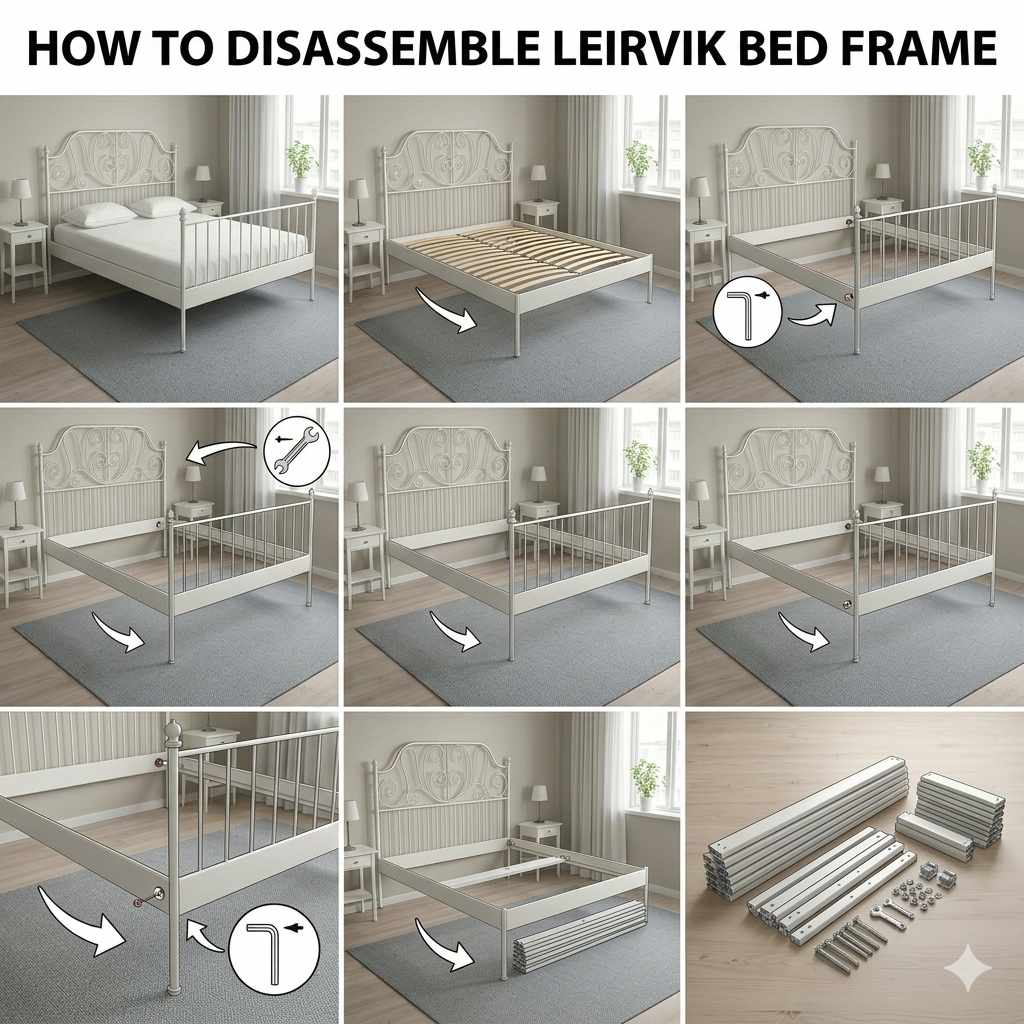
Disassembling your IKEA Leirvik bed frame is straightforward if you follow a few simple steps. First, remove the mattress and slats, then systematically unscrew the main frame bolts, separating the headboard, footboard, and side rails. Keep hardware safe to ease reassembly later.**
Moving day can be tough, especially when you face bulky furniture. That big, sturdy IKEA Leirvik bed frame often seems impossible to take apart. You might worry about stripping screws or snapping those important pieces. Don’t sweat it! We’ve been there. Taking furniture apart doesn’t require a massive toolbox or a degree in engineering. It just takes a little patience and knowing where to look for those hidden fasteners. This guide will walk you through every step to safely and cleanly break down your Leirvik bed, making your move much smoother. Let’s get your bed ready for its next trip!
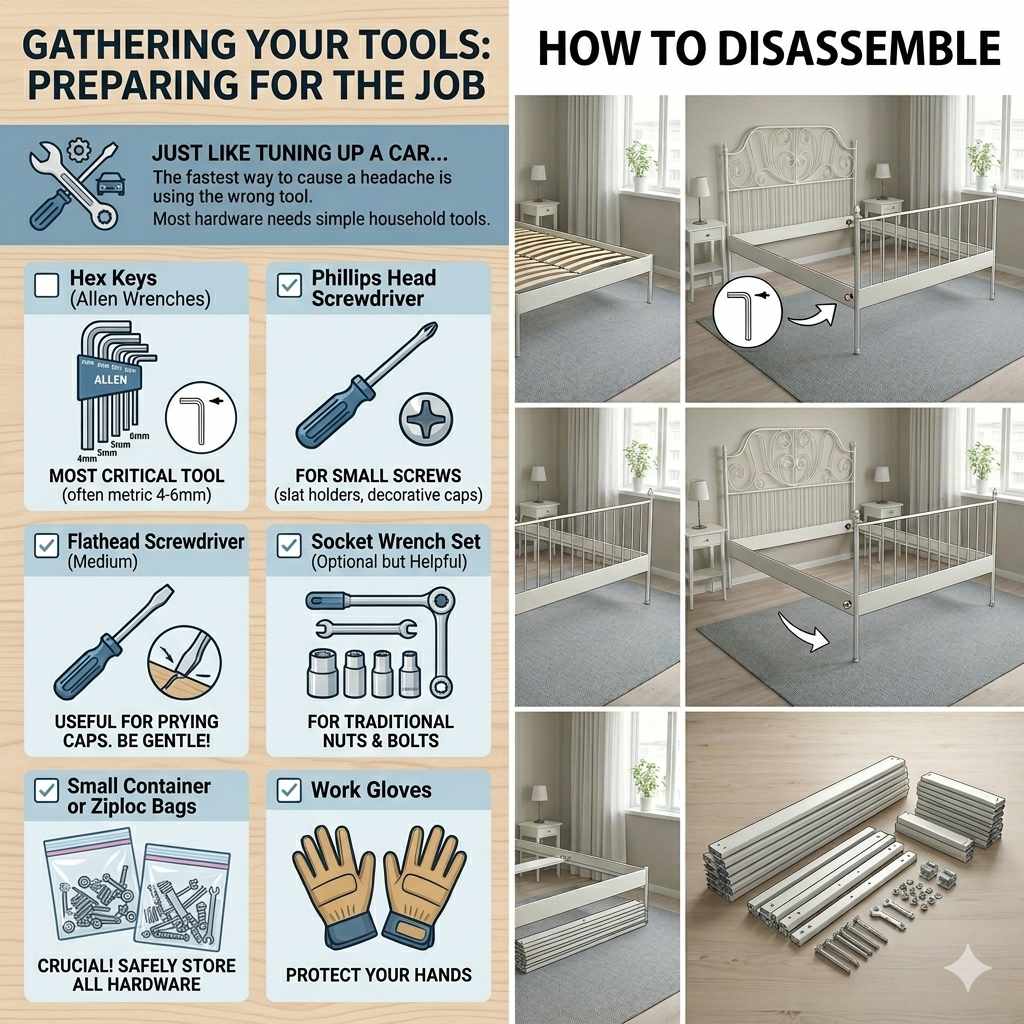
Gathering Your Tools: Preparing for the Job
Just like tuning up a car, you need the right tools before you start any disassembly job. Using the wrong tool—like trying to force a flathead screwdriver into a Phillips screw—is the fastest way to strip a bolt and cause a headache. For the Leirvik frame, you likely won’t need heavy machinery. Most of the hardware is designed to be managed with simple household tools.
The Essential Tool Checklist
Before you touch that frame, make sure these items are handy. Having them ready prevents frustrating trips back to the garage mid-job.
- Hex Keys (Allen Wrenches): This is the most critical tool for IKEA furniture. The Leirvik typically uses standard metric sizes, often 4mm, 5mm, or 6mm. Check if your original IKEA assembly tools are still around—they are usually the best fit.
- Phillips Head Screwdriver: Needed for any small screws holding slat holders or decorative caps.
- Flathead Screwdriver (Medium Size): Useful for prying off decorative plastic caps that hide bolt heads. Be gentle here!
- Socket Wrench Set (Optional but Helpful): If your frame uses traditional nuts and bolts instead of just hex screws, a small socket set can speed things up.
- Small Container or Ziploc Bags: Crucial! You must safely store every single screw, cam lock, and dowel rod.
- Work Gloves: To protect your hands from sharp edges or splinters if the wood is rough.
Step 1: Clear the Area and Remove Bedding
Safety starts with a clean workspace. You need room to maneuver the large headboard and side rails without tripping over stray tools or bumping into nearby walls. Think of this like staging your spot before an oil change—everything needs to be accessible.
Tidy Up the Setup
- Remove Mattress and Box Spring/Foundation: Carefully lift the mattress off the frame entirely. Do this with a helper if possible; these things are heavy. Set the mattress somewhere flat and protected.
- Remove Slats or Support System:
- If you have wooden slats: They usually rest on plastic or fabric holders attached to the side rails. Gently lift the entire slat assembly out of the frame.
- If you have a solid base: Look for screws holding the base into the side rails. Remove these screws and set the base aside.
- Check for Hidden Hardware: Sometimes, small brackets or mounting plates are hidden underneath the frame rails. Give the perimeter a good sweep with your hand to check for anything loose before you start taking major components apart.
Step 2: Locating and Identifying Fasteners
The trick to disassembling any flat-pack furniture, including the Leirvik, is knowing what kind of fastener you are dealing with. IKEA often uses two main types: locking bolts (cam locks) and simple hex screws. Identifying them now prevents confusion later.
Understanding IKEA Hardware
The Leirvik frame primarily connects the legs, headboard, and side rails using robust metal hardware designed for stability. Here is what you will look for:
| Hardware Type | How to Identify | Disassembly Tool |
|---|---|---|
| Hex Bolts (Allen Screws) | Visible screw heads requiring an internal socket to turn. Common on main joints. | Hex Key (Allen Wrench) |
| Cam Locks and Posts | A metal peg (post) screws into one piece, and a circular housing (lock) receives the peg in the adjoining piece. | Screwdriver (to turn the locking mechanism) |
| Wooden Dowels | Small wooden pins used for alignment, not structural holding. | Gently pulling or wiggling apart. |
Step 3: Removing Decorative Caps and Covers
IKEA often hides the main connection points to give the frame a seamless look. These caps must come off first to access the screws underneath. This step requires a gentle touch.
Pro Tip: Avoiding Scratches
When prying off caps, especially plastic ones, always place a thin cloth (like an old t-shirt scrap or microfiber towel) between your screwdriver tip and the frame material. This acts as a buffer and keeps your nice white frame looking pristine for reassembly.
- Find any visible plastic plugs or caps where the headboard meets the side rails or where the footboard attaches.
- Use your flathead screwdriver or the edge of a thin, sturdy plastic tool (like a guitar pick or plastic trim removal tool) to gently lift the edge of the cap.
- Once you have a slight gap, ease the cap off. If it pops off easily, great! If it resists, double-check if there is a retaining screw underneath it first.
Step 4: Detaching the Side Rails from the Headboard and Footboard
This is the heaviest part of the process. The side rails carry most of the weight and securely link the two vertical ends (headboard and footboard). It is highly recommended to have a partner for this stage.
The Disconnection Procedure
- Identify Connection Points: Stand the headboard upright. Locate where the long side rails connect. Usually, there are two to three major connection points per rail (top, middle, bottom).
- Access the Bolts: If any bolts are visible, use the correct size Hex Key to begin turning them counter-clockwise. You only need to loosen them enough so the rail can slide away from the headboard bracket—you might not need to remove the bolt completely if it stays seated in the bracket.
- Dealing with Cam Locks: If you see a circular cam lock (Step 2), use your screwdriver to turn the lock mechanism.
- Turn the lock about a half-turn (180 degrees) until you feel it release tension on the connecting post. The arrow on the lock often needs to point toward the post it secures.
- Once loosened, the rail should start to separate cleanly from the headboard bracket.
- Separate the Rail: With all fasteners loosened, carefully pull the side rail away from the headboard. Use your partner to support the weight of the detached rail so it doesn’t bang against the floor.
- Store Hardware Immediately: As soon as the rail detaches, place all associated screws, dowels, and cam locks into a labeled Ziploc bag—label this “Headboard to Rail Hardware.”
Step 5: Disassembling the Headboard and Footboard (If Necessary)
The Leirvik often comes in two main sections: the headboard assembly and the footboard assembly. If you have a smaller doorway or a tight stairwell, you might need to take these large sections apart further. This step is less common but vital for very tight spaces.
Breaking Down Large Sections
If your headboard or footboard is taller than your anticipated doorway clearance, look closely at the vertical posts.
- Examine the Joints: Most large headboards are made of a central panel sandwiched between two outer posts. Look for screws or bolts entering the end grain of the post into the side of the panel.
- Unlock Decorative Elements: Some decorative top pieces might simply slide onto a groove or be held by wooden dowels hidden under decorative end caps. Remove these caps first.
- Unscrew the Main Braces: Use your Hex Key to remove the bolts holding the outer posts to the inner structure. Work slowly, supporting the section you are loosening so it doesn’t collapse unexpectedly.
- Keep Components Together: If you break down the headboard, bag all hardware and label the bag clearly: “HQ Hardware” (Headboard Quick-release).
Step 6: Dealing with Mid-Support Legs
Don’t forget the centerpiece! Most large beds require a central leg or support beam running underneath for stability—essential for preventing the mattress from sagging in the middle (which can void some mattress warranties). For excellent structural integrity, you need to know how these attach.
Removing Center Supports
The support beam attaches either to the side rails directly or connects the headboard to the footboard via the middle.
- Check where the support feet screw into the rail or beam. These are usually simple machine screws.
- Unscrew the feet. If the support beam itself connects to the headboard/footboard structure, it will usually be secured with one or two large bolts that you already addressed in Step 4. If the beam is simply resting on a ledge inside the frame, it should lift right out once the side rails are removed.
Step 7: Final Check and Packing Strategy
You’ve successfully broken down the frame! Before you load the truck, perform a final check. This is the most important moment for ensuring stress-free reassembly later.
The Golden Rules of Furniture Moving
As a seasoned DIYer, I can’t stress this enough: 90% of reassembly frustration comes from lost or mixed-up hardware. Follow these rules:
- Double-Bag Everything: Place screws, washers, and dowels into sturdy Ziploc bags. Twist-tie the top shut.
- Label Everything Clearly: Use a permanent marker on the bag. For the Leirvik, effective labels might include:
- “Headboard Joint Bolts (6mm)”
- “Side Rail Cam Locks”
- “Footboard Connection Screws”
- Tape Hardware to the Corresponding Piece: Use painter’s tape (which won’t damage the finish) to stick the hardware bag directly onto the piece of wood it belongs to. For example, tape the “Headboard Bolts” bag onto the actual headboard panel.
- Protect the Finish: Wrap the large panels (headboard, footboard, rails) in moving blankets or the original cardboard sheets if you still have them. Stacking them flat is often safer than standing them upright during transport.
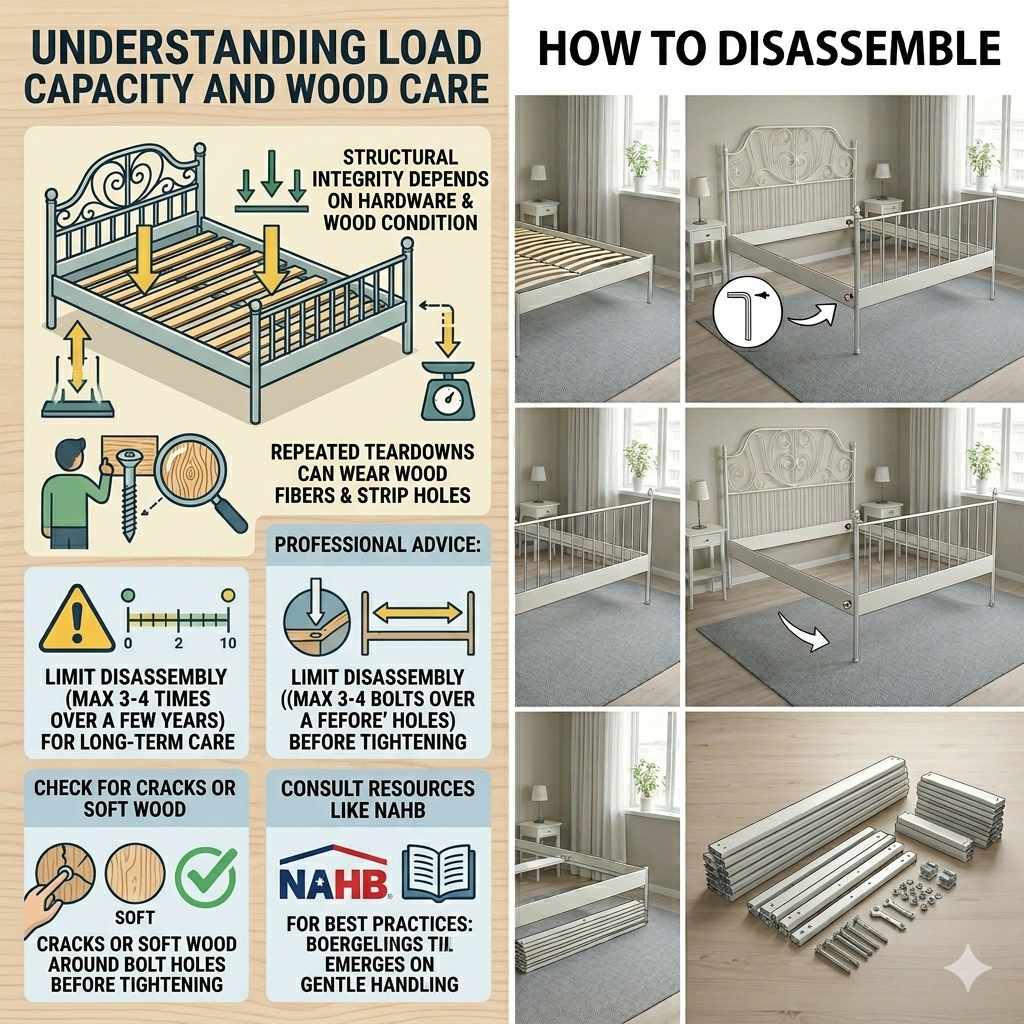
Understanding Load Capacity and Wood Care
When dealing with large furniture like beds, remember that the structural integrity depends on the quality of that hardware. While IKEA furniture is designed to be assembled and disassembled, repeated teardowns can wear out the wood fibers around the screw holes. For long-term furniture care, professionals often advise against taking down large pieces more than a few times over many years. Always check that the wood around the bolt holes isn’t cracked or overly soft before tightening bolts upon reassembly. For more general tips on maintaining wood furniture integrity, resources like those from the National Association of Home Builders (which sometimes cover furniture care best practices) emphasize gentle handling.
Frequently Asked Questions (FAQ) About Disassembling the Leirvik Bed
Q1: Do I need power tools to take apart my Leirvik bed?
A: No, it is strongly recommended that you do not use power drills or drivers. IKEA hardware is often designed to be snug but not overly tight. Power tools can easily strip the soft metal screws or damage the wooden housing. Stick to hand tools like Hex Keys and screwdrivers for control.
Q2: What if I lost the original Allen wrench?
A: Most Leirvik beds use common metric sizes like 4mm, 5mm, or 6mm. Before buying a whole set, try borrowing one from a neighbor or pick up a cheap, multi-sized set from a local hardware store. Ensuring you have the exact right fit is key to preventing stripped screws.
Q3: The side rail won’t come off the headboard, even after loosening the bolts. What’s wrong?
A: The most common culprit is the wooden dowels. After the bolts or cam locks are loose, the rail might be held in place by friction or these alignment dowels. Try gently wiggling the rail side-to-side rather than pulling straight out. If it’s still stuck, ensure both connection points (top and bottom) on that side are fully released.
Q4: Can I disassemble the headboard into smaller pieces for a smaller car?
A: Yes, if necessary. The Leirvik headboard is often composed of a central upholstered panel and two vertical end posts. Look for screws that enter the posts from the inside face of the panel. Removing these allows you to separate the large piece into two or three more manageable sections for transport.
Q5: Should I remove the plastic feet or glides from the bottom of the frame?
A: It depends on how you plan to move it. If you are wrapping the frame tightly, removing the small plastic feet (usually attached with a simple screw) prevents them from snagging or breaking off. Make sure to bag the screws holding these feet on!
Q6: How long should this process take?
A: If you have all your tools ready and work at a steady pace (and have a helper for the large pieces), this usually takes between 30 to 45 minutes for a novice. If you need to search for tools or spend time carefully prying off caps, budget closer to an hour.
Conclusion: Confidence in Your DIY Skills
See? You handled that like a pro. Disassembling the IKEA Leirvik bed frame boils down to methodical disassembly—working piece by piece, identifying the fastener, and keeping everything organized. By prioritizing the removal of the mattress and slats first, addressing the main heavy side rails next, and meticulously bagging every tiny screw, you have ensured that reassembly will be just as smooth as the teardown was.
Remember, furniture moving challenges are temporary. Whether you are moving apartments or just rearranging the bedroom, taking the time now to secure every piece of hardware means you won’t be hunting for a lost cam lock later. Give yourself a pat on the back. You saved time, saved money on professional movers, and maintained the integrity of your furniture. Now that the heavy lifting is over, you are ready for the next phase of your move with confidence under your belt!