
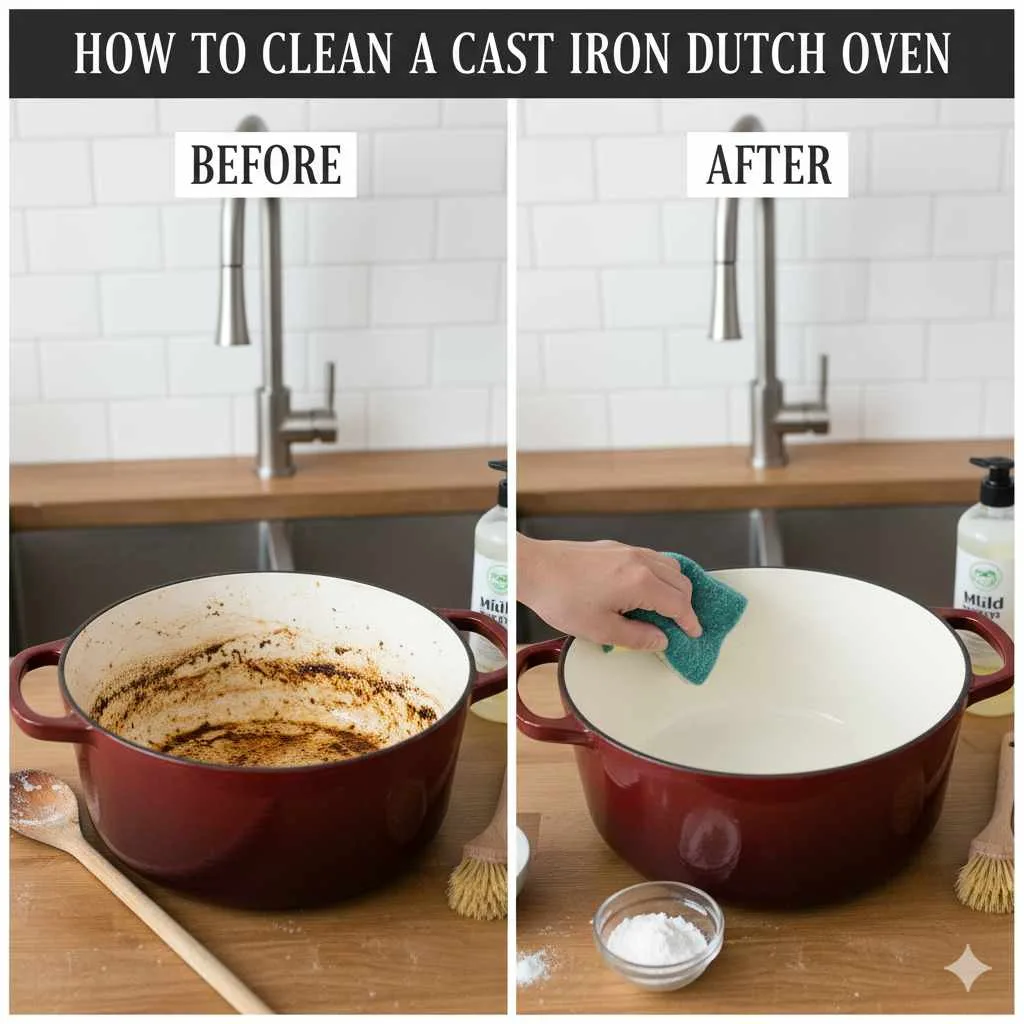
Effortlessly clean your cast iron Dutch oven with this simple, proven method to keep it ready for your next delicious meal.
That beautiful cast iron Dutch oven can be your kitchen’s MVP, making everything from hearty stews to perfectly baked bread. But when it comes to cleaning, a little worry can creep in. You might wonder, “Will I damage it? Will it rust?” It’s a common feeling, but I’m here to tell you that caring for your Dutch oven is much simpler than you think! With a few easy steps, you’ll have it sparkling clean and ready for action, no sweat required. Let’s dive into a method that’s both effective and totally beginner-friendly.
Why Your Cast Iron Dutch Oven Needs Special Care
Cast iron cookware, especially a Dutch oven, is unique. Unlike stainless steel or non-stick pans, it has a special relationship with its seasoning. This ‘seasoning’ is essentially a layer of polymerized oil bonded to the metal. It’s what makes your Dutch oven naturally non-stick and protects it from rust. When you clean your Dutch oven, the goal is to remove food scraps effectively without stripping away this precious protective layer. Improper cleaning can lead to rust or a sticky mess, which, trust me, is the last thing we want!
Regularly cleaning and maintaining your cast iron Dutch oven ensures it lasts for generations. It’s an investment piece that, with proper care, will become a cherished heirloom. Think of it as nurturing a cooking companion that only gets better with age and use. The right cleaning techniques help build and maintain that beautiful, non-stick surface, making cooking a joy rather than a chore.

The Golden Rule: Preserve That Seasoning!
Before we get into the nitty-gritty, let’s talk about the most important principle: preserving your cast iron’s seasoning. This is what makes cast iron so special. It’s a natural, chemical-free non-stick coating that improves with use. Harsh scrubbing, abrasive cleaners, and the dishwasher are the ultimate enemies of this seasoning. So, our cleaning method will be gentle yet effective, focusing on removing residue while protecting that hard-earned layer of polymerized oil.
Think of it like tending to a garden. You want to remove weeds and debris, but you don’t want to dig up the healthy soil. Similarly, we want to remove food bits but leave the seasoned surface intact. This is the secret to a Dutch oven that’s always ready to perform its culinary magic.
What You’ll Need for Effortless Cleaning
Gathering your supplies beforehand makes the cleaning process smooth and quick. You don’t need much – just a few basic items readily available in most kitchens. Having everything ready means you can tackle the cleanup right after cooking, which is actually the best time to clean your Dutch oven.
- Warm Water: Your primary cleaning agent.
- A Stiff Brush or Non-Scratch Sponge: For gently scrubbing away stuck-on food. Avoid steel wool or overly abrasive scrubbers, as they can damage the seasoning. A dedicated cast iron brush is a great investment.
- A Flat-edged Spatula or Scraper (Optional): For stubborn, caked-on bits. A plastic or nylon one is best to avoid scratching.
- A Clean Dish Towel or Paper Towels: For thorough drying.
- Cooking Oil (Vegetable, Canola, or Flaxseed): For re-seasoning.
- Heat Source (Stovetop or Oven): To dry and re-season the oven.
The Proven Effortless Method: Step-by-Step
Here’s the simple, no-fuss method that guarantees a clean Dutch oven without harming its seasoning. Follow these steps, and you’ll be a cast iron cleaning pro in no time!
Step 1: Clean While Warm (But Not Piping Hot!)
Timing is key! The best time to clean your Dutch oven is shortly after you’ve finished cooking, while it’s still warm. This prevents food from hardening and becoming difficult to remove. However, let it cool down enough so you don’t burn yourself or cause thermal shock (sudden temperature changes that can crack the iron).
Just a few minutes of cooling is usually sufficient. You should be able to handle it with an oven mitt or towel without discomfort. This warm state makes food residue much easier to loosen.
Step 2: Rinse and Scrape Away Food Bits
Place your warm Dutch oven under running warm water. Use your stiff brush or non-scratch sponge to gently scrub away any food particles. For most messes, warm water and a little elbow grease will do the trick. If you have some seriously stuck-on bits, a gentle scrape with a flat-edged spatula (plastic or nylon is best!) can help lift them without doing damage.
If you’re dealing with a particularly stubborn mess, don’t be tempted to use soap. A tiny drop of mild dish soap can be acceptable occasionally on a very well-seasoned pan, but it’s generally best to avoid it entirely, especially when you’re starting out. For most situations, warm water is all you need. You might be surprised at how effective it is!
Step 3: Tackle Stubborn Residue (If Necessary)
For those rare occasions when food is really baked on, you have a few options that are still kind to your seasoning:
- Simmer Water: Fill your Dutch oven with about an inch of water and place it on the stovetop over low heat for a few minutes. This will help loosen hardened food. Then, try scrubbing again with your brush.
- Salt Scrub: For really tough spots, pour a generous amount of coarse salt (like kosher salt) into the warm Dutch oven. Use a paper towel or sponge to scrub the salt around. The salt acts as a gentle abrasive. Rinse thoroughly afterward.
Remember, the goal is to coax the food off, not to blast it with abrasive force. Patience here will be rewarded with a happy Dutch oven.
Step 4: Rinse Thoroughly
Once all the food residue is gone, give your Dutch oven a final rinse with warm water. Make sure to rinse away any lingering bits of food or salt if you used the salt scrub method.
A clean rinse ensures no residue is left behind that could burn onto the surface during the drying and re-seasoning steps. This is also your last chance to check for any missed spots before moving on.
Step 5: Dry It Completely (Crucial!)
This is perhaps the most important step in preventing rust. Cast iron can rust very quickly if left wet. Never put your Dutch oven in the dishwasher. After rinsing, immediately dry it thoroughly with a clean dish towel or paper towels. Get into all the nooks and crannies.
To ensure it’s bone dry, place the clean (and now towel-dried) Dutch oven back on the stovetop over low heat for a few minutes. This gentle heat drives off any residual moisture that your towel might have missed. You’ll likely see a faint wisp of steam – that’s good! It means all the dampness is evaporating.
Step 6: Apply a Thin Layer of Oil (Re-seasoning)
Once the Dutch oven is completely dry and still warm, it’s time for a light re-seasoning. This step replenishes the protective oil layer and keeps your seasoning in top shape. Pour a small amount of cooking oil (about a teaspoon) into the oven. Use a paper towel to spread a very thin, even layer of oil all over the entire inside surface of the Dutch oven. You want it to look slightly shiny, not greasy or pooled.
Wipe away any excess oil. The goal is a microscopic layer; too much oil will become sticky and gummy as it heats. Imagine you’re just giving it a light polish. This quick ‘maintenance seasoning’ after each wash is a game-changer for keeping your cast iron in its best condition. For more in-depth re-seasoning tips, you can refer to resources like NIST’s guide on cast iron care, which emphasizes the importance of proper seasoning.
Step 7: Store Properly
Store your clean, dry, and lightly oiled Dutch oven in a dry place. If you have a lid, place a paper towel layer between the lid and the pot to prevent moisture from getting trapped and to protect the surfaces. Avoid storing it in humid environments.
A dry storage space is essential to prevent rust from forming. If you live in a particularly humid climate, consider using a dehumidifier in your kitchen or storage area, or ensure your Dutch oven is exceptionally well-dried before storing.
Important “Don’ts” for Cast Iron Dutch Oven Cleaning
To ensure your Dutch oven stays in pristine condition, there are a few things you should absolutely avoid. These are the quickest ways to damage its seasoning or cause rust.
- Never put it in the dishwasher: The harsh detergents and prolonged wetness will strip the seasoning and likely cause rust.
- Avoid harsh scrubbing pads: Steel wool, abrasive sponges, and metal scouring pads can scratch and remove the seasoned layer.
- Don’t soak for extended periods: Leaving water in cast iron for too long is a recipe for rust. Clean and dry it promptly.
- Never use strong detergents or cleaners: Most will break down the polymerized oil layer. Stick to warm water and gentle methods.
- Don’t let it air dry: Always dry it thoroughly with a towel and then heat it to be absolutely sure it’s moisture-free.
When to Re-Season Your Dutch Oven
While daily light seasoning after cleaning is great maintenance, there are times when a full re-seasoning is necessary. You’ll know it’s time if you notice any of the following:
- Dull, Dry Patches: Your Dutch oven should have a slight sheen from the seasoning, not look dull or chalky.
- Food Sticking Excessively: If your non-stick surface seems to be failing, the seasoning might be wearing thin.
- Rust Spots: Rust means the seasoning has failed in that area, and re-seasoning is required to protect the metal.
- After Using Mild Soap (Occasionally): If you’ve had to use a tiny bit of soap for a stubborn mess, a quick re-season afterwards is wise.
A full re-seasoning involves coating the entire oven thinly with oil and baking it in the oven at a high temperature (usually 400-450°F or 200-230°C) for about an hour. Repeat this process a few times for a robust seasoning. Many manufacturers, such as Lodge Cast Iron, offer detailed guides on this more intensive process.

Table: Cleaning Challenges and Solutions
Here’s a quick reference for common cleaning hiccups and how to solve them:
| Problem | Solution | Why it Works |
|---|---|---|
| Slightly Stuck-on Food | Warm water and a stiff brush. Gentle scraping if needed. | Warmth and mild abrasion lift residue without harming seasoning. |
| Stubborn, Baked-on Food | Simmer water inside the pot, then scrub. Or use a coarse salt scrub. | Moisture or safe abrasive loosens tough bits. |
| Sticky Residue | Scrape thoroughly with a spatula, then re-season with a thin oil layer and heat. | Reapplying oil and uniform heating helps create a smooth, protective surface. |
| Rust Spots | Scrub rust away (you might need fine steel wool just for the rust spot), rinse, dry thoroughly, and then perform a full re-seasoning. | Removes damaged metal & rebuilds protective seasoning. |
FAQs About Cleaning Cast Iron Dutch Ovens
Q1: Can I use soap to clean my cast iron Dutch oven?
As a general rule, it’s best to avoid soap. Modern dish soaps are less harsh than older lye-based soaps, so a tiny drop on a well-seasoned pan might be okay if absolutely necessary, but it’s best to stick to warm water. If you do use soap, always re-season afterwards.
Q2: How do I know if my Dutch oven is seasoned?
A well-seasoned cast iron Dutch oven will have a smooth, slightly glossy, dark surface. It will also be naturally non-stick, meaning food slides off easily. If food sticks consistently or the surface looks dull and rough, the seasoning may need strengthening.
Q3: What should I do if I see rust on my Dutch oven?
Don’t panic! Rust is treatable. Gently scrub the rusty spots with a fine steel wool or a stiff brush. Then, wash, dry thoroughly, and perform a full re-seasoning process (coating with oil and baking in the oven). This should remove the rust and re-establish protection.
Q4: How often should I re-season my Dutch oven?
Daily light re-seasoning after each cleaning is recommended for maintenance. A full re-seasoning is needed only when the existing seasoning appears damaged, dull, or food starts sticking excessively. This might be a few times a year, depending on your usage.
Q5: Can I boil water in my cast iron Dutch oven to clean it?
Yes, boiling water is a great way to loosen stubborn bits of food. Just be sure to do it for a short period and then proceed with gentle scrubbing while the pot is still warm. Always dry thoroughly afterward to prevent rust.
Q6: Is it okay to leave food in my Dutch oven overnight?
It’s best not to. Leftover acidic foods, in particular, can break down the seasoning over time. It’s always ideal to clean your Dutch oven as soon as possible after cooking and cooling.
Conclusion: Your Cast Iron Companion for Years to Come
See? Caring for your beloved cast iron Dutch oven is far from intimidating. By following this simple, proven method – warm water, gentle scrubbing, immediate and thorough drying, and a light oil application – you’ll not only keep it clean but also nurture its essential seasoning. This consistent care ensures your Dutch oven remains your reliable, naturally non-stick kitchen workhorse, ready to create countless delicious memories for years, even decades, to come. Embrace the beauty and functionality of cast iron; it truly is a treasure that rewards your simple efforts with incredible culinary results and lasting value. Happy cooking and happy cleaning!


