
Building a wall bookcase is easier than you think! This step-by-step guide breaks down exactly how to build a sturdy, custom wall bookcase using basic tools. We focus on simple construction methods so you get a beautiful storage solution without the headache.
Are your books taking over every flat surface in your home? Maybe you dream of that streamlined, built-in look you see in magazines, but the thought of major construction feels overwhelming. Don’t worry! Installing a simple, strong wall bookcase is one of the most rewarding DIY projects. It saves floor space and looks fantastic. Many homeowners think this requires advanced carpentry skills, but mastering the basics makes it totally achievable. By the time we are done, you will have the know-how to put up a custom bookcase safely and securely. Let’s dive into the essential steps for this beginner-friendly build.
Getting Started: Pre-Planning Your Wall Bookcase Project
Before we grab a single tool, a good plan saves a lot of headaches later. Think of this like checking your oil level before a long road trip—it ensures everything runs smoothly. Planning covers where it goes, how big it should be, and what materials will hold up the weight of your heaviest hardcovers.
Choosing the Perfect Location
Where you put your bookcase matters for both looks and stability. You want a spot that gets used but doesn’t block major pathways.
- Check for Wiring and Pipes: Never drill into a wall without confirming what’s behind it! Use a reliable stud finder that detects voltage and metal. Hitting a live wire is dangerous, and striking a water pipe turns a fun project into an expensive disaster. If you aren’t sure how to check, look into resources on safe home electrical practices, like those provided by utility safety organizations.
- Wall Stud Location: Bookcases must anchor into wall studs (the vertical wooden framing inside your walls). Measure where your studs are located before you decide on the width of your unit. Standard spacing is often 16 inches center-to-center, but always check your specific wall.
- Room Flow: Ensure the depth of the bookcase won’t interrupt doorways or seating areas. A standard depth for book storage is 10 to 12 inches.

Deciding on Design and Materials
For beginners, we recommend a straightforward ‘box’ design that screws directly into the studs, often called a “recessed” or “alcove” style if done between two existing walls, or a simple “freestanding but secured” unit. We will focus on building sturdy shelves into existing wall framing.
Material Choice: The Backbone of Your Bookcase
The weight of books adds up fast. We need materials that won’t sag or bow over time. Never use flimsy particleboard for load-bearing shelves!
| Material Type | Pros (Why it’s Good) | Cons (Things to Watch Out For) |
|---|---|---|
| ¾-inch Plywood (Cabinet Grade) | Very strong, resists sagging, takes paint/stain well. The best choice for DIY. | More expensive than MDF; requires an edging treatment if you want a clean look. |
| MDF (Medium Density Fiberboard) | Very smooth, excellent for painting, usually cheaper. | Heavy, sags easily under the weight of books unless supported every 16–20 inches. |
| Solid Wood (Pine/Poplar) | Looks premium, can be sanded easily. | Most expensive, can warp slightly if humidity changes dramatically. |
Tools and Supplies Checklist
Being prepared means you won’t be hunting for a measuring tape halfway through. Keep your tools organized in a nearby container. For this build, we focus on reliability and safety. Remember, good tools make the job easier!
Essential Tools You Will Need
These are the workhorses for putting up a secure wall unit:
- Stud Finder: Non-negotiable for safety and structural integrity.
- Tape Measure and Pencil: Measure twice, cut once!
- Level (Torpedo and 4-Foot): Crucial for making sure your shelves aren’t slanted.
- Power Drill/Driver: For drilling pilot holes and driving screws.
- Circular Saw or Miter Saw: For cutting your plywood/lumber to length (many home improvement stores will make straight cuts for you if you bring dimensions).
- Clamps: To temporarily hold pieces in place while you screw them together.
- Safety Gear: Safety glasses and hearing protection are must-haves.
Required Hardware and Supplies
For a standard 8-foot tall bookcase anchored to studs, you will need these basic parts:
- ¾-inch Cabinet-Grade Plywood (for sides, top, bottom, and shelves).
- Finishing Nails or Wood Screws (3-inch, structural screws for attaching the main frame to the studs).
- Wood Glue (High-quality PVA wood glue dramatically increases strength).
- Optional: Backing material (¼-inch plywood or hardboard).
Step-by-Step Construction: Building Your Bookcase Frame
We are going to build the main box structure first. This process relies on creating strong butt joints—where one piece of wood simply butts up against another—held together by glue and screws driven into pilot holes.
Step 1: Measuring and Cutting Your Pieces
If you purchased large sheets of plywood, now is the time to cut the pieces for the basic box. A simple bookcase has four main components for the outer shell:
- Two Vertical Side Pieces (the height of your bookcase).
- One Top Piece.
- One Bottom Piece.
Critical Tip on Dimensions: When calculating the length for your top and bottom pieces, remember that the shelves will sit between the two side pieces. You must subtract the thickness of the two side pieces (e.g., 2 x ¾ inch = 1.5 inches) from the total desired width of your unit.
Example: If you want the bookcase to be 48 inches wide total, and your sides are ¾-inch thick, the top and bottom pieces should be 48″ – 1.5″ = 46.5″ long.
Step 2: Assembling the Basic Box (The Shell)
This is where the wood glue earns its keep. Always apply a bead of glue to every surface that touches another piece of wood before driving screws.
- Lay one side piece flat on your workbench.
- Apply glue to the end grain of the bottom piece.
- Align the bottom piece flush (perfectly even) with the bottom edge of the side piece. Clamp them tightly.
- Drill pilot holes through the outside of the side piece and into the end of the bottom piece. Pilot holes prevent the wood from splitting, which is crucial for clean results. Look up guides on pilot hole sizing for your specific screw type.
- Drive 3-inch structural screws into the pilot holes, pulling the two pieces tightly together.
- Repeat this process to attach the top piece to the same side piece. You now have a large ‘C’ shape.
- Attach the second side piece using glue, alignment checking with your square, and screws. You now have a sturdy, rectangular box frame.
Step 3: Installing the Backing (For Stability)
A thin piece of ¼-inch plywood or hardboard attached to the back doesn’t just cover the wall; it squares your entire unit, making it exponentially more rigid against side-to-side movement (racking). This is especially important when attaching shelves to studs!
- Lay the assembled box face-down on a clean surface.
- Place your backing material over the back opening. Ensure the frame is perfectly square using a large framing square or by measuring the diagonals—if the diagonal measurements are equal, the box is square.
- Apply wood glue around the entire perimeter where the backing meets the frame.
- Attach the backing using small finishing nails or short screws (about 1 inch long) spaced every 6 to 8 inches around the edges. If you are building this unit recessed between two walls, you will attach the backing directly to the studs later.
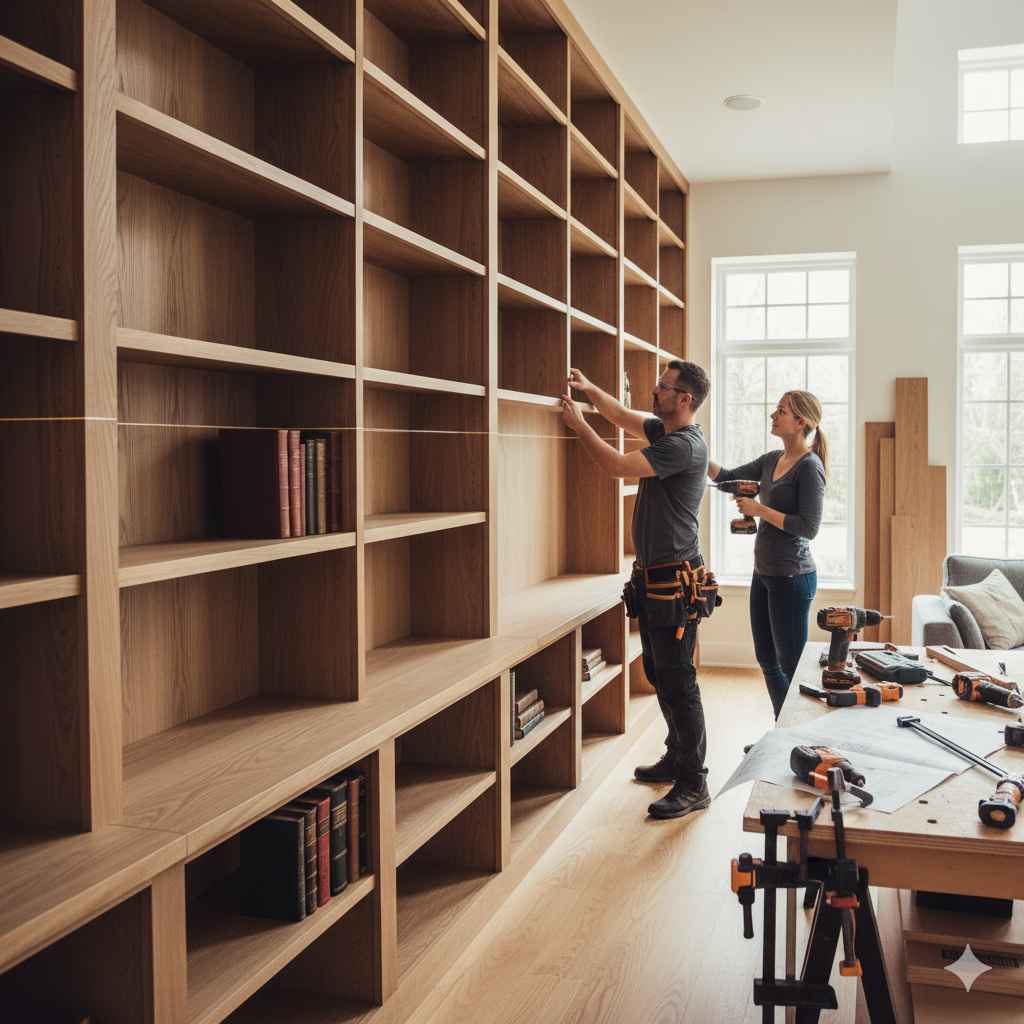
Securing the Bookcase to the Wall Structure
This is the absolute most important step for safety, especially if children might use the unit. A heavy, fully loaded bookcase that tips over is extremely dangerous. We must anchor into the structural wood studs.
Locating and Marking Studs
Take your stud finder and clearly mark the center edge of every stud behind where the bookcase will sit. Use a long level to connect these marks vertically with a pencil line. These lines are essential reference points.
Attaching the Frame
- Carefully move your assembled bookcase frame into its final position against the wall.
- Using the level again, confirm the top of the bookcase is perfectly level side-to-side and front-to-back. Adjust shims underneath the bottom edge if necessary.
- From inside the bookcase (through the empty space where shelves will go), drive long structural screws (3-inch or longer, depending on the wall depth) through the back panel and directly into the center of the wall studs you marked.
- Place screws every 16 to 24 inches vertically, securing both the top and bottom of the unit into the studs. You should use at least two screws per stud location for maximum hold. For extra security, use metal L-brackets or reinforcing straps (often found near construction tie-downs) to secure the top plate directly to the wall framing, following manufacturer instructions.
When finished, give the bookcase a firm shake. It should feel like it is part of the wall. For more details on safe structural fastening, reviewing guidelines from organizations like the U.S. Consumer Product Safety Commission about furniture anchoring can provide extra peace of mind.
Installing the Shelves: The Load-Bearing Elements
The shelves are what hold all those great stories! Because books are heavy, we need to use a strong support system. For a beginner build, the easiest and strongest method is using fixed, screwed-in shelves rather than adjustable pegs.
Shelf Spacing and Fixed vs. Adjustable
If you know you will only store trade paperbacks (shorter books), you can space shelves closer. If you have tall art books or binders, you need more vertical space. Standard spacing is usually 12 to 14 inches of clear vertical space.
Our Recommendation for Strength: Fixed shelves, secured permanently on all four sides (top, bottom, and both sides of the bookcase), carry weight much better than shelves resting on pins.
Step 4: Calculating Shelf Placement
Measure the inside height of your assembled bookcase shell. Subtract the thickness of the top and bottom pieces, and then subtract the thickness of the shelves you plan to use (if you are stacking them). Then, divide the remaining space by the number of shelves you want, plus one (which gives you the number of spaces between shelves).
Example: If your internal height, minus the permanent top/bottom shelf space, is 70 inches, and you want four equally spaced shelves:
- Total height for 5 open spaces: 70 inches.
- Clearance per space: 70 / 5 = 14 inches.
Step 5: Installing Fixed Shelves
Fixed shelves are attached just like your top and bottom pieces—with glue and screws driven through the sides.
- Measure down from the top of the interior space and mark the precise location for the top of your first fixed shelf, making sure the mark is perfectly level across both side panels.
- Cut the shelf pieces. Remember, fixed shelves also sit between the side panels, so they must be shorter than the overall exterior width by 1.5 inches (two times the ¾-inch wood thickness).
- Apply glue to both ends of a shelf piece.
- Slide the shelf into place, clamp it securely, and check it with your level one last time.
- Drill pilot holes through the exterior side panels and into the ends of the shelf. Drive 2.5-inch screws to secure it firmly.
- Repeat for all fixed shelves.
Step 6: Dealing with Sagging (The Secret Weapon)
Even with ¾-inch plywood, a 36-inch span loaded with books can eventually bulge in the middle. To prevent this sag, use shelf supports strategically:
- For Shelves up to 30 inches wide: ¾-inch material should hold fine without extra support if the books are packed reasonably well.
- For Shelves 31 to 40 inches wide: Add a sturdy vertical support piece (a piece of wood, usually 1×2 lumber) glued and screwed directly in the center of the underside of the shelf. This acts as an internal beam.
- For Shelves over 40 inches wide: You need two central supports, dividing the shelf span into three sections.
Finishing Touches for a Professional Look
The structure is up and it’s rock solid. Now we deal with the cosmetic details to give it that expensive, built-in look.
Hiding Hardware and Gaps
This is what separates a garage shelf from a custom bookcase.
- Filling Screw Heads: If you drove screws where they will be covered by trim (like the top or bottom), you can fill the heads with wood putty or bondo designed for wood. Let it dry completely.
- Covering Edge Banding: If you used plywood and the exposed edges look rough, you can iron-on edge banding to seal and smooth the reveals. This is a thin veneer strip that sticks down with heat.
- Caulking Gaps: The area where the bookcase meets the wall and the floor might have small imperfections. Use paintable acrylic latex caulk to fill these seams. This smooth, continuous line makes the unit look perfectly integrated with the existing wall structure. Run a smooth bead, wipe away the excess with a damp finger, and let it cure.
To Paint or To Stain?
The choice depends on your aesthetic and material:
- Staining: Only use stain on solid wood or high-grade furniture plywood where the grain looks attractive. Ensure you use a sanding sealer first for an even finish.
- Painting: Excellent for MDF or standard plywood (especially if you covered the edges). Use a high-quality primer first (a stain-blocking primer is best), followed by two coats of durable interior paint (semi-gloss or satin offers easier cleaning).

FAQ: Beginner Questions About Building Bookcases
Q1: How deep should a bookcase shelf be for standard books?
A: Most standard hardcover books and trade paperbacks fit comfortably on a shelf that is 10 to 12 inches deep. If you plan on displaying very large art books or binders, measure those items first and aim for an inch or two extra clearance.
Q2: Do I absolutely have to use plywood, or can I just use MDF?
A: While MDF is cheaper and smoother for painting, it sags much more easily than quality ¾-inch plywood. If you use MDF, you must support the shelves every 20 inches maximum, usually by adding a wooden support strip underneath the center of the shelf.
Q3: What is a pilot hole and why is it so important to drill one?
A: A pilot hole is a small hole pre-drilled into the wood where you plan to drive a screw. It is important because it allows the screw threads to grab the wood fibers without pushing them apart, preventing the wood from splitting, especially near edges. Always make the pilot hole slightly narrower than the screw shaft.
Q4: How do I ensure my bookcase doesn’t tip over?
A: The number one defense is anchoring securely into the wall studs using long structural screws, as detailed in Step 3. Additionally, keeping heavier books lower down on the shelves lowers the overall center of gravity, making the unit much more stable.
Q5: Can I use simple metal shelf pins instead of fixed shelves?
A: You can, but fixed shelves are significantly stronger for heavy loads like books. Metal pins often allow shelves to bow under the weight. If you must use pins, ensure you use four per shelf (one in each corner) and use a high-quality shelf material that is at least ¾-inch thick.
Q6: What is “racking” and how does adding a backing panel prevent it?
A: Racking is the tendency of a rectangular frame to shift sideways, turning it into a parallelogram. Adding a rigid backing panel (like ¼-inch plywood), and securing that panel to the wall studs, triangulates the structure, making it extremely resistant to that sideways movement.
Conclusion: You Built That!
Congratulations!
Building a wall bookcase is far simpler than most homeowners expect.
With proper planning, accurate measurements, and strong materials, this project becomes completely manageable.
Focusing on structural integrity—like anchoring into studs and using fixed shelves—ensures long-term durability.
Quality plywood, wood glue, and pilot holes make a major difference in strength and stability.
Taking time to square the frame and install backing prevents shifting or sagging over time.
Safety should always come first, especially when securing the unit to the wall.
Once installed, a custom bookcase maximizes vertical space and reduces clutter instantly.
Finishing details like caulk, paint, or stain give it a polished, built-in look.
The result is a sturdy, attractive storage solution tailored exactly to your space.
Follow these steps carefully, and you’ll create a bookcase that’s both functional and built to last.


