

Fasteners are the backbone of everything built, from your car to your home. They are simple, vital hardware items—like screws, bolts, and rivets—used to join two or more objects together securely without permanent welding. Understanding these basic tools boosts your DIY confidence immensely.
If you’ve ever tried to fix something and realized you didn’t know the right thing to hold two metal pieces together, you are not alone. Many new DIYers feel overwhelmed by the sheer choice of hardware in the store. Don’t worry! It’s easier than you think. Fasteners are just specialized connectors designed for specific jobs. Think of them as the unsung heroes keeping your car tight and safe. We are going to break down exactly what they are, why they matter, and how to pick the right one every single time so you can tackle those minor repairs like a pro.
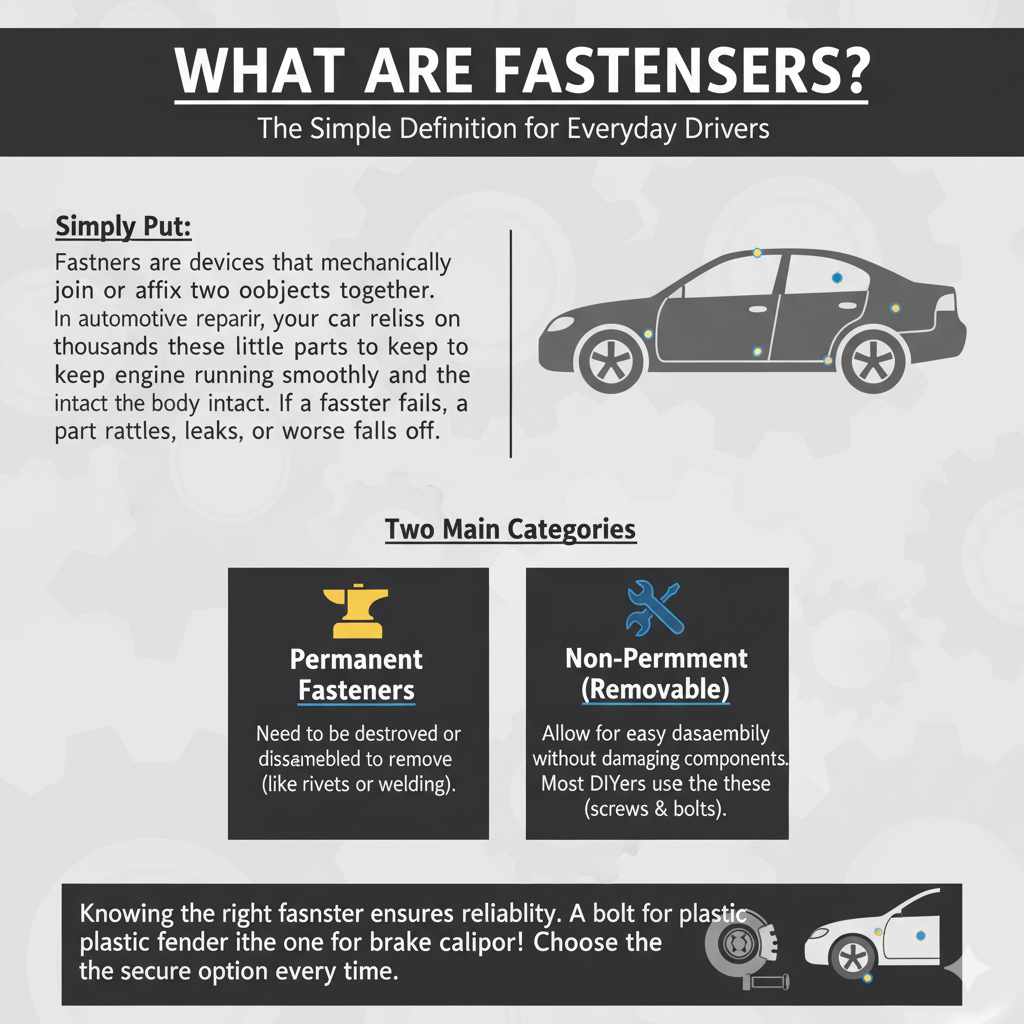
What Are Fasteners? The Simple Definition for Everyday Drivers
Simply put, fasteners are devices that mechanically join or affix two or more objects together. In the world of automotive repair, your car relies on thousands of these little parts to keep the engine running smoothly and the body intact. If a fastener fails, a part rattles, leaks, or worse, falls off.
They come in two main categories, which makes them much easier to grasp:
- Permanent Fasteners: These need to be destroyed or disassembled to remove the parts they hold together (like rivets or welding).
- Non-Permanent (Removable) Fasteners: These allow for easy disassembly without damaging the components or the fastener itself. This is what most DIYers use—think of all the screws and bolts in your car’s interior trim.
Knowing the right fastener for the job ensures reliability. A bolt used to hold a plastic fender liner isn’t the same as one holding your brake caliper in place! We want to make sure you choose the secure option every time.
Why Understanding Fasteners is Essential for Car Care
As a driver, you don’t need to be an engineer, but you do need to know how your vehicle stays together. Good fastening practice means safety and longevity for your ride.
Here are the top reasons why this knowledge matters to you:
- Safety First: Critical components, like those holding your wheels or suspension parts, rely 100% on correct fasteners (usually high-strength bolts). Loose or wrong fasteners lead to dangerous situations.
- Preventing Damage: Using an overly large screw in a small hole, or using the wrong material, can strip threads, crack plastic, or lead to corrosion, creating costly future repairs.
- Easy Maintenance: Most routine maintenance, like changing an air filter or accessing a battery, requires removing and reinstalling non-permanent fasteners correctly.
- Reducing Noise and Vibration: A missing trim clip or loose body bolt translates directly into annoying rattles and squeaks inside your cabin.
For reliable information on bolt strength and handling, you can always reference standards set by organizations like the American Society of Mechanical Engineers (ASME), though we will keep our discussion focused on practical application here.
The Main Types of Automotive Fasteners: A Beginner’s Guide
When you look down at the floor of your garage, you probably see a mix of metal hardware. Let’s break down the most common types you will encounter when fixing things:
1. Screws and Bolts (The Heavy Lifters)
Bolts and screws are king in the mechanical world. They work almost identically: a threaded shaft paired with a matching nut or a pre-tapped hole.
Bolts vs. Screws: What’s the Difference?
It can be confusing, but here is the shortcut:
- Bolts: Usually require a nut to tighten them, and they often have a smooth shank (unthreaded section) under the head. They are generally used for high-load applications, like securing engine mounts.
- Screws: Are designed to thread directly into a material (often metal or wood) or into a pre-existing, non-mating hole. They usually have threads along the entire length.
When looking at the head, you will often see stamped markings that tell you the bolt’s strength grade. For example, some metric bolts have markings like “8.8” or “10.9.” Higher numbers mean stronger metal, which is necessary for safety-critical areas. Never replace a high-grade bolt with a low-grade one—it’s a major safety risk!
2. Nuts and Washers (The Support Team)
Bolts rarely work alone. They need their partners:
- Nuts: These are the female counterpart to a bolt, used to secure the connection by threading onto the bolt end. Common types include hex nuts (standard six-sided) and locking nuts (which have nylon inserts or distorted threads to prevent loosening from vibration).
- Washers: These flat pieces of metal sit between the fastener head (or nut) and the surface. They serve three main jobs: distributing the load over a wider area, preventing surface damage, and sometimes acting as a lock (lock washers).
3. Rivets (The Permanent Fix)
Rivets are permanent fasteners. They consist of a smooth rod (the rivet shank) with a head already on one end. To install them, you place the rivet through holes in the materials, and then use special tools to deform the tail end, creating a second head that locks everything in place. You see them used often in body panel repairs or trailer construction. Removing them usually requires drilling them out.
4. Clips, Pins, and Retainers (The Trim Specialists)
These are the little plastic or metal bits that frustrate us the most during simple jobs. They don’t handle heavy loads, but they are critical for appearance and preventing rattles.
- Body Clips/Push-Pins: These plastic fasteners are pushed into holes to secure things like bumper covers, fender liners, and interior door panels. They are notorious for breaking when removed improperly!
- Cotter Pins: These metal pins are often used in suspension or steering components where a nut must absolutely not spin off. They are inserted through a drilled hole in a bolt or castle-nut combination and then bent open to lock.
- Snap Rings/Retaining Rings: Used internally (like inside transmissions or on axles) to hold bearings or gears in place on a shaft.
The trick to working with clips is having the right removal tool. Don’t use a screwdriver on a plastic clip; use a dedicated trim removal tool to avoid snapping it.
The Importance of Thread Type and Material
This is where the technical side gets practical. Not all threads are created equal, and picking the wrong one guarantees failure.
Thread Pitch and Diameter
Every threaded fastener has two key measurements:
- Diameter: How wide the shaft is (e.g., 1/4 inch or M6 metric).
- Pitch: How far the threads are spaced apart (coarse vs. fine threads).
If you try to put a fine-thread bolt into a coarse-thread hole, you will immediately strip the threads or cross-thread it, which ruins the part. Always match the thread type exactly. When replacing parts, measure the old thread precisely or buy direct OEM replacements.
Material Matters: Strength vs. Corrosion
Fasteners are made from different materials depending on where they live on your vehicle:
- Steel (Standard Grade): Strong and cheap. Used everywhere, often cadmium or zinc plated for basic corrosion resistance.
- Stainless Steel: Excellent resistance to rust, which is why they are great for external parts constantly exposed to water, like exhaust tips or certain brackets. They are generally softer than hardened steel bolts.
- Aluminum: Very light and resistant to corrosion, but much weaker. Used where weight savings are critical or in areas that don’t experience high stress.
- Coated Fasteners: Many factory fasteners use special coatings (like yellow zinc or black phosphate) for enhanced corrosion protection against road salt and weather.
Pro Tip: When you replace a bolt that was coated (like a silver or yellow zinc-plated one), try to replace it with a similarly coated bolt. If you use bare steel in a location exposed to road grime, it will rust and seize much faster.
Torque Specifications: How Tight is Too Tight?
This is perhaps the single most overlooked aspect of fastener safety. Tightening a bolt “as tight as you can” is a recipe for disaster, either through stripping the threads or stretching the bolt past its safe limit.
What is Torque?
Torque is the rotational force applied to a fastener, measured in foot-pounds (ft-lbs) or Newton-Meters (Nm). Manufacturers use specific torque specs to ensure that bolts are tight enough to prevent loosening but not so tight that they stretch or damage the component they are holding.
Why You Need a Torque Wrench
A torque wrench is one of the best investments you can make for car repair confidence. It allows you to apply the exact amount of rotational force required.
When to Use a Torque Wrench: Always! (But Especially Here)
- Whenever you touch critical safety components (e.g., brake caliper bolts, suspension links).
- When installing covers or gaskets (like oil pans or valve covers) where over-tightening crushes the seal.
- When removing and reinstalling wheel lug nuts (critical for road safety).
These specifications are always found in your vehicle’s service manual. Do not guess! For example, lug nuts might require 100 ft-lbs, while a small plastic engine cover screw might only need 50 inch-pounds (a completely different scale!).
Table: Common Fastener Types and Their Typical Automotive Use
This table summarizes where you might see certain fasteners in your daily driving experience:
| Fastener Type | Material Example | Typical Location in a Car | Removable? |
|---|---|---|---|
| Hex Bolt & Nut | Grade 10.9 Steel | Engine mounts, transmission bell housing bolts | Yes (with wrench) |
| Sheet Metal Screw | Zinc-Plated Steel | Securing inner fender liners, plastic kick panels | Yes (with screwdriver) |
| Panel Clip/Push Pin | Nylon Plastic | Door cards, bumper edges, radiator shrouds | Yes (with trim tool) |
| Serrated Flange Bolt | Grade 8.8 Steel | Alternator or A/C compressor mounting brackets | Yes (with wrench) |
| Rivets | Aluminum/Steel | Older body panel repairs, trunk floor attachments | No (must be drilled) |
How to Safely Remove and Replace Foundational Fasteners
Even the simplest task of removing a bolt requires a slight technique to ensure you don’t break something or strip the head. Here is a simple, confident process for handling fasteners:
Step 1: Clean the Area and Assess
Before touching anything, spray any rusty or dirty fastener with a quality penetrating oil (like PB Blaster or a similar product). Let it sit for 15 minutes. This prevents the head from rounding off when you apply force. Visually inspect the fastener head for damage—is it already stripped?
Step 2: Select the Right Tool
This is crucial. Always use a 6-point socket or wrench for tight, rusted fasteners, not a 12-point. A 6-point grips the flats of the head much more securely, reducing the risk of rounding it off. For Philips or flat heads, ensure the screwdriver tip perfectly fills the slot.
Step 3: Apply Force Correctly (The Removal Process)
When loosening, turn counter-clockwise (lefty-loosey). For bolts that are stuck, apply steady, increasing pressure. If it won’t budge, try tightening it just a fraction of a turn first—this can sometimes break the rust seal—then immediately try loosening it again.
Step 4: Managing Removed Fasteners
Never toss removed bolts into a pile!
- Keep Them Organized: As you remove parts, place the fasteners for that section into a labeled zip-top bag or an egg carton. Note which bolt came out of which exact hole.
- Inspect Threads: Run the bolt through a thread tap (if you have one) or at least run the nut onto the bolt 2-3 times to clean out any dirt or debris. This ensures it seats correctly when you reinstall it.
- Check for Damage: If the bolt head is rounded, the threads are stripped, or the bolt shank is significantly stretched (you can feel it’s thinner or longer than a new equivalent), replace it! Do not reuse critical bolts.
Step 5: Installation and Torquing (The Reassembly Process)
When putting the part back, always start all fasteners by hand (finger tight) first. This prevents cross-threading. Once they are all seated, follow the manufacturer’s torque sequence (often a criss-cross pattern) and tighten them according to your service manual using that torque wrench.
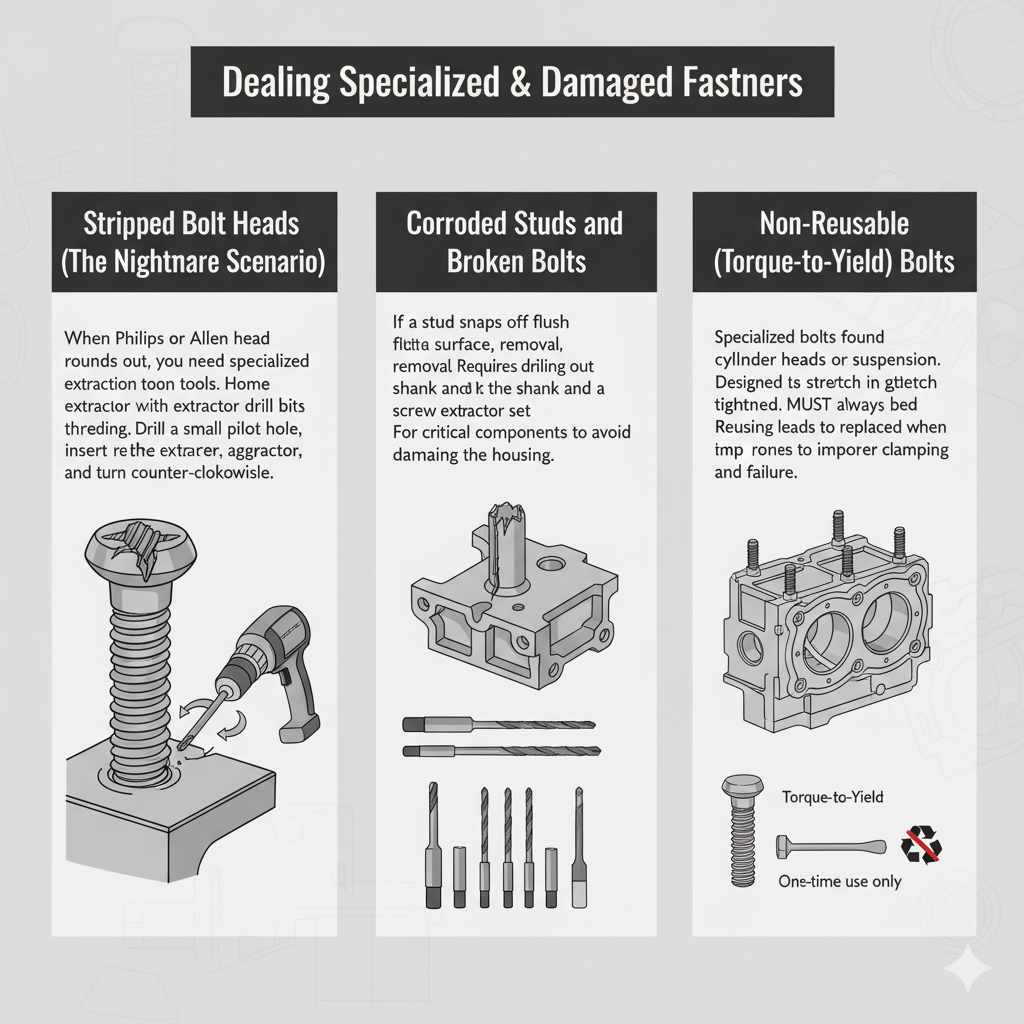
Dealing with Specialized and Damaged Fasteners
Sometimes, you run into fasteners that refuse to cooperate or are designed to be tricky.
Stripped Bolt Heads (The Nightmare Scenario)
When a Philips or Allen head rounds out, you need specialized extraction tools. The most popular method for home garages involves using specific “extractor” drill bits. These bits have reverse, aggressive threading. You drill a small pilot hole into the center of the stripped screw, insert the extractor, and it bites in as you turn it counter-clockwise. This is a lifesaver for interior panel screws.
Corroded Studs and Broken Bolts
If a stud (a bolt without a head, often found on exhaust manifolds) snaps off flush with the surface, removal is much harder. This usually requires drilling out the entire shank and potentially using a screw extractor set designed for deep placement. For significant breakage involving critical components, sometimes it’s best to take it to an experienced technician to avoid damaging the housing itself.
Non-Reusable (Torque-to-Yield) Bolts
These are specialized bolts, often found holding things like cylinder heads or certain suspension components. They are designed to stretch when tightened to a specific torque reading, and they must always be replaced when removed. Reusing them will lead to improper clamping force and likely component failure. They are engineered for one-time use only.
Basic Tool List for Fastener Work
You don’t need a massive toolbox, but you need the right foundation to tackle most common tasks safely.
| Essential ToolUse CaseBudget Tip | ||
|---|---|---|
| Socket & Ratchet Set | Removing and installing 90% of bolts | Start with a mid-range chrome set for general use. |
| Torque Wrench (Ft-Lb / In-Lb) | Ensuring proper tightness on all critical bolts | Buy a reliable beam or click-type torque wrench; don’t skimp here. |
| Penetrating Oil | Loosening rust/seized connections | Any quality penetrating spray works well. |
| Screwdriver Set (Philips/Flat) | Light-duty screws and panel clips | Ensure the tips are sharp and undamaged. |
| Trim Removal Tools | Removing plastic clips without breaking them | Plastic tools are inexpensive and save you money on replacement clips. |
| Vise Grips/Locking Pliers | Holding onto small, stubborn bolts or nut heads | A good quality set provides a reliable grip. |
Frequently Asked Questions (FAQ) About Fasteners
Q1: Can I reuse any bolt or screw I take out of my car?
A: Generally, most standard bolts and screws can be reused if they are in good shape. However, you must always replace bolts specified as “torque-to-yield” (often for engine components) or any bolt that looks stretched, corroded, or stripped.
Q2: What is the best way to stop bolts from rattling loose?
A: Use the correct locking hardware. For high-vibration areas, consider using Nylon insert lock nuts, thread-locking adhesive (like Loctite—check compatibility with your materials), or fiber lock washers.
Q3: What is the difference between metric and standard (SAE) size
A: Metric fasteners are measured in millimeters (mm) and are commonly used in most modern vehicles, especially those made in Europe and Asia. Standard or SAE fasteners are measured in inches and are often found in older American vehicles and equipment. The key difference is the measurement system and thread spacing, so using the wrong type can damage the threads. Always match the exact size and system when replacing a bolt or screw.
Q4: How do I know if a fastener is too worn to reuse?
A: A fastener should be replaced if you notice stripped threads, rust, bending, or a rounded head that prevents proper tool grip. Damaged fasteners cannot hold the correct torque and may fail under stress. When working on important parts like brakes or suspension, it’s always safer to install a new, properly rated fastener rather than risk reusing a questionable one.
Q5: Can I use lubricant or anti-seize on bolts during installation?
A: Yes, in some cases applying anti-seize compound or light lubricant can help prevent corrosion and make future removal easier. This is especially useful for bolts exposed to moisture, heat, or road salt, such as exhaust or wheel components. However, always check the manufacturer’s recommendation because lubrication can change torque values and affect how tightly the bolt clamps the parts together.
Conclusion: Mastering Fasteners Makes Every Repair Easier
Fasteners may be small, but they play a massive role in keeping vehicles, tools, and structures securely assembled. From simple screws and bolts to specialized clips and rivets, each fastener is designed for a specific purpose. Understanding the different types, materials, and thread styles helps ensure that every repair or installation is done safely and correctly.
For DIY enthusiasts and everyday drivers, learning how fasteners work can make routine maintenance simpler, safer, and more efficient. Choosing the right size, using proper tools, and following correct torque specifications prevents damage and improves the reliability of your work. Even small details—like using washers or replacing worn bolts—can make a big difference in long-term durability.
Ultimately, fasteners are the unsung heroes of mechanical design. By gaining basic knowledge about them, you build the confidence to tackle repairs, organize hardware properly, and keep your projects running smoothly. With the right fastener and the right technique, even complex tasks become manageable and rewarding for any DIYer.


