Making a Japanese bed frame (like a sturdy, low-profile platform) is straightforward. You primarily need basic lumber, simple cutting, and secure joining techniques to create a durable, minimalist foundation that supports your traditional futon or low mattress perfectly.
Tired of bulky beds taking up all your space? Many folks love the clean, open feeling of a low-profile Japanese-style bed, often called a shiki-futon frame or platform bed. But finding the right size and style can be tough, and store-bought options aren’t always cheap. Don’t worry! Building your own Japanese bed frame is a fantastic, rewarding DIY project that saves cash and gives you a custom fit. We are going to walk through this step-by-step, focusing on simple cuts and strong assembly. By the end, you will have a solid, beautiful, low-to-the-ground foundation you built with your own hands. Ready to simplify your bedroom?
Why Build Your Own Japanese Bed Frame? The DIY Advantage
When you decide to build something for your home, you instantly gain control. This is especially true for something as central as your bed. For beginners, this project looks more complex than it actually is. We are keeping the design minimalist, just like traditional Japanese furniture.
Space, Style, and Savings Combined
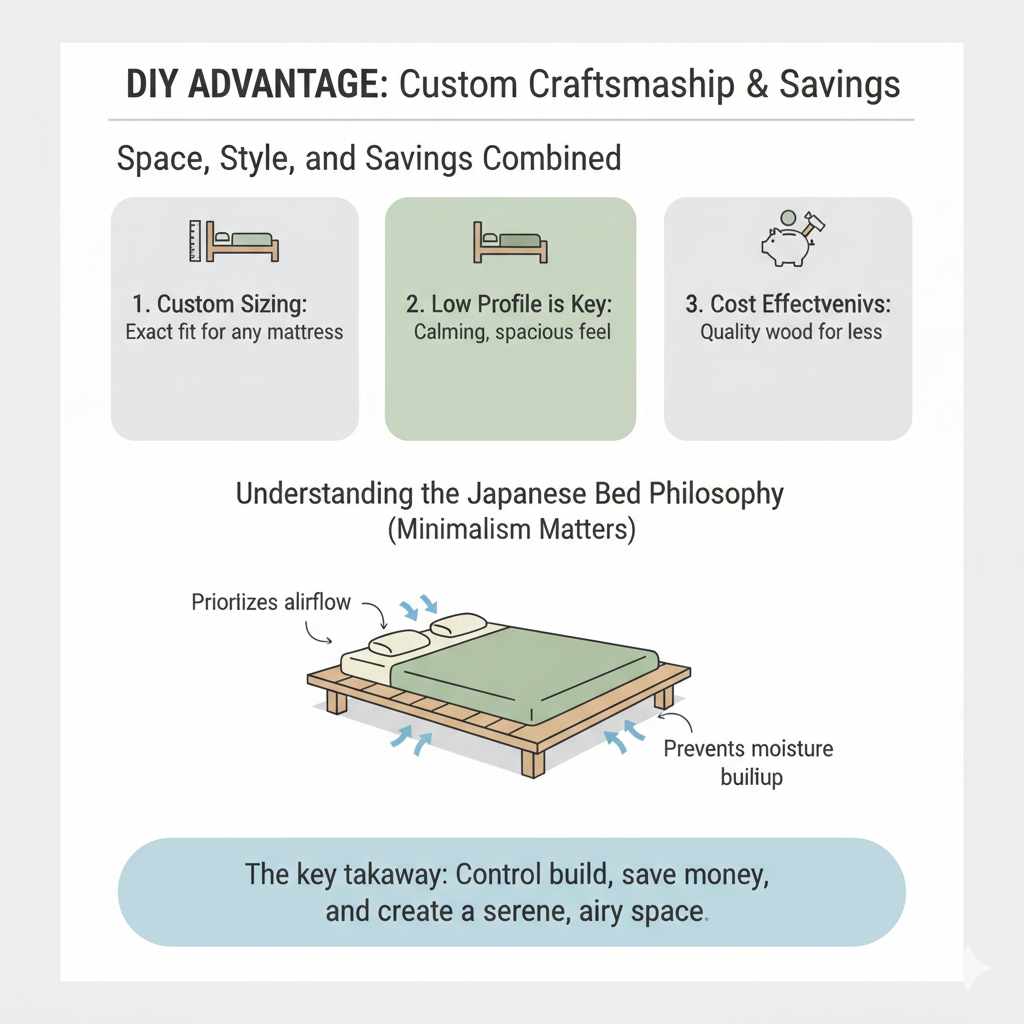
There are three huge perks to tackling this build:
- Custom Sizing: Whether you need a narrow twin, a standard queen, or a custom size for an oddly shaped room, you cut the wood exactly to your mattress dimensions.
- Low Profile is Key: Japanese beds are designed to sit very close to the floor. This creates a sense of calm and makes the room feel much larger. Building it ensures the height is exactly where you want it.
- Cost Effectiveness: Store-bought solid wood platform beds cost a fortune. By sourcing lumber yourself, you skip retailer markups and get superior material quality for less money.
Understanding the Japanese Bed Philosophy (Minimalism Matters)
A true Japanese bed frame (or foundation) prioritizes airflow and simplicity. Unlike Western beds, which are often high off the ground, these frames are low to allow air circulation underneath the futon or mattress. This ventilation is crucial, especially in humid climates, as it prevents moisture buildup, which can lead to mold or mildew under bedding. Our design focuses on slatted supports for maximum breathability.
Essential Preparation: Tools and Materials Checklist
Before we saw anything, let’s gather our supplies. Think of this like topping off your engine oil—preparation makes the whole process smoother and safer. For this basic platform, we are focusing on easily accessible dimensional lumber, like common pine or construction-grade spruce. Safety first—always wear eye protection when cutting!
The Necessary Tools List
You do not need a full professional workshop for this project. Most of these items are standard for any basic home repair or DIY task.
- Tape Measure and Pencil: For accurate marking. Measure twice, cut once!
- Circular Saw or Miter Saw: A circular saw is fine for straight cuts. If you have a miter saw, it makes angled (though we mainly need straight) and repetitive cuts very easy.
- Power Drill/Driver: Essential for driving screws quickly and securely.
- Speed Square or Carpenter’s Square: To ensure all your corners are exactly 90 degrees (square).
- Clamps: To hold pieces steady while drilling or fastening.
- Safety Gear: Safety glasses and hearing protection.
Lumber Selection and Cut List (For a Standard Queen Size: 60” x 80”)
We will use 2×4 lumber for the main frame (strong and readily available) and 1×4 lumber for the slats. Exact dimensions can vary slightly based on local lumber availability. Always check lumber quality for straightness before buying.
| Part | Material Needed (Approximate) | Purpose |
|---|---|---|
| Outer Frame Rails | Four pieces of 2×4 | The long sides and head/foot boards. |
| Center Support Beam | One piece of 2×4 | Runs down the middle for extra support. |
| Frame Legs/Feet | Six pieces of 2×4 (cut to your desired height, usually 4”–6”) | Lifts the frame slightly off the ground for airflow. |
| Support Brackets (Optional) | Scrap pieces of 2×4 or plywood reinforcement | Used at inside corners for maximum strength. |
| Slats | Approx. 15–18 pieces of 1×4 | The horizontal surface that supports the bedding. |
| Fasteners | 3-inch deck or construction screws (about 75 total) | Used structurally joining the 2×4 frame. |
| Fasteners | 1 1/4-inch wood screws | Used for attaching the slats. |
Pro Tip on Lumber: Lumber isn’t always sold exactly as labeled. A “2×4” is actually about 1.5 inches thick by 3.5 inches wide. We account for this when we measure our cuts, but it’s good to know why your tape measure might not match the stencil on the wood!
Step-by-Step Guide: Building Your Low-Profile Frame
This process breaks down into three manageable phases: building the main box, adding the center support, and finally, installing the crucial slats. Remember, we are aiming for simplicity and strength throughout. If you are interested in formal building standards, resources like the National Association of Home Builders (NAHB) offer great background on load-bearing structures, though our bed frame is minimally load-bearing for sleeping.
Phase 1: Constructing the Outer Frame Box
The outer box is the backbone of your bed. We connect the long rails to the shorter head/foot boards.
Step 1: Prepare Your Cuts
Measure and cut your four main frame pieces. For a Queen (60″ W x 80″ L outside measurement):
- Cut two long side pieces to exactly 80 inches.
- Cut two shorter end pieces (head/foot boards) to 57 inches. (This is 60 inches minus the width of the two side rails (1.5” + 1.5” = 3”). This ensures the total outside dimension is 60 inches).
Step 2: Assemble the First Corner
Lay two adjacent frame pieces (one long, one short) on a flat surface, forming an ‘L’ shape. Apply wood glue to the end grain where they meet (optional, but adds strength). Clamp the pieces together securely.
Step 3: Drilling Pilot Holes
Using a drill bit slightly smaller than your 3-inch screws, drill two pilot holes through the longer piece and into the end of the shorter piece. Pilot holes prevent the wood fibers from splitting when you drive the screws in, especially near the ends.
Step 4: Secure the Corner
Drive two 3-inch screws through your pilot holes, fastening the corner together tightly. Use your speed square to check that the angle is exactly 90 degrees. A slightly crooked corner will throw the entire frame out of square.
Step 5: Complete the Rectangle
Repeat Steps 2 through 4 for the remaining three corners until you have a solid, rectangular frame box. This box needs to be perfectly flat and square before moving on.
Phase 2: Adding Support for Stability and Airflow
In a Japanese-style bed, you need support for the center of the mattress while keeping the overall height very low. This usually means adding feet and a center beam.
Step 6: Attaching the Frame Feet
Flip your frame over so the underside is facing up. Decide on your desired height (we recommend 4 to 6 inches for good airflow). Cut six pieces of 2×4 to your chosen height. These will be your main feet.
Place one foot centered along the short end rails (near the head and foot). Place two feet along the long side rails—one about 1/3 of the way down and one about 2/3 of the way down. You need six feet total: two at the ends (one on the long rail, one on the short rail) and four along the long sides.
Secure each foot by driving four 3-inch screws upward through the foot and into the frame rail above it. Make sure feet are perpendicular to the ground.
Step 7: Installing the Center Support Beam
The center beam rests on two cross-pieces or sits on the ends of the shorter head/foot boards. If using the short boards as end supports, measure the exact interior distance between the two short boards. Cut your 2×4 center beam to this exact measurement.
Place the beam exactly down the center line of the frame. Secure it at the ends by screwing down through the top rail into the center beam using two 3-inch screws on each end.
Phase 3: Installing the Slats (The Surface)
The slats are what hold your futon or mattress off the main structure, allowing necessary air to circulate underneath. For a strong foundation, we need them spaced evenly and secured well.
Step 8: Determine Slat Placement
You are using 1×4 lumber (which is actually about 3/4” thick). You need the slats to sit flush on top of the frame rails and the center beam. The ideal gap between slats is typically 2 to 3 inches for optimal support without sacrificing airflow.
For a standard Queen (80 inches long), if you use 3-inch gaps, you will need about 16 to 18 slats. Start by marking the placement for the first and last slat, ensuring they are flush with the interior edges of the frame ends.
Step 9: Spacing the Slats
This is the most time-consuming but critical step for looks and function. Use a scrap piece of wood cut to your exact desired gap (e.g., 3 inches) as a spacer block. Lay your first slat, place the spacer block next to it, and then lay the next slat. Repeat this process down the length of the frame, working from one side rail across to the center beam, and then from the center beam to the other side rail.
Step 10: Securing the Slats
Once you have all the slats laid out perfectly in their positions, secure them. Drive two 1 1/4-inch screws through the 1×4 slat and down into the 2×4 frame rail or center beam underneath. Do this for every point where the slat crosses a support piece. Do not overtighten; you want the screw head to sit just below the surface of the slat.
Refinement and Finishing Touches
Now that the structure is built, we need to make it safe, smooth, and visually appealing. Since Japanese design emphasizes natural materials and clean lines, sanding and finishing are key.
Sanding for Smoothness (Safety First)
This is where you turn rough lumber into furniture. Focus on all edges and surfaces that might touch skin, especially the top edges of the frame.
- Start with 80-grit sandpaper to knock down any rough spots, splinters, or slightly proud screw heads.
- Move to 120-grit sandpaper for a smoother feel.
- Finish with 180 or 220-grit sandpaper for a surface that feels soft to the touch.
Finishing Options: Oil vs Stain
For a true Japanese aesthetic, heavy paint is usually avoided. The goal is to highlight the wood grain.
| Finish Type | Pros | Cons |
|---|---|---|
| Clear Polyurethane Sealant | Maximum protection against moisture and spills. Easy to wipe clean. | Can create a plasticky, overly glossy look if not careful. |
| Natural Tung Oil or Linseed Oil | Penetrates the wood, enhancing the grain beautifully, very natural look. | Requires more coats and longer curing time. Less protection against major spills. |
| Light Stain (Walnut or Oak) | Allows you to control the color depth easily. | Requires precise application to avoid blotching. |
If you choose an oil finish, apply thin coats, wiping off the excess after 15 minutes, and allow adequate time to dry between coats, as recommended by the manufacturer (check reputable finishing guides for best practices).
Design Variations for the Advanced DIYer
Once you master the basic platform, you can add features that make it even more functional. Think about how different elements in bedroom design, like accessibility and storage, are handled in modern furniture. Many people often inquire about incorporating these features:
Incorporating Headboards
If you want a simple headboard, you can build a vertical panel using plywood or shiplap boards. Secure two vertical supports to the back end of your frame rails (underneath where the mattress sits) that rise to your desired headboard height. Attach your finished panel to these supports. Keep the wood choice consistent with your base for a cohesive look.
Adding Drawers for Storage
This is trickier because you need clearance for the drawers to slide. Instead of trying to build drawers directly underneath the frame (which requires precise carpentry for clearance), consider building a separate, slightly taller base box (about 10–12 inches high) that the low platform rests on top of. This base box can have drawer slides pre-installed, using the under-bed space effectively without compromising the low look of the main sleeping area.
Ventilation Considerations
If you live in a highly humid area, maximizing the space between the bottom of your frame and the floor is essential. You can raise the feet slightly, or, for a more modern look, build the entire frame structure higher and recess the feet inward so they are hidden from view. This creates the illusion that the bed is floating, while maximizing the airflow gap underneath. Always ensure the floor surface is clean and dry before placing the frame.
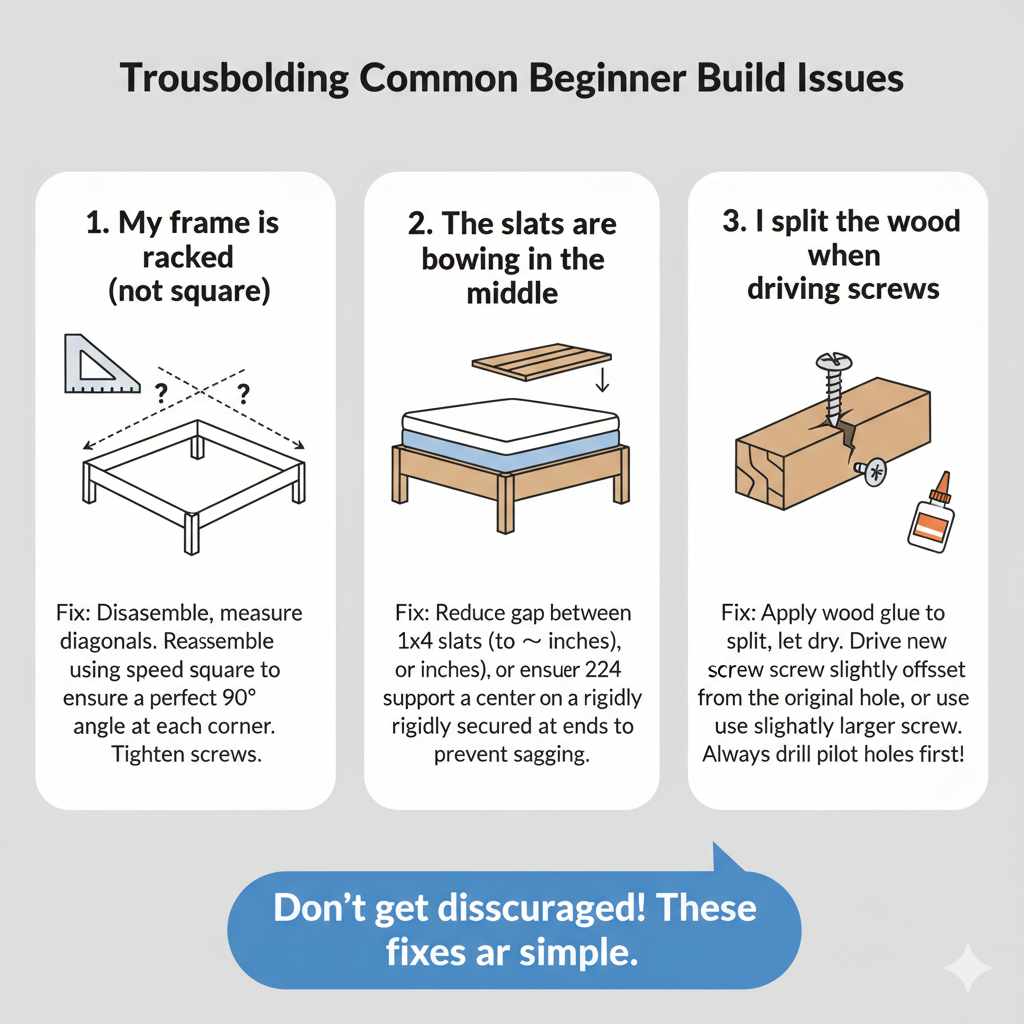
Troubleshooting Common Beginner Build Issues
Even the best plans can hit small snags. Don’t get discouraged! These issues are very common, especially when working with dimensional lumber.
- Problem: My frame is racked (not square).
Solution: Take the frame apart where the error occurred (usually one corner). Measure the diagonals from corner to corner. If the diagonal measurements are unequal, the frame is not square. Reassemble, ensuring your speed square shows a perfect 90 degrees at every joint before screwing it down.
- Problem: The slats are bowing in the middle.
Solution: This usually means the gap is too wide or the center support beam isn’t providing enough rigid support. Either reduce the space between the 1×4 slats to 2 inches or ensure your center 2×4 beam is tightly secured at both ends, preventing sagging under weight.
- Problem: I split the wood when driving screws.
Solution: This is why we use pilot holes! If it happens, back the screw out, apply a little wood glue into the split hole, let it dry, and then slightly offset your new screw location to avoid the damaged area, or use a slightly larger screw if the original hole is compromised.
Frequently Asked Questions (FAQ) About Japanese Bed Frames
Q1: Do I need a box spring with a Japanese bed frame?
A: No. Traditional Japanese frames are designed for futons, which are inherently thin and firm. If you are using a Western mattress, ensure your slats are spaced closely (2 inches apart maximum) for good support, or use a thin piece of plywood laid over the slats first to provide a completely solid, flat surface.
Q2: How high off the floor must my frame be for good ventilation?
A: Experts recommend at least 3 to 4 inches of clearance beneath the frame. This allows enough space for air to circulate freely and carry away moisture. Our suggested 4-6 inch feet provide an excellent margin of safety.
Q3: Can I use pallet wood for this project?
A: While tempting for budget reasons, it is generally discouraged for bedding. Pallet wood is often untreated, may have unseen mold or harsh chemicals, and you have no guarantee of its structural integrity. Stick to new, clean construction lumber (like pine 2x4s) for safe sleeping surfaces.
Q4: How Much Weight Can a DIY Japanese Bed Frame Hold?
A properly built Japanese platform bed made with 2×4 framing and a center support beam is extremely strong. When slats are spaced 2–3 inches apart and securely fastened, the frame can typically support 600–800 pounds combined weight. The key factors are tight joints, pilot holes to prevent splitting, and a solid center beam. For heavier sleepers, adding extra center legs provides even more reinforcement.
Q5: Do Japanese Bed Frames Make Rooms Look Bigger?
Yes, that’s one of their biggest advantages. Because the frame sits low to the ground, it creates more visible wall space and higher sightlines, making the room feel open and uncluttered. This minimalist profile reduces visual bulk compared to tall Western beds. In smaller bedrooms or apartments, a low platform design can significantly enhance the sense of space and calm.
Final Thoughts: Build Simple, Sleep Better
Building your own Japanese bed frame is more than just a weekend DIY project — it’s a practical way to simplify your space and take control of your bedroom design. With basic tools, affordable lumber, and careful measurements, you can create a sturdy, low-profile platform that supports your mattress while promoting airflow and durability.
The beauty of this design lies in its simplicity. No complicated joinery. No expensive specialty hardware. Just clean lines, solid construction, and a minimalist foundation built with your own hands. By following proper slat spacing, adding a center support beam, and keeping the frame slightly elevated for ventilation, you ensure long-term strength and comfort.
Whether you’re looking to save money, customize sizing, or embrace a calmer aesthetic, a Japanese-style bed frame delivers space, style, and function all in one.