A wobbly or noisy bed frame is annoying, but fixing it is usually simple! This guide shows you step-by-step how to tighten loose bolts, mend squeaks, and stabilize wobbly legs using common household tools, giving you a quiet, solid night’s sleep quickly.
If you’ve ever been woken up by a loud creak or felt your whole bed shake when you just roll over, you know the frustration of a failing bed frame. It’s not just annoying; it can ruin your sleep and eventually lead to bigger damage. Getting professional help for a simple wiggle seems like overkill, right? Good news! Most common bed frame issues are easy fixes you can handle today. Think of me, Dustin, your friendly guide—we’re going to tackle these problems safely, with simple tools, and get your bed rock solid again. Ready to stop the squeaks and restore your peace? Let’s dive into how to fix a bed frame.
Understanding Why Bed Frames Fail: The Usual Suspects
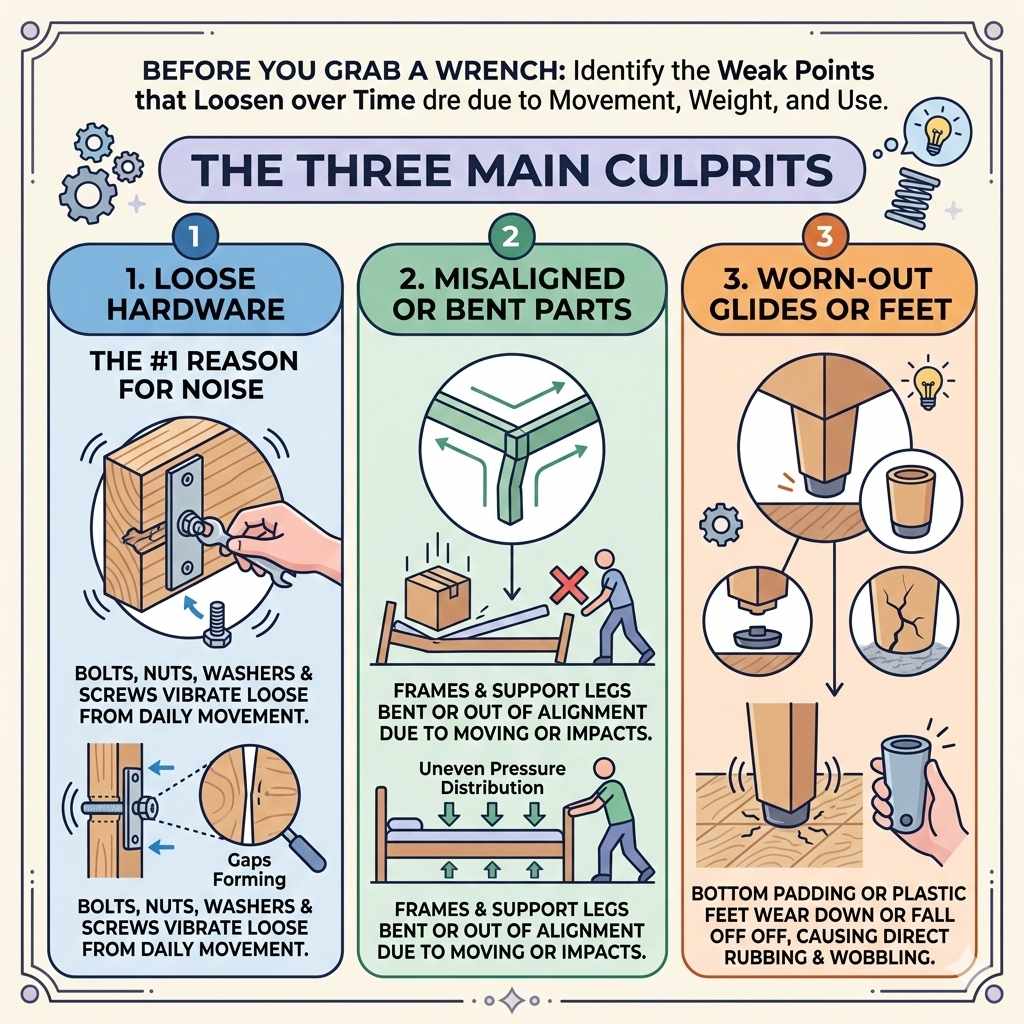
Before we grab a wrench, it helps to know what we are fighting against. Bed frames, especially metal ones, don’t usually break suddenly. They loosen up over time due to movement, shifting weight, and normal use. Understanding the weak points helps you target the fix perfectly.
The Three Main Culprits
Most bed frame problems fall into one of these categories:
- Loose Hardware: This is the #1 reason for noise. Bolts, nuts, washers, and screws vibrate loose from daily movement.
- Misaligned or Bent Parts: If you moved the bed recently or dropped something heavy on it, frames or center support legs might be bent or out of alignment, causing uneven pressure.
- Worn-Out Glides or Feet: The bottom padding or plastic feet can wear down or fall off, causing the metal or wood to rub directly against the floor, leading to noise or wobbling.
Essential Tools You Will Need (Keep It Simple!)
You don’t need a full mechanic’s garage to fix a bed frame. Most repairs require just a few simple tools you probably already have lying around. Having the right tools makes the job fast and prevents stripping screws.
Here is the basic toolkit for fixing a bed frame:
- Wrench Set (Adjustable or Box-End): An adjustable wrench (Crescent wrench) is the most versatile. You need this for tightening nuts and bolts.
- Screwdriver Set (Flathead and Phillips): Essential for securing screws on side rails or headboard brackets.
- Hex Keys (Allen Wrenches): Very common on modern, ready-to-assemble (RTA) frames. Often included with the frame, but a good set is handy.
- Rubber Mallet: Excellent for gently tapping pieces back into alignment without damaging finishes. Never use a regular metal hammer!
- Flashlight or Headlamp: Frames are dark places. Good light is key to spotting loose hardware.
- Penetrating Oil (Optional, but helpful): If bolts are rusted or stuck, a spray like WD-40 helps loosen them up first.
Phase 1: Diagnosing the Noise or Wobble
We need to find the exact source of the problem before we can fix it. Don’t just start tightening everything randomly!
The “Shake Test”
Have a partner help you with this test. Have them gently shake the bed while you watch and listen closely. Try shaking the headboard, the footboard, and the side rails independently.
- Listen for the Squeak: Is the noise coming from where the side rail attaches to the headboard? Or is it in the middle of the frame?
- Check the Center Support: Does the middle of the bed dip or shake excessively? This often points to issues with the center support beam or its feet.
- Inspect Leg Connections: Carefully push down on each corner leg. Does one seem loose or wobble independently?
Visual Inspection Checklist
Once you’ve located the general area, get down low and look closely. Shining your flashlight is crucial here.
| Component Area | What to Look For | Likely Fix |
|---|---|---|
| Corner Brackets/Plates | Visible gaps between the rail and the headboard/footboard connection. | Tightening bolts or re-seating the bracket. |
| Center Support Rail | The rail is touching the floor directly, or the support leg is leaning. | Adjusting the height of the center support leg. |
| Slats (If applicable) | Slats are moving in their brackets or making contact with the frame rail. | Adding small felt pads or securing the slat retainer clips. |
Phase 2: Fixing Common Bed Frame Issues Step-by-Step
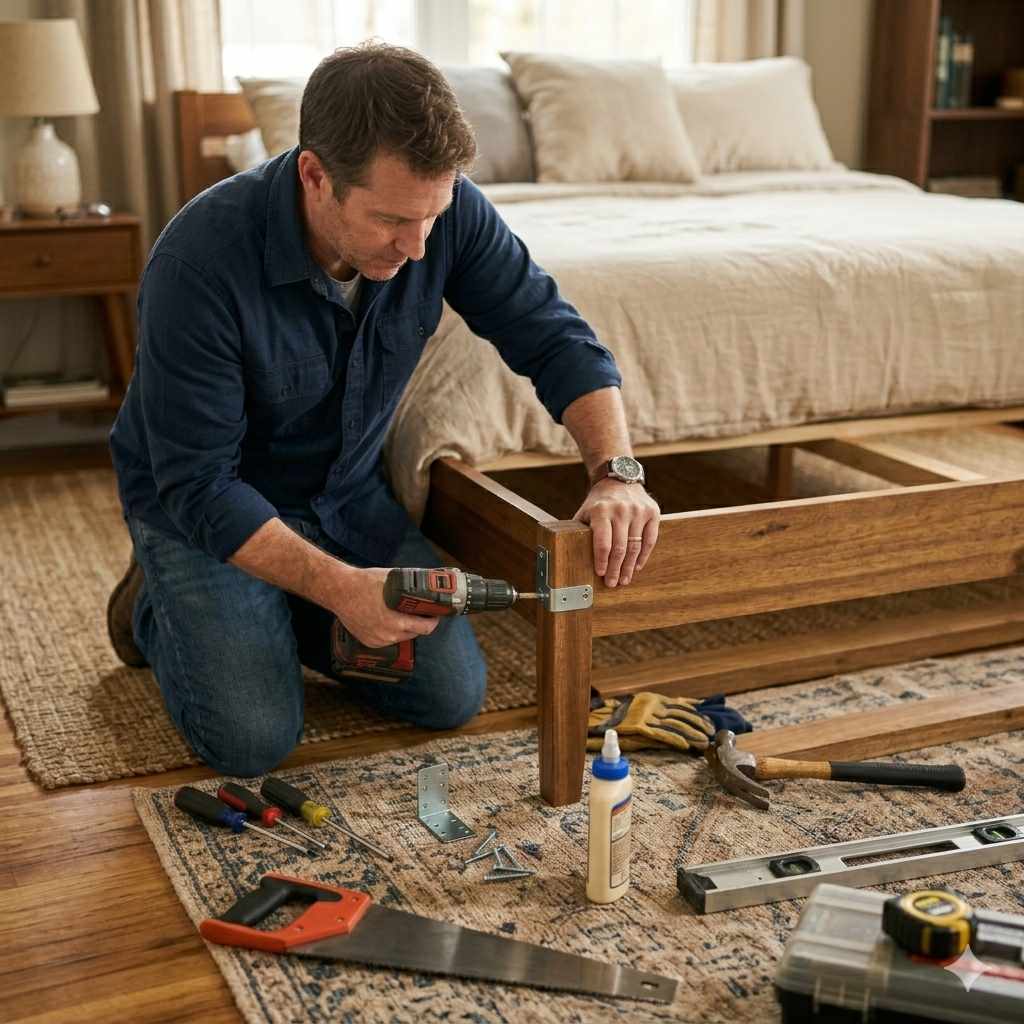
Now that we know the problem, let’s get to work! Remember to always work safely. If the frame is very heavy, it’s best to remove the mattress and box spring completely first, or at least move them to one side to access the connection points easily.
Fix 1: Tightening Loose Bolts and Screws (The Squeak Killer)
This is the most common fix. A loose bolt means metal parts are rubbing against each other—that’s your squeak!
- Identify the Hardware: Locate the bolt or screw that seems loose at the connection point (usually where the long side rails meet the headboard or footboard).
- Apply the Correct Tool: Using your wrench or Allen key, gently turn the fastener clockwise.
- Tighten Snugly, But Don’t Overdo It: This is important, especially with RTA furniture. Tighten until you feel firm resistance. If you crank it down too hard, you can strip the threads, which makes the problem much worse! We are aiming for “snug and secure,” not “crushed.”
- Check the Other Side: Always check the corresponding bolt on the opposite side of the frame, as they often loosen together.
Dustin’s Tip: If you tighten a bolt and it just spins without getting tight, the internal threading might be stripped. You’ll need a slightly larger bolt or a thread repair kit (like a Heli-Coil) for a permanent fix, but often replacing the entire bolt is easier for beginners.
Fix 2: Stabilizing the Center Support Beam
For Queen, King, and California King frames, the center support beam and its legs transfer the weight of the mattress and foundation down to the floor. If these are too short, the center sags, causing the whole frame to twist and creak.
Adjusting Center Support Legs
Many center legs are adjustable, often by screwing the foot in or out.
- Lift Slightly: If possible, have your helper raise the center rail just a tiny bit (about 1/8th of an inch). This relieves pressure on the leg.
- Adjust the Foot: Twist the foot of the support leg clockwise to extend it, or counter-clockwise to retract it, until it firmly contacts the floor.
- Check Levelness: Once contact is made, lower the center rail back down. Tap the mattress gently. The goal is for the support leg to bear weight, but not so much that it bows the center beam upward. A slight downward pressure is perfect.
If the leg is fixed (not adjustable), measure the gap between the bottom of the leg and the floor. You will need to use shims or wooden blocks (check local hardware stores for furniture shims) to bridge that gap and eliminate the play. You can read more about ensuring a solid foundation from building standards experts, who emphasize even weight distribution. The National Floor Association discusses how subfloors and foundation support are crucial for longevity. (Note: While this source focuses on flooring, the principle of even load bearing applies perfectly to your frame structure.)
Fix 3: Dealing with Squeaky Slats (Wooden Frames)
If you have a wooden slat system, the noise is often the wood rubbing against the frame or the slats rubbing against each other.
Quieting Wooden Slat Rub
- Felt Pad Solution: The best beginner fix is sound dampening. Purchase small, adhesive-backed felt pads (the kind used under chair legs). Place one pad on every point where a wooden slat rests directly on the side rail. This buffers the friction.
- Check the Center Gap: If the slats run over a center beam, ensure there is a small gap or that the slats are slightly elevated. Apply felt pads wherever wood meets wood in the center as well.
- Securing Loose Slats: Some systems use small plastic sockets or clips to hold the slats in place. If these clips are cracked or missing, the slat will move. Visit a home improvement store for replacement slat sockets matching your frame type.
Fix 4: Fixing Bent or Warped Rails (Advanced Beginner)
If you notice a visible dip in the side rail that won’t go away after tightening everything, the metal might be slightly bent. This usually requires putting some leverage on it.
Safety First: Always remove the mattress and box spring. Work slowly. This fix might require a helper.
- Locate the Bend: Pinpoint the exact area where the rail is sagging or warped.
- Use Leverage: Place a sturdy piece of wood (like a 2×4) slightly under the lowest point of the bend.
- Apply Gentle Upward Force: Have your helper brace the far end of the rail while you use gentle, controlled pressure on the 2×4 to try and lever the rail back up toward level. If it’s metal, you may need to use a clamp or even a car jack (with extreme caution and soft padding between the jack and the frame!) to slowly inch it back.
- Test: Reassemble and check for the wobble/noise. If it still dips, you may need professional welding or a stronger replacement rail, as severely bent metal loses structural integrity.
Specific Frame Type Fixes
Different materials require slightly different care when troubleshooting.
Metal Frames (The Most Common)
Metal frames rely entirely on well-seated bolts and locking mechanisms. The biggest enemy here is vibration loosening things up.
- Use Lock Washers: If you replace any bolts, switch to lock washers (split ring washers). These washers resist rotation and are designed to keep hardware tight under vibration a bit better than standard flat washers.
- Frame Pin Alignment: Many modern metal frames use connecting pins to slide pieces together before bolting. Ensure these pins are fully seated. If they are slightly angled out, the bolt won’t seat properly. Use the rubber mallet to gently tap the pieces together until the frame joints look perfectly flush alongside the bolt holes.
Wood Frames (Platform or Slat Systems)
Wood absorbs moisture and expands/contracts, which can loosen screws holding brackets or headboards.
- Screw Hole Re-taping: If a screw hole in the wood has become too large (stripped), you can repair it easily. Remove the screw, apply a bit of wood glue, and insert a few wooden toothpicks into the hole before screwing the original bolt back in. The toothpicks act as temporary wood filler.
- Check Wood Dowels: Many modern flat-pack wood beds use wooden dowels for alignment. If these are loose or broken, they cause wiggle. Use wood glue to secure any loose dowels when putting pieces together.
Preventative Maintenance: Keeping Your Bed Frame Quiet for Years
The best fix is the one you never have to do! Just like changing your car’s oil keeps your engine running smoothly, a little regular frame care goes a long way. Think of this as your basic “tune-up” schedule.
| Maintenance Task | Frequency | Why It Matters |
|---|---|---|
| Full Hardware Check (Tightening) | Every 6 Months | Prevents the slow onset of wobbles and creaks caused by small vibrations. |
| Center Leg Height Verification | Every 3 Months or After Moving Mattress/Foundation | Ensures even load distribution and prevents beam sagging. |
| Inspection for Metal Fatigue/Rust | Annually | Early detection of cracks or rust spots that could lead to catastrophic failure (important for older metal frames). |
| Cleaning/Dusting Under Frame | Every 6 Months | Removes debris that can accumulate and act as abrasive material between parts. |
The Importance of Lubrication (For Squeaks You Can’t Locate)
If you have tightened everything and you still have a minor squeak, it might be friction between parts that don’t actually use a bolted connection—like two pieces of metal simply pressing together.
For these tricky spots, a tiny bit of lubricant can work wonders. You don’t want messy grease under your bed. Use one of these:
- Silicone Spray: Great for metal-on-metal sliding parts inside joints.
- Wax (Candle Wax or Beeswax): Rub hard wax on areas where wood rubs against wood or where a plastic glide contacts the metal frame. This creates a smooth, non-squeaky barrier.
Safety Considerations Before You Start
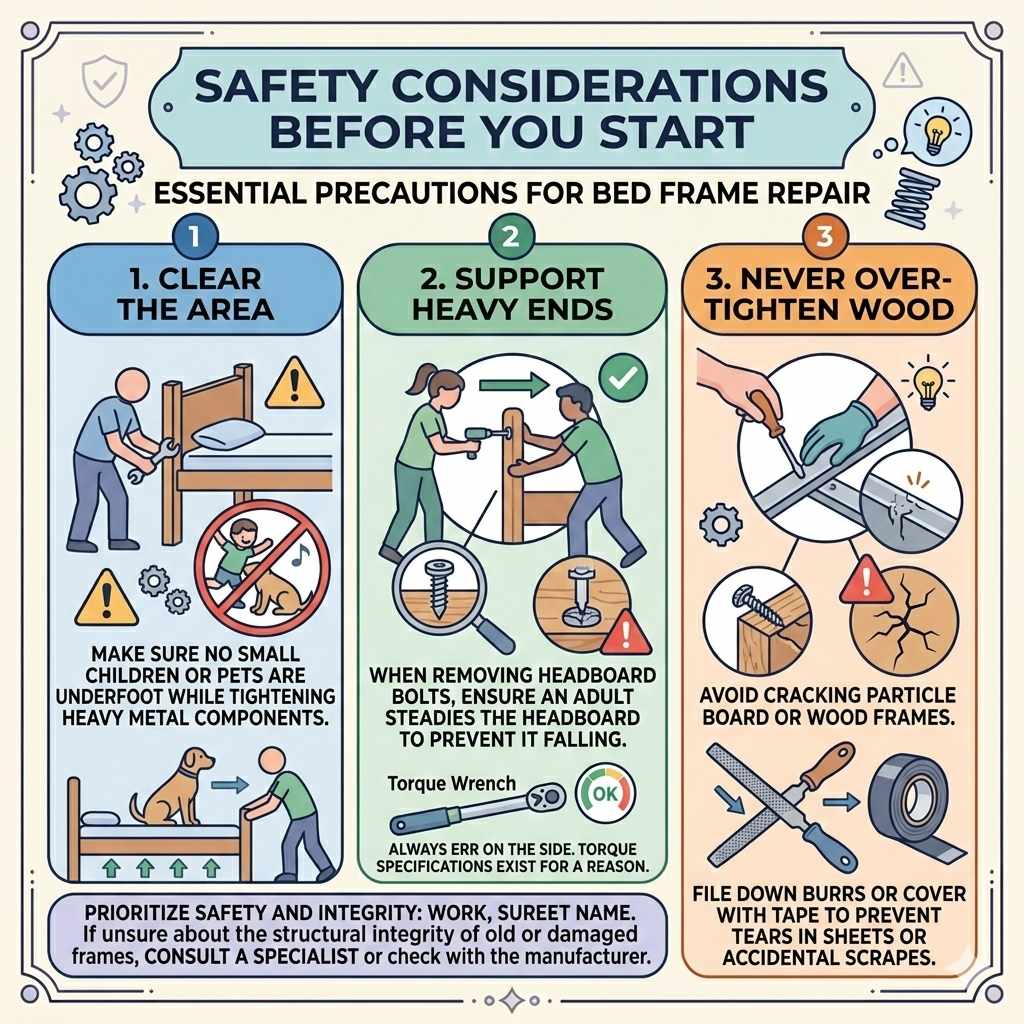
Working on something supporting your body weight requires a little caution. While fixing a bed frame is generally very safe, keep these checkpoints in mind:
- Clear the Area: Make sure no small children or pets are underfoot while you are tightening heavy metal components.
- Support Heavy Ends: If you are removing the headboard bolts, make sure an adult is steadying the headboard so it doesn’t fall forward.
- Never Over-Tighten Wood: Always err on the side of slightly looser rather than cracking the particle board or wood frame. Torque specifications exist for a reason, and stripping cheap fasteners is easy.
- Check for Sharp Edges: If you find old, exposed metal ends or burrs, file them down or cover them with heavy-duty electrical tape to prevent tears in sheets or accidental scrapes.
Remember, the integrity of your sleeping surface is important for your health, much like ensuring your car’s tires are properly inflated guarantees a safe ride. If you are unsure about the structural integrity of a very old or damaged frame, consulting a local furniture repair specialist or checking replacement parts information from the original manufacturer is the wisest next step.
Frequently Asked Questions (FAQ) About Bed Frame Fixes
Q1: My metal bed frame is still super noisy even after tightening bolts. What now?
A: Check the center support legs first! If they are too low, the side rails flex, causing noise even when the bolts are tight. If the legs are fine, try placing small felt pads or rubber washers between any two metal parts that touch each other but aren’t bolted together.
Q2: Do I need to take the mattress off to fix the frame?
A: It is highly recommended, especially if you are working on the center support or the headboard/footboard connections (the main weight-bearing points). Working on a bare frame is much safer, easier, and ensures you can access all hardware properly.
Q3: How do I stop my bolt from spinning endlessly when I try to tighten it?
A: This means the threads are stripped. Try inserting a small piece of metal wire or a toothpick coated in wood glue into the hole before reinserting and tightening the bolt. If it’s a nut, try replacing the nut with a self-locking nut or using a high-quality lock washer.
Q4: Is it okay if my wooden bed frame slats sink slightly in the middle?
A: A slight sink (less than an inch) on a Queen or King is normal with heavy use, but significant sagging means the slats are overloaded or broken. Make sure you are using the correct number and size of slats recommended by the manufacturer for your mattress type (e.g., foam mattresses often need slats closer together than traditional box springs).
Q5: Can I use WD-40 to stop a squeak?
A: WD-40 is great for loosening rusted bolts, but it’s not the best long-term lubricant for squeaks caused by metal friction. It can attract dust over time. Use dedicated silicone spray or wax for quieter, longer-lasting results on friction points.
Q6: My frame screws are recessed. What drivers do I need?
A: Recessed screws often use Hex (Allen) heads or sometimes Torx (star-shaped) heads. Always check which type you have before buying tools. A good basic 5mm or 6mm Allen wrench set will handle most European or flat-pack furniture.
Conclusion: Enjoying Your Rock-Solid, Quiet Sleep Again
A wobbly or squeaky bed frame might feel like a major frustration, but as you’ve seen, most issues come down to a few simple causes—loose hardware, uneven support, or minor friction between parts. The good news? With a basic toolkit, a careful inspection, and a little patience, you can restore stability and silence in less time than you might expect.
By tightening bolts properly, adjusting center supports, cushioning friction points, and performing occasional maintenance checks, you’re not just fixing an annoyance—you’re protecting your investment. A well-maintained bed frame supports your mattress correctly, distributes weight evenly, and helps extend the lifespan of everything resting on it.
The key takeaway is simple: small movements create small problems, and small problems are easiest to fix early. A quick hardware check every few months can prevent the return of creaks, wobbles, and late-night disturbances.