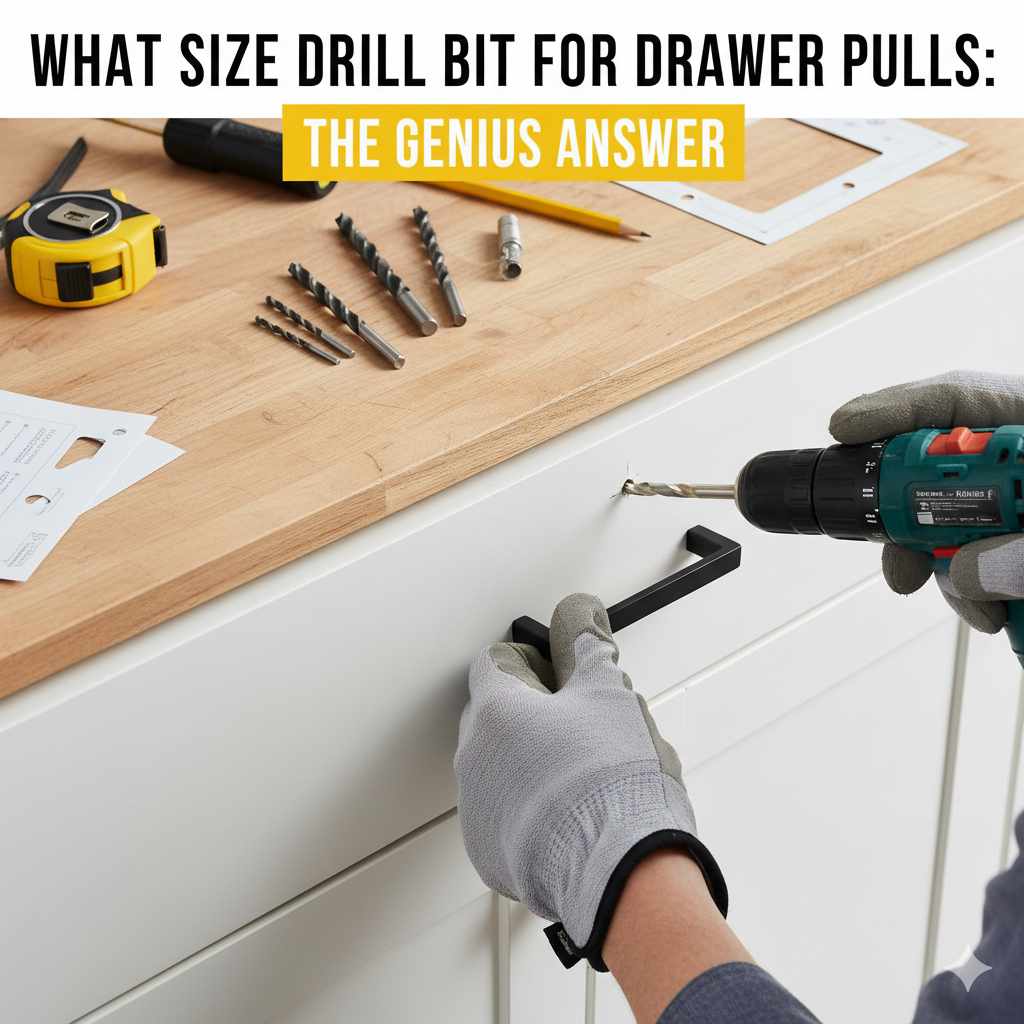
For most drawer pulls, a 3/16-inch drill bit is the perfect size because the standard mounting screw is an 8-32 machine screw. However, the genius answer is to always choose a drill bit that is slightly larger than the screw’s solid shaft but smaller than its outer threads. This guarantees a snug, secure fit every time.
You’ve got the perfect new drawer pulls. You’re ready to give your kitchen or bathroom a fresh, new look. But then you freeze, drill in hand, staring at a case full of bits. Pick one that’s too small, and the screw won’t go in. Pick one that’s too big, and the pull will be wobbly forever. It’s a simple step that feels surprisingly high-stakes.
Don’t worry, you’re not alone. This is one of the most common spots where a simple DIY project can go sideways. But I’m here to tell you there’s an easy, foolproof way to get it right every single time. Forget the guesswork. I’ll walk you through a simple method that works for any drawer pull, knob, or handle. You’ve got this!
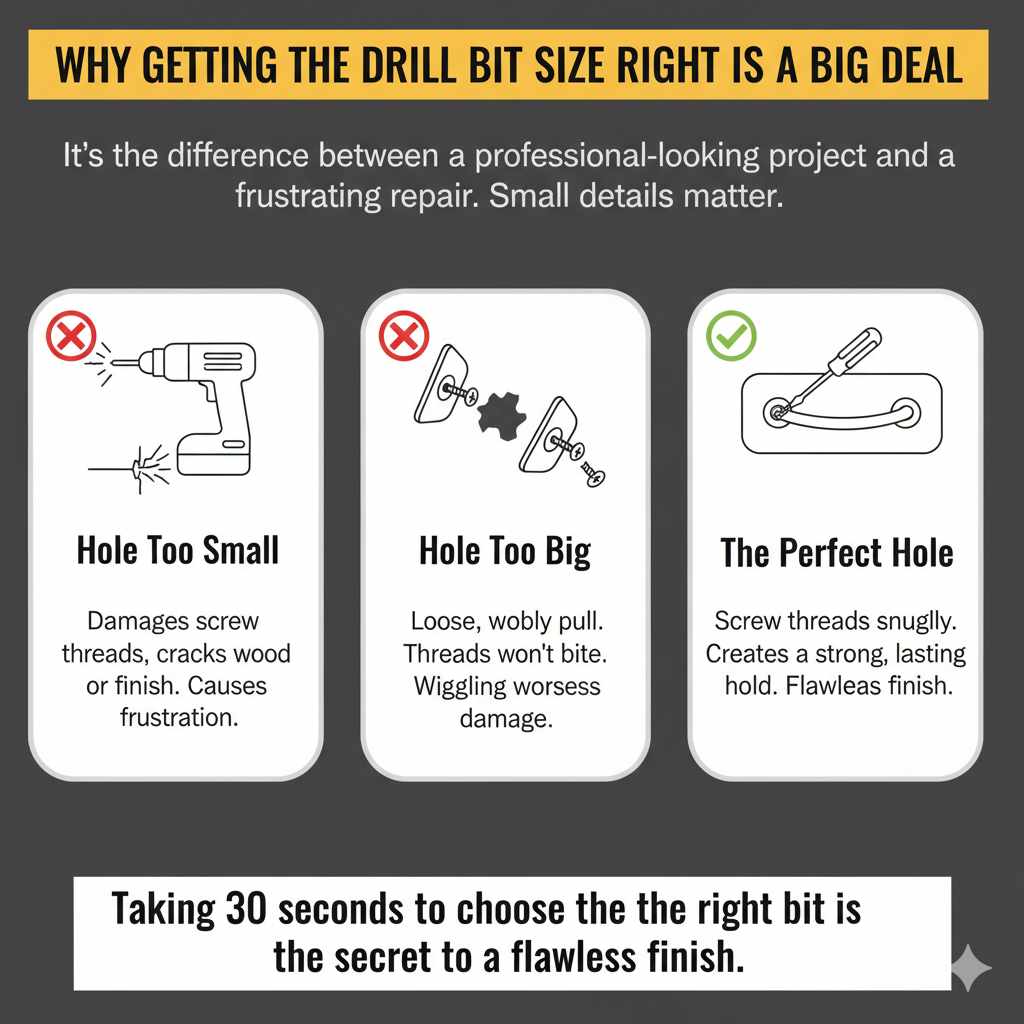
Why Getting the Drill Bit Size Right is a Big Deal
You might be thinking, “It’s just a tiny hole. How much does it really matter?” Well, in the world of home improvement, just like in car repair, the small details make all the difference between a job that looks professional and one that feels a little… off. Getting the drill bit size right is about more than just fitting a screw.
Think of it like using the right size socket on a bolt. Too big, and you’ll strip the bolt head. Too small, and it won’t fit at all. It’s the same principle here.
- If the hole is too small: This is the most common mistake. You’ll try to force the screw in, which can damage the screw threads, crack the wood or cabinet finish, or even snap the head off the screw. It’s a recipe for frustration and can turn a quick update into a repair job.
- If the hole is too big: The screw threads won’t have anything to bite into. The drawer pull will feel loose and jiggle every time you touch it. Over time, that constant wiggling can widen the hole even more, making the handle practically unusable. You might try to fix it with wood glue or filler, but it’s best to avoid the problem from the start.
The perfect hole allows the screw to thread snugly into the wood, creating a strong, lasting hold. Your new hardware will feel solid and secure, just like it was installed by a pro. Taking an extra 30 seconds to choose the right bit is the secret to that flawless finish.
The “Genius” Method: How to Find the Perfect Drill Bit Size in Seconds
Alright, let’s get to the simple trick that will make you feel like a genius. You don’t need complicated charts or fancy tools (though they can help!). You just need the hardware that came in the package and your drill bit set.
Step 1: Inspect Your Hardware
First, open up your new drawer pulls. Inside, you’ll find the pulls themselves and the mounting screws. The screws are your key. Almost all cabinet hardware in the United States uses one of two common screw sizes:
- 8-32 Machine Screw: This is the undisputed champion of cabinet hardware. It’s the standard for the vast majority of knobs and pulls. The “8” refers to the diameter, and the “32” refers to the thread count per inch.
- M4 Machine Screw: This is the metric equivalent, often found in hardware from IKEA or other European brands. It’s very similar in size to the 8-32.
For an 8-32 screw, the go-to drill bit is 3/16 inch. For an M4 screw, a 3/16 inch or a 5mm bit works perfectly. So, if you’re in a hurry, using a 3/16″ bit is a very safe bet. But for a truly perfect fit, let’s move to the next step.
Step 2: The Visual Test (The Easiest Method)
This is the most practical method, and you can do it right now with what you have. Grab the screw that came with your drawer pull and hold it up. Now, grab a few drill bits that look close in size (likely around 3/16″).
Hold the drill bit directly in front of the screw. Here’s what you’re looking for:
The drill bit should be slightly wider than the solid metal shaft of the screw, but it should hide behind the threads.
In other words, when you look at them head-on, you should be able to see the screw’s threads peeking out from behind the drill bit, but the main body of the screw should be completely hidden. This ensures the hole is big enough for the screw’s body to pass through but small enough for the threads to grip the wood firmly.
Step 3: Use a Drill Bit Sizer or Sizing Chart
If you want to be 100% certain and remove all guesswork, two simple tools are your best friend. One is a drill bit index (the case your bits came in), and the other is a simple chart.
Many drill bit cases have built-in sizing holes. You can simply poke the screw through the holes until you find the one it fits into perfectly. That’s the size of the screw shaft, so you’ll want the drill bit that is the next size up. For example, if the screw fits snugly in the 5/32″ hole, you’d use a 3/16″ drill bit.
Alternatively, you can use a simple sizing chart. Here is a handy reference for the most common cabinet hardware screws.
Common Drawer Pull Screw Sizes and a Drill Bit Chart
While the 8-32 screw is king, you might run into other sizes. This table covers the most likely candidates and the perfect drill bit for each. Save this for future projects!
| Screw Size (Imperial/Metric) | Common Use | Recommended Drill Bit Size |
|---|---|---|
| #8-32 | Standard for most knobs and pulls in the U.S. | 3/16″ |
| M4 (4mm) | Common for IKEA and other European hardware. | 3/16″ or 5mm |
| #6-32 | Smaller, more delicate hardware. | 7/64″ |
| #10-24 | Larger, heavy-duty pulls or handles. | 13/64″ or 7/32″ |
| M5 (5mm) | Less common, for some larger metric pulls. | 7/32″ |
Your Step-by-Step Guide to Drilling Perfect Holes
Okay, you’ve confidently selected your drill bit. Now let’s get that hardware installed perfectly. Follow these simple steps for a clean, professional job.
- Gather Your Tools: You don’t need a huge workshop. Just grab your drill, the correct drill bit, a tape measure, a pencil, and some painter’s tape. Crucially, put on some safety glasses. Wood dust and small splinters are no joke.
- Measure Twice, Drill Once: This old saying is your best friend. Decide where you want your pull to go. For drawers, the center is usually best. Measure the width and height of the drawer front and make a small, precise mark with your pencil. If you’re installing pulls with two screws, use a cabinet hardware jig or a template to ensure your holes are perfectly level and spaced correctly.
- Apply Painter’s Tape: Place a small piece of blue painter’s tape over the spot where you’re going to drill. This simple trick does two amazing things: it gives you a better surface to mark on, and more importantly, it helps prevent the wood from splintering or the paint from chipping as the drill bit enters.
- Create a Starting Point: To prevent your drill bit from “walking” or skittering across the surface, you need to create a tiny indent for it to sit in. You can use a tool called a center punch, but the tip of a nail and a light tap from a hammer works just as well. Just a small dimple is all you need.
- Drill the Hole: Align the tip of your drill bit in the indent you just made. Keep your drill straight and level (90 degrees to the cabinet face). Apply gentle, steady pressure and let the drill do the work. Don’t force it. If you’re drilling through a thick drawer front, pull the bit out once or twice to clear out the wood dust.
- Drill From the Front to the Back: Always start drilling from the finished side of the drawer or door. This ensures the cleanest entry hole. For an ultra-clean exit hole on the back, you can hold a scrap piece of wood firmly against the back where the bit will come through. This supports the wood fibers and prevents “tear-out.”
- Install Your Hardware: Clean any dust from the hole. Push the screw through from the back of the drawer front and thread it into the pull. Tighten it until it’s snug, but don’t overtighten and risk cracking the wood. Your new drawer pull should be firm and secure!
Working with Different Cabinet Materials
Not all cabinets are made the same. The material can affect how you should drill. But don’t worry, the changes are minor.
Softwoods (like Pine)
Pine is very soft and prone to splintering. The painter’s tape trick is essential here. Use a sharp drill bit and a slower drill speed to avoid tearing the wood fibers. A brad-point drill bit, which has a sharp spur at the center, is fantastic for getting a clean start on softwoods.
Hardwoods (like Oak or Maple)
Hardwoods are dense and tough. You’ll need to apply a bit more pressure, but keep it steady. A sharp bit is crucial, as a dull one can burn the wood and create smoke. Using a medium speed on your drill works best. Don’t rush it; let the bit cut its way through cleanly.
MDF or Particle Board
These engineered materials are common in modern cabinetry. They are essentially wood fibers and glue. They drill very easily but are also the most likely to tear out on the back. Using that scrap wood block on the back is highly recommended for a clean hole in MDF. Standard drill bits work just fine here.
Regardless of the material, a high-quality, sharp set of drill bits makes a world of difference. To learn more about the different types, this guide from The Home Depot is a great resource for understanding what makes each bit special.
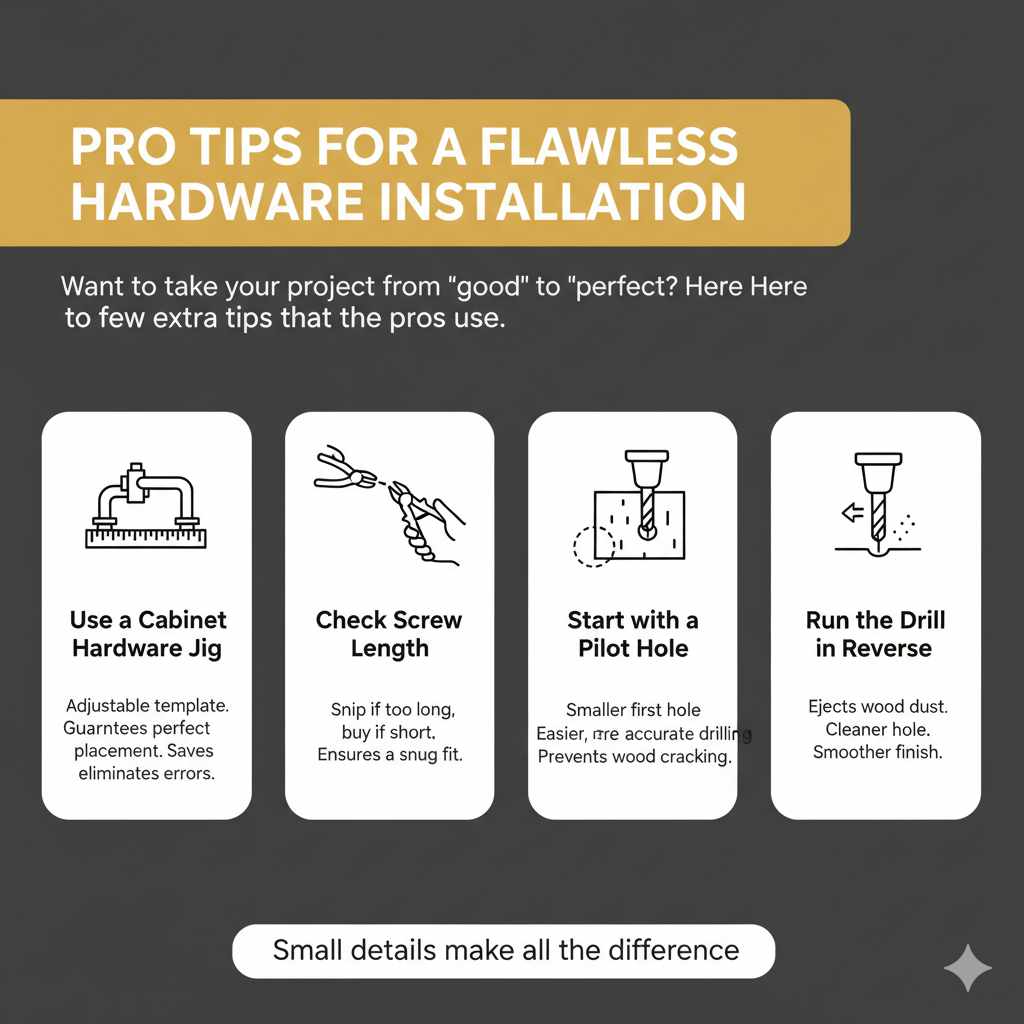
Pro Tips for a Flawless Hardware Installation
Want to take your project from “good” to “perfect”? Here are a few extra tips that the pros use.
- Use a Cabinet Hardware Jig: If you’re installing more than a few pulls, especially ones with two screws, a hardware jig is a game-changer. It’s an adjustable template that guarantees every hole is in the exact same spot on every drawer and door. It saves a massive amount of time and eliminates measuring errors.
- Check Screw Length: Sometimes the screws that come with hardware are a standard length and might be too long or too short for your specific cabinets. Most are designed to be snapped off at different lengths. If they are too long, you can use a pair of pliers to snap them at the score marks. If they are too short, you’ll need to buy the correct length at a hardware store.
- Start with a Pilot Hole: For very dense hardwoods or for very large screws, drilling a smaller “pilot” hole first can make the final drilling much easier and more accurate. Use a bit that’s about half the diameter of your final hole size.
- Run the Drill in Reverse: After drilling the hole, briefly run the drill in reverse to pull it back out. This helps to cleanly eject any remaining wood dust from the hole and can lead to a smoother finish.
Frequently Asked Questions (FAQ)
What is the standard drill bit for cabinet knobs?
The standard drill bit size for most cabinet knobs is the same as for pulls: 3/16 inch. This is because they almost always use the same 8-32 machine screw for mounting.
What happens if I use a drill bit that’s too big?
If your drill bit is too big, the screw threads won’t be able to grip the wood inside the hole. This will cause the knob or pull to feel loose, wobbly, and insecure. Over time, it can even damage the cabinet door as it wiggles around.
Can I just use a regular drill bit for wood?
Yes, absolutely. A standard HSS (High-Speed Steel) twist drill bit, which is what comes in most general-purpose sets, works perfectly fine for wood, especially for a small job like this. For the cleanest possible hole, a brad-point bit is even better, but it’s not a necessity.
How do I drill a straight hole without a drill press?
To drill a straight hole, start by making a dimple with a nail or center punch to guide the bit. Stand directly over your work so you are looking down on the drill. As you drill, try to keep your arm and the drill aligned, forming a 90-degree angle with the cabinet face. Drilling slowly and steadily helps maintain control.
What’s the difference between a drawer pull and a cabinet knob?
A cabinet knob is a single piece of hardware that attaches with one screw. A drawer pull (or handle) is longer and attaches with two screws. The process for drilling the holes is the same, but for a pull, you must be very precise with the spacing between the two holes.
Do I need to drill a pilot hole?
For a standard 3/16-inch hole for cabinet hardware, you typically do not need to drill a smaller pilot hole first. The main hole is small enough that it acts as its own pilot. The exception would be if you are drilling into extremely dense or brittle hardwood, where a pilot hole could reduce the risk of splitting.
What does an 8-32 screw mean?
The term “8-32” is a standard size in the Unified Thread Standard. The “8” refers to the major diameter of the screw (in this case, 0.164 inches), and the “32” means there are 32 threads per inch. It’s the most common screw used for cabinet hardware in North America.
Conclusion: You’ve Got This!
Choosing the right size drill bit for drawer pulls doesn’t have to be a stressful moment. As we’ve covered, it’s less about memorizing numbers and more about a simple, logical method. The “genius” answer is always right there in your hand: just compare the bit to the screw.
By finding a bit that’s a touch wider than the screw’s shaft but narrower than its threads, you guarantee a perfect, snug fit every time. Remember to use painter’s tape to protect your finish, measure carefully, and let the drill do the work. This small project is one of the fastest ways to completely change the look and feel of a room, and now you have the confidence to do it right.
So go ahead, open that package of new hardware, grab your drill, and give your cabinets the upgrade they deserve. You’ll be amazed at what a difference this simple, professional touch can make.