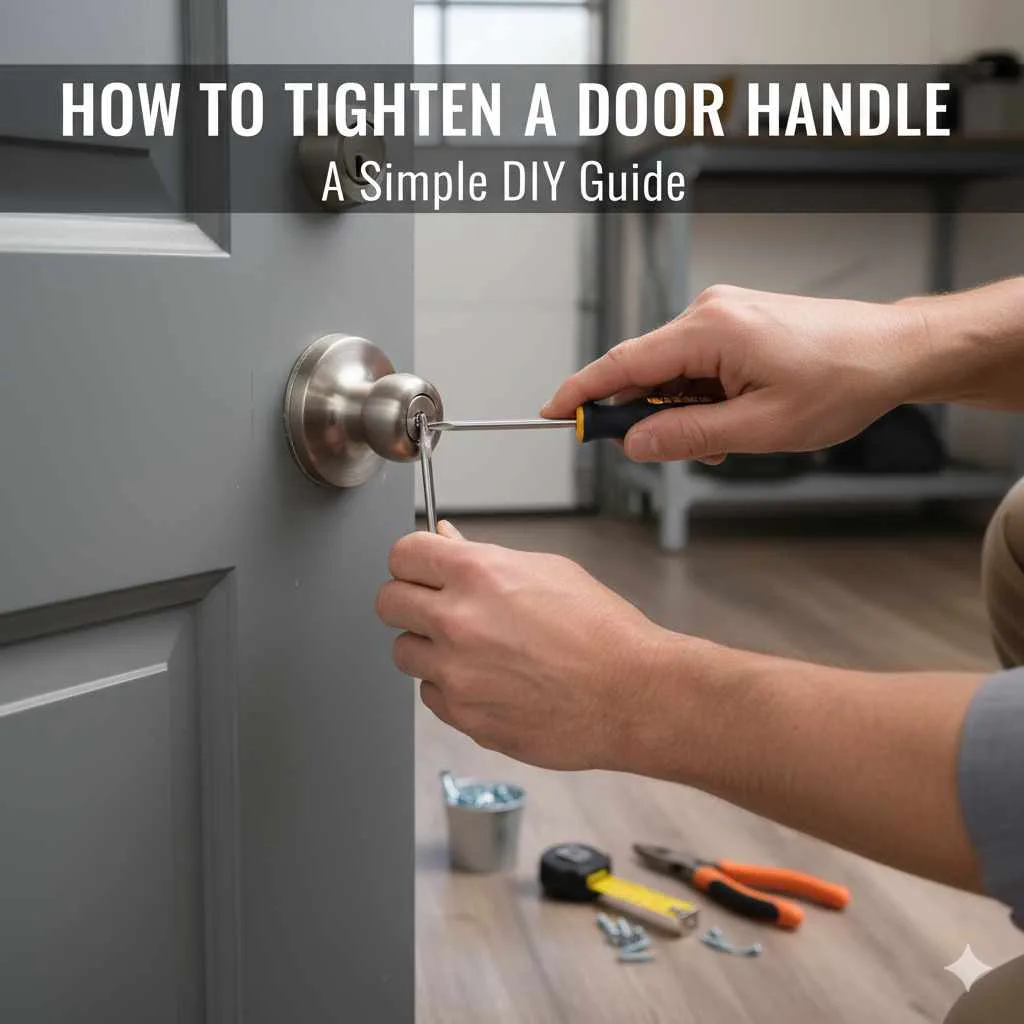
Quick Summary: A loose door handle is an easy fix! Learn how to tighten a wobbly door handle in minutes with simple tools. This guide provides clear, step-by-step instructions to restore stability and function to your doors, making your home feel more secure and polished.
Have you ever reached for a door handle, only to have it spin uselessly or feel alarmingly loose? It’s a common annoyance that can make even your own home feel a little less secure and polished. That wobbly door handle isn’t just an eyesore; it can be a sign that something isn’t quite right. The good news is that tightening a loose door handle is a remarkably simple DIY task. You don’t need to be a master handyman to tackle this common household problem. With just a few basic tools and a little bit of guidance, you can restore that satisfying solid feel to your doorknobs and levers. Let’s get your doors back in perfect working order!
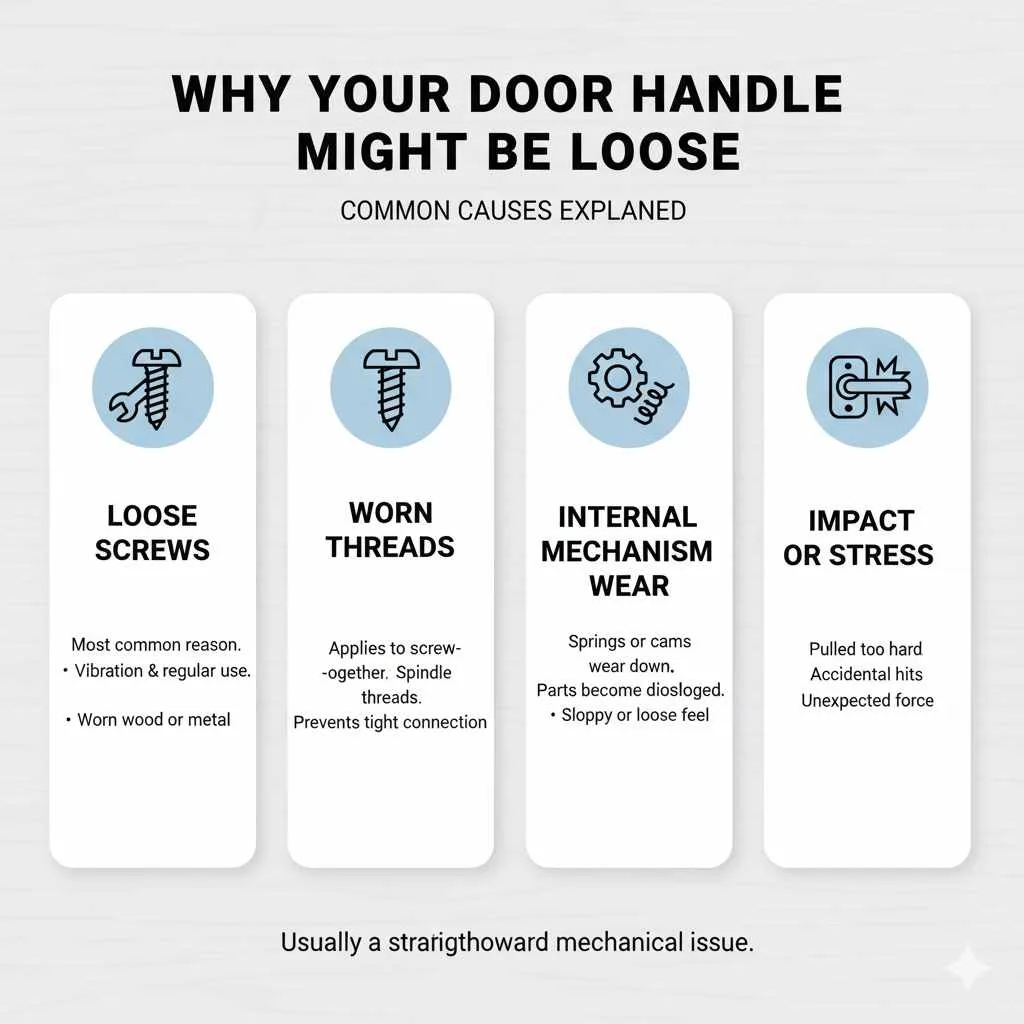
Why Your Door Handle Might Be Loose
Door handles become loose for a variety of reasons, but they generally fall into a few main categories. Understanding why can help you address the problem effectively and even prevent future issues. It’s usually a straightforward mechanical issue, not something to worry about extensively.
- Loose Screws: This is the most common culprit. Over time, the screws that hold the handle mechanism together can vibrate loose from regular use, or the wood or metal they’re screwed into can wear down slightly.
- Worn Threads: If your handles are the type that screw together directly, the threads on the spindle or within the handle itself might become worn, preventing a tight connection.
- Internal Mechanism Wear: The internal parts of the handle, like springs or cams, can sometimes wear down or become dislodged, leading to a loose or sloppy feel.
- Impact or Stress: Sometimes, a door handle can become loose due to unexpected stress, like being pulled on too hard or an accidental impact.
Tools You’ll Need for the Job
The beauty of fixing a loose door handle is that it typically requires very common household tools. You likely already have most, if not all, of these items in your toolbox or a kitchen drawer. This makes it a quick and accessible DIY project!
- Screwdriver Set: You’ll most likely need a Phillips head screwdriver (the one with the cross-shaped tip) and possibly a flathead screwdriver. Having a set with various sizes is ideal.
- Allen Wrench (Hex Key): Many modern door handles, especially those with a smaller set screw holding them onto the spindle, require an Allen wrench. These often come in sets.
- Small Pliers (Optional): Sometimes, you might need pliers to gently grip a small part or to help loosen a stubborn component.
- Damp Cloth: For wiping away any dust or grime.
- Small Container or Bowl: To keep screws and small parts from getting lost.
Identifying Your Door Handle Type
Before you start tightening, take a moment to identify the type of door handle you have. This will guide you to the correct method for tightening it. Most home door handles fall into one of these basic categories:
1. The Classic Knob with Visible Screws
These are the traditional round knobs. Often, the screws that hold the two halves of the knob mechanism together are visible on the rose (the circular plate against the door). Sometimes, you might need to remove a decorative cover to reveal them.
2. The Lever Handle with Visible Screws
Similar to the knob, lever handles also often have visible screws on the trim plate or rose. These are usually straightforward to access.
3. The Hidden Screw or Set Screw Handle
This is where an Allen wrench often comes into play. Many modern designs hide the screws to give a sleeker look. You’ll typically find a small set screw on the underside or side of the handle lever or knob, which secures it to the spindle.
4. The “Through-Bolted” Handle
Some handles have long bolts that go all the way through the door. The screws are usually visible on the interior side of the door, holding the mechanism together and securing both handles.
How to Tighten a Door Handle: Step-by-Step Guide
Now, let’s get down to business! Follow these steps, and you’ll have that wobbly handle feeling secure again in no time. Remember to work gently, especially if your door or handle is older or made of delicate material.
Step 1: Assess the Looseness
First, try to determine where the looseness is coming from. Does the entire handle assembly wobble away from the door? Or does the handle itself spin freely on its spindle, while the base stays put? This will help you pinpoint the problem area before you start removing parts.
Step 2: Locate the Screws
This is where identifying your handle type becomes crucial.
- For handles with visible screws: Look for screws on the decorative plate (rose) or the handle base. You might need to gently pry off a decorative cover plate if yours has one. Many decorative covers simply twist or pop off.
- For handles with hidden set screws: Look for a tiny hole on the underside or side of the handle lever or knob. This hole will likely house a small set screw.
Step 3: Tighten Visible Screws
If you found visible screws, grab an appropriately sized screwdriver from your set.
- Insert the screwdriver tip into the screw head.
- Turn the screw clockwise (to the right) to tighten it.
- Tighten until snug. Be careful not to overtighten, as this can strip the screws or crack the door material.
- Test the handle to see if the wobble has improved. You may need to tighten all screws on both sides of the door for a complete fix.
Step 4: Tighten Hidden Set Screws (Using an Allen Wrench)
If you found a small set screw, grab the correct size Allen wrench.
- Insert the Allen wrench into the set screw hole.
- Turn the wrench clockwise to tighten the set screw. This screw presses against the spindle, securing the handle in place.
- Tighten until you feel resistance. The handle should now feel much more secure on its spindle.
- If you have a matching handle on the other side, repeat this process if it also feels loose.
Step 5: Addressing Spindle or Through-Bolt Issues
Sometimes, the problem isn’t just loose exterior screws. The internal spindle or the through-bolts might be loose.
- For handles attached by a spindle: If the handle still feels loose after tightening the set screw, the spindle itself might be loose. You may need to remove the handle (often by unscrewing the set screw completely) to access the spindle and tighten any associated screws that hold the entire mechanism to the door.
- For through-bolted handles: If your handle has screws going all the way through the door, you’ll likely need to access the interior side. Tighten these screws firmly, again being careful not to overtighten.
Step 6: Reassemble or Adjust Fáceplates (If Necessary)
If you had to remove a decorative cover plate or a faceplate to access screws, carefully reattach it. Ensure it sits flush against the door. If the handle still feels shaky, you might need to adjust the rose or faceplate to ensure it’s seated properly.
Step 7: Test Thoroughly
Once tightened, test the door handle by opening and closing the door several times. Operate the latch and ensure everything functions smoothly. Give it a good wiggle to confirm it feels secure and stable. Congratulations, you’ve likely fixed it!
When the Tightening Doesn’t Fix It: Deeper Dive
If tightening screws doesn’t solve the wobble, it might be time to look a little more closely at the internal workings of the door handle. Don’t worry, even these issues are usually manageable for a DIYer.
Table: Common Door Handle Problems and Solutions
| Problem | Likely Cause | DIY Solution |
|---|---|---|
| Handle spins, but latch doesn’t retract | Internal spindle not properly connected to the latch mechanism. | Remove the handle(s). Check if the spindle is correctly inserted into the latch mechanism’s slot. Re-seat if needed. Tighten screws securely. |
| Handle feels “mushy” or has excessive play | Worn internal springs or components within the handle. | Often requires replacing the handle mechanism. For minor play, ensure all screws are tight. Sometimes a small shim can help if the rose is loose. |
| Latch doesn’t retract fully or springs back slowly | Latch mechanism itself is sticking or the spring is weak. | Remove the handle and latch plate. Lubricate the latch mechanism with a spray lubricant. If still faulty, the entire latch assembly may need replacement. This Old House offers great tips on latch issues. |
| Screws keep loosening | Pilot holes are stripped (in wood doors). | Use slightly larger screws. Alternatively, fill the stripped hole with wood filler or a wooden dowel and glue, let it dry, and re-drill a pilot hole before inserting the original screw. |
Replacing a Worn-Out Handle or Latch
If your handle is severely worn, rusted, or past its prime, tightening might only be a temporary fix. In many cases, it’s more cost-effective and a better long-term solution to replace the entire door handle set or the internal latch mechanism. Replacing an entire handle set is a very achievable DIY project. Most new sets come with clear installation instructions. You can find a wide variety of styles and finishes to match your home’s decor at hardware stores and online retailers.
For example, replacing the latch mechanism is often just a matter of unscrewing the old one from the edge of the door, sliding it out, and inserting the new one, followed by reattaching the handle. The Family Handyman provides excellent visual guides for such repairs.
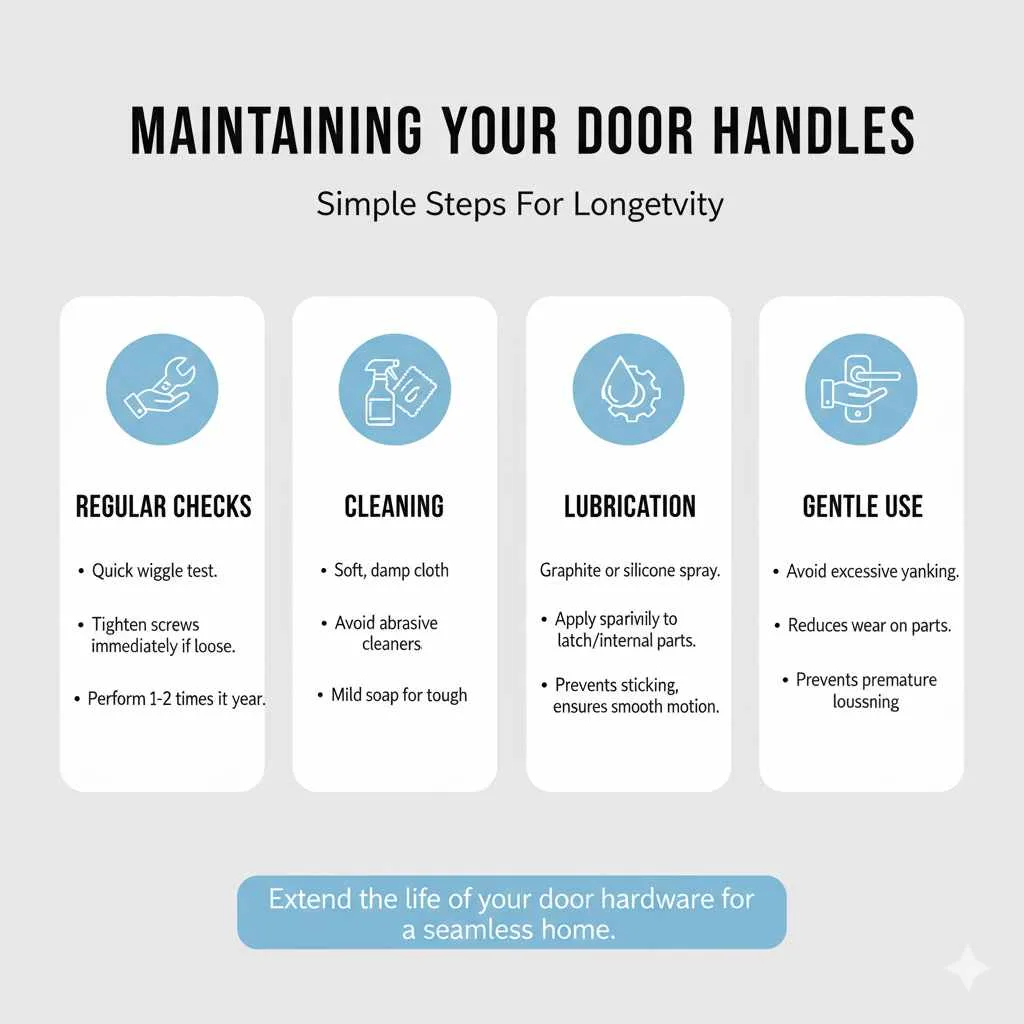
Maintaining Your Door Handles
Once you’ve got your door handles feeling solid and secure, a little bit of preventative care can go a long way in keeping them that way. This ensures they function beautifully for years to come, adding to the overall comfort and aesthetic of your home.
- Regular Checks: Periodically (perhaps once or twice a year), give your door handles a quick wiggle test. If you feel any looseness developing, tighten the screws immediately before it becomes a bigger problem.
- Cleaning: Clean your door handles regularly with a soft, damp cloth. Avoid abrasive cleaners that can scratch the finish. For tough grime, a little mild soap and water should do the trick.
- Lubrication: If a latch mechanism feels sticky or the handle isn’t moving smoothly, apply a small amount of graphite lubricant or a silicone-based spray around the latch bolt and the internal workings. Do this sparingly; you don’t want to attract excess dirt. You can find helpful lubrication advice from resources like Home Depot’s DIY guides.
- Gentle Use: Encourage family members to operate doors gently. While handles are designed for regular use, excessive yanking or forceful operation can prematurely loosen screws or wear out internal parts.
By incorporating these simple maintenance steps, you can extend the life of your door hardware and ensure your doors continue to operate smoothly and reliably, contributing to the seamless flow and welcoming atmosphere of your home.
Frequently Asked Questions (FAQ)
Q1: How do I know which type of screwdriver to use?
Look at the screw head. If it has a cross shape, you need a Phillips head screwdriver. If it’s a single straight slot, you need a flathead screwdriver. Make sure the tip of the screwdriver fits snuggly into the screw head to avoid stripping it.
Q2: Can I overtighten a door handle screw?
Yes, you can. Overtightening can strip the screw threads, meaning the screw will no longer grip properly and will just spin. It can also crack or damage the door material, especially if it’s wood, or warp the metal components of the handle.
Q3: My door handle is loose, but I can’t find any screws! What should I do?
This is common with more modern or decorative handles. Look very closely for a small, almost invisible hole on the underside, side, or even the back of the handle lever or knob. This hole likely contains a tiny set screw that needs an Allen wrench (hex key) to tighten.
Q4: How do I remove a decorative cover plate from my door handle?
Decorative cover plates, often called roses, are usually held on by friction or a simple twist mechanism. Gently try to twist the cover plate counter-clockwise. If it doesn’t budge, look for a small notch or slot where you might be able to carefully insert a thin flathead screwdriver or a putty knife and gently pry it away from the door. Be gentle to avoid damaging the plate or the door.
Q5: My interior door handle is loose. Is the process the same for exterior doors?
Yes, the general process of identifying screws and tightening them is the same for both interior and exterior doors. However, exterior door handles often require more robust construction and might have a different fastening system, but the principles of locating and tightening screws are consistent. Ensure any exterior hardware is also weather-resistant.
Q6: What if the screws are turning but the handle still wiggles?
This often indicates that the threads inside the door handle components, or the holes they screw into, are stripped or worn. You may need to try slightly larger screws, or, if it’s a wooden door, fill the stripped holes with wood filler or a small wooden dowel and glue, let it dry, and then re-drill a pilot hole for the screw.
Q7: Can I fix a loose door handle without taking it apart?
In many cases, yes! If you can locate visible screws on the rose or trim plate, or a set screw on the handle itself, tightening those is usually all that’s needed. If the looseness is due to internal wear or a damaged spindle, you will likely need to disassemble at least part of the handle mechanism.
Conclusion
Tackling a loose door handle might seem like a small task, but it’s one that makes a significant difference in the comfort and security of your home. You’ve learned to identify common causes, gather simple tools, and follow clear, step-by-step instructions to tighten virtually any type of door handle. Remember, the key is observation: find those screws, take a breath, and gently tighten them clockwise. Even if you discover a deeper issue, you now have the knowledge to troubleshoot further, whether it’s re-seating a spindle or considering a replacement.
Fixing this common annoyance not only restores functionality but also adds a subtle touch of polish to your living space. It’s a small victory in your DIY journey, building confidence and proving that you’ve got this! Enjoy the satisfying solid feel of your newly secured door handles, and feel proud of the simple yet effective improvement you’ve made.