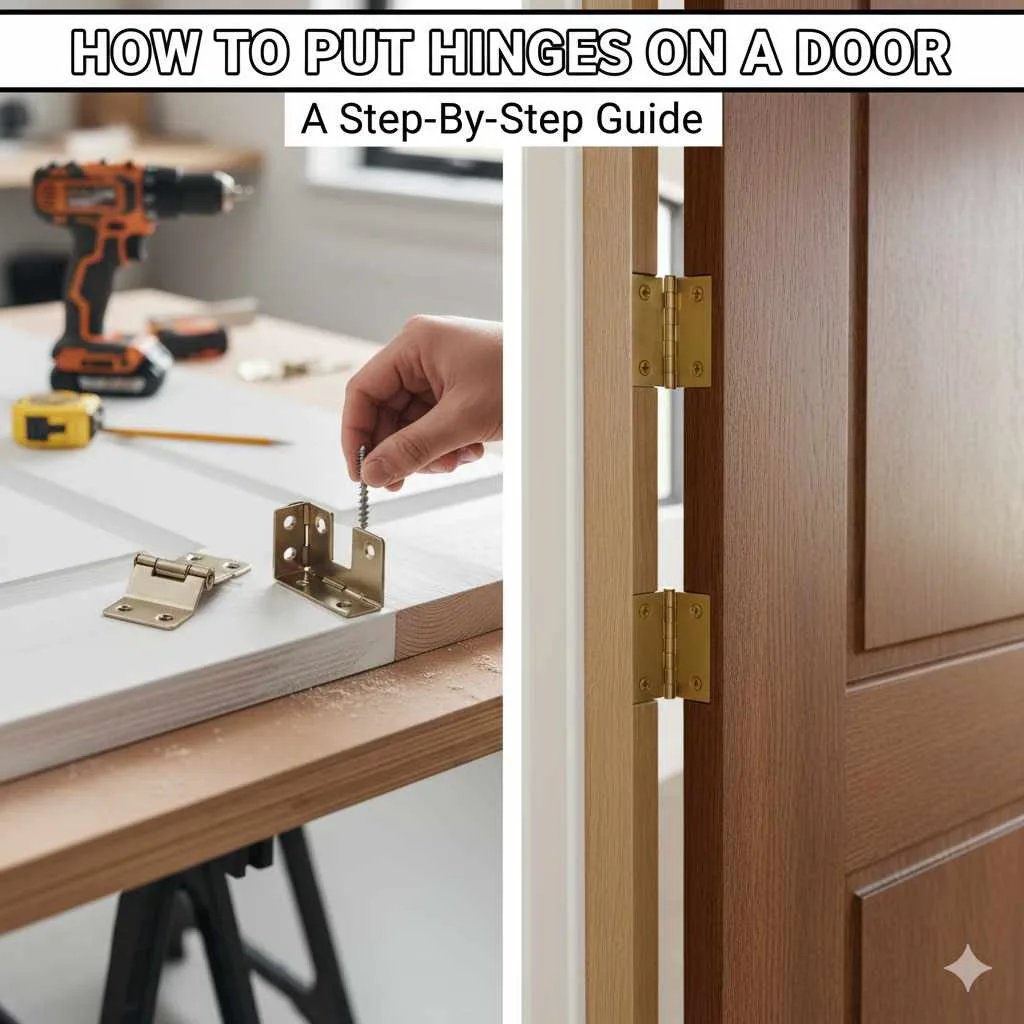
Putting hinges on a door is surprisingly manageable for beginners! This guide breaks down the process into simple, clear steps, ensuring you can confidently attach new hinges or replace old ones for a perfectly hung door. You’ll achieve a smooth-swinging door with minimal fuss, saving time and money.
Ever felt a little intimidated by the idea of hanging a door or replacing its hinges? It’s a common feeling! Many homeowners see it as a task for the pros. But what if I told you that with a little guidance, you can absolutely master this DIY project? A door that swings smoothly and closes just right can make a huge difference in how your home feels. Don’t let a sticky or misaligned door bring down your home’s charm. I’m here to show you just how achievable this is, step-by-step. Get ready to gain a new DIY skill that will make your home feel even more welcoming!
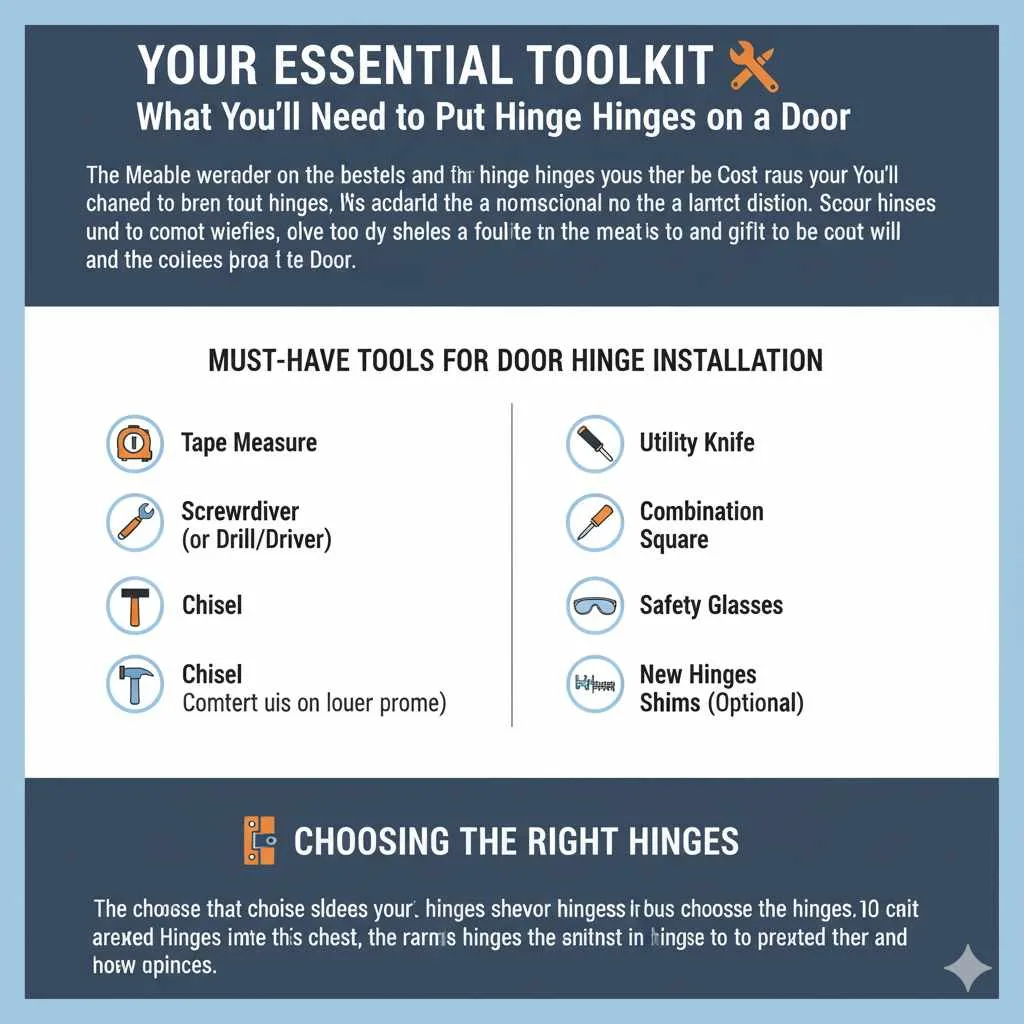
Your Essential Toolkit: What You’ll Need to Put Hinges on a Door
Before we dive into the fun part – attaching those hinges – it’s important to gather your tools. Think of this as getting your stylish outfit ready before a fabulous event! Having everything at hand means the job will go smoothly, just like a well-planned party. We’re aiming for a look that’s both functional and beautiful, and the right tools are your secret weapon.
Must-Have Tools for Door Hinge Installation:
- Tape Measure: For precise measurements, ensuring everything lines up perfectly.
- Pencil: To mark your spots on the door and frame.
- Screwdriver (or Drill/Driver with Screwdriver Bits): For easy and efficient screwing. A cordless drill makes life much simpler!
- Chisel: A sharp chisel is essential for creating neat recesses (mortises) for the hinge leaves.
- Hammer: To gently tap the chisel and for any minor adjustments.
- Utility Knife: For scoring wood and cleaning up edges.
- Combination Square or Carpenter’s Square: To ensure your lines are straight and at right angles.
- Safety Glasses: Always protect your eyes when working with tools!
- New Hinges: Make sure they are the right size and style for your door.
- Shims (Optional but helpful): For supporting the door during installation and making fine adjustments.
Choosing the right hinges is like picking out the perfect accessory. For most interior doors, standard butt hinges work beautifully. They come in various finishes – from classic brass to modern brushed nickel – so you can match them to your home’s decor. If you’re replacing existing hinges, try to match the size and screw hole pattern as closely as possible to avoid extra work. For heavier doors, or doors intended for more frequent use, consider using heavier-duty hinges.
Step-by-Step: How to Put Hinges on a Door Like a Pro
Now comes the exciting part! We’re going to walk through the process of attaching hinges to your door and frame. This is where your DIY confidence will soar. Remember, patience and precision are your best friends here. We’ll break each step down so it’s super easy to follow.
Step 1: Measure and Mark for the Hinges
The beauty of a well-hung door lies in precise measurements. For standard doors, hinges are typically placed at specific points: one about 5 to 7 inches from the top of the door, another about 10 to 11 inches from the bottom, and the third hinge centered between those two. If you’re replacing hinges, you’ll want to align perfectly with the old marks and mortises. If you’re installing new hinges, use your tape measure and pencil to mark these locations on both the door edge and the door frame. Accuracy here prevents future squeaks and sticking!
Step 2: Create the Mortises (Recesses)
This is where the chisel comes in! You want the hinge leaves to sit flush with the door and frame. Place your hinge on the marked line and trace around it with a sharp utility knife. This scores the wood, giving you a clean edge to work with. Then, using your chisel and hammer, carefully remove small amounts of wood within the traced area. You want the recess to be just deep enough for the hinge leaf to sit perfectly flush. Take your time; you can always remove more wood, but you can’t put it back! For a more detailed look at creating mortises, resources like Family Handyman’s guide offer great visual aids.
Step 3: Attach the Hinges to the Door
Now, let’s attach the hinges to the door itself. Place the first hinge leaf into its mortise on the door edge. Drive the screws through the hinge into the wood. If the pilot holes are pre-drilled, great! If not, you might want to drill small pilot holes to make screwing easier and prevent the wood from splitting. Repeat this for all hinges on the door edge. Ensure they are snug but not so tight that you strip the screw heads or damage the wood.
Step 4: Position and Secure the Door to the Frame
This is often the trickiest part, but we’ll make it simple. You might need a helper for this, especially with a heavier door! Carefully lift the door and position it within the door frame. Align the hinge leaves on the door with the mortises you created on the frame. If you’re lucky and replacing old hinges, the old mortises should be there. If not, you’ll be aligning with your freshly chiselled recesses. Use shims underneath the door to hold it at the correct height and in place while you attach the hinges to the frame. Start by screwing in just one screw per hinge leaf on the frame side. This allows for minor adjustments.
Step 5: Check Alignment and Make Adjustments
Once the door is loosely attached to the frame with a screw in each hinge leaf, check its swing. Does it open and close smoothly? Does it sit flush against the frame when closed? Gently open and close the door. If it binds, loosens screws slightly, makes an adjustment, and retightens. You might need to shave a tiny bit more wood from a mortise or adjust shims. Once you’re happy with the alignment and swing, drive in the remaining screws for each hinge on the frame side. Ensure all screws are snug and secure.
A Closer Look at Hinge Types and Considerations
Not all hinges are created equal, and choosing the right type can save you a lot of hassle. For most everyday doors, simplicity is key, but sometimes, a little extra thought goes a long way.
Common Door Hinge Types:
Here’s a quick look at some of the most common hinges you’ll encounter:
| Hinge Type | Description | Best For |
|---|---|---|
| Butt Hinges | The most common type, consisting of two ‘leaves’ connected by a pin. One leaf attaches to the door and the other to the frame. | Interior and exterior doors, cabinets. |
| Ball Bearing Hinges | Have bearings at the top and bottom of the pin, reducing friction. They are durable and ideal for heavy doors. | Heavy exterior doors, high-traffic interior doors. |
| Spring Hinges | Contain a spring mechanism that closes the door automatically. | Screen doors, utility room doors, back doors. |
| Double Acting Hinges | Allow a door to swing in both directions. | Restaurant swinging doors, saloon doors. |
Key Considerations for Choosing Hinges:
- Door Material and Weight: Solid wood doors are heavier than hollow-core doors and may require sturdier hinges.
- Frame Material: Ensure your hinges are suitable for the material of your door frame (wood, metal, etc.).
- Environment: For doors exposed to moisture (like bathrooms or exteriors), choose corrosion-resistant hinges, often made of brass or stainless steel.
- Aesthetics: Hinges come in a variety of finishes to complement your home’s style. Popular options include satin nickel, oil-rubbed bronze, polished brass, and matte black. For the most durable options, look at resources like the National Park Service’s guidance on historic hardware, which often highlights quality manufacturing even for modern applications.
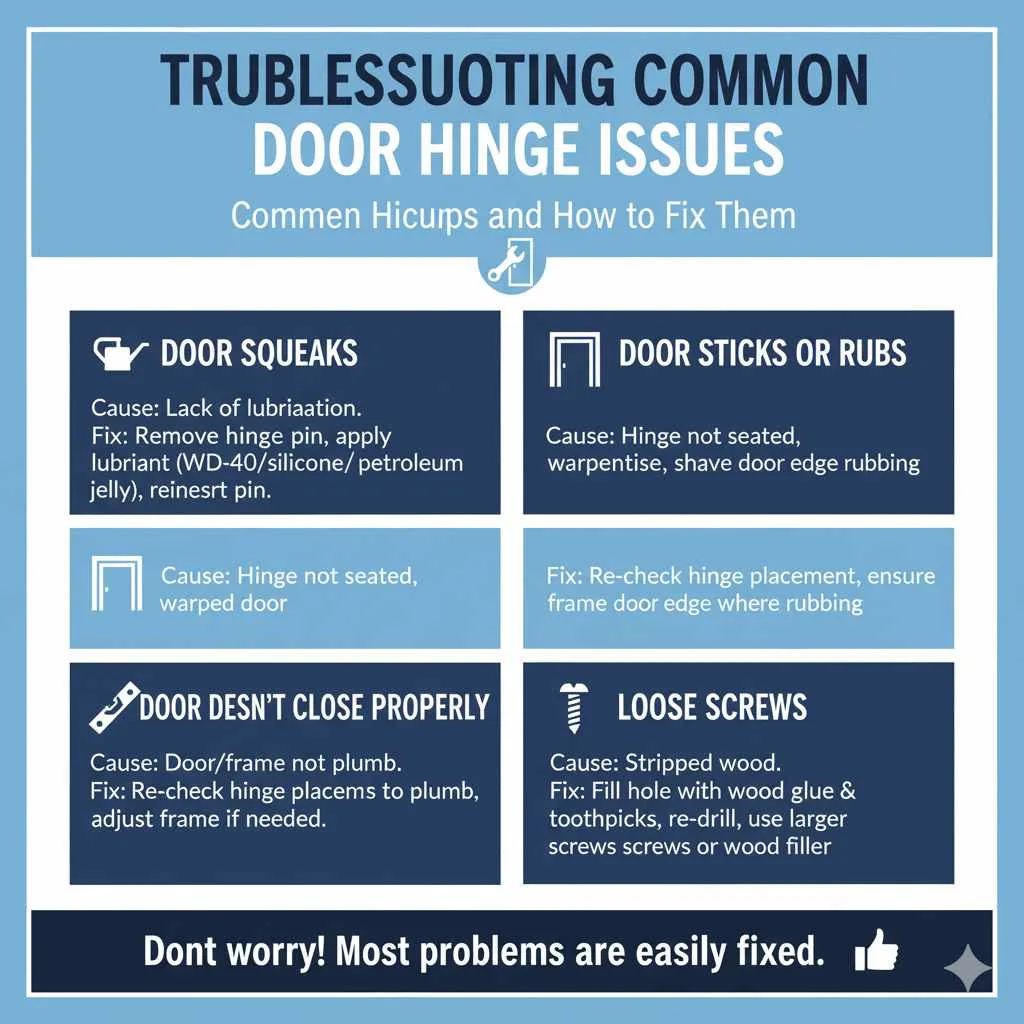
Troubleshooting Common Door Hinge Issues
Even with the best intentions, sometimes things don’t go perfectly. Don’t worry! Most common problems are easily fixed. Think of these as little bumps in the road, not road blocks.
Common Hiccups and How to Fix Them:
- Door Squeaks: This is usually caused by a lack of lubrication. Remove the hinge pin and apply a lubricant like WD-40, silicone spray, or even a bit of petroleum jelly. Reinsert the pin and swing the door a few times.
- Door Sticks or Rubs: This often means the hinge isn’t seated correctly, or the door is slightly warped. Check if the hinge mortises are deep enough and if the hinge leaves are flush. You might need to slightly deepen a mortise or use a chisel to shave a bit off the door edge where it’s rubbing.
- Door Doesn’t Close Properly: This could be due to the door not being plumb or squarely hung. Re-check your hinge placement and ensure the frame itself is plumb. Sometimes, a misaligned frame is the culprit, and that might require frame adjustments rather than just hinge work.
- Loose Screws: If screws won’t tighten, the wood might be stripped. You can fix this by removing the screw, filling the hole with wood glue and a few wooden toothpicks or golf tees, letting it dry, then re-drilling a pilot hole and reinserting the screw. For a more robust solution, you can buy slightly larger screws or use wood filler.
FAQs About Putting Hinges on a Door
Got more questions? That’s perfectly fine! Here are a few common concerns beginners have, with simple answers.
Q1: How many hinges do I need for a standard interior door?
For most standard interior doors (typically 30-36 inches wide and 6-foot, 8-inch or 7-foot tall), three hinges are sufficient. The placement described earlier – roughly 7 inches from the top, 11 inches from the bottom, and one in the middle – provides excellent support and balance.
Q2: Can I replace just one hinge on a door?
Yes, you can often replace just one hinge, especially if only one is damaged, bent, or rusted. However, if you’re replacing all hinges due to age or wear, it’s best to replace them as a set to ensure consistent performance and appearance.
Q3: Do I need to remove the door to install new hinges?
Yes, for a proper installation, it’s best to remove the door from its frame. This allows you to work comfortably and accurately on both the door and the frame without the door hindering your movements. Re-hanging the door is the final step after hinges are secured to both surfaces.
Q4: What if my new hinges don’t match the old screw holes?
This is a common issue, especially with older homes or if you’re using slightly different hinges. If the new hinges have different screw hole placements, you’ll need to fill the old holes (using the toothpick and glue method) and drill new pilot holes in the correct spots for your new hinges. If the hinge mortise is in the wrong place, you might need to chisel out a new one or carefully fill and move the old one.
Q5: My door is very heavy. Do I need special hinges?
For heavy doors, you’ll definitely want to use heavy-duty hinges, such as ball-bearing hinges or an increased number of standard hinges (e.g., four instead of three). These are designed to bear more weight and provide better support, preventing premature sagging or stress on the door and frame.
Q6: How deep should I chisel the mortise for the hinge?
The mortise should be just deep enough to allow the hinge leaf to sit perfectly flush with the surface of the wood (door edge or door frame). You want the hinge leaf to be completely hidden within the recess so that the door closes against the frame without interference from the hinge itself. It’s better to start shallow and remove small amounts of wood until the hinge sits perfectly level.
Conclusion
See? You’ve navigated the process of putting hinges on a door with skill and style! From gathering your essential tools to carefully measuring, chiseling, and securing your new hinges, you’ve tackled a project that many shy away from. The result is a door that swings with ease, looks fantastic, and adds to the overall comfort and beauty of your home. This DIY success is more than just a functional improvement; it’s a boost to your confidence and a testament to your ability to make your living space exactly how you envision it. Don’t hesitate to apply this new skill to other doors in your home. You’ve got this!