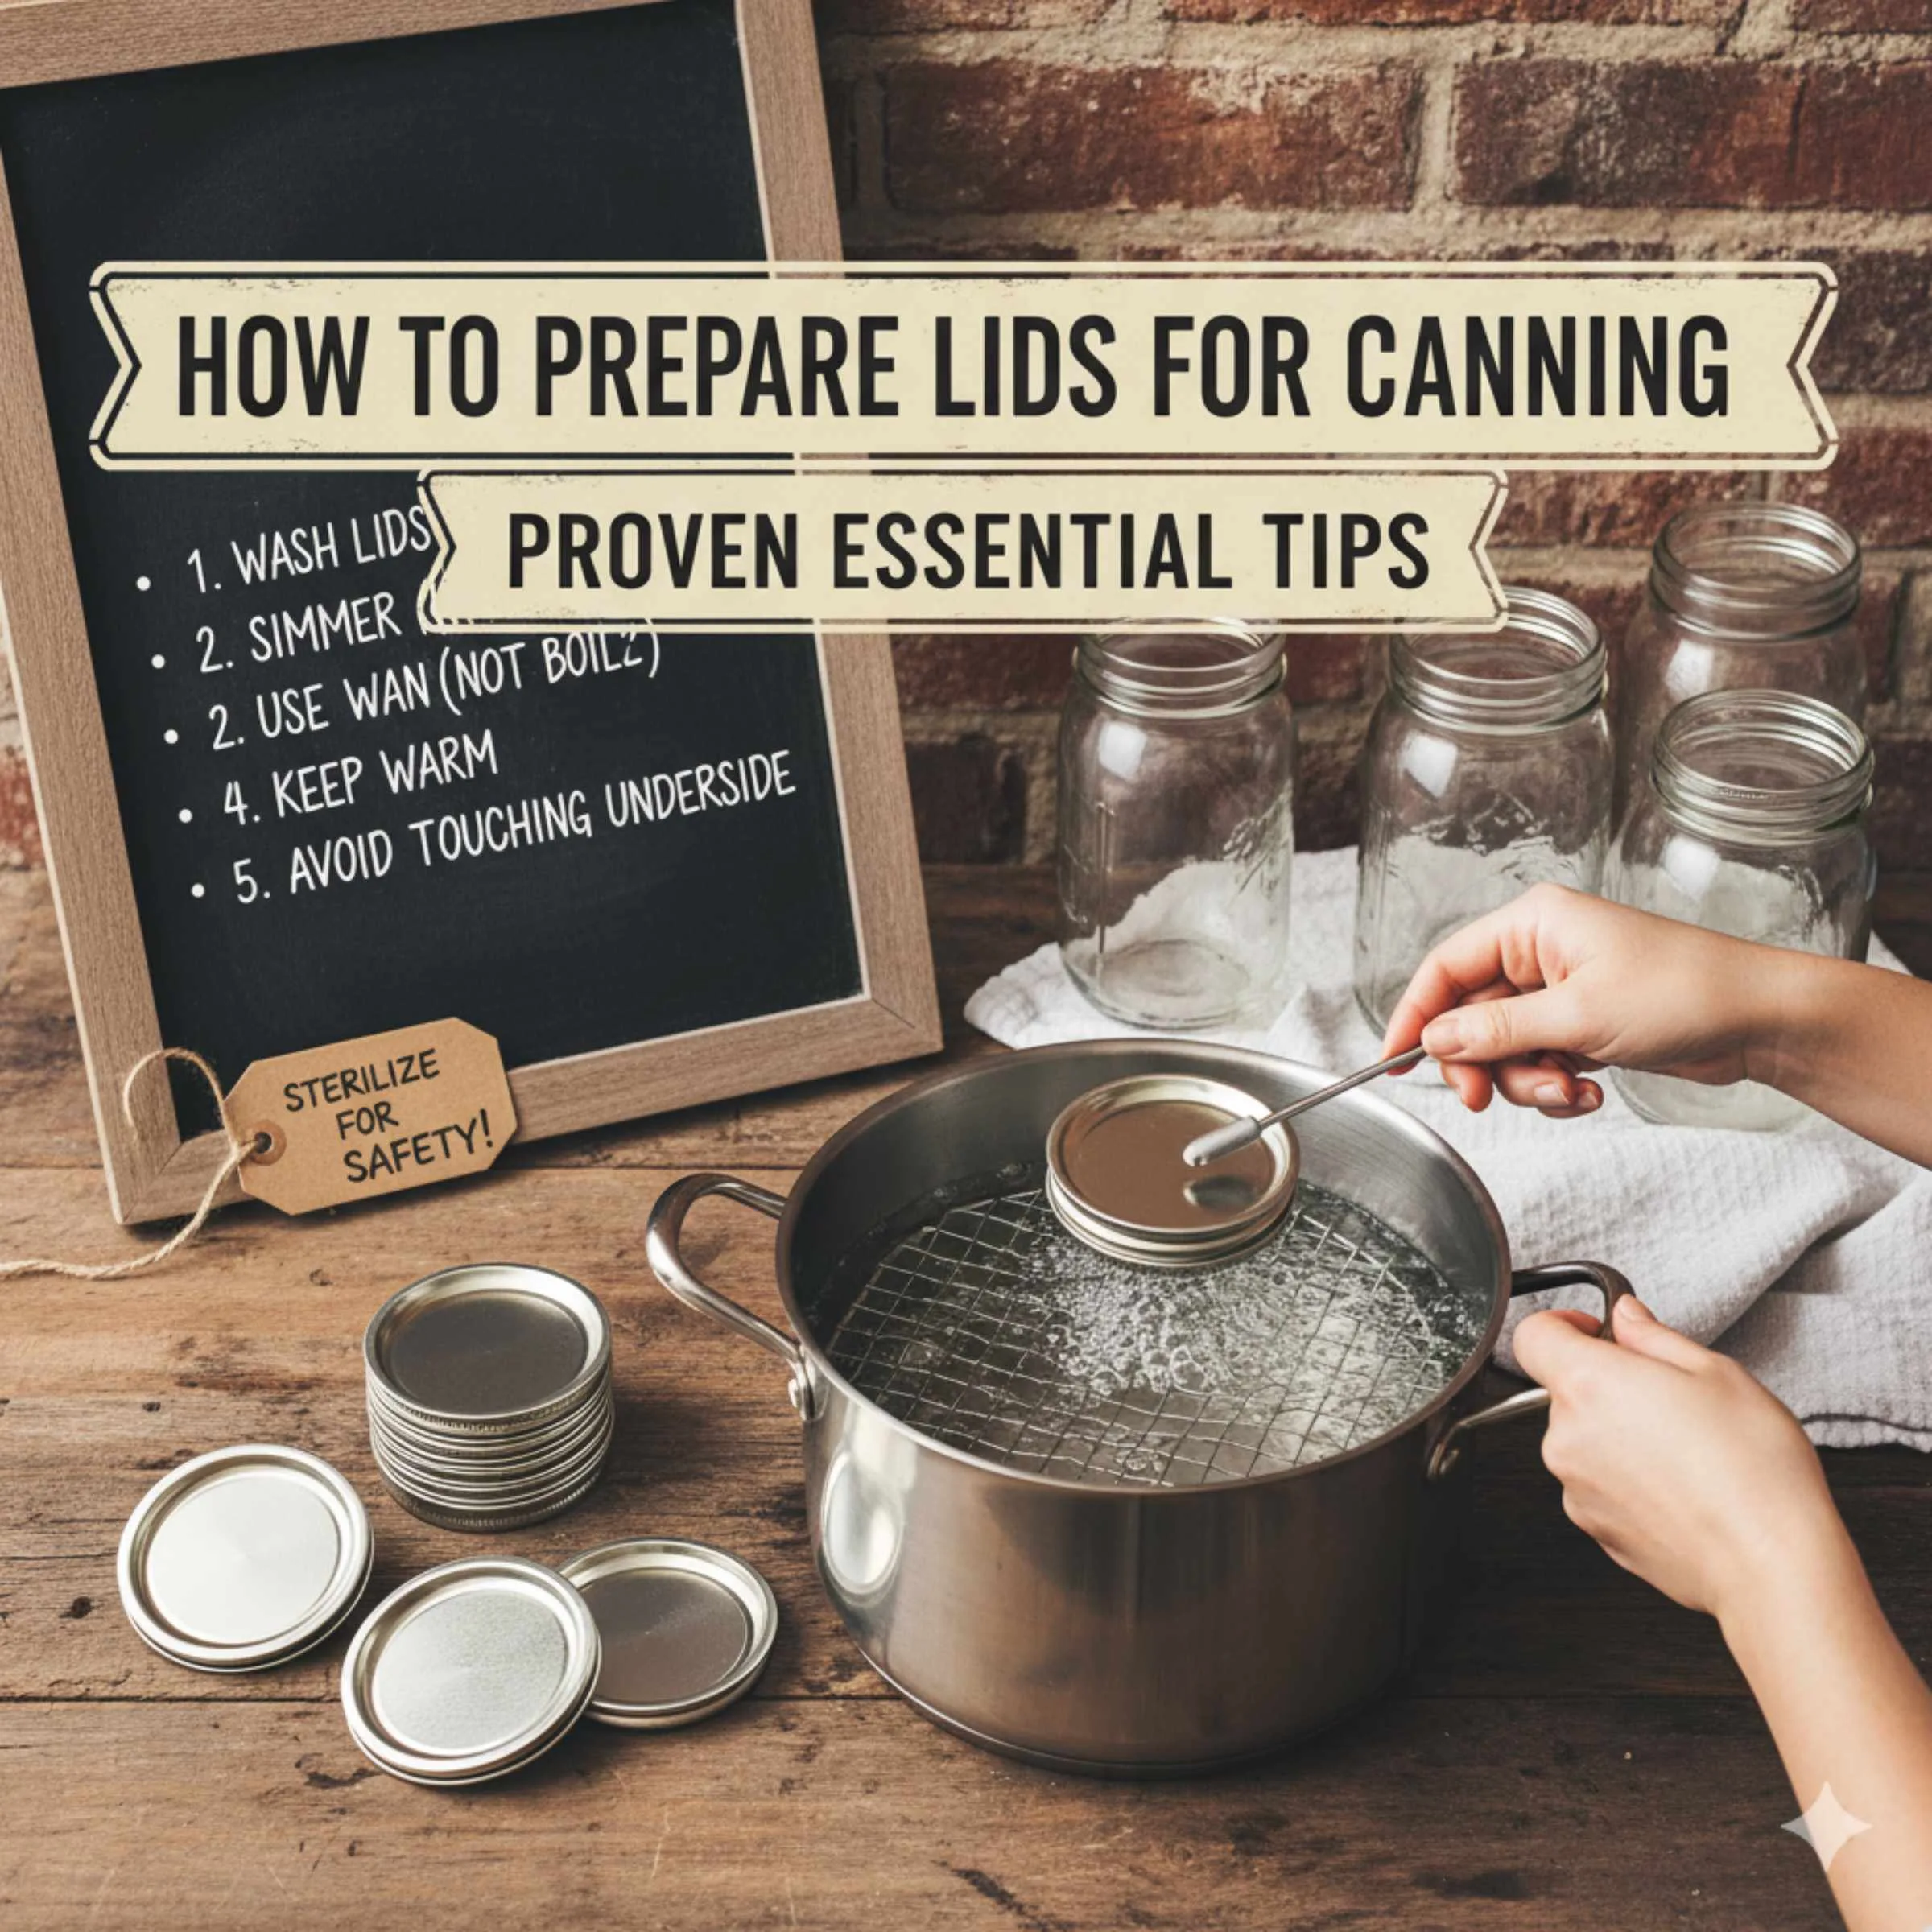
To properly prepare lids for canning, you must clean them and then soften the sealing compound by heating them gently in hot (not boiling) water for about 10 minutes just before use. This crucial step ensures a safe, airtight seal for long-term food preservation.
Are you ready to put up your garden harvest or enjoy homemade jellies all year long? Canning is a fantastic way to save food and fight off those pantry boredom blues. However, that final step—getting the lid to seal just right—can feel tricky. Many new canners worry about wasted time or spoiled food if the lids don’t grip the jar properly. Don’t stress! Preparing your canning lids is easier than you think. We will walk through the simple, safe steps so you can confidently seal every jar perfectly. Let’s dive into the proven tips that make sure your hard work stays fresh and safe.
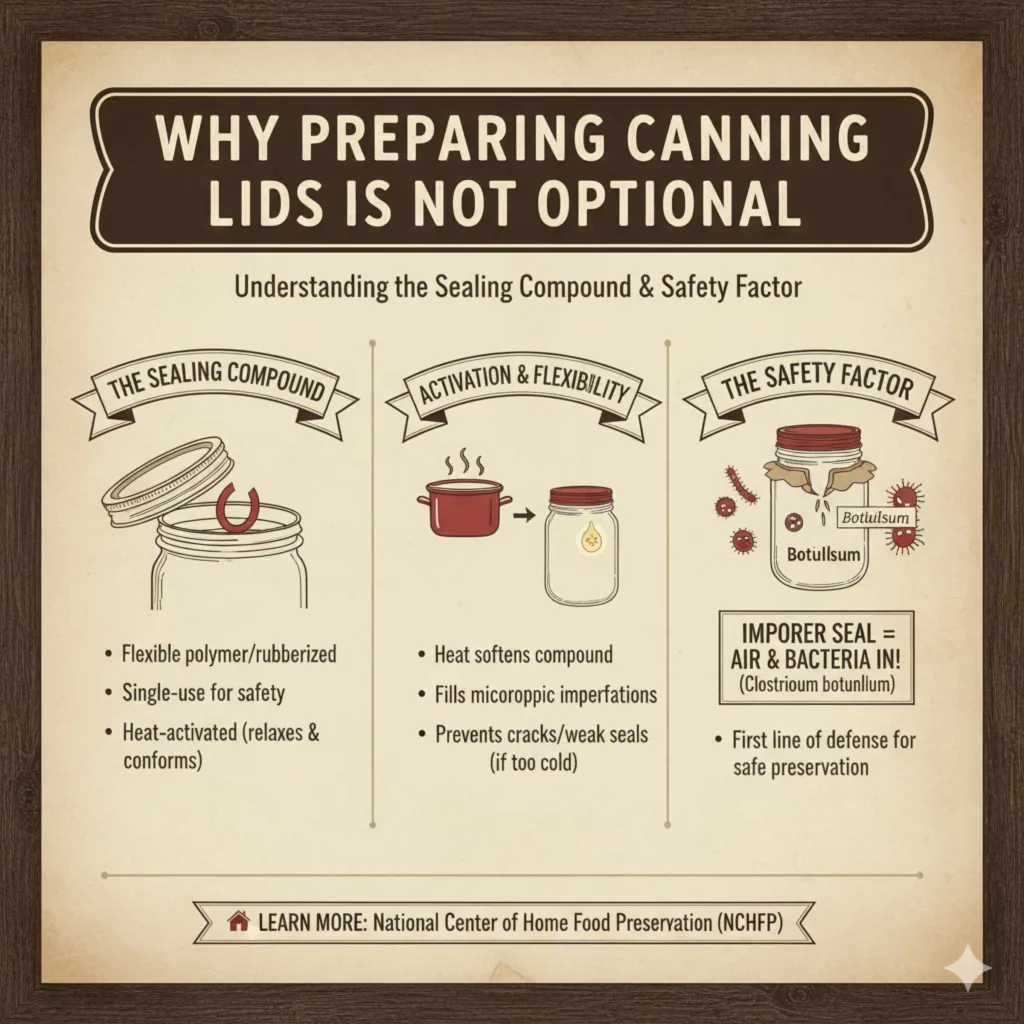
Why Preparing Canning Lids Is Not Optional
You might wonder why you can’t just snap a clean lid onto a hot jar and call it a day. The answer lies in the small, rubbery ring—the sealing compound—that lives on the underside of your two-piece canning lids. This compound is what creates the powerful vacuum seal necessary for safe home preservation.
Understanding the Sealing Compound
Lids, especially the common flat metal discs made by Ball or Kerr, are designed for single use to ensure safety. The sealing compound is almost always made of a type of flexible polymer or rubberized material. Think of it like the gasket in your car engine—it needs to be slightly soft to conform perfectly to the glass rim of the jar.
- Activation: Heat relaxes the slightly stiff compound. This allows it to flow just enough to fill microscopic imperfections on the jar rim when the lid is tightened and the jar cools.
- Flexibility: If the compound is too cold or stiff (straight from the box), it might crack or not press evenly, leading to a weak seal or—worse—a jar that fails to seal entirely, allowing air and bacteria in.
- Cleanliness: Dirt, dust, or factory residue on the sealing compound can prevent a proper bond. A quick wash removes these contaminants.
The Safety Factor: Preventing Botulism
While exciting, home canning carries real responsibility. An improper seal means air gets in, and that air can carry dangerous bacteria, like Clostridium botulinum. Although proper processing times (like boiling water baths or pressure canning) handle most threats, a perfect seal is your first line of defense. As the National Center for Home Food Preservation suggests, ensuring proper sealing is paramount for shelf stability and food safety.
Step 1: Inspecting and Cleaning Your Lids
Before any heating happens, every single lid needs a quick check-up. Think of this like checking your tires before a long road trip—you only want reliable equipment doing the job.
What You Need for Inspection and Cleaning
Gather these simple supplies:
- New (unused) two-piece canning lids (flats and rings).
- A bowl or small pot of clean, warm water.
- A clean dishcloth or paper towels.
The Inspection Checklist
Don’t just grab lids out of the box! Take a minute to check them:
- Rust or Damage: Throw away any lid that shows signs of rust, deep scratches, or dents, especially around the rim or the sealing compound edge.
- The Compound: Look closely at the rubbery ring. Does it look smooth and uniform? Are there any dry, cracked, or missing spots? If yes, discard it.
- Rings: Screw bands (rings) are reusable, but if they are rusty or bent, they can prevent even tightening. Replace bent rings immediately.
Washing the Lids
This step is about removing anything that might get trapped between the lid and the jar rim.
- Fill a small saucepan or bowl with warm tap water. You do not need soap, but a tiny drop of mild dish soap is okay if you rinse it very thoroughly afterward.
- Place the flat lids gently into the water.
- Let them soak for a minute or two. The goal is just to wipe them clean, not to cook them yet.
- Use your fingers or a very soft cloth to gently wipe the top and bottom of each lid. Pay special attention to the underside where the sealing compound is.
- Drain the water and set the clean lids to the side on a clean towel while you prepare the jars.
Step 2: The Essential Heating Process (Softening the Seal)
This is the most crucial part of preparing your lids. Heating them activates the sealing compound, ensuring a strong vacuum forms as the contents cool down. However, there is a big distinction between heating and boiling.
The Temperature Trap: Why Boiling is Bad
This is where many beginners run into trouble. Boiling water is too harsh for the sealing compound on modern lids. High heat can degrade the material, making it too soft or even causing it to melt slightly, which ruins its elasticity and sealing ability. Always aim for hot, but not vigorously boiling, water.
Quick Temperature Guide for Lid Preparation:
| Method | Ideal Temperature Range | Why This Temperature? |
|---|---|---|
| Water Bath Method (Recommended) | 180°F to 190°F (82°C to 88°C) | Softens the gasket without damaging the polymer structure. |
| Too Hot (Boiling) | 212°F (100°C) | Can destroy the softening agent, leading to seal failure. |
| Not Hot Enough | Below 150°F (65°C) | Does not fully activate the sealing compound. |
The Standard Water Bath Method (The Safest Bet)
This method is the standard recommendation from major canning supply companies and USDA guidelines because it heats the lids evenly and gently.
- Place the cleaned flat lids into a clean, small saucepan.
- Cover the lids completely with water—about an inch above the tops of the lids is fine.
- Place the pot on the stove over medium heat.
- Watch the water closely. You want to see tiny bubbles forming around the edges of the pot and small, lazy bubbles rising from the lids. This indicates you are near the correct temperature (around 180°F).
- Crucially: As soon as you see these small bubbles, reduce the heat immediately to keep the water hot, but stop it from reaching a rolling boil.
- Keep the lids simmering gently in this 180°F water bath for 10 minutes. This gives the compound the perfect amount of time to soften.
Alternatives for Heating Lids (If You Are Short on Space)
If your canner pot is already full of jars or you are just doing one or two pints, you might want an alternative soaking method. Remember, the goal is consistent, moderate heat.
- The Jar Method: Place the clean lids in a small, heat-safe bowl. Pour already hot tap water (near boiling, but not boiling) over them. Let them sit for 10 minutes. This is often less consistent than using the stove, so ensure your tap water is piping hot.
- The Pot Method (No Jars): If you are using a pressure canner, you can often heat the lids in a separate small saucepan while the pressure gauge comes up, saving space in the main canner’s water reservoir.
Step 3: Handling and Placing Hot Lids
Once the 10 minutes are up, your lids are primed and ready for action. This step requires dexterity, as the lids and jars will both be very hot.
Keep Them Warm Until Use
Do not let the lids cool down once they have been softened. If they cool, the sealing compound stiffens again. Keep them submerged in the hot water until the absolute moment you are ready to place them on the filled jars.
When you are ready to use them:
- Turn off the heat under the saucepan holding the lids.
- Using clean, clean tongs (magnetized tips are great if you have them, but clean metal tongs work), carefully lift one lid out of the water.
- Allow the excess water to drip off, but do not wipe or dry the sealing compound! You want that slight moistness as it aids in the final seal formation.
- Place the hot, softened lid directly onto the rim of your freshly filled and vented jar.
The Final Tightening: Fingers Only!
This is another common mistake beginners make. Over-tightening lids can actually cause them to warp or prevent air from escaping during the processing stage, leading to a poor seal or even jar breakage.
- Place the Flat Lid: Center the hot lid on the jar.
- Apply the Ring: Screw on the band (the screw ring).
- The Fingertip Tightness Rule: Tighten the band only until you feel resistance. Then, tighten it just a tiny bit more—this is often described as “fingertip tight.” For most people, this means applying gentle pressure with two fingers until you feel the threads catch firmly.
Why Fingertip Tight? During processing (boiling or pressure canning), steam needs an escape route. If the lid is screwed on too tightly, the expanding air/steam cannot escape. When the canner cools, this trapped air creates a weak seal or pushes the lid upward, leading to seal failure. The slight looseness allows air out, and once the canner cools, the downward pressure creates the perfect vacuum seal.
A Note on Reusable Lids and Newer Technologies
Are you moving past the standard two-piece lids? While the basic preparation rules are similar, there are a few things to know about alternative sealing methods.
One-Piece Lids (e.g., Tattler Plastic Lids)
Some serious canners prefer reusable plastic lids, which use a separate rubber gasket. These generally must be soaked in very hot water (often near boiling) for a longer duration, sometimes up to 30 minutes, to fully saturate and soften the separate rubber gasket before assembly. Always follow the specific manufacturer’s instructions for these reusable systems, as high heat application can vary greatly.
Lids for Freezing (Not Canning)
If you are prepping jars to go into the freezer (like freezing soup or chili), you do not need to heat a sealing compound because freezing relies less on a vacuum seal and more on preventing freezer burn. For freezer jars, simply clean the lids well and screw the bands on firmly for a tight closure.
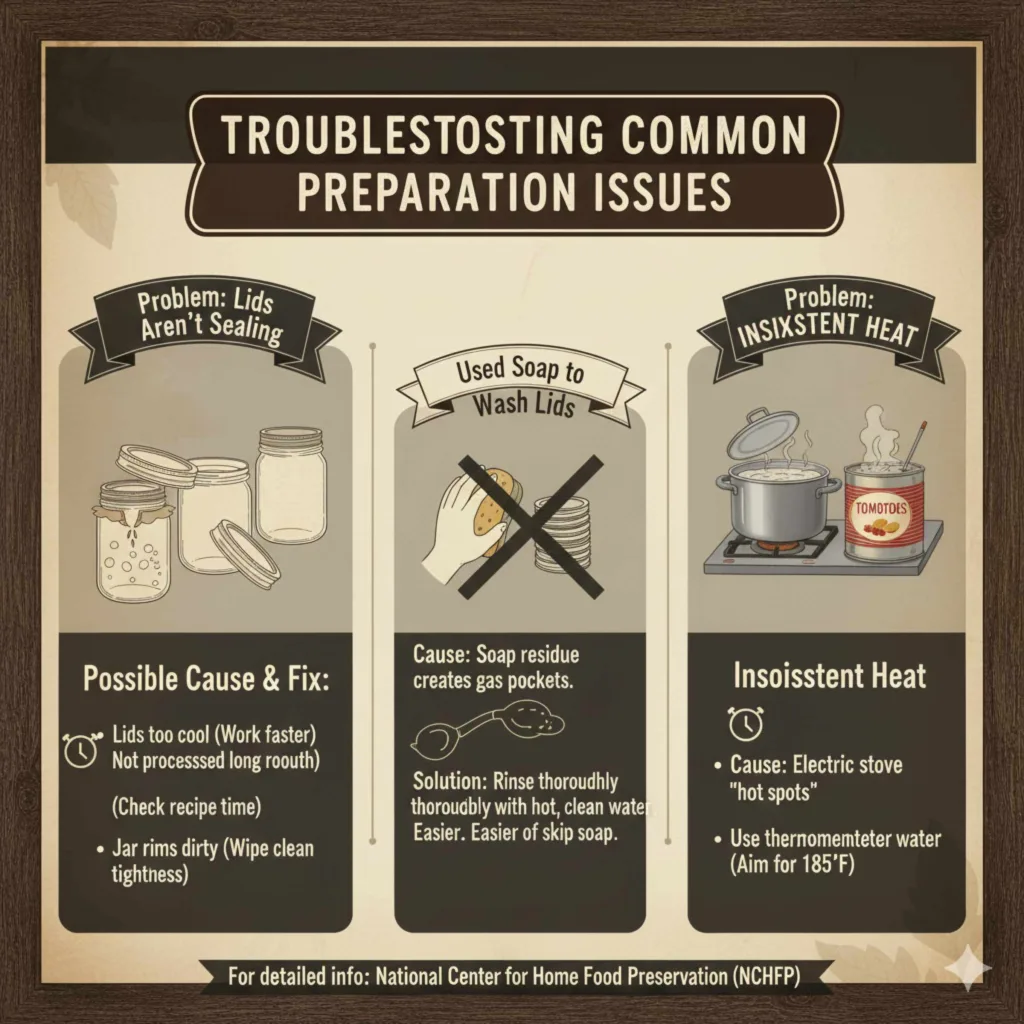
Troubleshooting Common Lid Preparation Issues
Even with the best prep, things can sometimes go awry. Here are solutions for common prep headaches.
Problem: My Lids Aren’t Sealing after Processing.
Possible Cause & Fix:
- The lids were too cool when applied (Solution: Work faster after heating).
- The jars were not processed long enough for the contents to get hot enough (Solution: Check your recipe processing time).
- The bands were tightened too much (Solution: Use only fingertip tightness next time).
- The jar rims were dirty (Solution: Always wipe jar rims with a clean, damp cloth before capping).
Problem: I Used Soap to Wash the Lids.
Possible Cause & Fix: Soap residue trapped under the seal can create gas pockets or interfere with the vacuum. (Solution: If you used soap, thoroughly rinse the lids under very hot, clean running water, ensuring no suds remain. It’s often easier just to skip the soap entirely for a simple wipe-down.)
Problem: I Can’t Find the Hotest Spot on My Stove for Consistent Heat.
Possible Cause & Fix: Many electric stoves have “hot spots.” (Solution: Use a simple, inexpensive candy or digital thermometer to monitor the water temperature in your small saucepan. Aiming for 185°F is the sweet spot that balances softening the seal with protecting the compound.)
For more detailed information on safe processing temperatures and times based on altitude and food type, consult reliable sources like the National Center for Home Food Preservation (.acis.ufl.edu).
Frequently Asked Questions (FAQ) About Canning Lids
Q1: Can I reuse the flat lids after opening a canned jar?
A: No. For safety and reliability, flat lids are designed as single-use items. The sealing compound is compromised once the vacuum is broken. Always use a new flat lid for every batch.
Q2: How long do I have to use the lids after soaking them in hot water?
A: Ideally, use them within 5 to 10 minutes. If they sit too long, they will cool down, and the sealing compound will revert to a stiffer state. Keep them in the hot water as long as possible.
Q3: Are metal canning rings (bands) safe to reuse?
A: Yes, the screw bands are reusable as long as they are not rusty, bent, or stripped. If they feel wobbly or don’t screw on straight, replace them to ensure even sealing pressure.
Q4: What happens if I forget to heat the lids?
A: Your jars might not seal correctly. The stiff sealing compound won’t conform well to the jar rim, resulting in a weak seal. You might notice the lid simply pops off or loosens after processing.
Q5: Do I need to dry the lids after taking them out of the hot water?
A: Absolutely not! Let excess water drip off, but do not wipe or dry the sealing compound. The slight moisture helps the final seal form when the jar cools down.
Q6: Can I use disposable lids intended for baby food jars or other small containers for canning?
A: No. Only use lids specifically manufactured for home canning (standard Mason jar sizes). These are engineered to withstand the heat and pressure required for safe, long-term preservation.
Conclusion: Confidence in Every Seal
Preparing your canning lids doesn’t require fancy gadgets or complex chemistry; it just requires attention to detail. By taking the extra few minutes to inspect your new lids, clean away any debris, and gently heat them in water just below a boil (around 180°F for 10 minutes), you set yourself up for canning success. Remember the golden rule: heat the seal, clean the rim, and only tighten to fingertip tightness.
This simple preparation ritual transforms those shiny new discs into powerful vacuum-creating tools, ensuring your delicious homemade preserves are safe, sealed tightly, and ready to enjoy for seasons to come. Next time you’re setting up your canner, approach those lids with confidence—you now know the proven essential tips for a perfect seal every single time. Happy canning!