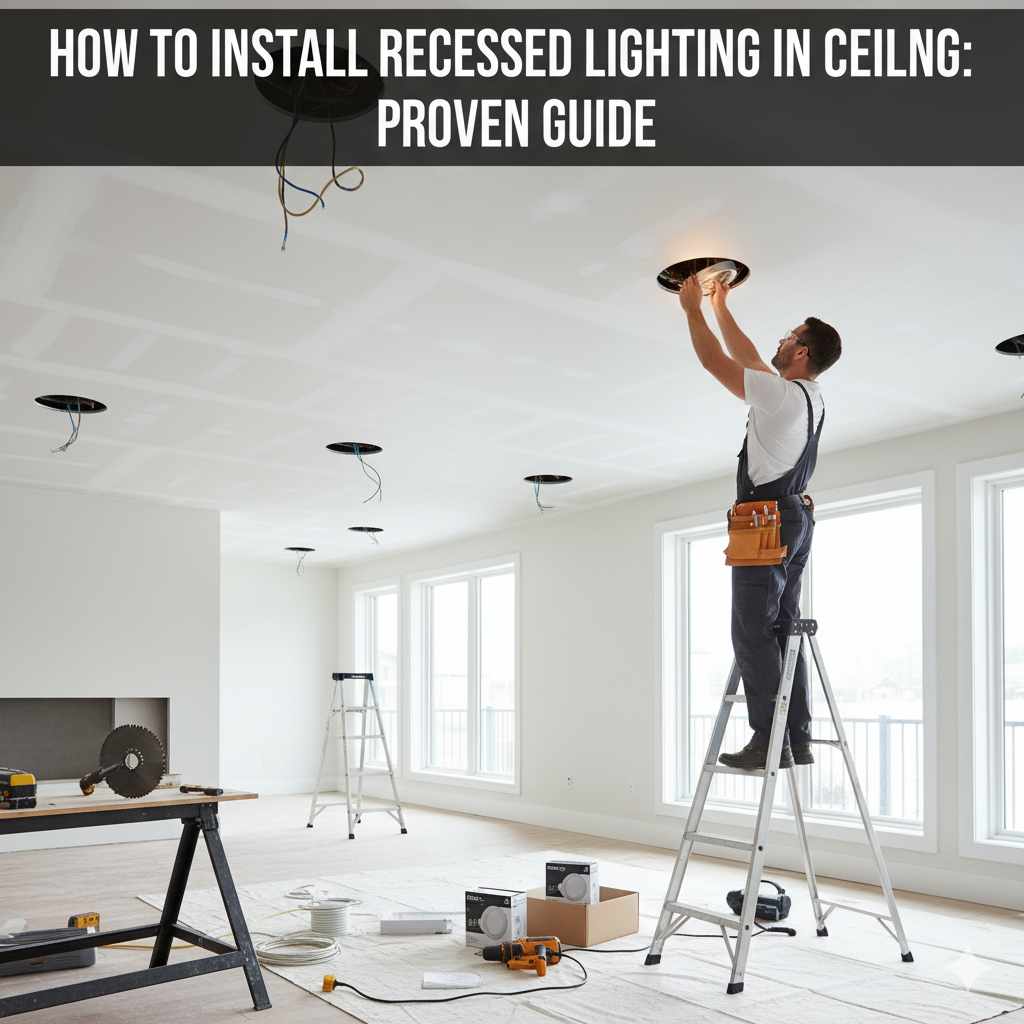
Installing recessed lighting in your ceiling is very achievable! This proven guide breaks down exactly how to install these fixtures safely by locating joists, cutting precise holes, wiring connections securely, and fitting the cans. Follow these clear steps for professional-looking results without the stress.
Thinking about upgrading your home lighting? Recessed lights, often called can lights, look sleek and modern. They make a big difference! However, when you look up at that ceiling, it might seem complicated to cut perfect holes and safely run the electrical wires. Don’t worry! Changing your ceiling lighting is a fantastic DIY project. Many homeowners feel nervous about cutting into the drywall, but with the right prep work and these simple instructions, you’ll gain major DIY confidence. We will walk through every single step, making sure your new lighting looks great and works perfectly for years to come.
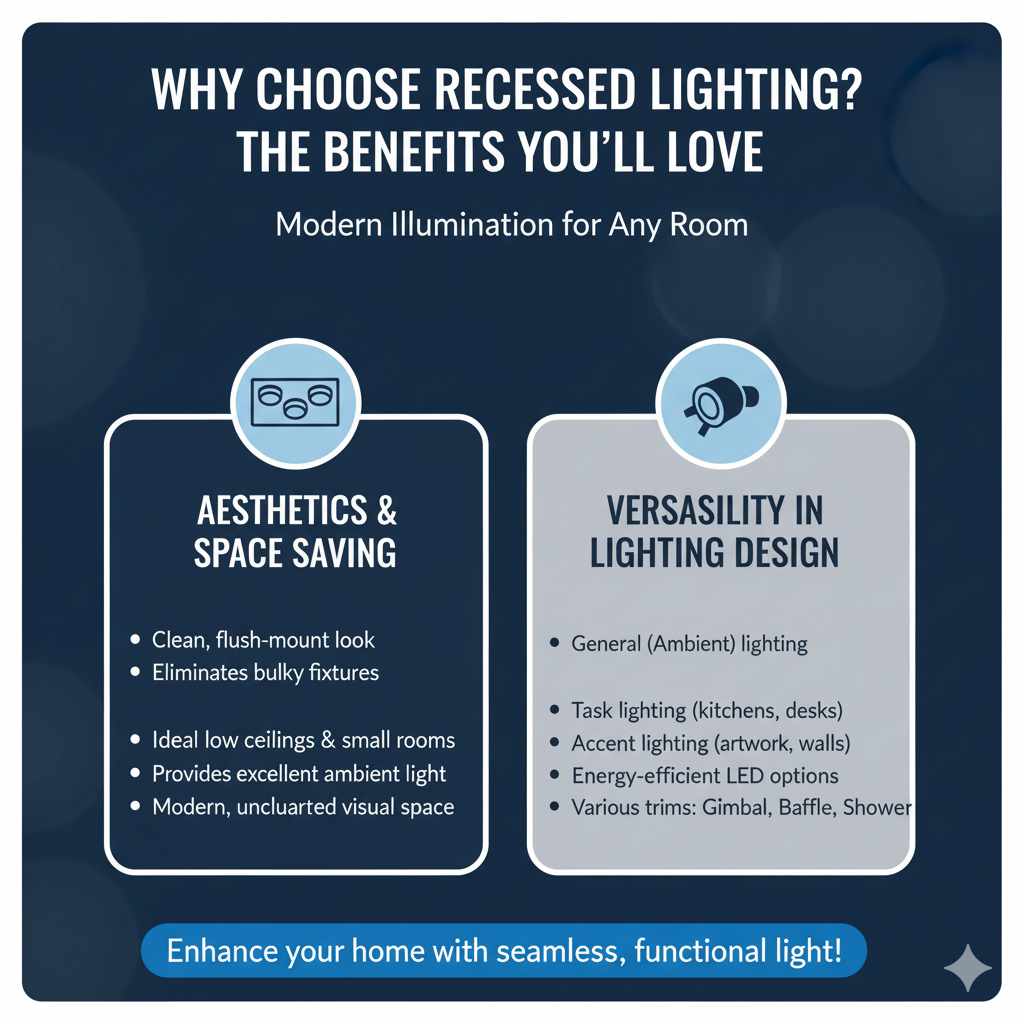
Why Choose Recessed Lighting? The Benefits You’ll Love
Before we dive into the “how-to,” let’s quickly review why homeowners love recessed lighting so much. It’s more than just looks; it’s about function too.
Aesthetics and Space Saving
The biggest draw is how clean they look. Since the light source sits flush (or nearly flush) with the ceiling surface, they avoid the bulky look of traditional pendant lights or chandeliers. This is amazing for smaller rooms or areas where you want an open, airy feel. They provide excellent general illumination without cluttering the visual space.
Versatility in Lighting Design
Recessed fixtures offer amazing versatility. You can use them for general ambient lighting, or you can use specialized trims (the part closest to the room) to focus light directly onto artwork or countertops—this is called “task lighting” or “accent lighting.” Modern LED recessed lights use very little energy, too!
Understanding Different Types of Recessed Fixtures
Not all cans are created equal. Knowing the main types helps you choose the right one for your project. We will focus mostly on the easiest kind for DIY beginners, but it is good to know the options available.
- IC-Rated Housings: This is crucial! IC stands for “Insulation Contact.” If your ceiling space in the attic has loose insulation sitting directly above the fixture, you must use an IC-rated housing. This prevents the fixture from overheating the insulation and causing a fire hazard. Always check local building codes or resources like engineering standards bodies for absolute clarity on insulation requirements, even though most modern kits are IC-rated.
- Non-IC Rated Housings: These require a minimum clearance (usually 3 inches) between the fixture and any insulation. Only use these if you are certain no insulation will touch them.
- Pancake/Slim Profile Lights: These are the easiest for retrofits (installing in an existing ceiling). They connect directly to the junction box and have no deep “can” housing, making them perfect for spaces with little overhead clearance.
Preparation is Everything: Tools and Safety First
Just like prepping an engine before an oil change, successful electrical work requires perfect preparation. Safety is our number one priority here. Never work on live circuits!
Essential Tools You Will Need
Gathering everything beforehand saves time and frustration. Trust me, you don’t want to stop halfway because you forgot one small tool.
| Tool | Purpose |
|---|---|
| Voltage Tester (Non-Contact) | To confirm power is OFF before touching wires. |
| Drywall Saw or Hole Saw Attachment | For cutting the precise circle in the ceiling. |
| Wire Strippers/Cutters | For safely exposing copper wires. |
| Screwdriver Set (Phillips and Flathead) | For securing junction boxes or clamps. |
| Tape Measure and Pencil | For marking the exact center points. |
| Step Ladder (Sturdy!) | Crucial for safely reaching the ceiling. |
Safety Precautions: The Non-Negotiables
We are dealing with electricity here. Treat it with respect!
- Shut Off Power: Locate the home’s main electrical service panel (breaker box). Flip the breaker that controls the area you are working in. If the breaker isn’t clearly labeled, turn off the main power for the entire house—better safe than sorry.
- Verify Zero Voltage: After turning the breaker off, use your non-contact voltage tester on the existing switch and any junction boxes you might access. Even if the light is off, test it. If the tester beeps or lights up, stop immediately and find the correct shut-off source.
- Protective Gear: Wear safety glasses. Dust and debris will fall, especially if cutting through drywall or insulation.
- Check Insulation Rating: Double-check that your new recessed housing is IC-rated if insulation is present above the ceiling line.
Step 1: Planning the Layout and Locating Joists
Designing where the lights go is the most important step for an even, appealing look. You can’t just look at the ceiling and start guessing!
Determining Placement
Recessed lights usually look best when spaced evenly. A general rule of thumb is to place fixtures about 1/2 to 2/3 the distance from the nearest wall or cabinet top.
- Example: If your room is 10 feet wide, you might start the first light 18 to 24 inches from the wall, and then space all the lights every 3 to 4 feet apart down the center line.
- Tip for Kitchens: If you are installing lights over countertops, ensure the light hits the surface. Lights are often placed about 12 to 18 inches away from the edge of the cabinet run.
Finding Ceiling Joists (Critical Step!)
You absolutely cannot cut a hole where a ceiling joist (the wooden framing member) is located. The light housing needs to fit between these joists.
Here is how to find them:
- Use a Stud Finder: Run a quality electronic stud finder across the ceiling. Mark the center line of any joists you find. Remember that joists are typically spaced either 16 inches or 24 inches apart, on center (O.C.).
- Locate Existing Fixtures: If you are replacing an existing fixture or adding lights near one, use that location as a starting point. Joists usually run perpendicular to the ceiling line or parallel to the longest wall, but existing electrical boxes are always attached to a joist or a secure framing member.
- Confirm with a Small Pilot Hole: If you are unsure, use a very small drill bit (⅛ inch) and carefully drill a tiny pilot hole where you plan to place your light. Gently try to push the bit upward. If you meet solid resistance after only about an inch, you’ve likely hit a joist. If you go through easily, you are safe to proceed with the larger hole.
Once you locate the joists, draw a straight line between them—this is your clear workspace for cutting the light hole.
Step 2: Making the Cut and Preparing the Housing
Now that you have your center marked exactly where you want the light, it’s time to cut the hole. Precision here makes the trim fit snugly later on.
Choosing the Right Hole Size
The size of the hole depends entirely on the size of the recessed light housing you purchased. Do not rely on the size of the eyeball trim (the visible part); check the housing instructions!
Most standard 6-inch recessed cans require a hole between 6 ¼ inches and 6 ¾ inches. The packaging almost always specifies the exact diameter needed.
Cutting the Hole
If you bought a kit that includes a cardboard template, use that! If not, use a compass or trace a circle onto the ceiling where you marked the center. Remember to stay between the joists.
- Use a measuring tape to confirm the distance across your chosen span between the joists is larger than your required hole diameter.
- Use a sharp drywall saw or a hole saw attachment on a drill. For drywall saws, start slow and use a gentle sawing motion. Let the tool do the work.
- Hold the saw vertically and cut just inside your marked line. Remove the cut-out piece.
- For Retrofit/Slim Lights: If you are using slim LED lights, you often only need a very small locator hole first. You may then drill the final hole from below the ceiling, or sometimes the housing clips directly to the drywall after the electrical connection is made, depending on the model. Consult the specific product manual.
Step 3: Running the Wiring (The Electrical Maze)
This is where many beginners get nervous. If you are replacing an existing fixture in that exact spot, this is five minutes of work. If you are running a brand-new circuit or tapping into an existing power source across the ceiling, it takes more time but follows the same simple rules.
Accessing Power Safely
You need access to the electrical source. This usually means one of three scenarios:
- Replacing an Old Fixture or Box: The old light fixture is still there. Keep the power OFF, open the existing junction box, and disconnect the wires.
- Finding an Existing Switch Leg: Power runs from a switch up to the ceiling location. You may need attic access or the ability to fish wires through the ceiling space.
- New Circuit: This requires running a new cable (like 14/2 NM-B wire) from your main breaker panel or an existing, correctly sized junction box to the new light location. Beginners should seek assistance from a licensed electrician for complex new wiring runs to ensure compliance with the National Fire Protection Association (NFPA) codes.
Wiring the New Recessed Housing
Most modern recessed units come with a small metal box or integrated junction box attached to or near the can. This is where you connect the incoming power cable.
Inside that box, you will follow standard wiring color codes:
| Incoming Wire Color (House) | Fixture Wire Color | Connection Type |
|---|---|---|
| Black (Hot) | Black or Red | Wire Nutted Together |
| White (Neutral) | White | Wire Nutted Together |
| Bare Copper or Green (Ground) | Green or Bare Copper | Secured via Screw or Wire Nut |
Crucial Tip on Wiring: Ensure you strip only about ¾ inch of insulation off the wires. Secure the connections tightly with appropriate-sized wire nuts. Give each wire a gentle tug after tightening the nut to confirm the connection is solid. Loose connections are a major source of electrical problems.
Step 4: Installing the Housing Can
With the wires connected securely in the junction box hidden above the ceiling, you can now push the entire lighting unit into the hole you cut.
For Traditional Cans (Housing Required)
These cans are designed to be held up by metal clips that grab the drywall from above or sides.
- Push the Junction Box: Gently tuck the wired junction box up through the ceiling hole first.
- Insert the Housing: Slowly feed the main housing (the metal can) up into the opening.
- Engage the Clips: Most standard cans use tension clips or “dogs” attached to the side of the can. These need to pivot out and grip the backside of your drywall securely. You might need to push the entire unit up firmly until you hear or feel these clips engage against the ceiling surface. They hold the weight of the fixture.
- Check Alignment: Ensure the lip or rim of the can is evenly flush against the ceiling surface all the way around.
For Retrofit/Slim LED Lights
These are often much simpler, especially if they use a remote driver box:
- Connect the wires from the house circuit to the wires coming out of the small driver box (the remote transformer).
- Tuck the driver box up above the ceiling.
- The light module itself usually has spring clips that you push outward, and then you pull the module up until the trim sits flush against the ceiling.
Step 5: Connecting the Trim and Testing
The final step brings everything together. The trim is the visible part that directs the light and covers the ugly edge of the hole.
Attaching the Trim
Modern trims usually attach in one of two ways:
- Plug-In Connector: The trim piece will have a small plug that connects directly into the socket or driver box of the housing installed above. This is common with LED modules.
- Screws or Clips: Older style housings might require you to screw the visible trim ring directly to the interior housing rim.
Ensure the trim is centered and sits flat against the ceiling. If you notice a gap, gently pull the can housing upper clips slightly to reposition it, then press the trim securely in place.
The Moment of Truth: Testing
Time to see your hard work pay off:
- Go back to your breaker box and securely flip the power back on.
- Go to the corresponding light switch.
- Flip it on! The new light should illuminate immediately.
If it doesn’t turn on, immediately shut the power off at the breaker. Recheck your wiring connections inside the junction box. Even if the power is off, it is good practice to use your voltage tester again before opening the box.
Troubleshooting Common Installation Issues
Even the best plans hit small bumps. Knowing how to fix common issues keeps your project moving smoothly.
Problem 1: The Light Won’t Turn On
Likely Cause: Wiring error or tripped circuit.
Fix: Confirm the breaker is on. Open the junction box and check the wire nuts. Look for a ‘hot’ wire touching a ‘neutral’ wire, or a loose ground connection. Remember, modern fixtures often have integrated thermal protection; if the can overheated during a test (perhaps due to insulation contact without being IC-rated), it may shut off automatically until it cools down.
Problem 2: The Light is Dim or Flickering
Likely Cause: Loose connection or using the wrong dimmer switch.
Fix: A loose wire connection (hot or neutral) is the number one cause of flickering. Re-secure those wire nuts firmly. Also, if you are using a standard incandescent dimmer switch with new LED bulbs, the dimmer may not be compatible. Most LEDs require specific “ELV” (Electronic Low Voltage) or “MLV” (Magnetic Low Voltage) dimmers. Check your bulb packaging or consult the manufacturer’s guidance on dimmer compatibility.
Problem 3: The Housing Won’t Stay Up (Falls Down)
Likely Cause: Clips aren’t grabbing the ceiling properly.
Fix: This almost always happens when you cut the hole too big, or when the clips hit a joist. If the hole is too large, the clips have nothing firm to grab onto. You may need to temporarily support the light while you push the clips out further, or use a slightly larger base trim if your chosen model allows for it. If you hit a joist, you must move the entire housing location slightly.

Recessed Lighting Installation FAQs for Beginners
Q1: Do I need an electrician to install recessed lighting?
A: Not always. Many homeowners successfully install recessed lighting as a DIY project, especially when replacing an existing fixture or using retrofit or slim LED recessed lights. However, if you need to run new electrical wiring, install a new circuit, or work inside the breaker panel, it’s safer to hire a licensed electrician to ensure everything meets electrical codes.
Q2: How far apart should recessed lights be spaced in a ceiling?
A: A common rule is to space recessed lights about 4 to 6 feet apart in standard rooms. Another guideline is to divide your ceiling height by two to determine spacing. For example, with an 8-foot ceiling, lights should generally be placed about 4 feet apart to provide even illumination without dark spots.
Q3: Can recessed lights be installed in ceilings with insulation above them?
A: Yes, but you must use IC-rated recessed lighting fixtures. These fixtures are designed to safely come into contact with insulation without overheating. Non-IC rated lights require at least 3 inches of clearance from insulation, which can be difficult to maintain in many attics.
Q4: Can recessed lighting be installed without attic access?
A: Yes. Many modern retrofit recessed lights or slim LED wafer lights are specifically designed for ceilings without attic access. These fixtures can be installed directly from below the ceiling using spring clips and a small junction box, making them perfect for finished ceilings in existing homes.
Conclusion
Installing recessed lighting in your ceiling may seem intimidating at first, but with the right planning and tools, it becomes a very manageable DIY project. By carefully locating ceiling joists, measuring and cutting precise holes, and making secure wiring connections, you can achieve clean, professional-looking results. Recessed lights are a great way to modernize any room while keeping the ceiling uncluttered and stylish. They also provide even, energy-efficient illumination that works well for living rooms, kitchens, hallways, and more.
The key to success is taking your time during the preparation stage and always prioritizing electrical safety. Once installed correctly, recessed lighting can dramatically improve both the look and functionality of your home. With the steps in this guide, you now have the confidence to complete your project and enjoy bright, sleek lighting that will last for years.