What Is Kayak Oil Canning? Causes & Solutions
Kayak oil canning, a disconcerting flex or buckle in a kayak’s hull, can leave paddlers worried about their vessel’s integrity. This phenomenon is more common than many realize and can stem from a variety of factors, ranging from manufacturing processes to environmental conditions and usage. Understanding what causes kayak oil canning and how to effectively address it is crucial for maintaining your kayak’s performance, longevity, and overall safety on the water.
This post will demystify kayak oil canning, explore its primary causes, and provide practical solutions and preventative measures. We’ll cover everything from material properties to storage techniques, ensuring you can keep your kayak in top shape for years to come.
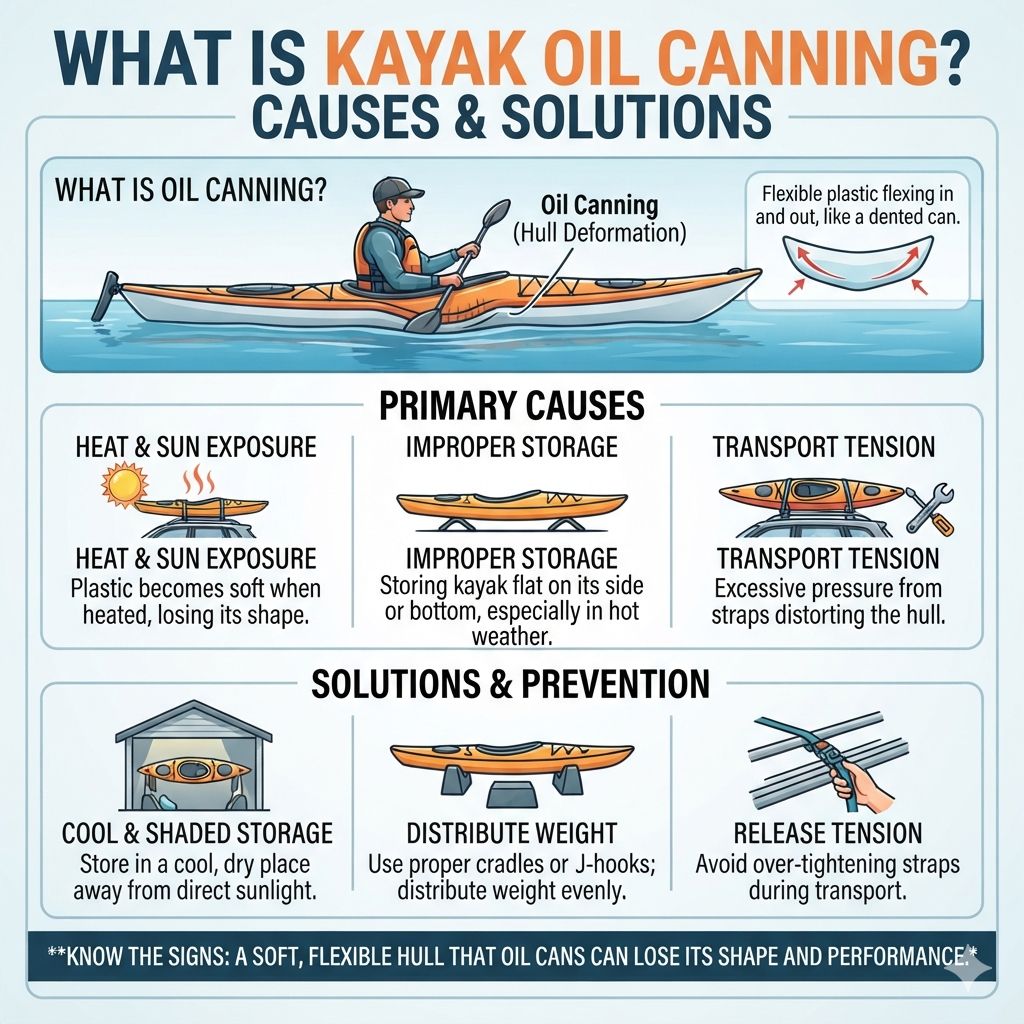
Simply put, kayak oil canning is the deformation or flexing of the hull, often appearing as a buckle or dent. It’s primarily caused by thermal expansion and contraction of the plastic, improper storage, or manufacturing defects, but it’s usually fixable with heat and patience.
Key Takeaways
- Kayak oil canning is a hull deformation, often a buckle or dent, that can affect plastic kayaks.
- Main causes include extreme temperature fluctuations, direct sunlight exposure, improper storage, and manufacturing inconsistencies.
- Fixing oil canning typically involves controlled heating of the affected area to allow the plastic to return to its original shape.
- Preventative measures focus on proper storage, avoiding prolonged direct sun exposure, and handling the kayak with care.
- While it can look alarming, most instances of kayak oil canning are cosmetic or minor and can be repaired.
What is Kayak Oil Canning?
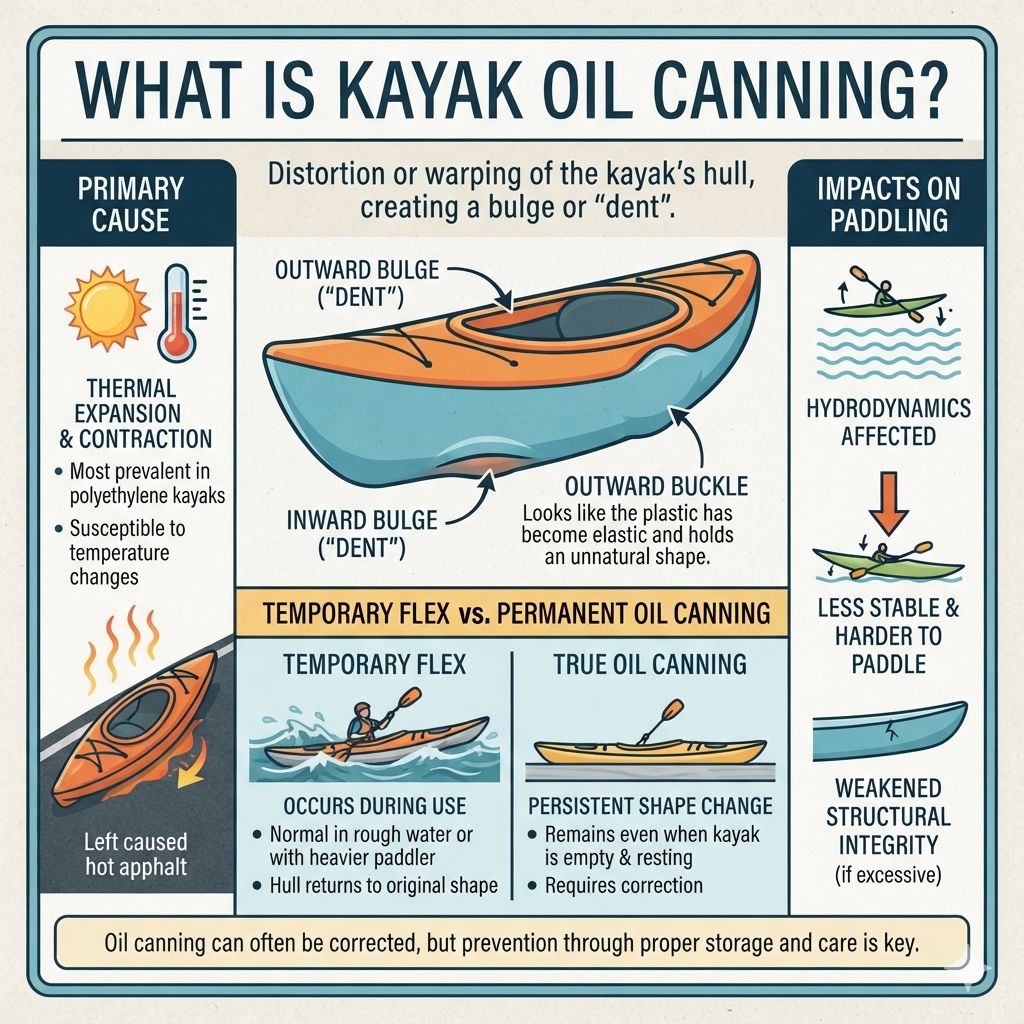
Kayak oil canning refers to a distortion or warping of the kayak’s hull, creating an inward or outward bulge, often described as a “dent” or “buckle.” This condition is most prevalent in kayaks constructed from polyethylene, a type of plastic known for its durability but also its susceptibility to thermal expansion and contraction. While the term “oil canning” is borrowed from sheet metal fabrication, it accurately describes the visual effect on a kayak’s plastic hull – it looks as though the material has become slightly elastic and is holding an unnatural shape.
The flexing can occur on the bottom, sides, or even the deck of the kayak. It might appear gradually over time or quite suddenly, particularly after exposure to significant environmental changes. A severely affected hull can impact the kayak’s hydrodynamics, making it less stable and harder to paddle efficiently.
In some cases, excessive or persistent oil canning can weaken the hull’s structural integrity, though this is less common with proper care and maintenance.
It’s important to distinguish between minor flexing that might occur temporarily during use and more permanent deformations. Most kayaks experience some degree of slight hull flex when paddled, especially in rough water or when a heavier paddler is onboard. However, true oil canning is a persistent shape change that remains even when the kayak is empty and resting.
Understanding Hull Materials and Their Behavior
Polyethylene, the most common material for recreational kayaks, is a thermoplastic. This means it can be repeatedly softened by heat and then hardened by cooling. While this property makes manufacturing possible and repairs feasible, it also makes the material sensitive to temperature changes.
When a kayak is manufactured, the molten polyethylene is often shaped using a process called rotational molding (rotomolding) or blow molding. The cooling process during manufacturing is critical; any uneven cooling can introduce internal stresses that make the hull more prone to warping later.
Other kayak materials, like ABS (Acrylonitrile Butadiene Styrene) or composite materials (fiberglass, Kevlar, carbon fiber), are generally more rigid and less prone to oil canning. ABS kayaks are made from layered sheets of plastic heated and vacuum-formed over a mold. Composites involve laminating reinforcing fibers with a resin system.
These materials have different thermal expansion coefficients and structural properties, making them less susceptible to the types of deformation seen in polyethylene.
The thickness of the hull material also plays a role. Thicker hulls offer more rigidity and are naturally more resistant to flexing. However, even thicker hulls can experience oil canning if subjected to extreme conditions or improper handling.
The design of the kayak itself, including the presence of internal ribs or bulkheads, can also contribute to hull stiffness and resistance to deformation.
Common Causes of Kayak Oil Canning
The primary culprit behind kayak oil canning is temperature fluctuations. Plastic hulls expand when heated and contract when cooled. If a kayak is exposed to intense sunlight for extended periods, especially if it’s stored or left on a hot surface like a dock or a black car roof, the plastic can heat up significantly.
When this heated plastic then cools, especially unevenly or rapidly, it can contract and pull the hull out of its original shape, leading to dents or buckles.
Improper storage is another major contributor. Storing a kayak upside down directly on two crossbars without adequate support can put significant pressure on specific points of the hull, leading to deformation over time. Similarly, storing a kayak upright on its hull in a way that creates pressure points, or even just leaning it against a hard surface for prolonged periods, can induce stresses that result in oil canning.
Kayaks should ideally be stored on their sides, suspended from straps, or placed on a rack with wide, padded supports that distribute weight evenly across the hull.
Manufacturing defects can also be a cause. If the polyethylene was not cooled evenly during the rotomolding process, internal stresses can build up within the plastic. These stresses can make the hull more likely to warp or buckle later, even under normal use or moderate temperature changes.
While less common, it’s a possibility, especially with kayaks from less reputable manufacturers or those with very thin hulls.
- Extreme Heat Exposure: Leaving a kayak in direct sunlight for extended periods, especially on hot surfaces like car racks, docks, or sand.
- Rapid Temperature Changes: Moving a kayak from a very hot environment to a very cold one quickly, or vice versa.
- Improper Storage: Storing upside down on narrow supports, storing on uneven surfaces, or allowing pressure points to form.
- Weight Distribution: Allowing heavy objects to rest on the hull, or placing significant, uneven pressure on specific areas.
- Manufacturing Issues: Uneven cooling during the molding process leading to internal stresses in the plastic.
- Physical Impact: While less common for causing permanent oil canning, severe impacts can stress the plastic and make it more prone to deformation.
How to Fix Kayak Oil Canning
Fortunately, most instances of kayak oil canning, particularly in polyethylene kayaks, are repairable. The key to fixing it lies in using controlled heat to soften the plastic, allowing it to relax and return to its original shape, and then cooling it to set the new form. This process requires patience and careful application of heat to avoid damaging the hull further.
The most common DIY method involves using a heat gun or a hairdryer set to a medium or high setting. It’s crucial to apply heat evenly and gradually, moving the heat source constantly to avoid overheating any single spot, which could melt or burn the plastic. The goal is to make the plastic pliable, not to melt it.
Once the affected area feels soft and pliable to the touch, gentle pressure can be applied from the opposite side of the bulge (pushing inwards on an outward bulge, or outwards on an inward bulge) to help coax it back into its intended shape. Sometimes, simply applying heat and allowing the plastic to relax on its own is enough. Once the hull is in its desired shape, it needs to be cooled down to set.
This can be done by applying cool water or simply allowing it to air cool in a shaded, moderate temperature environment.
Step-by-Step Repair Process
This step-by-step guide outlines a common method for repairing oil canning using a heat gun or a powerful hairdryer. Always test the heat on an inconspicuous area first to understand how quickly the plastic reacts.
- Preparation: Clean the affected area of the hull thoroughly to remove any dirt or debris. If the kayak is stored indoors, ensure good ventilation.
- Gather Supplies: You will need a heat gun (preferred for more consistent heat) or a powerful hairdryer, a spray bottle with cool water, a soft cloth, and possibly some thick gloves. For more stubborn dents, you might need a piece of wood or a plastic paddle to help apply gentle outward pressure from the inside of the hull.
- Apply Controlled Heat: Set your heat gun to a medium setting. Hold it at least 6-8 inches away from the hull. Move the heat gun back and forth across the dented or buckled area continuously. Do not focus the heat on one spot for more than a few seconds at a time. You want to warm the plastic until it becomes slightly pliable and starts to give way. You can test this by gently pressing on the area with your gloved finger.
- Gently Reshape: Once the plastic is warm and pliable, you can begin to reshape it. If it’s an inward dent, you can often gently push from the inside of the hull using your hand or a piece of wood. If it’s an outward bulge, you might be able to gently pull it out or press it in. Sometimes, simply heating and letting the plastic relax is enough. Work slowly and with minimal force. If the plastic feels like it’s getting too soft or threatening to melt, back off with the heat immediately.
- Cool and Set: Once the hull is in its desired shape, immediately begin cooling the area. You can use the cool setting on your heat gun or spray it gently with cool water from the spray bottle. This helps the plastic harden in its new, corrected shape. Continue cooling for several minutes until the area is completely cool to the touch.
- Inspect and Repeat (If Necessary): After cooling, inspect the hull. You may need to repeat the heating and reshaping process a few times for significant deformations. Be patient; it’s better to do multiple gentle applications than one aggressive one.
When to Seek Professional Help
While most oil canning issues can be resolved with DIY methods, there are situations where professional help is advisable. If the deformation is very severe, affects a critical structural area like the keel, or if you are uncomfortable using heat sources on your kayak, a professional repair shop specializing in plastic boat repair is your best option. They have specialized equipment and experience to handle complex repairs without causing further damage.
Also, if the hull material appears to be significantly degraded, brittle, or has sustained other damage like cracks in addition to the oil canning, it might be beyond a simple heat-and-reshape repair. Professionals can assess the overall condition of the hull and perform more robust repairs, potentially involving plastic welding or reinforcement, if necessary.
Consider the value of your kayak and your own skill level. For a high-value touring or racing kayak, investing in a professional repair might be worthwhile to ensure optimal performance and structural integrity. For a beginner’s recreational kayak, a DIY fix is often sufficient and cost-effective.
Preventing Kayak Oil Canning
The best approach to dealing with kayak oil canning is prevention. By adopting good habits regarding storage, transport, and handling, you can significantly reduce the risk of your kayak developing hull deformations.
Proper storage is paramount. Always store your kayak in a cool, dry place, away from direct sunlight. If storing outdoors, use a kayak cover or tarp to protect it from UV rays and extreme temperatures.
When storing, support the kayak evenly. The ideal methods involve hanging it from its grab handles using wide straps, or resting it on its side (gunwales) on a padded rack designed for kayaks. Avoid storing it upside down on narrow bars, as this concentrates pressure on the hull and can lead to dents over time.
During transport, especially on hot days, take precautions. If transporting on a roof rack, consider the time of day and use padded cradles or rollers to minimize pressure points. If the kayak is going to sit on the rack for an extended period in the sun, consider covering it with a light-colored tarp or shade cloth.
Optimal Storage Techniques
Storing your kayak correctly is one of the most effective ways to prevent oil canning and prolong its lifespan. The goal is to distribute the kayak’s weight evenly and minimize stress on any single point of the hull.
- Store on its Side (Gunwales): This is often considered the best method for polyethylene kayaks. Resting the kayak on its edge, supported by padded cradles or racks, allows the hull to remain relatively free of pressure.
- Suspension Systems: Using wide, soft straps to suspend the kayak from overhead storage or a wall mount is an excellent way to keep the hull entirely unsupported. Ensure the straps are wide enough (at least 2 inches) to distribute the weight and avoid creating pressure points.
- Kayak Stands/Racks: If using a stand or rack, ensure it has wide, padded arms or supports designed to cradle the kayak. Some racks are designed to hold the kayak upside down, which is also acceptable as long as the supports are wide and padded.
- Avoid Pressure Points: Never store a kayak resting directly on a hard, narrow surface. If you must lean it against a wall, use ample padding and ensure the contact point is on the strongest part of the hull or the gunwales.
- Indoors Preferred: Whenever possible, store kayaks indoors in a garage, shed, or basement. This protects them from UV rays, extreme temperatures, and moisture.
- Consider a Kayak Cover: If storing outdoors is unavoidable, use a UV-resistant kayak cover. This provides a layer of protection against sun damage and the elements.
Transporting Your Kayak Safely
Transporting your kayak involves a different set of considerations, primarily focused on securing it safely and minimizing stress during transit.
| Transport Consideration | Best Practice | Potential Issues |
|---|---|---|
| Roof Rack System | Use padded cradles, rollers, or saddles specifically designed for kayaks. Ensure a snug but not overly tight fit. | Over-tightening straps can deform the hull. Narrow bars without padding can create pressure points. |
| Straps | Use cam straps to secure the kayak. Keep them firm but avoid cinching them down so tightly that the hull visibly deforms. | Ratchet straps can easily overtighten and damage the hull. Loose straps can allow the kayak to shift. |
| Loading/Unloading | Use a loading assist system if possible. Slide the kayak onto the rack from the side or rear. | Dragging the hull on hard surfaces or dropping it can cause damage. Forceful lifting can lead to strains. |
| Sun Exposure During Transport | If the kayak will be on the rack for extended periods in the sun, consider covering it with a light-colored tarp. | Prolonged exposure to direct sunlight, especially while stationary on a hot roof rack, can heat the hull significantly. |
Proper vehicle rack systems and secure strapping are vital for safe transport and preventing hull damage.
Warning: Never use ratchet straps to secure a kayak on a roof rack, as they can easily overtighten and permanently deform the hull. Cam straps offer much better control over tension.
Understanding Thermal Expansion and Contraction
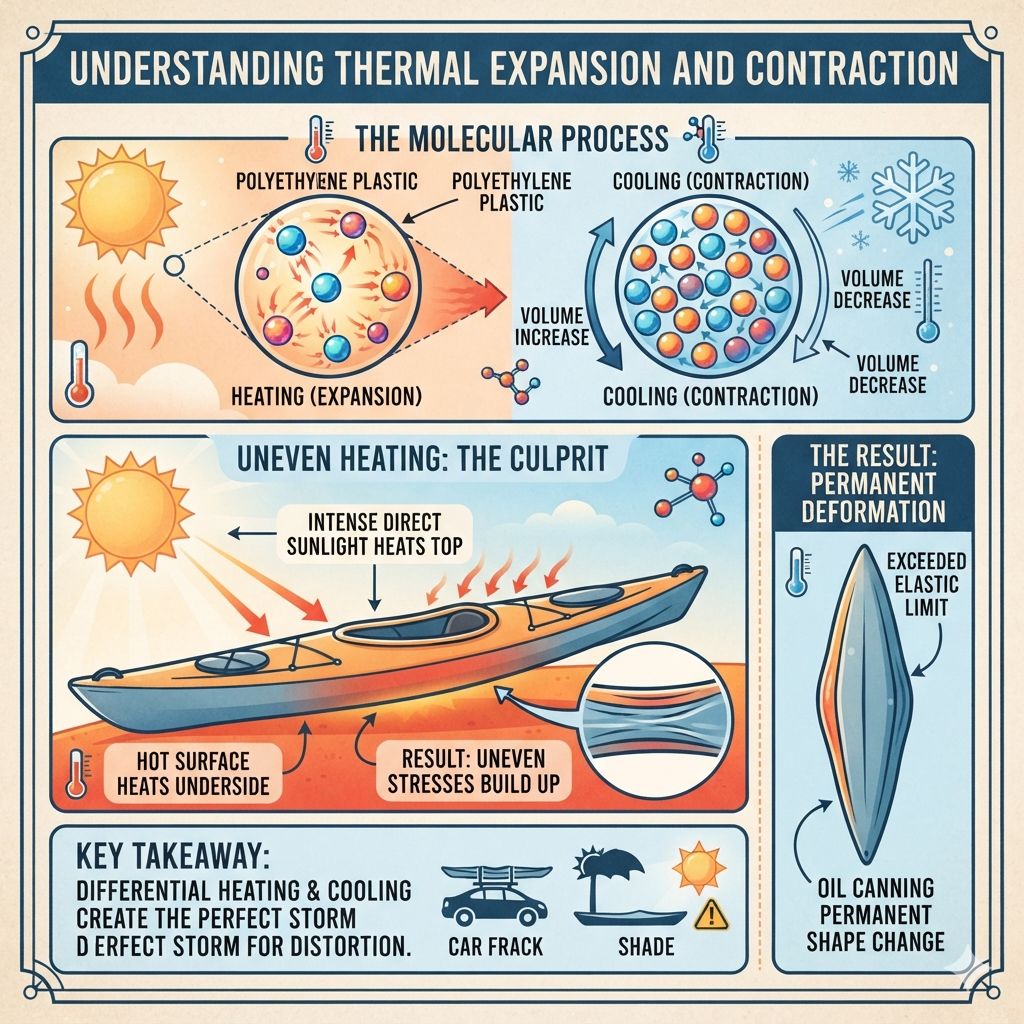
The phenomenon of oil canning is fundamentally linked to how plastic materials like polyethylene react to changes in temperature. When heat is applied, the molecules within the plastic gain energy, move more, and spread further apart. This increased volume causes the material to expand.
Conversely, when the temperature drops, the molecules slow down, move closer together, and the material contracts.
For a kayak hull, which is a large, relatively thin sheet of plastic, this expansion and contraction can lead to significant forces. If the hull is uniformly heated and cooled, the expansion and contraction might be even across the entire surface, leading to minimal permanent deformation. However, real-world conditions are rarely so uniform.
Direct sunlight might heat one part of the hull much more intensely than another, or the kayak might be resting on a hot surface that heats its underside disproportionately.
When one part of the hull expands more than another, or when it cools and contracts unevenly, internal stresses build up. These stresses can exceed the elastic limit of the plastic, causing it to permanently deform and hold a new shape – the oil canning. This is why kayaks stored or transported in direct sun on hot days are particularly vulnerable.
The differential heating and subsequent uneven cooling create the perfect storm for hull distortion.
Factors Affecting Hull Rigidity
Beyond material type and temperature, several other factors influence how rigid a kayak’s hull is and its susceptibility to deformation. These include the thickness of the hull material, the shape and design of the hull, and the presence of any internal structural reinforcements.
Hull thickness is a straightforward factor. A thicker hull has more material to resist bending and flexing. Manufacturers often offer kayaks in different weights or thicknesses, with heavier, thicker models generally being more robust but also heavier to carry.
When considering a new kayak, looking at its weight specifications can sometimes indicate its hull thickness and, by extension, its resistance to oil canning.
The hull’s shape also plays a critical role. Certain hull designs are inherently more rigid than others. For instance, kayaks with a pronounced keel line running along the bottom tend to be stiffer than those with flatter, softer bottoms.
Features like chine (the angle where the hull transitions from the bottom to the sides) can also add rigidity. Some kayaks incorporate internal bulkheads or ribs that act as structural supports, significantly enhancing the hull’s resistance to deformation.
The manufacturing process itself also impacts rigidity. The quality of the rotomolding or vacuum-forming process, including how evenly the plastic is distributed and how it cools, can leave residual stresses or create thinner spots that are more prone to flexing. Even the quality of the polyethylene resin used can affect its inherent strength and elasticity.
| Factor | Impact on Rigidity | Susceptibility to Oil Canning |
|---|---|---|
| Hull Thickness | Thicker hulls are more rigid. | Less susceptible. |
| Hull Shape (e.g., Keel) | Designs with prominent keels or sharp chines offer more rigidity. | Less susceptible. |
| Internal Structure (Bulkheads, Ribs) | Adds significant structural support. | Significantly less susceptible. |
| Material Quality (Polyethylene Grade) | Higher quality resins can have better tensile strength and elasticity. | Less susceptible if higher quality. |
| Manufacturing Process Quality | Even cooling and material distribution lead to fewer internal stresses. | Less susceptible if well-manufactured. |
| UV Exposure | Degrades plastic over time, making it more brittle and prone to deformation. | More susceptible over time. |
Understanding these factors can help you choose a kayak less prone to oil canning or take better care of the one you have.
Frequently Asked Questions
What is the primary difference between minor hull flex and oil canning?
Minor hull flex is a temporary, slight deformation that occurs during paddling or when weight is applied, and the hull returns to its original shape when the pressure is removed. Oil canning, on the other hand, is a persistent, noticeable buckle or dent in the hull that remains even when the kayak is empty and at rest, indicating a more permanent distortion of the plastic.
Can oil canning affect kayaks made from materials other than polyethylene?
While polyethylene kayaks are the most susceptible due to their thermoplastic nature and sensitivity to heat, other plastic kayaks (like ABS) can also experience some degree of warping under extreme conditions, though it’s much less common. Composite kayaks (fiberglass, Kevlar) are generally rigid and not prone to oil canning; any deformation in these materials is usually due to significant structural damage.
How long does it take for a kayak to develop oil canning?
It can vary greatly. In cases of severe neglect (e.g., prolonged storage in direct, intense heat on an unsuitable surface), oil canning can appear relatively quickly, sometimes within a single hot season. For less extreme conditions or kayaks with inherent weaknesses, it might develop gradually over several years of use and improper storage.
Is a kayak with oil canning unsafe to paddle?
For minor to moderate oil canning, a kayak is generally still safe to paddle. The primary concern is that it can affect the kayak’s performance, making it track less predictably or feel less stable. However, if the oil canning is severe, compromises a key structural area, or if you notice cracking or delamination associated with the deformation, it’s best to avoid paddling until it’s inspected and repaired.
What are the best tools for applying heat when fixing oil canning?
A heat gun is generally the preferred tool for its ability to provide consistent, controllable heat. A powerful hairdryer can work for minor dents, but it may take longer and require more effort. Always use the lowest effective heat setting and keep the tool moving to avoid overheating or melting the plastic.
Final Thoughts
Kayak oil canning, while visually unsettling, is a common issue primarily affecting polyethylene kayaks and is usually a consequence of temperature fluctuations and improper storage. By understanding the causes, employing careful handling and storage practices, and knowing how to perform simple repairs with controlled heat, you can maintain your kayak’s structural integrity and performance. Proactive prevention is always more effective than repair, so prioritize proper storage and transport to ensure your kayak remains a reliable companion on the water for many adventures to come.
Products related to this article
Sponsored / affiliate links. As an Amazon Associate I earn from qualifying purchases. I may earn additional commission from eligible campaigns.