You can effectively secure a temporary tarp roof without using nails by relying on high-quality strapping, heavy weights, secure anchor points, and careful tensioning techniques. This method prevents surface damage, making it perfect for quick weather protection on sheds, temporary repairs, or when drilling is not an option.
Dealing with a leaky roof is always stressful. Maybe your asphalt shingles just gave out, or a storm is coming, and you need fast, temporary coverage. You might not have time—or permission—to use a hammer and nails. That’s where the genius solution comes in: learning how to put a tarp on a roof without nails. It sounds tricky, but with the right setup, you can create a surprisingly secure, watertight barrier. We will walk through safe, easy steps to keep the water out until permanent repairs are made. Let’s get your temporary roof secure.
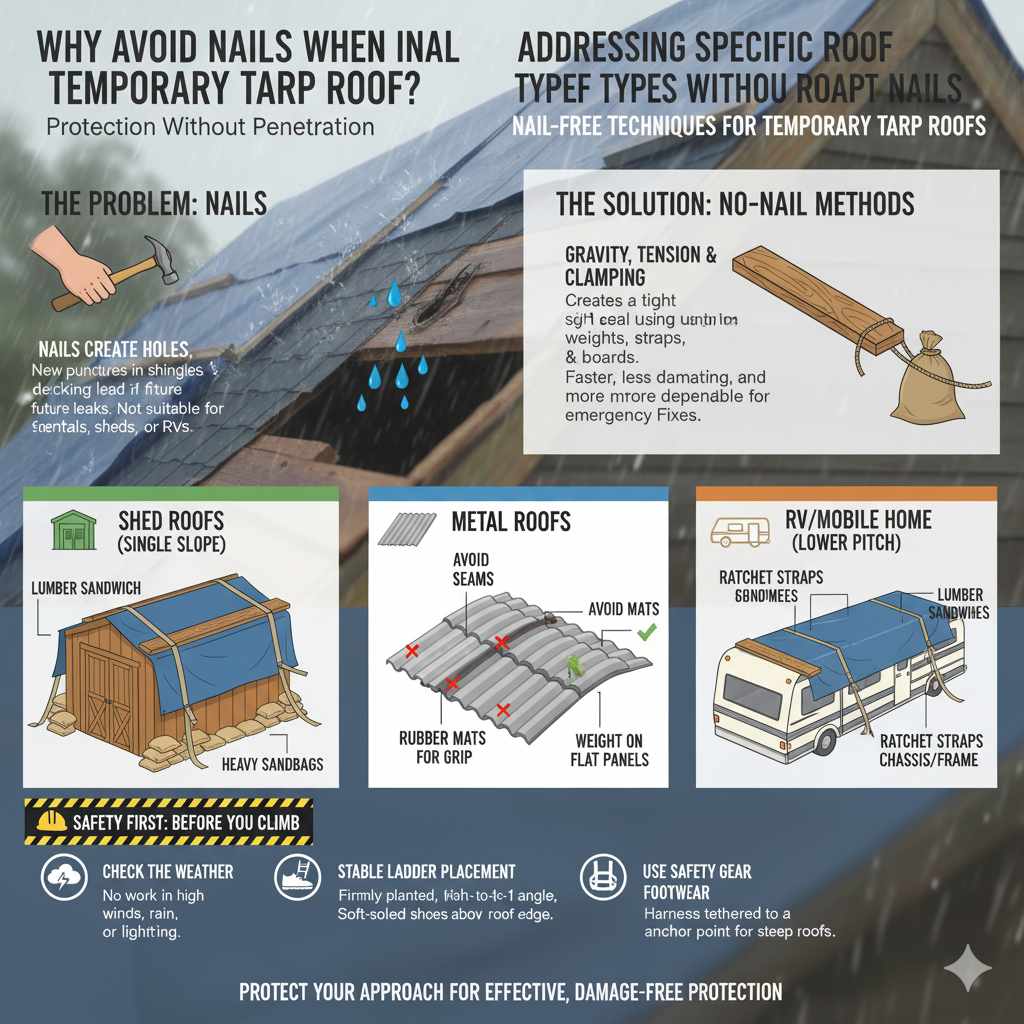
Why Avoid Nails When Installing a Temporary Tarp Roof?
When we talk about temporary roof coverings, nails are usually the first tool people grab. However, for a short-term fix, nails can actually cause more problems than they solve. Nails create new holes in your roof decking or existing layers, giving future water sources a clear path right into your attic. If you are renting, or working on a temporary structure like a shed or an RV, puncturing the roof is simply not an option.
The goal here is protection without penetration. We want a tight seal using gravity, tension, and clamping forces. This approach is faster, much less damaging, and often more dependable for emergency fixes than haphazard nailing.
Safety First: Before You Climb
Working on a roof, even a low one, carries risks. Before you even think about the tarp, safety must be your top priority. A tarp becomes slippery when wet, and wind can be unpredictable.
- Check the Weather: Never attempt roof work if high winds, rain, or lightning are present. Even a slight breeze can make a large tarp act like a sail.
- Stable Ladder Placement: Ensure your ladder is firmly planted on level ground. The top two rungs should extend above the roof edge, and the ladder should be angled correctly (the four-to-one rule: for every four feet of height, the base should be one foot away from the wall).
- Wear Appropriate Footwear: Use soft-soled shoes with good grip. Avoid slick work boots or sandals.
- Use Safety Gear: If the roof is steep or high, use a safety harness tethered to a secure anchor point, like a sturdy chimney or ridge beam.
Essential Tools and Materials for Nail-Free Tarping
To successfully secure a tarp without penetrating the roof surface, you need materials designed for gripping and weighing down. Think tension and friction rather than piercing.
The Right Tarp Matters
Not all tarps are created equal. A painter’s drop cloth won’t cut it here. You need something rugged and waterproof.
For roofing emergencies, look for:
- Heavy-Duty Polyethylene (Poly) Tarps: Look for 10-mil thickness or higher. A 6-mil tarp might tear easily under wind stress.
- UV Resistance: Since the tarp might be out for several weeks as you wait for permanent repairs, choose one rated for UV protection.
- Grommets: Ensure the tarp has strong, evenly spaced grommets (the metal rings) around the edges. These are your tie-off points.
Key Securing Tools (No Hammers Required)
This list focuses on what replaces the nail:
- Rope or Bungee Cords (Heavy Duty): You need strong nylon rope or thick, UV-resistant bungee cords for tying down the edges.
- 2×4 or 4×4 Lumber (The “Dead Weight”): These pieces of wood will run along the edges of the tarp and provide the necessary anchor point weight and clamping force.
- Clamps (Optional but Recommended): Heavy-duty C-clamps or Ratchet Clamps can temporarily secure wood borders to the roof fascia or edges—if you can safely reach them.
- Sandbags or Water Barrels: For flat or low-pitch roofs, these are excellent non-damaging weights.
- Duct Tape or Utility Tape: High-quality, waterproof utility tape is great for sealing seams or holding overlaps, but it should not bear structural load.
Step-by-Step Guide: How to Put a Tarp on a Roof Without Nails
The technique you use depends heavily on the pitch, or slope, of your roof. A low-slope (flat) roof requires gravity and weight, while a steep-slope roof requires careful strapping and overlapping.
Scenario 1: Low-Slope or Flat Roof Tarping
Flat roofs are the simplest to cover without nails because you can easily place weight on them. The goal is complete coverage with weighted edges.
Step 1: Inspect and Measure
Clear any sharp debris (like fallen branches) from the damaged area. Measure the area you need to cover, adding an extra 3 to 4 feet on all sides for a secure wrap-around.
Step 2: Lay the Tarp
Unfold the tarp and lay it over the damaged section, ensuring it extends well beyond the leak area. On a flat roof, you want the water to drain off the sides, not pool in depressed areas.
Step 3: The Lumber Sandwich Technique
This is your nail replacement system. Take your 2x4s or 4x4s and cut them slightly longer than the width of the tarp edge you are securing.
- Place one piece of 2×4 directly on top of the tarp edge, lining it up with the grommets.
- Place a second 2×4 directly underneath the tarp edge.
- Clamp or tightly rope this “sandwich” together. The friction between the two boards holds the tarp securely against the roof material underneath.
Step 4: Anchor the Weight
If the roof is completely flat and you can safely access the edges (or if you are working from the ground on safe perimeter walls), use weight.
- Place heavy sandbags directly on top of the lumber sandwich every 3 to 4 feet along the edge.
- If the roof is accessible from the side, strap the lumber edges tightly to the fascia board or surrounding secure structural elements using ratcheting tie-downs looped through the grommets.
Scenario 2: Steep-Slope Roof Tarping (The Ridge Lock Method)
Steep roofs are challenging because gravity works against you, trying to pull the tarp down. We must anchor the tarp at the ridge (the peak) and use downward tension.
Step 1: Prepare the Ridge Anchor Points
You need strong anchor points near the roof peak. If you have existing vents, chimneys, or sturdy pipe stacks, these are ideal. If not, you must create temporary anchors safely.
Note on Ground Anchors: If you cannot safely get onto the steep roof, you must anchor from the ground or an adjacent, safer area. This involves running ropes tautly down the slope.
Step 2: Position the Tarp for Overlap
Start by laying the tarp over the damaged area. The crucial part here is making sure the tarp runs over the ridge line if possible, or at least overlaps existing shingles below the damage by 2 to 4 feet. Water shedding is key, so the highest edge of the tarp must be higher than the lowest edge.
Step 3: The Ridge Trap
If the tarp can go over the ridge:
- Drape the tarp over the peak so it hangs down equally on both sides.
- Use the Lumber Sandwich technique (as described above) along the ridge line on both sides.
- Securely rope or strap the lumber sandwiches to the opposite side of the roof structure, running the ropes over the ridge and securing them to solid framing or weighted supports on the safe side. This creates high tension pulling directly down the slope.
For more detailed best practices on wind resistance for temporary structures, consider reviewing guidelines from organizations like the Federal Emergency Management Agency (FEMA) regarding temporary weather hardening (though applied here to personal property).
Step 4: Securing the Lower Edges
The lower edges must be pulled taut, not left baggy. Water running down the roof will catch loose edges and peel the tarp upward.
- Use heavy weights (sandbags) placed on the lower edge, positioned just off the roof edge, pulling the tarp down and slightly outward against the slope.
- If you can safely reach the fascia board, use your ratchet straps to anchor the lower grommets tightly to a ground anchor point, ensuring the tension pulls the tarp snug against the roof surface.
The “No-Touch” Method: Ground-Based Weighting
This method is ideal for very high or very steep roofs where climbing poses too much risk, but you still need significant security.
Materials Needed for Ground Anchoring
| Item | Purpose | Notes |
|---|---|---|
| Extended Reach Pole/Broom Handle | For pushing the tarp into place from the ground. | Must be sturdy (metal preferred). |
| Spool of Strong Rope (Polypropylene) | To run through grommets and anchor to ground weights. | At least 3/8 inch thickness. |
| Ground Anchors or Heavy Barrels | To anchor the ropes securely on the ground. | Water barrels or stakes driven deep into the soil work well. |
Procedure for Ground-Based Securing
- Attach Ropes: Before lifting the tarp, thread long sections of rope through the grommets along the sides and bottom edges that you will be anchoring from the ground.
- Raise the Tarp: With a helper, carefully lift the tarp up and over the damaged area. Use the reach pole to push the tarp up the slope until the top edge is securely placed near or over the ridge.
- Tensioning the Sides: Pull the side ropes taut, aiming to keep the tarp flat against the roof surface. Secure these ropes to ground anchors situated several feet away from the base of the house. You want a slight outward pull to keep it tight against wind shear.
- Ridge Securing (If Applicable): If the tarp covered the ridge, use the lumber sandwich technique on the safe side (the side you can access) and anchor heavily there. On the dangerous side, try to run a final rope over the peak and secure it tightly against the structure on the safe side, creating counter-tension.
Maintaining and Checking Your Nail-Free Tarp
A temporary fix requires regular checks. Unlike a nailed roof that requires no thought until it fails, your tarp needs attention, especially after severe weather.
The Weekly Inspection Checklist
- Check Rope Tension: Wind and sun cause ropes to stretch or shrink. Use a flashlight or binoculars to ensure all tie-downs are still taut. If they are slack, water can get underneath.
- Inspect Wood Clamps: Ensure that the lumber sandwiches haven’t slipped, which could expose the underlying material to wind lift. If clamps were used, check their grip strength.
- Look for Pooling Water: If your roof has low spots where water is collecting on top of the tarp, you need to clear the water or adjust the tarp immediately. Pooling water adds immense, uneven weight and will eventually cause the tarp to fail or slide.
- Check for Abrasion: Look at any spots where the tarp rubs against rough fascia or sharp edging. Use heavy utility tape to reinforce these friction points.
Addressing Specific Roof Types Without Nails
The best nail-free technique adapts to the specific structure you are protecting.
Shed Roofs (Single Slope)
Sheds are generally low to the ground and often have very low pitches. If the shed roof is wood, you can often use strapping around the entire perimeter.
- Place the tarp, ensuring it overhangs the low side significantly.
- Use the lumber sandwich method along the high side (where the roof meets the wall).
- Use heavy sandbags or even bricks (if the tarp is thick enough) along the entire three remaining lower edges. If the shed has a small eave, secure the straps around the fascia board underneath the eave.
Metal Roofs
Metal roofs are tricky because they are slick and have sharp seams. Never place weight directly on the seams where they curve.
- Avoid Seams: Lay the tarp so it covers the ridge lines, applying weight only on the relatively flat panels between the seams.
- Use Rubber Mats: To prevent the tarp from sliding on the slick metal, place pieces of old rubber matting or non-slip shelf liner under the tarp in the areas where straps will provide the most tension. This increases the coefficient of friction significantly.
RV or Mobile Home Roofs (Lower Pitch)
These roofs require extra care because the underlying structure is softer (often thin aluminum or fiberglass).
The primary tool here is strapping tension. When securing RVs, you must anchor the tarp to the chassis or the frame, not just the roof edge.
- Run heavy ratchet straps completely under the RV body.
- Place the lumber sandwiches along the tarp’s long edges.
- Loop the ratchet straps through the side grommets, over the lumber, and hook them firmly to the frame brackets underneath.
- Tighten the straps until the central area of the tarp bows slightly upward, ensuring all water runs off to the sides.

Pros and Cons of the Nail-Free Tarping Method
It is important to weigh the benefits against the limitations of this temporary solution. It’s a great choice for quick fixes, but it’s not a permanent roof replacement.
Advantages (Why This Works)
- Zero Damage: This is the biggest win—no new holes mean no future leaks caused by your handy work.
- Speed: Tarping an area safely without measuring and driving dozens of nails is much faster.
- Portability: The system can be deployed and removed quickly if you only need temporary protection for a day or two.
- Cost-Effective: You reuse existing strong ropes, lumber, and sandbags instead of buying roofing nails and specialized patching materials.
Disadvantages (When to Be Cautious)
| Limitation | Impact |
|---|---|
| Wind Sensitivity | Requires constant monitoring; high winds can lift unsecured edges easily. |
| Difficult on Very Steep Slopes | Achieving necessary tension without climbing can be hard and unsafe. |
| Not UV Stable Long-Term | Most construction tarps break down after 6–12 months of sun exposure. |
| Aesthetics and Debris | The roof looks unfinished, and the setup can collect leaves and debris. |
FAQ: Beginner Questions About Temporary Roof Covering
Q1: How long can a tarp reasonably stay on my roof as a temporary fix?
If secured perfectly using heavy lumber and tension, a high-quality tarp can last 1 to 3 months. However, you must check it weekly, especially after heavy rain or wind. For anything longer than three months, you risk UV degradation and moisture holding underneath.
Q2: What is the best way to seal the edges of the tarp so water doesn’t wick underneath?
The best way in a nail-free setup is the “Lumber Sandwich” technique. Use two pieces of wood clamped right over the tarp edge. For sealing seams where two tarps overlap, use wide, waterproof utility tape (like HVAC foil tape or Gorilla Tape) applied firmly to the top layer.
Q3: Can I use bungee cords instead of heavy rope for anchoring?
For lighter, lower roofs, yes, but be very cautious. Bungee cords lose elasticity quickly in the sun and heat. Use them only for secondary securing or very tight, localized clamping. For primary anchoring along the eaves, always use heavy-duty nylon rope or specialized ratcheting tie-downs.
Q4: If my roof is asphalt shingle, what’s the danger of just folding the edges under?
Folding the tarp edges under the shingles may seem like a quick solution, but it can actually create problems. When the tarp is folded, water can collect along the crease and slowly seep underneath the tarp and into the roof layers. Wind can also catch the folded section and lift the tarp, causing it to loosen or shift. Instead of folding, it’s much safer to secure the edges using the lumber sandwich method, ropes, or weighted anchors so the tarp stays flat and tightly sealed against the roof surface.
Q5: What size tarp should I use for covering a damaged roof area?
It’s always best to choose a tarp that is at least 3 to 4 feet larger than the damaged area on all sides. This extra coverage allows you to properly secure the edges and ensures water runs over the tarp instead of underneath it. For larger roof sections, using a heavy-duty tarp with reinforced grommets will provide better wind resistance and longer-lasting protection.
Conclusion: A Simple Way to Protect Your Roof in an Emergency
Learning how to put a tarp on a roof without nails can be extremely helpful when you need fast, temporary protection from rain and weather. By using strong ropes, lumber clamps, heavy weights, and proper tensioning techniques, you can secure a tarp effectively without causing additional damage to your roof. This method is especially useful for renters, temporary structures, or situations where drilling or nailing is not possible.
The most important things to remember are safety, proper tarp placement, and strong anchoring. Always check the weather before climbing onto a roof, use a stable ladder, and ensure the tarp overlaps the damaged area enough to guide water away. When installed correctly, a heavy-duty tarp can keep your home protected for several weeks while you arrange permanent roof repairs.
While this nail-free method works well for emergencies, it should only be considered a temporary solution. Regularly inspect the tarp after storms, tighten any loose ropes, and watch for signs of wear. With careful setup and maintenance, this simple technique can give you peace of mind and valuable time until a professional repair or full roof replacement is completed.