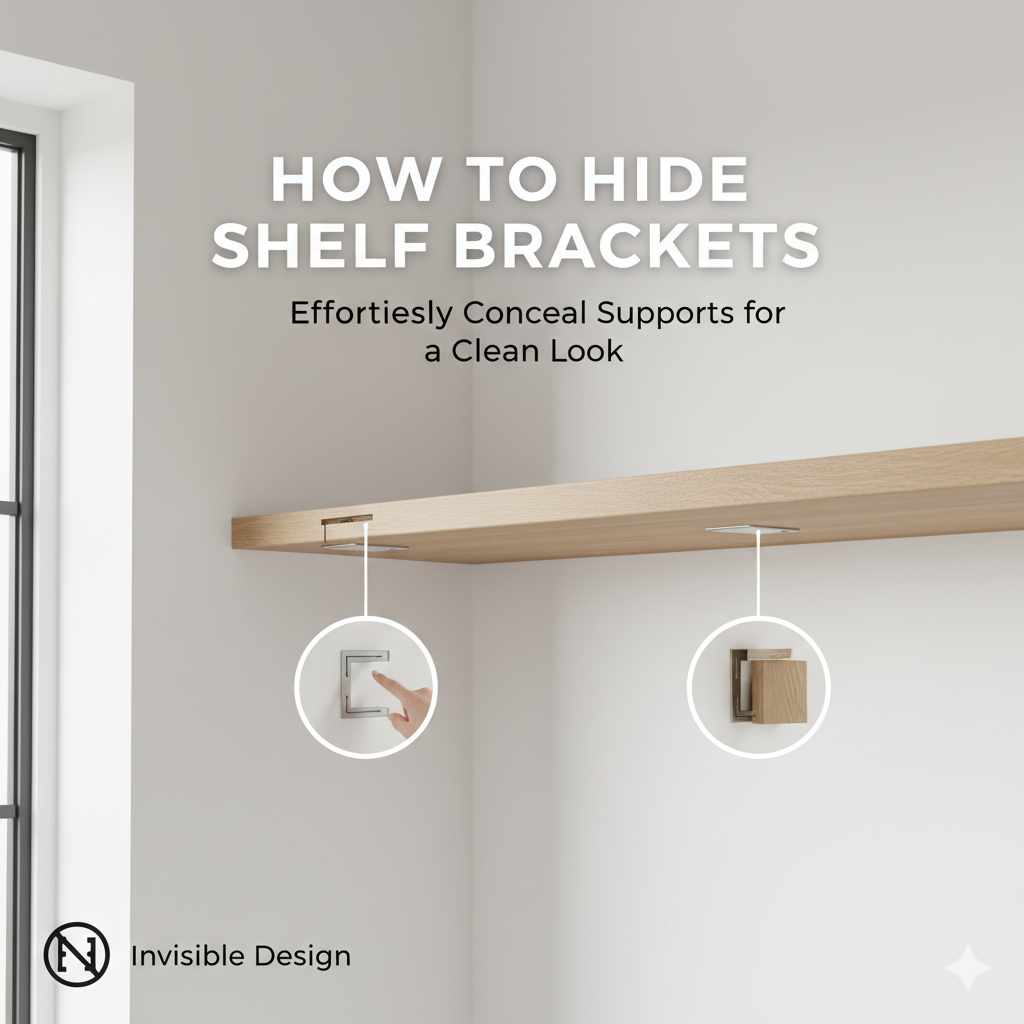
To hide shelf brackets effortlessly, choose hidden hardware like floating shelf brackets installed inside the wall studs or opt for decorative, built-in shelving where the support structure is integrated into the material. For exposed L-brackets, the best trick is painting them the same color as the wall or cleverly placing decorative items to camouflage them. This guide shows you the simplest, most effective methods.
Does the sight of chunky, exposed shelf brackets ruin the clean look you’re trying to achieve in your room? You want that sleek, modern, or minimalist vibe, but those metal supports shout “hardware!” Loud and clear. It’s a common frustration, even for experienced DIYers. Don’t worry. Hiding shelf supports doesn’t require tearing down your whole wall. We are going to walk through several easy, proven solutions today. Whether you are hanging a few light books or a heavy display, mastering how to hide shelf brackets is simpler than you think. Let’s get that flawless look you’re after!
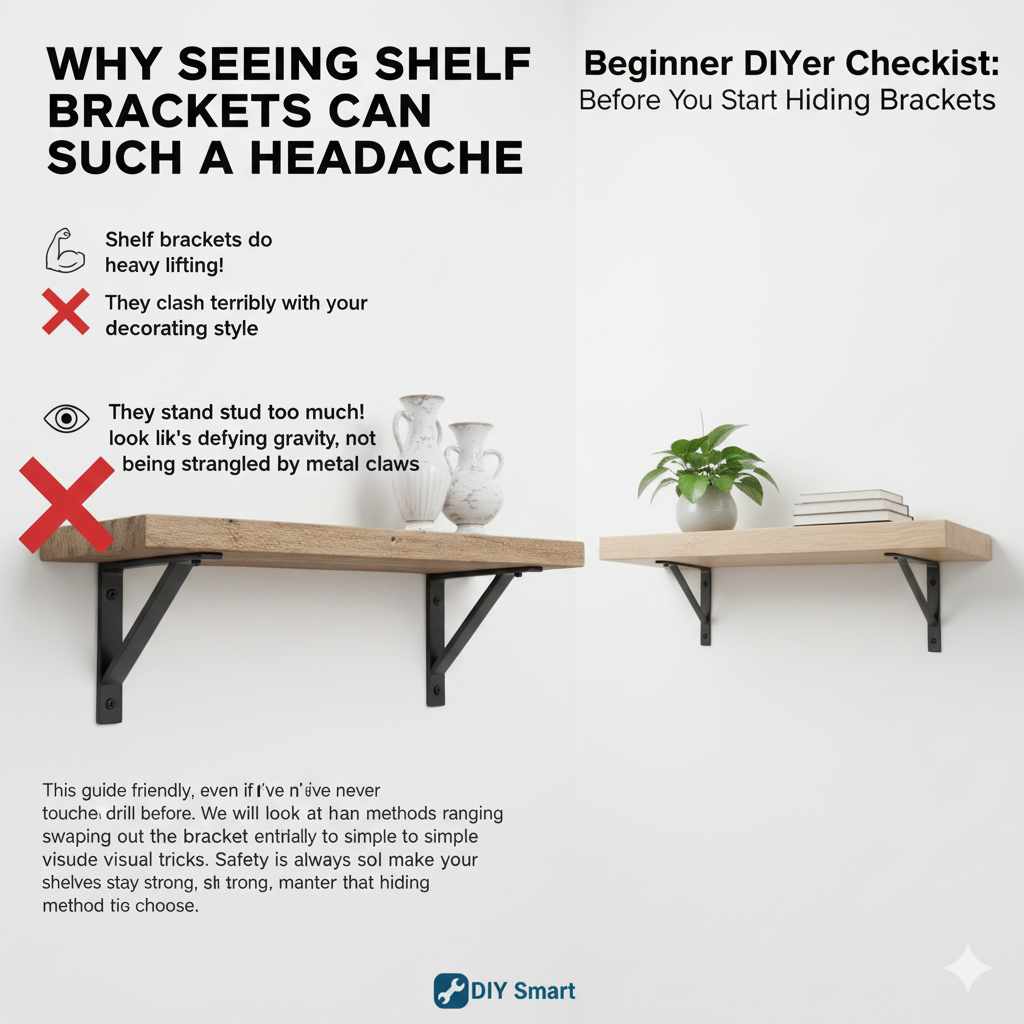
Why Seeing Shelf Brackets Can Be Such a Headache
Shelf brackets are essential for keeping your items safe. They do the heavy lifting! But sometimes, they clash terribly with your decorating style. Traditional L-brackets, while sturdy, can look bulky. If you have delicate décor, a rustic wood shelf, or a modern, floating look in mind, those visible supports stand out too much. Our goal is always function first, but aesthetics matter inside your home. We want the shelf to look like it’s defying gravity, not being strangled by metal claws.
This guide is friendly, even if you’ve never touched a power drill before. We will look at methods ranging from swapping out the bracket entirely to simple visual tricks. Safety is always our number one priority, so we will make sure your shelves stay strong, no matter what hiding method you choose.
Method 1: The Invisible Support – Choosing Floating Shelf Hardware
The most popular way to completely eliminate the sight of a bracket is to use hardware specifically designed to remain unseen. This is often called a “floating shelf.” It looks like the shelf is simply attached to the wall with nothing underneath, giving you that stunning, clean effect.
Understanding Floating Shelf Supports
These brackets work by having strong metal rods or arms that slide into pre-drilled holes in the back of the shelf itself. Because the rods are completely hidden by the wood, the shelf appears flush and unsupported.
Tools You Might Need for Floating Shelves:
- Stud finder (Essential for safety!)
- Power drill and various bits
- Level (Crucial for straight shelves)
- Measuring tape
- Pencil
- A helper (These can be heavy to hold steady)
Step-by-Step: Installing True Floating Shelves
This method requires more precision than simply screwing an L-bracket to a wall, but the result is worth the effort. Remember to check the weight rating for your chosen hardware.
- Locate and Mark Studs: Safety first! Use your stud finder to locate the vertical wooden studs inside your drywall. Mark the center of the studs lightly with a pencil. Your brackets must anchor into these studs for heavy loads. If you are only holding very light items (like small picture frames), you might use heavy-duty toggle bolts, but studs are always better.
- Mark the Bracket Position: Hold the actual metal floating bracket against the wall where you want the shelf. Use your level to ensure it is perfectly straight. Mark the holes for mounting onto the studs.
- Drill Pilot Holes: Following the bracket manufacturer’s instructions carefully, drill pilot holes for the mounting screws into the studs.
- Mount the Bracket: Secure the floating shelf bracket firmly to the wall using the long structural screws provided. Double-check that it is completely rigid and level.
- Prepare the Shelf: The back of your wooden shelf needs holes drilled into it to accept the support rods. This is where precision matters. Most floating shelf kits provide a template. Align this template perfectly with the back edge of your shelf and use a drill press (if available) or a very steady hand to bore the holes to the correct depth.
- Slide and Secure: Carefully slide the shelf onto the rods protruding from the wall bracket. Some systems click or lock into place. If the fit is very tight, a little gentle persuasion (tapping with a rubber mallet) might be needed.
Pro Tip from Dustin: If you are hanging a shelf over a tricky spot, like behind existing pipes or wires, consult local building codes or consider consulting a vetted professional. For sturdy structural work, knowing where your studs are based on resources like the International Residential Code (IRC) guidelines for wall framing is vital.
Method 2: Camouflage – Making Visible Brackets Disappear
What if tearing into the drywall to install full floating hardware isn’t an option, or you simply have existing, very strong L-brackets you want to keep? The next best approach is camouflage. We want the brackets to blend in so seamlessly that your eye glides right over them.
Option A: Paint Match Magic
This is the easiest and often most deceptive trick for hiding standard L-brackets.
The Process:
- Clean the Bracket: Wipe down the brackets with a degreaser or rubbing alcohol. They must be spotless for paint to stick.
- Prep the Wall: If the wall is textured or painted recently, consider lightly sanding the area where the bracket meets the wall.
- Choose Your Paint: Use a high-quality metal primer first, especially if the bracket is glossy or rusty. Then, use the exact matching interior wall paint color and sheen (matte, eggshell, etc.).
- Apply Thin Coats: Apply several thin coats rather than one thick coat. Thick paint can drip and look messy. Let each coat dry fully.
When done right, the metal seems to vanish against the wall surface, drawing all attention to the shelf material above it.
Option B: Architectural Concealment
If painting isn’t enough, you can use the shelf structure or decorative items to block the view of the support.
Concealment Strategies:
- Using Thick Shelves: If your shelf material is thick (say, 2 inches or more), you can often recess the bracket slightly into the bottom of the shelf. This provides a small overhang that shadows and hides the top profile of the bracket.
- Decorative Wraps: For rustic or industrial looks, you can wrap the bracket in natural rope, twine, or even thin strips of leather. This doesn’t exactly hide it, but it transforms it from a plain metal piece into a design element.
- The Top-Heavy Load Trick: Place your largest, visually heaviest items directly over or slightly in front of the brackets. If your eyes are drawn to a stack of heavy art books sitting right over the support, you won’t notice the support itself.
Method 3: Building Them In – Integrated Shelf Systems
If you are doing new construction, a major remodel, or want the ultimate custom look, integrating the supports into the structure eliminates the bracket problem entirely by replacing the visible bracket with solid structure.
The Built-In Alcove or Niche
Instead of hanging a shelf on a flat wall, you build a shallow recess, or niche, into the wall framing between two studs. The shelf material then sits directly on the finished drywall/backer board inside this recess. The support is the wall structure itself.
Pros and Cons of Built-Ins:
| Pros (Hidden Support) | Cons (Complexity) |
|---|---|
| Ultimate clean and custom look. | Requires cutting into drywall and potentially altering framing. |
| Extremely strong supports (anchored to studs). | More time-consuming and requires precise finishing work. |
| Perfect for bathrooms or kitchens where storage is needed. | May reduce usable space slightly compared to surface mounts. |
Bracket-Free Shelving with Cleats and Rabbet Joints
If you don’t want a full niche, you can still use a “French cleat” or a simple wooden supporting strip (called a cleat) mounted securely to several studs. The shelf itself is then custom-made with a groove (a rabbet joint) cut along its back underside.
This groove slides perfectly over the wall-mounted cleat. Because the shelf wraps around the support strip, the support is hidden from the front and sides. This is a fantastic, robust method that still offers a floating appearance when installed correctly.
Method 4: Choosing Specialty Hardware for Minimal Visibility
Sometimes, the bracket you choose is the problem. Modern hardware manufacturers have created several functional supports that take up far less visual space than traditional L-brackets.
The Pin Bracket System
These are tiny, often metal, pins that stick out from the wall. The shelf must have holes drilled horizontally into its back edge to accept these pins—similar to floating shelves, but less intrusive in terms of depth.
These work best for lightweight items, like displaying small decorative objects or single rows of paperback books. They hide exceptionally well because the support rods are very slender (often only 1/4 inch thick).
Invisible Glass Shelf Brackets
If you love the look of glass shelves (often used in showers or curio cabinets), the hardware is usually very minimal, often consisting of small, screw-mounted knobs (standoffs) that hold the glass from beneath. Because glass lets light and sight pass through, these small points of contact are much less noticeable than a solid L-bracket.
Safety First: Ensuring Your Hidden Shelves Don’t Collapse
Whether you choose a floating system or camouflage a visible bracket, the stability of that shelf dictates its usefulness. As a guide who prioritizes safety, especially when dealing with things attached to walls, remember these key points for load-bearing shelves.
The Importance of Stud Finding
Drywall alone can only hold a few pounds before ripping out. For anything heavier—like ceramics, tools, or many books—you must secure your brackets into wooden studs or specialized, heavy-duty anchors. Knowing how to properly locate studs, which are typically spaced 16 or 24 inches apart on center, is non-negotiable for secure shelving, as advised by many home improvement experts.
Weight Capacity Comparison (Approximate):
| Hardware Type | Typical Load Capacity (Per Bracket) | Best Use Case |
|---|---|---|
| Standard L-Bracket (Into Stud) | 30–50 lbs | General kitchen/living room storage |
| Heavy-Duty Floating Bracket (Into Stud) | 40–75 lbs | Heavy books, media equipment |
| Toggle Bolts (Into Drywall Only) | 10–20 lbs | Light décor, picture frames |
| French Cleat System (Into Studs) | 50+ lbs | Long, heavy shelves where support needs to be distributed |
Level and Plumb are Your Best Friends
A shelf that is even slightly off-level will naturally push weight unevenly onto one side of the bracket or anchor point. Over time, this uneven stress can cause the bracket to pull out of the wall. Always take the extra minute to check your level both horizontally (level) and vertically (plumb) before installing any support. This ensures the weight distributes evenly across all anchor points.
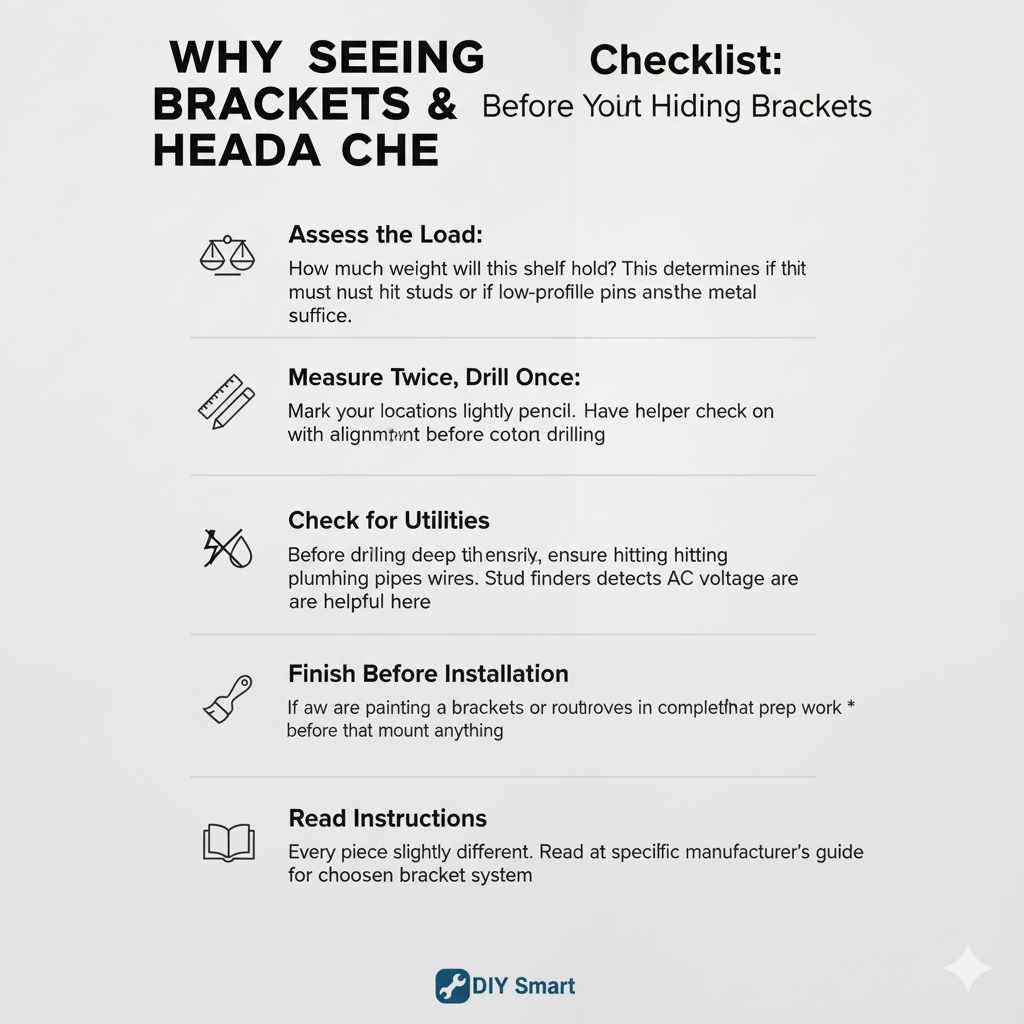
Beginner DIYer Checklist: Before You Start Hiding Brackets
You’ve picked your method—great job! Before you drill that first hole, run through this short checklist to ensure a smooth project and spectacular results.
- Assess the Load: How much weight will this shelf hold? This determines if you musthit studs or if low-profile pins will suffice.
- Measure Twice, Drill Once: Mark your locations lightly in pencil. Have a helper check the alignment with the level before committing to drilling.
- Check for Utilities: Before ever drilling deep into a wall, ensure you are not hitting plumbing pipes or electrical wires. Stud finders that detect AC voltage are very helpful here.
- Finish Before Installation: If you are painting the brackets or routing grooves in the wood shelf, complete all that prep work before* you mount anything to the wall.
- Read the Instructions: Every piece of hardware is slightly different. Read the specific manufacturer’s guide for your chosen bracket system, especially regarding screw depth and drill bit size.
FAQ: Simple Answers for Shelf Bracket Camouflage
Q1: What is the easiest way to hide a standard L-bracket after it is installed?
A: The easiest way is painting. Use interior wall paint that perfectly matches the color and sheen of your wall. Apply primer first, then two thin coats of your matching topcoat over the metal bracket.
Q2: Can I use floating shelves if I have plaster walls instead of drywall?
A: Plaster walls are tricky. They are brittle and do not hold screws as reliably as modern drywall over studs. You may need specialized plaster anchors, or it might be safer to use a very robust cleat system mounted with long, structural screws that pass through the plaster and deep into the underlying lath or framing.
Q3: How thick does a shelf need to be for hidden hardware to work?
A: For most standard floating shelf brackets, the shelf material should be at least 1.5 inches thick to allow enough depth for the support rods to slide in securely without poking through the front or top surface.
Q4: If I can’t find a stud, what is the strongest anchor for a medium-weight shelf?
A: Look for heavy-duty self-drilling anchors or toggle bolts rated for high shear strength. Always check the weight rating and only use these if you absolutely cannot reach a stud, as they have a much lower weight ceiling than solid wood mounting.
Q5: Can I cover visible brackets with decorative trim?
A: Yes, if you are going for a more traditional or built-in look, you can build a small wooden box or trim piece that wraps around the bracket, effectively turning the bracket into the “inside” of a decorative support column. Ensure this trim does not touch the shelf itself, or it will look like the column is holding the shelf up unevenly.
Q6: Do floating shelves actually hold as much weight as visible brackets?
A: Yes, modern, high-quality floating shelf systems that anchor robustly into wall studs are often just as strong, sometimes stronger, than visible brackets because the load is distributed more evenly across multiple, heavy-duty internal rods rather than relying on a single L-shape anchor point.
Final Thoughts on Achieving Invisible Support
Hiding those shelf brackets is really about making a choice between visual trickery and structural redesign. If you want instant results with minimal effort, painting and smart placement are your best bets for dealing with existing hardware. If you are installing new shelves and prioritizing that gravity-defying appearance, investing the time into true floating bracket hardware or a French cleat system will give you a professional, clean finish.
Remember, building and decorating your space should be rewarding, not frustrating. By understanding the difference between camouflaging supports and completely eliminating them with specialized hardware, you now have the confidence to tackle any shelving project perfectly. Go ahead—mount that shelf and enjoy the beautiful, clean lines you created!