Hang a pendant light easily with this guide for a stylish home upgrade that boosts your space’s charm and function, even for beginners.
Creating a stunning focal point in your home doesn’t have to be complicated! Pendant lights are a fantastic way to add personality and focused illumination to any room. But the thought of tackling a DIY electrical project can feel a little daunting, right? You might worry about complicated wiring or making a mistake.
Well, take a deep breath! This guide is designed to break down the process of hanging a pendant light into simple, super-manageable steps. We’ll walk you through everything you need, from choosing the perfect spot to making those final, satisfying connections. Soon, you’ll be enjoying your beautiful new light, and you’ll feel so proud of what you accomplished! Let’s light up your home together.
Why Hang a Pendant Light?
Pendant lights are more than just sources of light. They’re stylish accents that can transform a room’s atmosphere. Think about your kitchen island needing a bit more flair and focused task lighting, or your dining area craving a designer touch. Pendant lights do it all!
They’re perfect for:
- Adding task lighting where you need it most (like over a kitchen counter or a reading nook).
- Creating a beautiful focal point that draws the eye.
- Enhancing the overall style and ambiance of a room.
- Providing a more modern and clean look compared to traditional ceiling fixtures.

Gathering Your Tools & Materials
Before diving in, let’s make sure you have everything ready. Having all your tools and supplies at the ready makes the process smooth sailing. It’s always better to be prepared!
The Pendant Light Kit
This is your star! Your new pendant light kit should include:
- The pendant light fixture itself (shade, socket, any decorative elements).
- A mounting bracket or canopy to attach it to the ceiling.
- A wire connector or wire nuts for joining electrical wires.
- A small piece of downrod or chain, depending on your fixture style.
- Screws and other small hardware specifically for the fixture.
Essential Tools
You likely have most of these already!
- Screwdriver Set: Flathead and Phillips head screwdrivers are a must.
- Wire Strippers/Cutters: For safely preparing the electrical wires.
- Voltage Tester: This is super important for ensuring the power is off! A non-contact voltage tester is easy to use. You can find great options from brands like Klein Tools or Fluke.
- Ladder or Step Stool: For safely reaching your ceiling.
- Pliers: Useful for twisting wires and handling small parts.
- Safety Glasses: Always protect your eyes!
- Drill (Optional): Might be needed for some mounting brackets or if you’re installing in drywall without a junction box.
- Stud Finder (Optional but Recommended): To locate a ceiling joist for secure mounting, especially for heavier fixtures.
- Electrical Tape: For extra security on wire connections.
Safety First!
This is non-negotiable. Before you touch any wires, you MUST turn off the power to the existing light fixture or the area where you’ll be working.
- Go to your main electrical panel (the breaker box).
- Locate the breaker that controls the light switch or the specific circuit you’ll be working on.
- Flip the breaker to the “OFF” position.
- Crucial Step: Go back to the light switch and try to turn the light on. It should NOT come on. Then, use your voltage tester on the wires in the ceiling box to absolutely confirm there is no power present. Safety is paramount when working with electricity. When in doubt, call a qualified electrician. For more information on electrical safety, consult resources from the U.S. Consumer Product Safety Commission (CPSC).
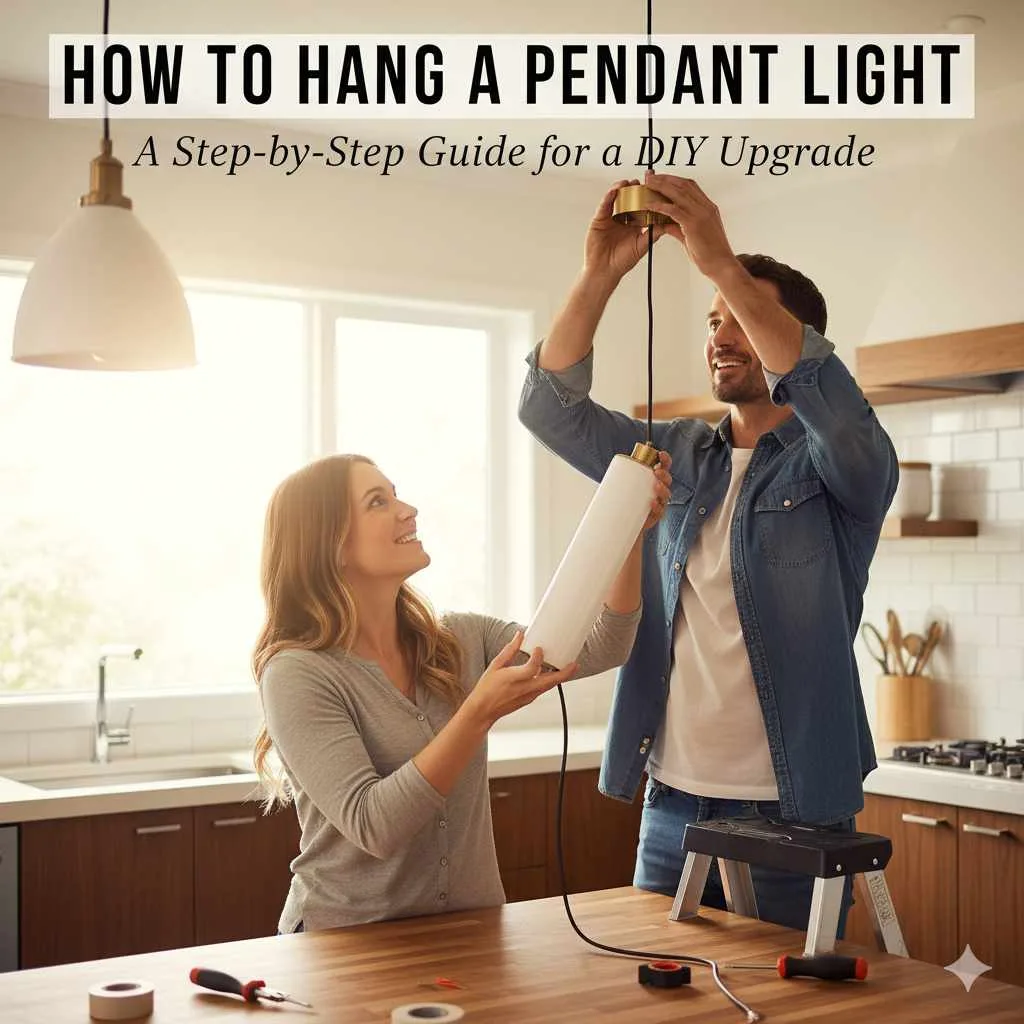
Step-by-Step: How to Hang a Pendant Light
Now for the exciting part! Let’s get that pendant light installed.
Step 1: Remove the Old Fixture (If Applicable)
If you’re replacing an existing light:
- Ensure the power is OFF (did you check with your voltage tester?).
- Carefully unscrew or unclip the old fixture’s cover or globe.
- You’ll usually see a mounting bracket holding the fixture to the ceiling electrical box. Unscrew this bracket.
- Gently lower the fixture. You’ll see wires connected with wire nuts.
- Unscrew the wire nuts to disconnect the fixture wires from the ceiling wires.
- Let the old fixture hang down or be supported so it doesn’t pull on the wires.
- Remove the old mounting bracket.
Step 2: Prepare the New Mounting Bracket
Your new pendant light will come with its own mounting bracket or canopy.
- Most brackets need to be attached to the existing electrical box in the ceiling.
- Determine the correct orientation for your bracket. Sometimes there are arrows or specific screw holes to use.
- Feed the pendant’s wires through the center of the mounting bracket.
- Screw the new mounting bracket securely to the electrical box in the ceiling. If the fixture is heavy, it’s ideal to attach the bracket directly to a ceiling joist. A stud finder can help locate these. This Old House has great tips on using a stud finder.
Step 3: Assemble Your Pendant Light
While the mounting bracket is up, it’s a great time to do any final assembly of your pendant light itself.
- This might involve attaching the shade to the socket holder, threading decorative parts, or assembling the downrod or chain.
- Follow the manufacturer’s specific instructions for your model.
- Ensure all parts are snug and secure.
Step 4: Connect the Wires – The Moment of Truth!
This is where you connect your new pendant to the house’s wiring. Remember, power is OFF!
You’ll typically see three types of wires:
- Black Wire: This is the “hot” wire.
- White Wire: This is the “neutral” wire.
- Copper or Green Wire: This is the “ground” wire (for safety).
Here’s how to connect them:
- Ground Wire First: Connect the bare copper or green wire from your pendant light to the bare copper or green wire coming from the ceiling electrical box. Use a wire nut and twist it clockwise until it’s snug.
- Neutral Wire: Connect the white wire from your pendant light to the white wire from the ceiling box. Secure with a wire nut.
- Hot Wire: Connect the black wire from your pendant light to the black wire from the ceiling box. Secure with a wire nut.
- Make Sure They’re Secure: Gently tug on each wire connection to ensure they are tight and won’t pull apart.
- Add Electrical Tape (Optional but Recommended): For extra peace of mind, wrap a bit of electrical tape around each wire nut and the connected wires.
Quick Tip: If the wires coming from your ceiling are different colors than expected, or if you have more than three wires, it’s best to consult an electrician. Some older homes have different wiring configurations.
Step 5: Tuck Wires and Attach the Canopy
Now it’s time to tidy things up and make it look professionally installed.
- Carefully tuck all the connected wires and wire nuts up into the electrical box.
- You might need to gently push them in, making sure no wires are pinched.
- Align the pendant light’s canopy (the decorative plate that covers the electrical box) with the mounting bracket.
- Secure the canopy using the screws provided with your pendant light kit. These usually go into the mounting bracket.
Step 6: Install the Bulb and Test
Almost there!
- Screw in the appropriate light bulb for your pendant fixture. Check the wattage recommendation for your fixture to avoid damage.
- Stand back and admire your work!
- Go back to your breaker box and flip the breaker back to the “ON” position.
- Go to your light switch and turn on the power.
- Congratulations! Your new pendant light should illuminate beautifully.
Troubleshooting Common Issues
Even with the best planning, a little hiccup can happen. Here are a few common fixes:
Light Doesn’t Turn On
- Check the Breaker: Did you flip the breaker back on?
- Check the Bulb: Is the bulb screwed in correctly? Is it the right type and wattage? Try a different bulb.
- Check Wire Connections: With the power OFF at the breaker, carefully remove the canopy and check that all wire connections are secure and correct.
Light Flickers
This usually indicates a loose wire connection, either at the fixture, the switch, or the electrical box. Turn off the power and re-tighten all connections.
Fixture Looks Crooked
- Check that the mounting bracket is securely attached to the ceiling box and that it’s level.
- Ensure the canopy is seated evenly against the ceiling.
- If it’s a chain-hung pendant, make sure the chain is equally distributed.
When to Call a Professional
While this guide aims to make DIY accessible, some situations are best left to the experts. If any of these apply, don’t hesitate to call a licensed electrician:
- You encounter old, frayed, or damaged wiring.
- The electrical box in your ceiling is loose or not rated for lighting fixtures.
- You’re unsure about your home’s wiring at all.
- The pendant light is very heavy and requires specialized support.
- You’ve followed all steps and the light still doesn’t work.
The Electrical Safety Foundation International (ESFI) offers excellent resources and emphasizes the importance of professional help when needed.
Choosing the Right Pendant Light Placement
The perfect placement can elevate your room’s design and function. Consider these popular spots:
Kitchen Islands and Counters
How High? Aim for about 30-36 inches (75-90 cm) between the countertop and the bottom of the pendant. This provides good task lighting without getting in the way.
Spacing: For multiple pendants over an island, space them evenly, leaving about 24-30 inches (60-75 cm) between each fixture.
Dining Tables
How High? Hang the pendant about 30-36 inches (75-90 cm) above the tabletop. This ensures it lights up your meal beautifully without blinding your guests.
Centering: Position it directly over the center of your dining table.
Living Rooms and Bedrooms
Accent Lighting: To highlight a reading nook or a piece of art, hang it at a comfortable eye level, typically around 60-66 inches (150-170 cm) from the floor.
General Lighting: If used as a central fixture, hang it at least 7 feet (2.1 meters) from the floor to avoid head bumps, but the exact height will depend on your ceiling height and room size.
Entryways and Hallways
Welcoming Glow: Hang it high enough so people don’t bump into it – usually at least 7 feet (2.1 meters) from the floor.
Centerpiece: Position it in the center of the space for a grand first impression.
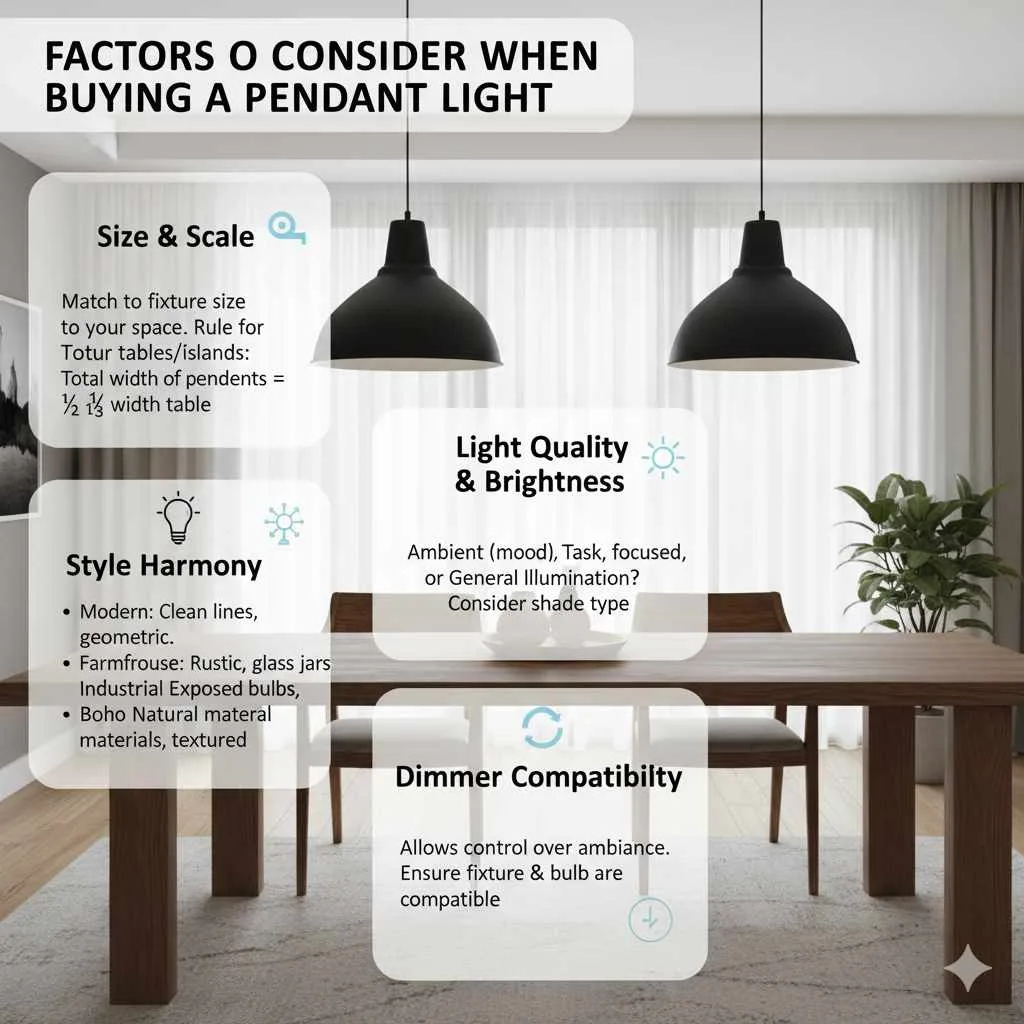
Factors to Consider When Buying a Pendant Light
Beyond where you’ll hang it, a few additional considerations make your choice perfect.
Size and Scale
A tiny pendant over a giant dining table can look lost, while an oversized one in a small nook can feel overwhelming. Measure your space and choose a fixture that complements its dimensions.
A good rule of thumb for kitchen islands or dining tables:
Width: The total width of the pendants should be about half to two-thirds the width of the table or island.
Style Harmony
Does the pendant’s style match your room’s decor? You don’t have to be matchy-matchy, but there should be a sense of visual connection.
- Modern: Clean lines, geometric shapes, metallic finishes.
- Farmhouse: Rustic metals, glass jars, simple silhouettes.
- Industrial: Exposed bulbs, metal cages, vintage elements.
- Boho: Natural materials, textured fabrics, vibrant colors.
Light Quality and Brightness
Consider the type of light your pendant will provide. Is it for ambient mood lighting, focused task lighting, or general illumination? Some pendants have shades that diffuse light softly, while others are designed to spotlight down.
Dimmer Compatibility
Want to control the ambiance? Make sure your chosen pendant and bulb are compatible with a dimmer switch. This is a fantastic way to make your lighting versatile.
Frequently Asked Questions About Hanging Pendant Lights
Q1: Do I need a professional to hang a pendant light?
Not necessarily! If you’re comfortable with basic DIY and electrical safety (like turning off the power and using a voltage tester), you can certainly hang a pendant light yourself. However, if you have any doubts or encounter complex wiring, it’s always best to call a qualified electrician.
Q2: How high should I hang a pendant light over a kitchen island?
For most kitchen islands, the bottom of the pendant should be about 30 to 36 inches (75-90 cm) above the countertop. This ensures good task lighting without being too low and getting in the way.
Q3: What’s the difference between a pendant light and a chandelier?
A pendant light typically hangs from a single cord, chain, or rod and often features a single shade or lamp. Chandeliers are usually larger, more ornate fixtures with multiple arms and bulbs, designed to be a central decorative and lighting element.
Q4: Can I hang a pendant light on a sloped ceiling?
Yes, many pendant lights can be adapted for sloped ceilings. You might need a special sloped ceiling adapter or a longer downrod to ensure the pendant hangs straight. Always check the manufacturer’s specifications for compatibility.
Q5: How do I know if my ceiling electrical box is strong enough?
Most standard ceiling electrical boxes are designed to hold the weight of typical light fixtures. However, for heavier pendants (over 50 lbs), you’ll need to ensure the box is securely anchored to a ceiling joist or use a heavy-duty mounting brace. If in doubt, consult an electrician.
Q6: Do I need to use wire nuts for electrical connections?
Yes, wire nuts (or other approved connectors) are essential for safely joining electrical wires. They provide insulation and a secure connection. Always use the correct size wire nut for the number and gauge of wires you’re connecting.
Q7: Can I use an LED bulb in any pendant light?
Generally, yes. However, it’s important to check the pendant fixture’s maximum wattage recommendation and ensure the LED bulb you choose does not exceed it. Some older fixtures might have specific heat limitations, but most modern fixtures are compatible with LED bulbs.
Conclusion
See? Hanging a pendant light is totally achievable! You’ve learned the importance of safety, gathered your tools, and walked through each simple step. The feeling of turning on that switch and seeing your beautiful new light illuminate the space is incredibly rewarding.
Beyond the practical steps, remember that this new fixture is an opportunity to express your personal style and enhance the comfort and beauty of your home. Whether it’s over your kitchen island, dining table, or in a cozy corner, your pendant light will add a touch of magic. So go ahead, embrace your DIY spirit, and enjoy the stunning results! You’ve got this!