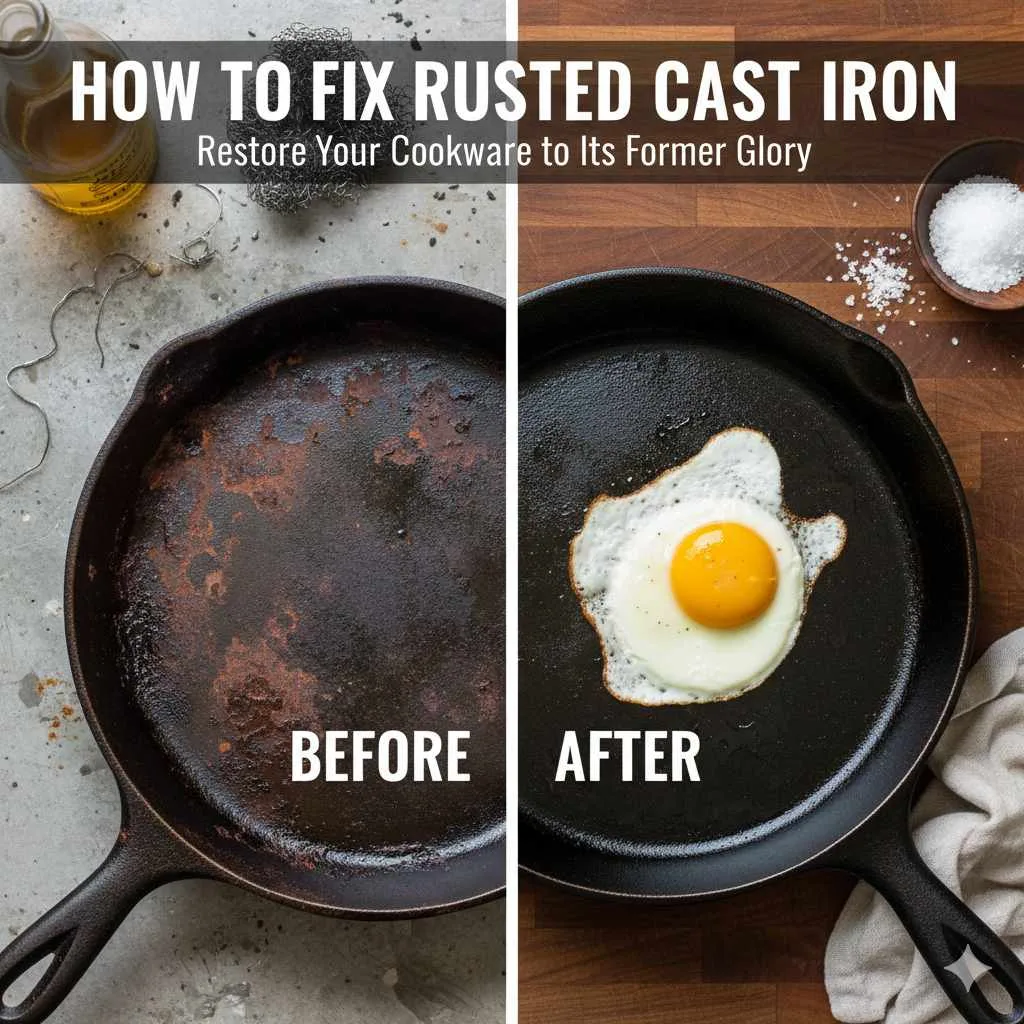
Don’t toss that rusty cast iron! You can easily restore your beloved skillet with simple household items and a few straightforward steps. This guide will show you how to fix rusted cast iron, making it look and cook like new again.
It’s a common kitchen heartache: you pull out your trusty cast iron skillet, only to find patches of dreaded rust. Before you think it’s beyond repair, take a deep breath! Rust happens, especially with cast iron. But the good news is that fixing a rusted cast iron skillet is surprisingly simple and incredibly rewarding. Restoring your pan not only saves you money but also brings back a piece of cookware that can last for generations with a little love. We’re going to walk through this step-by-step, arming you with the knowledge and confidence to banish rust and bring your cast iron back to its former glory. Get ready to rediscover the joy of cooking with a perfectly seasoned, rust-free skillet!
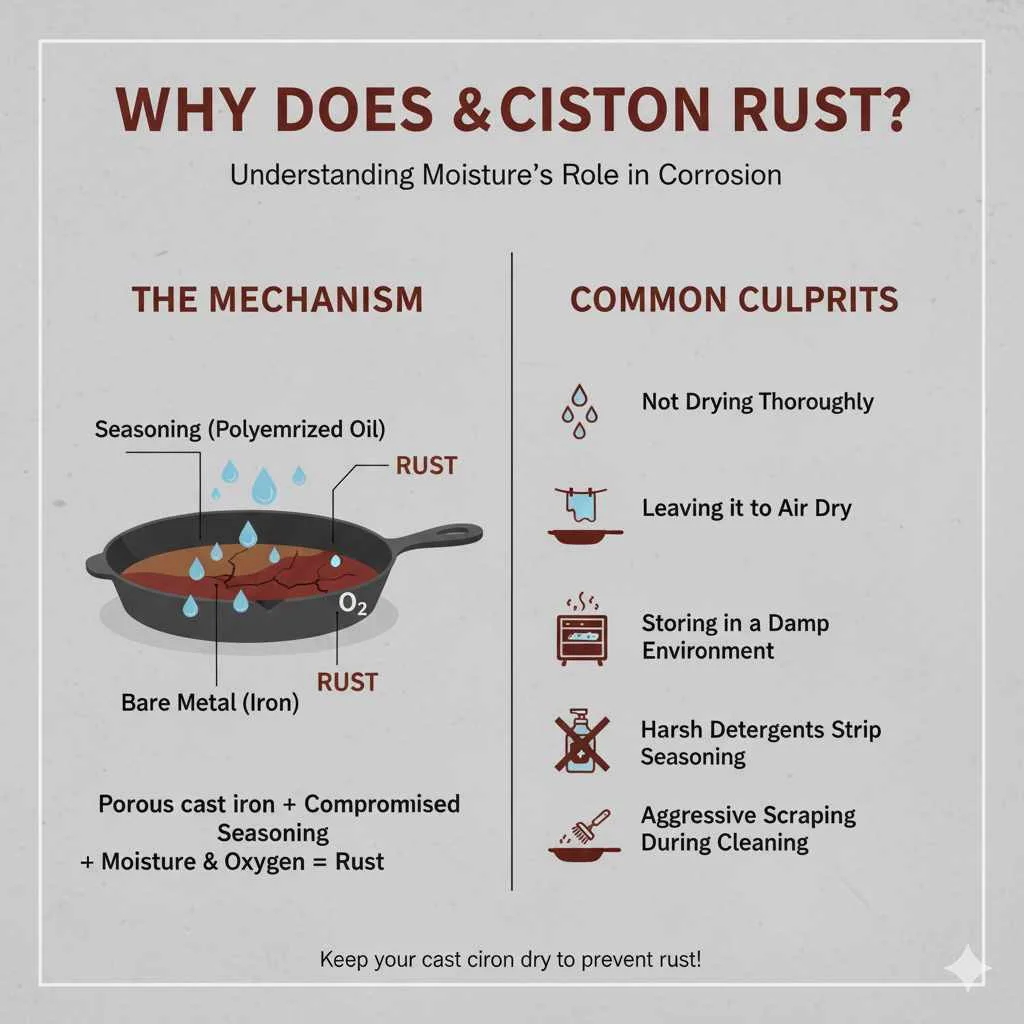
Why Does Cast Iron Rust?
Rust on cast iron is usually the result of moisture. Cast iron is porous, and if its seasoned layer (the protective, non-stick coating built up from polymerized oil) is compromised or if the pan is left wet for too long, the bare metal is exposed to oxygen and moisture, leading to rust. Common culprits include:
- Washing and not drying it thoroughly.
- Leaving it to air dry.
- Storing it in a damp environment.
- Using harsh detergents that strip the seasoning.
- Scraping away too much of the seasoning during cleaning.
What You’ll Need to Fix Rusted Cast Iron
Gathering your supplies before you start makes the process so much smoother. You likely have most of these items already in your home, which is fantastic for a budget-friendly fix!
Essential Cleaning Supplies:
- Steel Wool Pads: Medium or fine grit is best. Avoid coarse grit, which can be too abrasive.
- Stiff Brush or Sponge: For scrubbing away rust.
- Dish Soap: A small amount will be needed for the initial cleaning.
- Baking Soda: An excellent mild abrasive.
- White Vinegar: A fantastic rust remover due to its acidity.
- Clean Cloths or Paper Towels: For drying and wiping.
- Oven: For re-seasoning, which is crucial after rust removal.
Seasoning Supplies:
- High Smoke Point Oil: Such as vegetable oil, canola oil, grapeseed oil, or flaxseed oil.
- Oven Mitts: For safety when handling the hot pan.
- Aluminum Foil: To line the oven rack and catch drips.
Step-by-Step Guide: How to Fix Rusted Cast Iron
Don’t let rust intimidate you. We’ll tackle this in a few simple phases: rust removal, cleaning, and re-seasoning. Each step is designed to be easy to follow, even if you’ve never done this before.
Phase 1: Rust Removal
This is where the magic happens. We’ll use the power of vinegar and a little elbow grease to lift that surface rust. Don’t worry if your pan looks a bit rough at this stage; it’s all part of the restoration process.
Prepare the Vinegar Bath:
In a sink or a large basin, mix equal parts white vinegar and water. You want enough liquid to submerge the rusted areas of your cast iron skillet. If only the bottom is rusted, you can just fill the pan directly with the vinegar-water solution.Soak the Skillet:
Place your rusted cast iron skillet in the vinegar-water solution. Let it soak. The duration is key: for light rust, 30 minutes to an hour might be enough. For heavier rust, you might need to soak it for a few hours, perhaps up to 6 hours. Crucially, do not leave it in the vinegar for too long (over 6-8 hours), as the acid can start to pit the iron itself.Scrub Away the Rust:
After soaking, remove the skillet from the vinegar solution. Use a steel wool pad or a stiff brush to scrub away the rust. You should find that the rust has loosened significantly and is much easier to remove. Rinse the pan thoroughly with warm water.Repeat if Necessary:
If you still see rust patches, you can repeat the soaking and scrubbing process. For stubborn spots, you can also try making a paste of baking soda and water and using it as an abrasive scrub.
Phase 2: Thorough Cleaning
Once the rust is gone, it’s vital to get the pan completely clean so you have a fresh surface ready for seasoning. At this point, the pan will likely look dull and gray, which is perfectly normal. You’ve essentially stripped it down to its bare metal.
Wash with Soap and Water:
Now is one of those rare times when using dish soap on cast iron is recommended. Wash the skillet using a small amount of mild dish soap and a sponge or stiff brush to remove any remaining vinegar residue or loosened rust particles. Rinse it extremely well with hot water.Dry Immediately and Completely:
This is a critical step! Moisture is the enemy of bare cast iron. After rinsing, immediately dry the skillet thoroughly with clean cloths or paper towels. Get into every nook and cranny. To ensure it’s bone-dry, place it on a low heat setting on your stovetop for a few minutes until all traces of moisture have evaporated. You should see a faint wisp of steam if there’s any lingering dampness.
Phase 3: Re-Seasoning Your Skillet
Re-seasoning is what gives your cast iron its protective, non-stick surface and prevents future rust. It involves baking thin layers of oil onto the pan. You’ll be creating a new layer of seasoning, just like the pros do!
Preheat Your Oven:
Preheat your oven to a high temperature, typically between 400°F and 500°F (200°C to 260°C). The exact temperature can vary slightly depending on the oil you use, aiming for a temperature above the smoke point of your chosen oil.Apply a Thin Layer of Oil:
Once the pan is completely dry and still warm from the stovetop drying, apply a very thin layer of your chosen cooking oil all over the skillet – inside, outside, and the handle. Grab one of your clean cloths and rub it in. Then, take a clean cloth and wipe off as much of the oil as you possibly can, as if you’re trying to remove it all. This is the secret to preventing sticky spots: less is more! A too-thick layer of oil will result in a sticky, uneven seasoning.Bake the Skillet:
Place a sheet of aluminum foil on the bottom rack of your oven to catch any potential drips. Place the oiled skillet upside down on the top rack of the preheated oven. This orientation allows any excess oil to drip away, ensuring a smooth finish.Bake for an Hour:
Let the skillet bake for one hour. You might notice a slight smoky smell from the oil polymerizing; this is normal and a good sign that the seasoning is happening. Ensure your kitchen is well-ventilated.Cool and Repeat:
After an hour, turn off the oven and let the skillet cool down completely inside the oven. Once cool, you’ll see a subtle sheen from the new seasoning. For the best results, repeat steps 2 through 5 at least 2-3 more times, or even more for a robust, factory-like finish. Each layer builds upon the last, creating a durable and beautiful cooking surface.
Tips for Maintaining Your Restored Cast Iron
Now that you’ve saved your skillet, keeping it in top shape is easy. A little bit of care after each use will keep rust away and your seasoning strong.
- Clean Promptly After Use: Wash your skillet with warm water. A stiff brush or a non-metal scraper can help remove food bits. For most messes, soap isn’t strictly necessary once your pan is well-seasoned, but if you use it, use a small amount and rinse thoroughly.
- Dry Immediately: Never let your cast iron air dry. Towel dry it completely, then place it on a low heat burner for a few minutes to evaporate any residual moisture.
- Lightly Re-oil: While the pan is still warm from drying, apply a very thin layer of cooking oil with a paper towel. Wipe off any excess. This helps maintain the seasoning and protects against rust.
- Store Properly: Store your cast iron in a dry place. If you stack pans, place a paper towel or a pan protector between them to prevent scratching and allow for air circulation.
- Avoid Harsh Detergents and Metal Scrubbers (for regular cleaning): Once seasoned, aggressive cleaning can strip away your hard-earned seasoning. Save steel wool for rust emergencies!
- Avoid Prolonged Cooking of Acidic Foods: While restored cast iron can handle acidic foods for short periods, cooking things like tomato sauce or wine for extended times can break down the seasoning.
Alternative Rust Removal Methods
While the vinegar soak is a beloved and effective method, other options exist that can also help tackle rust. It’s good to know about them in case you run out of vinegar or want to try something different.
1. Baking Soda Paste
This is a gentler abrasive method. Mix baking soda with a little water to form a thick paste. Apply it to the rusted areas and let it sit for a while (around 30 minutes to an hour). Then, scrub vigorously with steel wool or a stiff brush. Rinse and dry thoroughly. This is great for light rust.
2. The Electrolysis Method
For very heavy rust or for enthusiasts looking for an advanced restoration technique, electrolysis is an option. This method uses a DC power source (like a battery charger) and an electrolyte solution to remove rust. It’s highly effective but requires more specialized equipment and safety precautions. For beginners, sticking to vinegar or baking soda is usually much easier and safer. You can find detailed guides on electrolysis from resources like the Smithsonian.
3. Commercial Rust Removers
There are chemical rust removers available. If you choose this route, ensure they are food-safe or can be thoroughly washed off. Always follow the product instructions carefully and use in a well-ventilated area. After using a chemical remover, you will still need to clean, dry, and re-season your pan as described in Phase 2 and 3.
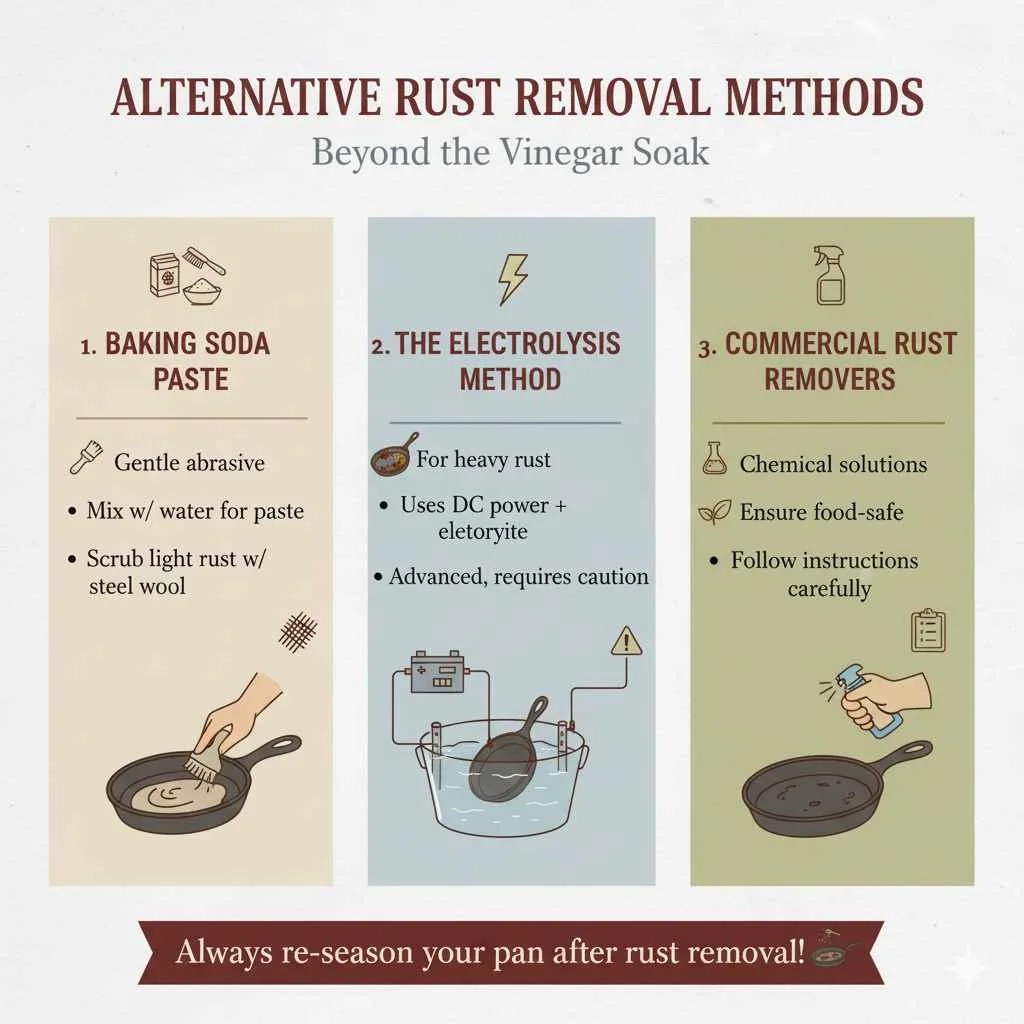
Table: Pros and Cons of Rust Removal Methods
To help you decide which method might be best for your situation, here’s a quick comparison:
| Method | Pros | Cons |
|---|---|---|
| White Vinegar Soak | Effective for most rust levels, readily available, relatively quick, budget-friendly. | Can pit iron if soaked too long, requires scrubbing, need to re-season immediately. |
| Baking Soda Paste | Gentle abrasive, natural, good for light rust, readily available. | May not be effective for heavy rust, requires vigorous scrubbing. |
| Electrolysis | Extremely effective for heavy rust, non-damaging to iron if done correctly, minimal scrubbing. | Requires specialized equipment and knowledge, safety concerns, time-consuming setup. |
| Commercial Rust Removers | Fast acting, requires less physical effort. | Can be harsh chemicals, requires careful handling and thorough cleaning, may have fumes, cost. |
Frequently Asked Questions About Fixing Rusted Cast Iron
Here are some common questions beginners have when tackling rust on their cast iron skillet.
Q1: Is it safe to cook with cast iron that had rust?
A1: Absolutely! Once you’ve completely removed the rust and properly re-seasoned the skillet, it is perfectly safe and often better than before. The re-seasoning process creates a healthy, protective cooking surface.
Q2: How many times do I need to season the skillet?
A2: For a good, durable seasoning after rust removal, repeating the seasoning process 2-3 times is generally sufficient. However, for an even more robust and slick finish, many people season their pans 5-6 times. The more layers, the better the non-stick quality and protection.
Q3: My cast iron still looks dull after seasoning. What did I do wrong?
A3: A perfect seasoning doesn’t happen overnight. It’s a gradual process that builds with use. If your pan looks dull, it might mean the seasoning layers aren’t thick enough yet or that too much oil was wiped off during the seasoning process. Continue to use your pan for cooking, and it will naturally develop a deeper, slicker sheen over time. You can also do more seasoning cycles.
Q4: Can I use my restored cast iron on an induction cooktop?
A4: Yes, absolutely! Cast iron is one of the best materials for induction cooktops because it is magnetic. Your restored skillet will work beautifully on induction, gas, electric, and even in the oven or over a campfire.
Q5: How can I prevent my cast iron from rusting again?
A5: The key is consistent care. After every use, wash, dry thoroughly (including a quick heat on the stove), and apply a thin layer of oil before storing. Avoid letting water sit in the pan, and store it in a dry environment.
Q6: What if there are deep pits in my cast iron from rust?
A6: Small pits left after rust removal are usually not a deal-breaker. They are part of the pan’s history. While they might make the surface slightly less perfectly smooth, they shouldn’t affect its cooking performance significantly once re-seasoned. Very deep pitting might be addressed with more aggressive restoration methods or multiple intense seasoning cycles, but your pan will likely still be functional.
Conclusion: Your Cast Iron’s New Beginning
See? You’ve done it! By following these steps, you’ve transformed a rusty, overlooked piece of cookware into a gleaming, functional kitchen essential. Fixing rusted cast iron isn’t a sign of a damaged pan, but rather an opportunity to practice a wonderful revival technique that connects you to your cookware on a deeper level. You’ve not only saved a beloved item but also gained the confidence and skills to maintain it for years to come. Think of the delicious meals you’ll create – the perfectly seared steaks, the golden-brown pancakes, the comforting stews – all cooked in a pan you brought back to life yourself. Happy cooking, and enjoy your beautifully restored cast iron!