
The easiest way on how to make a skillet cookie is by mixing your favorite chocolate chip cookie dough, pressing it into an oven-safe cast-iron skillet, and baking until the edges are golden and the center is gooey. This method delivers a huge, warm dessert perfect for sharing (or not!).
Trying to get that perfect bakery feel at home can sometimes feel tricky. You want a cookie that is delightfully crisp on the edges but perfectly soft and melty in the middle, right? Well, ditch the dozens of dropped cookies on a baking sheet. We are going big, bold, and better today with the skillet cookie!
This giant dessert is incredibly simple to make, even if you usually stick to checking your oil or changing a flat tire. We are going to walk through every single step, making sure you get that ideal, warm, shareable treat. Get ready to impress your family or just treat yourself royally. Let’s dive into this essential genius baking method!
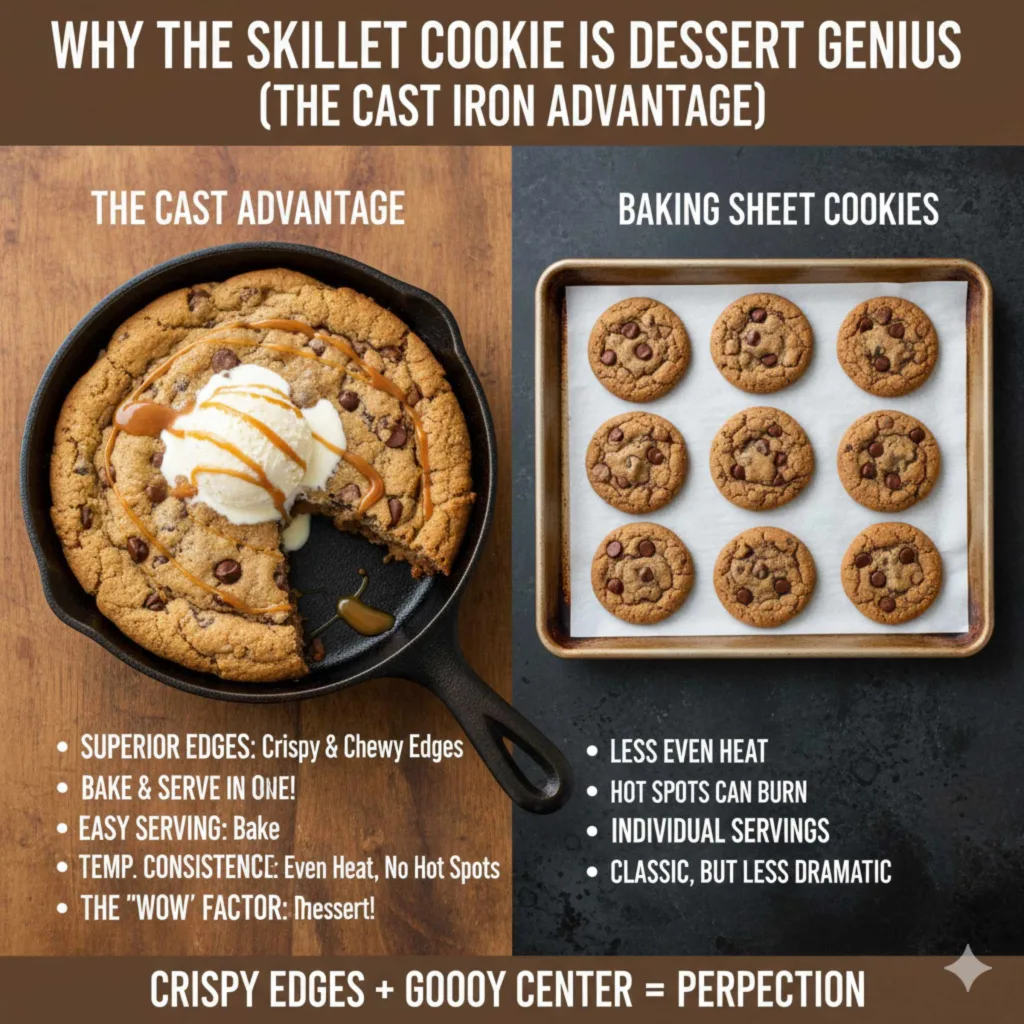
Why the Skillet Cookie is Dessert Genius (The Cast Iron Advantage)
If you are used to baking cookies on a flat baking sheet, switching to a skillet might seem strange. Why the change? It all comes down to the magic of cast iron and the shape of the pan. Think of it like switching from street tires to off-road tires—you get better performance for the specific task!
Cast iron is famous in cooking because it holds heat exceptionally well and distributes it evenly. When you bake a cookie in a skillet, the sides and bottom get perfectly browned and slightly caramelized before the center is done. This creates that sought-after contrast: crispy edges meeting a warm, gooey middle.
Benefits You Get from Using a Skillet:
- Superior Edges: The high sides of the skillet ensure a wonderful, slightly chewy, crunchy edge.
- Easy Serving: It bakes and serves in one piece. Scoop right out of the pan!
- Temperature Consistency: Cast iron stabilizes oven heat, reducing hot spots that can burn small cookies.
- The “WOW” Factor: Serving a massive, bubbling cookie straight from a sizzling skillet is impressive.
Gather Your Essential Tools (The Right Gear Matters)
Just like when you grab your wrench set before an oil change, having the right tools ready makes the process smooth. For a skillet cookie, you don’t need much, but the skillet itself is the star.
Essential Tool Checklist:
- The Skillet: A 10-inch or 12-inch cast iron skillet is ideal. If you don’t have cast iron, a heavy, oven-safe, deep-dish pie pan or cake pan will work in a pinch, but the results won’t be quite as perfect.
- Mixing Bowl: Large enough to combine your dough.
- Whisk or Hand Mixer: To cream the butter and sugar.
- Rubber Spatula: For scraping down the sides of the bowl.
- Measuring Cups and Spoons: Accuracy matters, even in baking!
- Parchment Paper (Optional): For easier cleanup, though some prefer to grease directly.
The Ingredients: Starting with Quality Dough
The great thing about the skillet cookie is that you can use your absolute favorite chocolate chip cookie recipe. It handles a thicker dough better than thin, crispy cookies. If you are feeling like a beginner, starting with a quality store-bought mix or refrigerated dough is totally acceptable!
However, for the best flavor, making it from scratch is easy. Here is the standard ingredient list we will base our method on. Remember, the key to success here is ensuring your dough is slightly thicker than usual.
Classic Skillet Cookie Ingredients:
| Ingredient | Amount | Purpose |
|---|---|---|
| Unsalted Butter, softened | 1 cup (2 sticks) | Richness and texture |
| Granulated Sugar | 3/4 cup | Sweetness and spreading control |
| Packed Brown Sugar | 3/4 cup | Moisture and chewiness |
| Large Eggs | 2 | Binding structure |
| Vanilla Extract | 1 tablespoon | Flavor depth |
| All-Purpose Flour | 2 1/4 cups | The main structure |
| Baking Soda | 1 teaspoon | Leavening/rise |
| Salt | 1/2 teaspoon | Balances sweetness |
| Chocolate Chips (or chunks) | 1 1/2 to 2 cups | The main event! |
Dustin’s Tip for Thickness: If your recipe seems too thin, add an extra tablespoon or two of flour. A thicker dough prevents the cookie from spreading too thinly up the sides of the skillet, leading to a better center consistency.
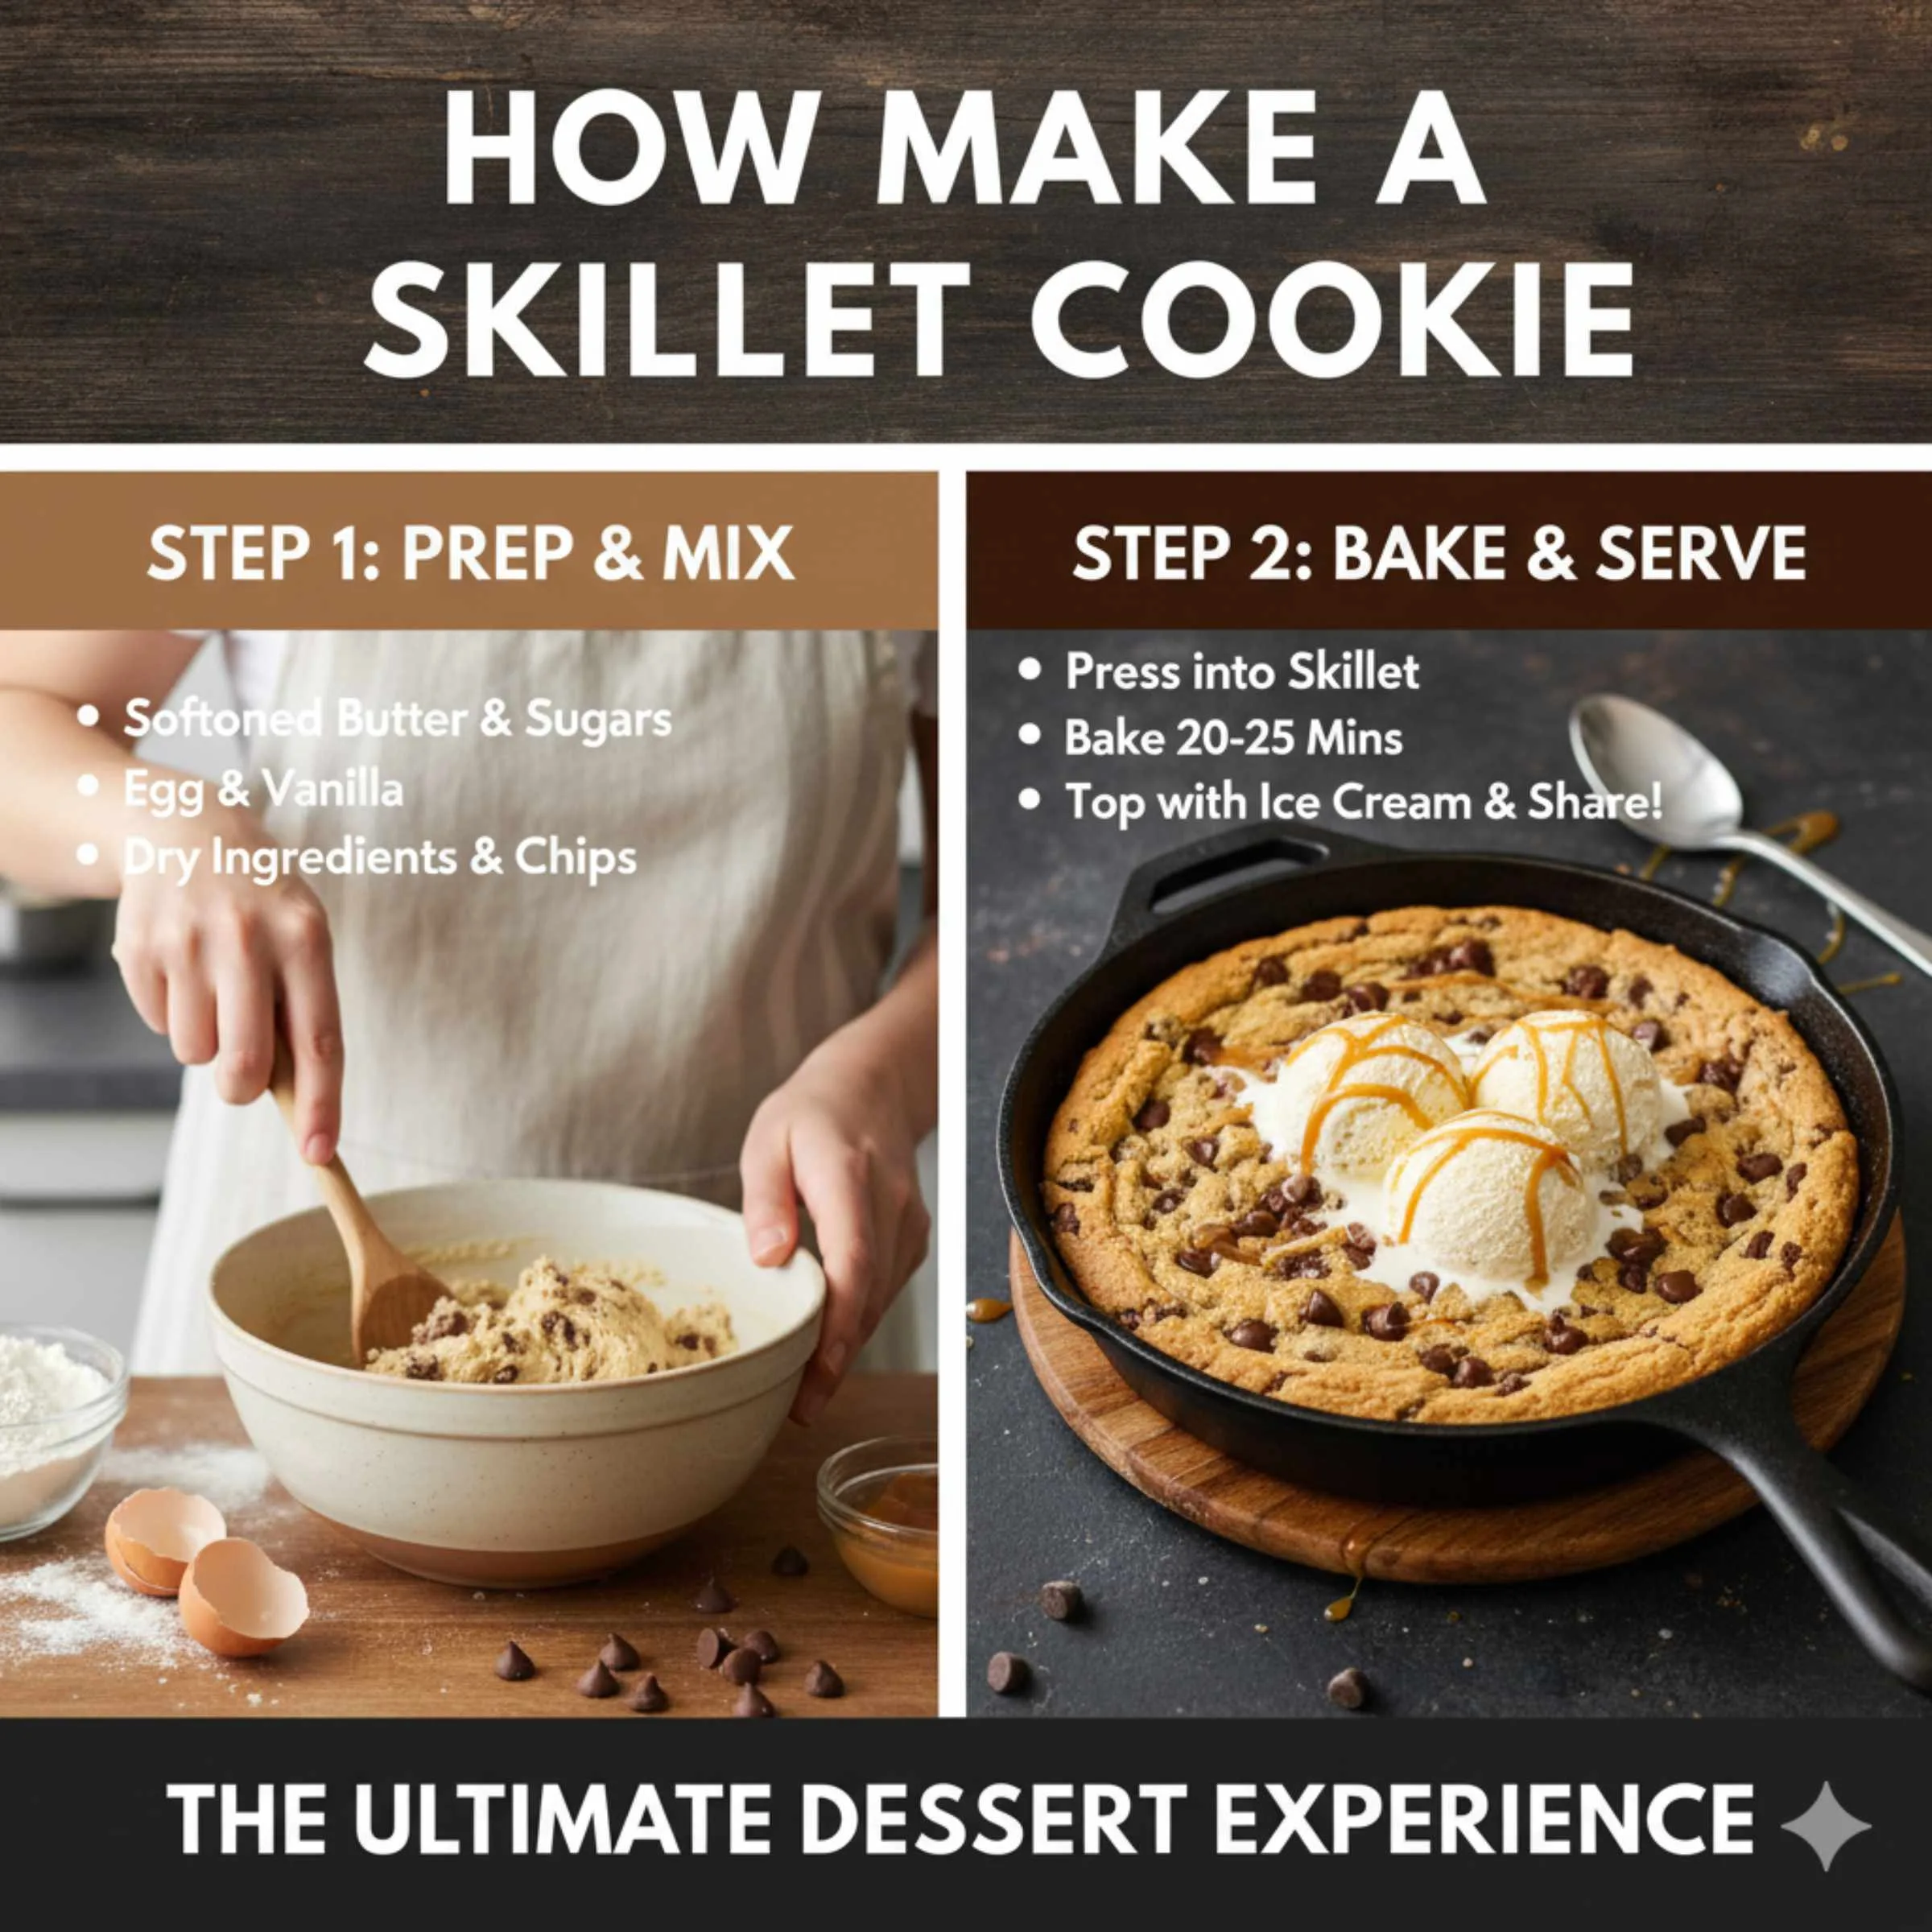
Step-by-Step: How to Make A Skillet Cookie (The Easy Way)
Let’s get this baked! We will follow a clear, simple path. Remember, precision in baking is like checking your fluid levels in your car—it keeps the engine (or in this case, the cookie) running smoothly.
Step 1: Prepping the Oven and Skillet
First things first: preheat your oven. Most skillet cookies bake best around 350°F (about 175°C). Get that temperature steady before you put anything in.
- Preheat: Set oven to 350°F (175°C).
- Prepare the Pan: Take your 10- or 12-inch cast iron skillet. You need to grease it well. Use a teaspoon of butter or cooking spray, and then use a paper towel to wipe a thin, even layer across the entire bottom and up the sides of the pan. This ensures it releases perfectly later.
- Lining (Optional but Smart): If you are worried about sticking or want super-easy cleanup, cut a circle of parchment paper to fit the bottom of the skillet before greasing.
Step 2: Mixing the Dry Ingredients
In a medium bowl, whisk together the dry stuff. This ensures your baking soda and salt are evenly distributed, preventing weird pockets of flavor or uneven rising.
- In the first bowl, combine the flour, baking soda, and salt. Whisk well for about 30 seconds. Set this aside.
Step 3: Creaming Butter and Sugars (Building the Base)
This step incorporates air, which gives your cookie structure. If you are using a stand mixer, use the paddle attachment. If using a hand mixer, that works great too!
- In a large mixing bowl, add the softened butter, brown sugar, and granulated sugar.
- Beat (cream) these ingredients together on medium speed until the mixture becomes light, pale, and fluffy. This usually takes 3 to 4 minutes. Don’t rush this!
Step 4: Adding Eggs and Vanilla
We add these one at a time to ensure they mix in completely without deflating the creamed butter mixture.
- Add one egg and mix on low speed until just combined.
- Scrape down the sides of the bowl with your spatula.
- Add the second egg and the vanilla extract. Mix again until smooth.
Step 5: Combining Wet and Dry
Gradually introduce the dry ingredients to the wet ingredients. Low speed is your friend here to prevent a flour cloud explosion!
- With the mixer on the lowest setting, slowly add the flour mixture to the wet ingredients in two additions.
- Mix only until just combined. Stop the moment you don’t see streaks of dry flour anymore. Overmixing develops too much gluten, leading to a tough cookie.
- Fold in your chocolate chips/chunks using a spatula.
Step 6: Pressing into the Skillet
This is where the cookie takes its final shape. We want an even layer.
- Dollop all the cookie dough into the prepared, greased skillet.
- Use a lightly floured spatula or your clean hands to gently press the dough evenly across the bottom of the skillet. Aim for an even thickness from the center to the edges—about 1 to 1.5 inches thick, depending on your skillet size. Don’t pack it down too firmly; keep it slightly fluffy.
- Optional: Sprinkle a few extra chocolate chips right on top for that professional, molten look.
Step 7: Baking Time
The baking time is flexible because ovens vary so much. You are looking for visual cues more than just a clock.
- Carefully place the skillet on the center rack of your preheated 350°F (175°C) oven.
- Bake for approximately 25 to 35 minutes.
- Check for Doneness: The edges should look set, golden brown, and slightly puffy. The center should still look slightly soft and slightly glossy. If the center looks completely raw, give it another 3-5 minutes.
When done, carefully remove the skillet from the oven. It retains heat extremely well, so be cautious handling it, just as you would when checking engine fluid temperatures. For more detailed information on oven calibration and food safety temperatures, resources like the National Institute of Standards and Technology (NIST) can offer reliable conversion charts.
Cooling and Serving Like a Pro
Patience is crucial here. If you slice into it immediately, it risks collapsing or seeming undercooked.
The Ideal Cool-Down:
- Allow the skillet cookie to cool in the pan on a wire rack for at least 15 to 20 minutes. This resting period allows the residual heat to finish cooking the very center to a perfect molten state without overbaking the edges.
- If you used parchment paper, you can carefully slide a thin spatula around the edges before serving to make sure the whole thing lifts easily.
Serving Suggestions (The Genius Finish)
A skillet cookie is begging for toppings. It’s best served warm, straight from the pan. Here are fantastic pairings:
- The Classic: Generous scoops of high-quality vanilla bean ice cream melting slowly into the warm cookie.
- Chocolate Lover: A drizzle of warm fudge sauce or melted salted caramel sauce.
- Next Level: A sprinkle of flaky sea salt right over the top before serving to enhance the chocolate flavor.
- Nutty Crunch: Chopped pecans or walnuts sprinkled over the top just before serving.
Troubleshooting Common Skillet Cookie Issues
Even the best mechanics run into unexpected snags. If your skillet cookie isn’t perfect the first time, don’t worry! These hiccups are easy to fix next time.
Problem/Solution Chart:
| The Problem | Why It Happened | The Fix for Next Time |
|---|---|---|
| Cookie is too thin and crispy all around. | Too much butter, not enough flour, or oven heat was too high. | Add an extra 1/4 cup of flour to the dough next time. Use a slightly lower oven temp (325°F). |
| Center is gooey, but edges are burned. | Skillet absorbs heat too intensely, or positioning was wrong. | Ensure your skillet is placed in the center rack. Use a piece of foil under the pan if your oven runs hot. |
| Cookie sticks badly to the pan. | Not enough grease or pan wasn’t hot enough when dough was added. | Ensure you grease heavily and consider using parchment paper just on the bottom next time. Season your cast iron well! |
| Cookie sinks/deflates severely after cooling. | Too much leavening agent (baking soda/powder) or not enough flour structure. | Measure your baking soda carefully. Ensure you are using fresh baking soda. |
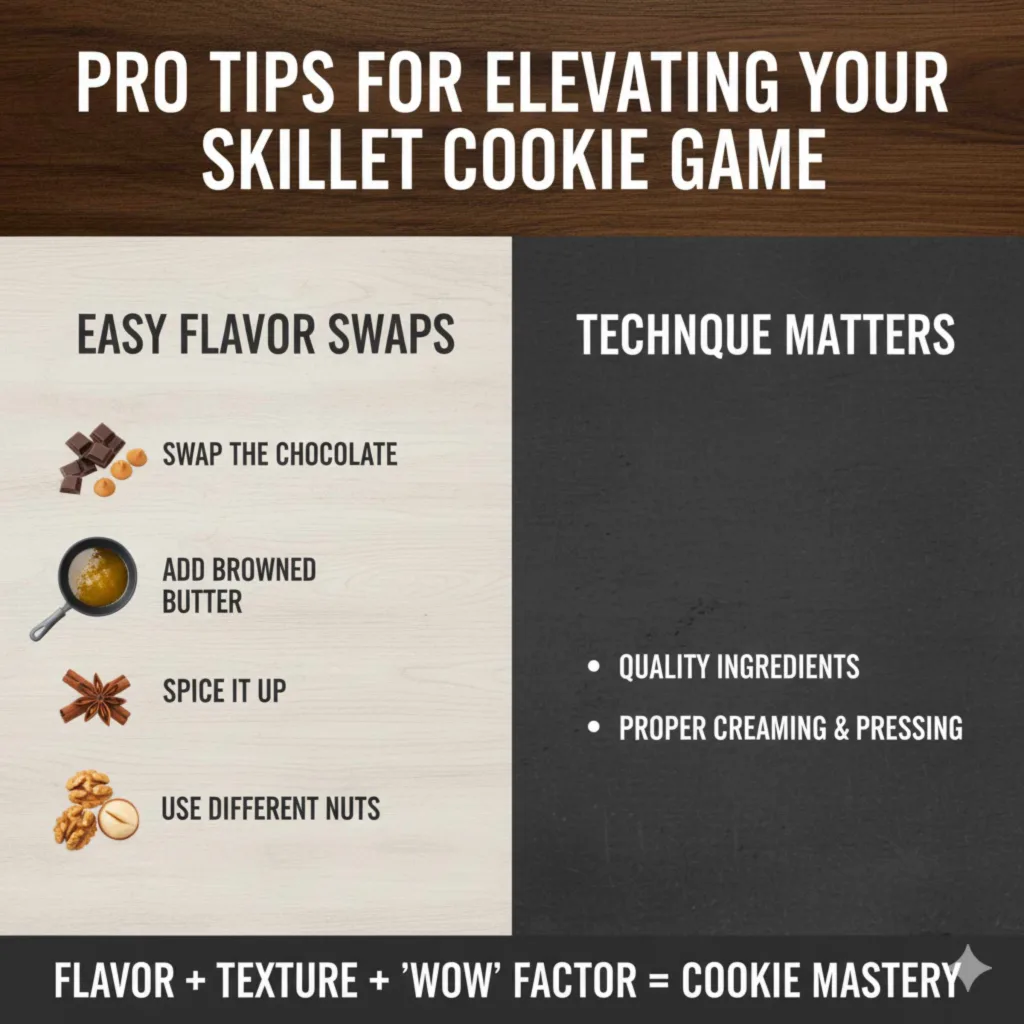
Pro Tips for Elevating Your Skillet Cookie Game
Once you master the basic technique, you can start customizing, just like upgrading your vehicle’s performance parts. Here are a few ways to take this dessert up a notch:
Easy Flavor Swaps:
- Swap the Chocolate: Instead of milk chocolate chips, try dark chocolate chunks, peanut butter chips, or white chocolate.
- Add Browned Butter: Melt your butter first and cook it until the milk solids toast and smell nutty (brown butter). Let it cool slightly before creaming it with the sugars. This adds incredible depth.
- Spice It Up: Add 1/2 teaspoon of ground cinnamon and a pinch of nutmeg to the dry ingredients for a warmer flavor profile.
- Use Different Nuts: Fold in toasted walnuts, macadamia nuts, or even salty peanuts for extra texture.
Remember, the integrity of any structure—whether it’s a good engine build or a perfect skillet cookie—relies on the foundation. By focusing on high-quality ingredients and proper technique (especially the creaming and the even pressing), you guarantee a solid result. For more on how even small ingredients affect baking science, informative educational sites often delve into the chemistry behind ingredients.
Skillet Cookie FAQs for Beginners
Q1: Can I use a regular frying pan instead of cast iron?
A: You can, but it needs to be oven-safe (no plastic handles!). A thin aluminum pan might cook too quickly, so a heavy, oven-safe stainless steel or ceramic pan is the next best option. Cast iron provides the best heat retention.
Q2: How do I store leftovers?
A: Let the cookie cool completely. Cover it tightly with plastic wrap or aluminum foil right in the skillet (if it fits in your fridge) or transfer slices to an airtight container. It keeps well at room temperature for 2 days or in the fridge for up to 5 days.
Q3: Can I chill the dough before baking?
A: Yes! Chilling the dough for 30 minutes to an hour firms it up, which helps prevent the cookie from spreading too much when it hits the heat. This results in a slightly thicker center.
Q4: My skillet is huge (15 inches). Should I double the recipe?
A: Not exactly. Doubling the recipe might make the dough layer too thick to cook through properly. For a 15-inch skillet, try multiplying your standard recipe by 1.5 times instead of double. Monitor the baking time closely.
Q5: Is it better to underbake or overbake a skillet cookie?
A: Always aim slightly underbaked! A skillet cookie firms up significantly as it cools. If you bake it until it looks perfectly done in the center, by the time you serve it, it will likely be firm throughout. Aim for that slightly soft, molten look.
Q6: Do I need to add baking powder if my recipe doesn’t call for it?
A: No. Stick to the leavening agents listed in your chosen recipe. Skillet cookies rely more on the creaming method (beating butter and sugar) for lift rather than excessive baking powder, as we want a denser, chewier texture.
Conclusion: Your New Go-To Dessert
See? Making a fantastic, giant, scoopable skillet cookie is far from a complicated garage repair; it’s straightforward, rewarding, and guaranteed to bring smiles. You’ve got the simple steps down: get that cast iron pan preheated, cream your fats and sugars until they are light and fluffy, mix gently, press evenly, and watch it bake to gooey perfection.
The beauty of this dessert is its immediate payoff. No cooling racks full of dozens of cookies—just one massive, steaming creation ready for ice cream. Feel confident putting this recipe in your regular rotation. Next time you are looking for an easy crowd-pleaser or a spectacular weeknight treat, you know exactly how to make a skillet cookie that tastes like it came straight from a top bakery. Enjoy that first warm, melty scoop!

Leave a Reply