Quick Summary:
Feeding a ratchet strap is simple once you learn the basic technique: thread the strap through the spool, pull it taut, and engage the ratchet mechanism by pumping the handle. This guide breaks down the process into easy-to-follow steps, ensuring secure and reliable cargo tie-downs every time.
Tying down everything from furniture to sports equipment can feel like a puzzle, especially when you’re new to it. You’ve got this great ratchet strap, ready to secure your load, but then comes the moment of truth: “How do I actually feed this thing?” It’s a common point of confusion, and if not done correctly, your precious cargo might not travel as safely as you’d hoped. But don’t you worry! I’m here to demystify the process. We’ll walk through it together, step-by-step, and soon you’ll be ratcheting with confidence. Get ready to secure your belongings with ease and style!
Why Mastering Ratchet Straps is a DIY Must-Have
Ratchet straps are incredibly versatile tools, and knowing how to use them properly opens up a world of DIY possibilities. Whether you’re moving a couch, hauling lumber for a project, or securing bikes for a road trip, they offer a reliable and sturdy way to keep items in place. Unlike simple rope or bungee cords, ratchet straps provide adjustable tension, meaning you can get just the right amount of snugness without overtightening or damaging your cargo. This adjustable tension is key to preventing shifting, wobbling, or even damage during transport.
For anyone who enjoys tackling projects around the house, venturing out for adventures, or simply needs to transport items safely, a good understanding of ratchet straps is essential. It’s a skill that not only saves you money by allowing you to do it yourself but also gives you peace of mind knowing your items are secure. Think of it as another handy tool in your home decor and DIY arsenal, right alongside your measuring tape and level!

Understanding the Parts of a Ratchet Strap
Before we dive into the “how-to,” let’s get acquainted with the main players. Knowing the name of each part helps when following instructions and understanding how everything works together. It’s like knowing the names of furniture pieces to arrange them perfectly in a room!
The Key Components:
- Webbing: This is the strong, woven fabric strap itself. It’s usually made of polyester, which is durable and resistant to stretching and weather. Colors can vary, but function remains the same.
- Ratchet Mechanism: This is the heart of the strap. It’s the metal device that has a spool and a lever. This mechanism is what allows you to tighten the strap by repeatedly pulling the loose end and then locking it in place.
- Hook/End Fitting: These are the metal pieces attached to each end of the webbing. They come in various shapes like J-hooks, snap hooks, or flat hooks, designed to attach securely to anchor points on your vehicle or trailer.
- Spool: This is the rotating cylinder inside the ratchet mechanism where the webbing winds up as you tighten the strap.
- Lever/Handle: This is the part you pump to tighten the strap and press to release it.
How to Properly Feed a Ratchet Strap: A Step-by-Step Guide
Now for the main event! Feeding a ratchet strap might seem a little tricky at first, but once you see how it works, you’ll be doing it in no time. We’ll break it down into simple, actionable steps. Remember, patience is your best friend when learning any new DIY skill.
Step 1: Prepare Your Strap and Anchor Points
First, unroll your ratchet strap and ensure the webbing is free from any twists or knots. Locate the anchor points on your vehicle, trailer, or the item you are securing. These are sturdy points designed to hold the strap securely. Make sure they are strong enough for the load you are transporting. For guidance on choosing appropriate anchor points, you can check out resources from the National Highway Traffic Safety Administration (NHTSA) which outlines safe towing and securing practices.
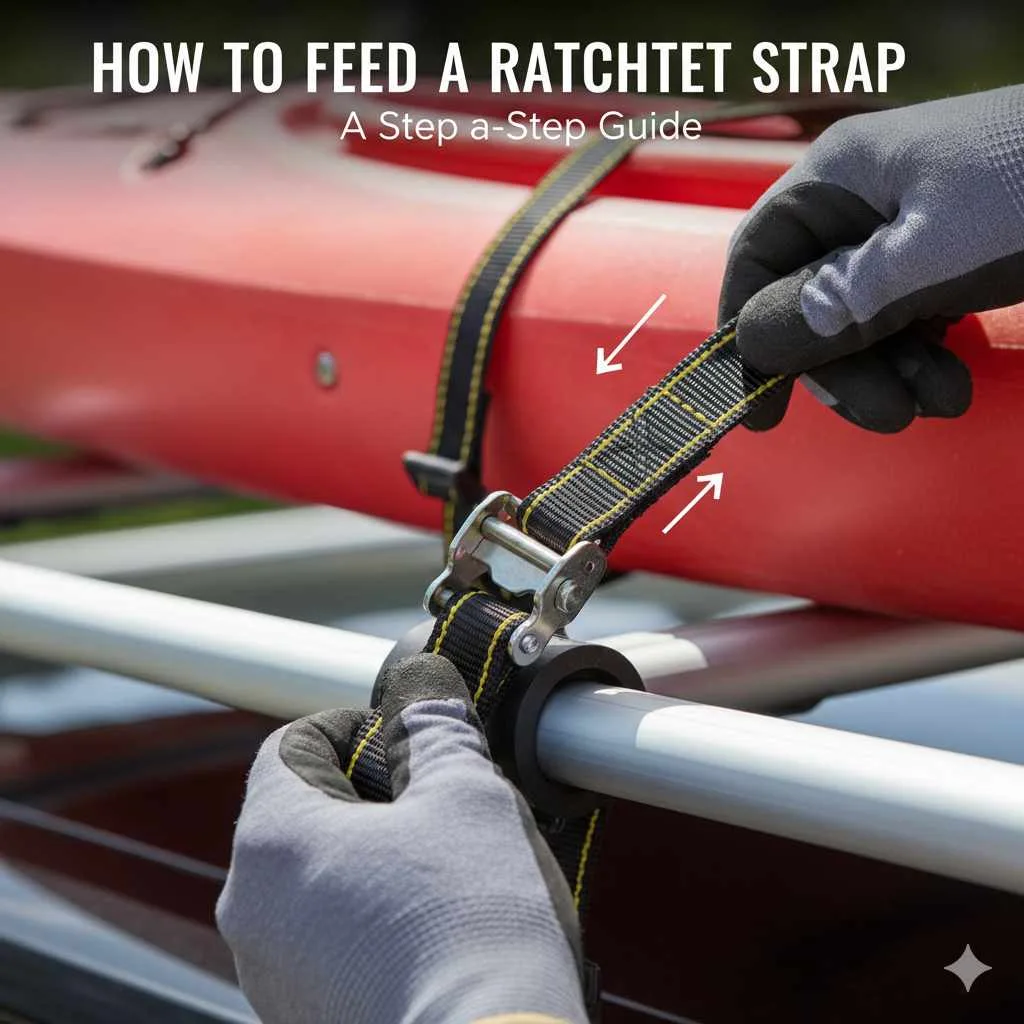
Step 2: Thread the Strap Through the Spool
Take one end of the strap (this is usually the end without the hook, or the end that is attached to the ratchet mechanism if it’s a one-piece strap). You need to guide this end through the opening in the spool on the ratchet mechanism. Imagine feeding a ribbon through a loop. The strap needs to go under the spool and come up on the other side.
Important Tip: Ensure the strap is fed through the spool in the correct direction. Most ratchet mechanisms have a specific way the strap should enter and exit to engage the locking teeth properly. Look closely at the mechanism; you’ll often see an arrow or a clear path for the webbing.
Step 3: Pull the Strap Snug
Once the strap is threaded through the spool, pull the loose end of the strap firmly. You want to pull out all the slack so the strap is snug against the load. Don’t worry about tightening it down fully yet; this step is just about removing the initial looseness between the anchor points.
Step 4: Engage the Ratchet Mechanism
Now, find the lever or handle on the ratchet mechanism. You will start pumping this lever up and down. With each pump, you’ll hear and feel the strap getting tighter. The ratchet mechanism has internal teeth that engage with each other, allowing the spool to turn in one direction (tightening) but preventing it from turning backward (loosening automatically).
Tip for Beginners: Start with a few pumps to get the feel for it. You’ll notice the strap is getting progressively tighter around your cargo. Continue pumping until the strap is securely taut.
Step 5: Lock the Strap and Release Tension (If Needed)
Once you’ve achieved the desired tightness, the ratchet mechanism should be locked in its current position. However, always give the strap a gentle tug to confirm it’s locked and won’t slip. To release the tension when you’re done, you’ll need to press the release lever on the ratchet mechanism. This usually involves pushing a tab or lever so the spool can turn freely in the other direction, allowing you to pull the strap loose.
Troubleshooting Common Ratchet Strap Issues
Even with the best intentions, sometimes things don’t go perfectly. Here are a few common hiccups you might encounter and how to solve them:
Problem: The ratchet won’t tighten (or slips).
Possible Causes & Solutions:
- Strap fed incorrectly: Double-check that the strap is threaded through the spool in the correct direction as described in Step 2. Sometimes it’s as simple as reversing the feed.
- Debris in the mechanism: Dirt, mud, or grit can jam the teeth. Try cleaning out the ratchet mechanism with a brush or compressed air.
- Damaged mechanism: If the ratchet teeth or lever are bent or broken, the mechanism might be compromised and need replacing. Safety first!
- Insufficient tension: Ensure you’ve pulled out all initial slack before you start pumping.
Problem: The strap is too tight and might damage the cargo.
Solution: Simply press the release lever on the ratchet mechanism and pull the strap to loosen it slightly. Then, re-tighten it to a more appropriate level. It’s always better to adjust than risk damage.
Problem: The hook won’t attach securely.
Solution: Ensure you are using a strong, stable anchor point. If the hook is damaged (bent, cracked), it might need replacement. Different hook types are designed for different anchor points, so make sure you’re using the right one for the job.
Best Practices for Using Ratchet Straps
Using ratchet straps safely and effectively goes beyond just knowing how to feed them. Here are some essential practices to keep in mind:
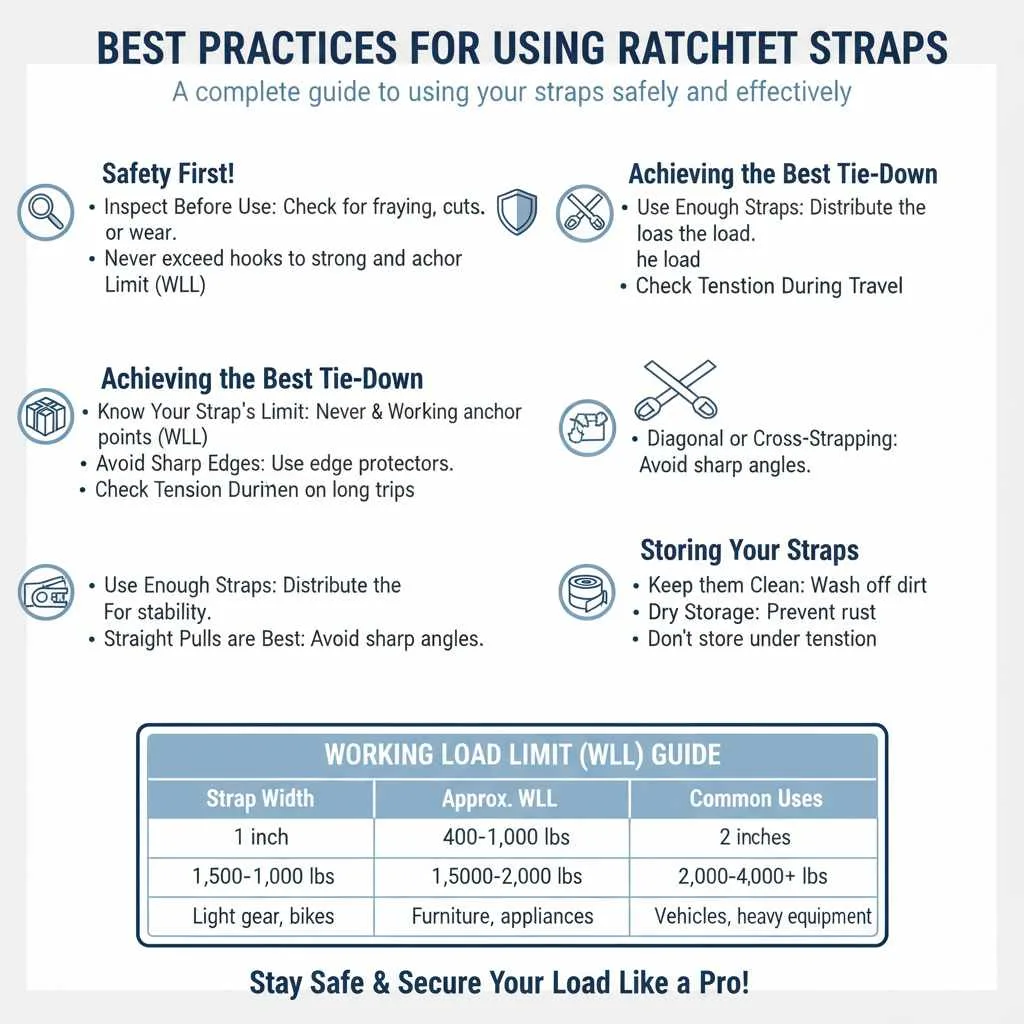
Safety First!
- Inspect Before Use: Always check your straps for fraying, cuts, or wear before each use. Any damage can significantly reduce their strength and lead to failure.
- Know Your Strap’s Limit: Every ratchet strap has a Working Load Limit (WLL). Never exceed this limit, which is usually printed on the strap’s tag. Overloading is dangerous. The chart below gives you a general idea of WLL ratings for common strap widths.
- Secure Properly: Ensure hooks are securely attached to strong anchor points. The strap should lie flat and not be pinched by sharp edges without protection.
- Avoid Sharp Edges: If you’re strapping over sharp corners of furniture or cargo, use edge protectors (often called corner protectors or sleeves) to prevent the webbing from being cut. Many hardware stores sell these, or you can improvise with thick cardboard or old carpet scraps.
- Check Tension During Travel: If you’re driving a long distance, it’s a good idea to stop periodically and check the tension of your ratchet straps.
Achieving the Best Tie-Down
- Use Enough Straps: For larger items, use multiple straps. Distribute the load evenly.
- Diagonal or Cross-Strapping: For many loads, using straps in a criss-cross or diagonal pattern provides the most stability.
- Straight Pulls are Best: Whenever possible, aim for the strap to pull directly on the item and the anchor point without sharp or awkward angles.
Storing Your Straps
- Keep them Clean: Wash off dirt and debris before storing.
- Dry Storage: Store in a dry environment to prevent rust on metal parts and degradation of the webbing.
- Loosely Wound: Don’t store them tightly wound under tension. Loosen them completely before storing.
Ratchet Strap Working Load Limits (WLL) Explained
Understanding the Working Load Limit (WLL) is crucial for safety. This is the maximum weight a strap or its components are rated to carry safely under normal use. It’s not the breaking strength; it’s a much lower, safer limit. Always err on the side of caution.
Here’s a table showing typical WLL ratings based on common strap widths. Remember, these are general guidelines, and you should always check the specific rating on your strap.
| Strap Width | Typical Working Load Limit (WLL) | Break Strength (Approximate) |
|---|---|---|
| 1 inch | 500 – 600 lbs | 1500 – 1800 lbs |
| 1.5 inch | 1,100 – 1,200 lbs | 3,300 – 3,600 lbs |
| 2 inch | 1,500 – 2,000 lbs | 4,500 – 6,000 lbs |
| 3 inch | 3,000 – 5,000 lbs | 9,000 – 15,000 lbs |
| 4 inch | 5,000 – 9,000 lbs | 15,000 – 27,000 lbs |
Factor of Safety: The difference between WLL and break strength is the “safety factor,” which accounts for potential wear, uneven loading, and dynamic forces (like hitting bumps) that can occur during transport. A common safety factor for ratchet straps is 3:1, meaning the break strength is at least three times the WLL.
FAQ: Your Ratchet Strap Questions Answered
1. How do I know which way to feed the strap into the ratchet?
Most ratchet mechanisms have a small gap or slot where the webbing feeds. If you look closely at the spool, you’ll see a point where it wraps around. Feed the strap into this opening, ensuring it lies flat and can be pulled through to wind onto the spool. If you’re unsure, try feeding it and see if it tightens when you pump the handle. If not, remove it and try feeding it from the opposite side or through a different part of the spool opening.
2. Can I use a ratchet strap to lift heavy objects?
No, absolutely not. Ratchet straps are designed for securing and restraining loads during transport, not for lifting. Lifting straps have very different designs and safety ratings. Using a ratchet strap for lifting can be extremely dangerous and lead to catastrophic failure.
3. How tight should a ratchet strap be?
A ratchet strap should be snug enough to prevent the cargo from shifting, but not so tight that it damages the cargo itself. You want to feel firm resistance when you try to move the item. For delicate items, apply less tension. For heavy, robust items, you can apply more. Experience will help you gauge the right amount of tension.
4. What are those little plastic or rubber things that sometimes come with ratchet straps?
Those are usually edge protectors or corner protectors. They are designed to be placed between the sharp edges of your cargo (like the corner of lumber or a furniture edge) and the strap. This prevents the strap from fraying or being cut by the sharp edge, significantly increasing safety and the life of your strap.
5. How do I release a ratchet strap that’s stuck?
First, ensure you are pressing the release lever firmly. If it’s still stuck, there might be debris jamming the mechanism. Try wiggling the strap slightly while pressing the lever. If that doesn’t work, you may try gently tapping the mechanism with a rubber mallet or spraying a lubricant like WD-40 into the mechanism (ensure it’s clean afterward). If extreme force is needed, the mechanism might be damaged and should be replaced for safety.
6. Can I connect two ratchet straps together to make a longer one?
It’s generally not recommended to connect two independent ratchet straps to create a longer one for securing loads. Each strap is designed and rated for a specific length and load. Connecting them introduces an extra point of potential failure and makes it difficult to manage tension evenly. If you need a longer strap, it’s best to purchase a single strap of the appropriate length.
Conclusion: Secure Your Style with Confidence
Learning how to feed and use a ratchet strap is a fundamental skill that empowers you to handle a variety of DIY projects and transportation needs with confidence and ease. You’ve learned about the essential components, walked through the simple steps of feeding and tightening, and even explored how to tackle common issues. Remember to always inspect your straps, respect their working load limits, and use edge protectors when needed. These practices will ensure your loads are secure and your DIY endeavors are successful and safe.
Now, go forth and secure your items with the knowledge you’ve gained! Whether you’re remodeling your home, moving to a new space, or planning an adventure, you’re equipped to handle the tie-downs. It’s amazing what you can achieve when you build your confidence, one perfectly secured load at a time. Happy strapping!